Exploring advanced customizations of react-table component within SPFx solution

Introduction to react-table component

Table makes your data looks prettier and makes it more intuitive to read. We can arrange our data in rows and columns. One such pre-built open source npm package is react-table, which is lightweight, fast and is used for making extensible grids for react.

React-table has out of the box features such as sorting, filtering, row selection, column ordering and many more which makes it unique. For more details refer to this documentation (https://react-table.tanstack.com/docs/overview).  

Prerequisites

Before starting one must have basic knowledge about:

  1. Basics of creating SPFx solution
  2. React Fundamentals

How to use react-table with SPFx

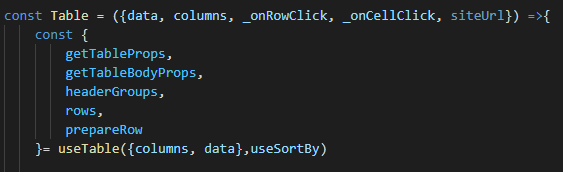
React-table is easy to use and can be used with SPFx easily. React-table needs data in array format and columns also in array format. Columns take at minimum Header and accessor as column definitions. Here Header is the display name given to the column of the table and accessor is the key in the data (used for mapping column to the matching data).
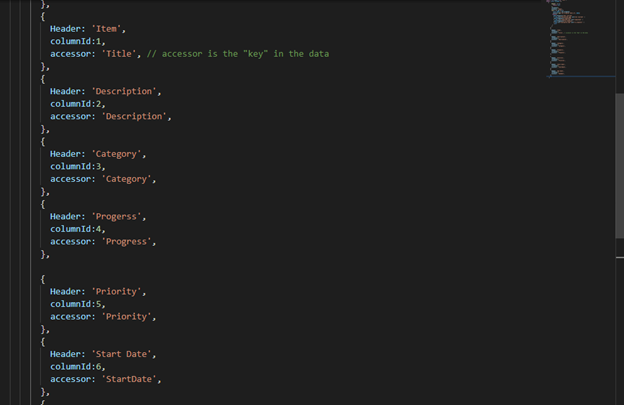
Basics of rendering rows and columns

React-table works in very organized manner. It requires Header and accessor as column definitions. We have our main react table component which we can import in any other component and use accordingly. We must pass table data and column data in table component and other properties that we need according to our use case scenario. Table data needs to be in array format in the way shown below:
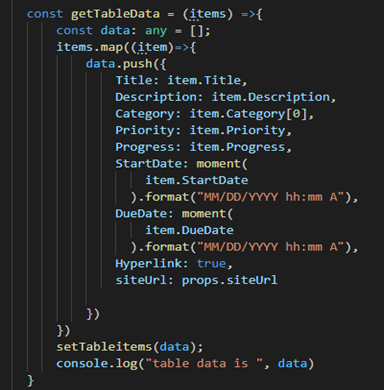
Here we are getting data and storing it in array format in a variable named “data” of type array and further we are maintaining a state to store data. Similarly like this react table needs column data also in array format as shown below:
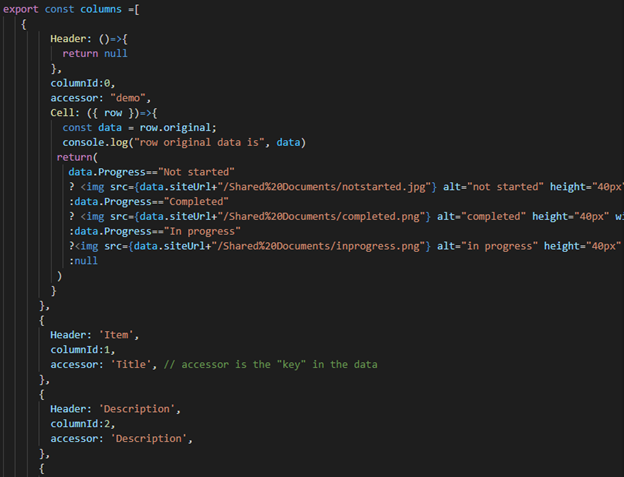
Further data and column are passed to the react table component. Now in table component we are passing tableitems state in the data property and columns which we are importing from TableColumn.tsx file. At the bottom of this post you will find the github repo link with all the source code shown above.

Properties like _OnRowClick and _OnCellClick are not required properties, they are used according to the scenario.
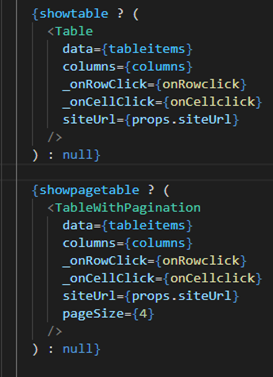
After we have passed all the required properties to the table component now it will receive the properties and display the data.
Now the table component will display the “columns as table headings and “data” as table row data.        

Customization and Configuration options

React-table provides the end user a large variety of customizations to add more functionality. Here we will see how to customize react-table in different manner, such as different scenarios in row customizations and column customizations.

Row customization scenarios

Conditional rendering of table data

Conditional rendering provides the capability to render data in different use case scenarios. We can make use of this capability in displaying our row data and making our table row clickable.

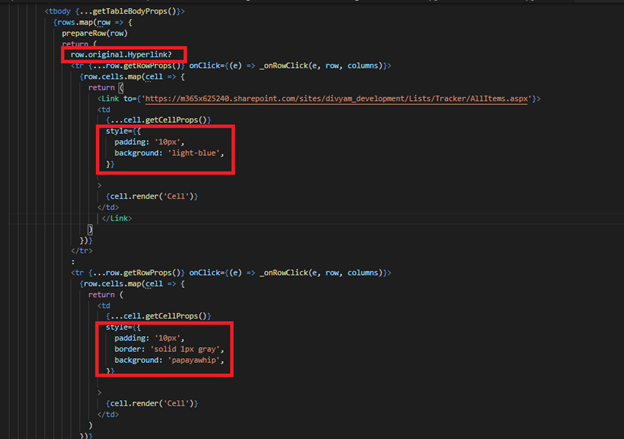
 We have Added a condition in the return function based on which different table data gets rendered.
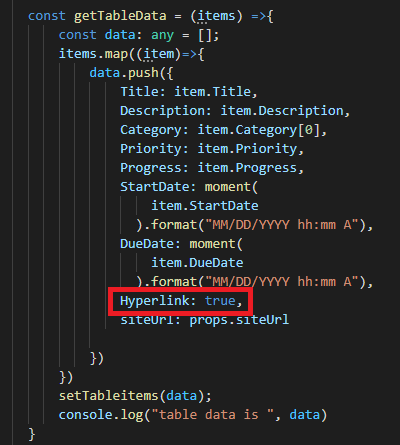
Basically, in the “data” array we are setting Hyperlink property as true or false according to which data renders. After data is passed to the table component, we can access row data and check the value of the Hyperlink property.
The table without border is the one having “Hyperlink” values
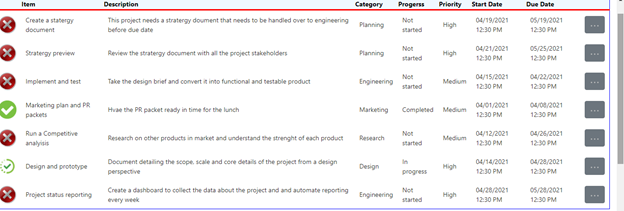
The table with border doesn’t have “Hyperlink” values
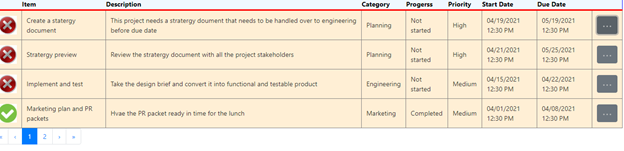
Apply hyperlink to table row

We can apply hyperlink on row data to make it clickable, we have passed a hyperlink parameter in our data that has value true or false which specifies which table row will have hyperlink in it.

As we have seen above how we have passed Hyperlink property as true or false based on which conditional rendering of table data is happening. If hyperlink property is true, then we will display table data in which table row has Link tag and will redirect to the specific link.
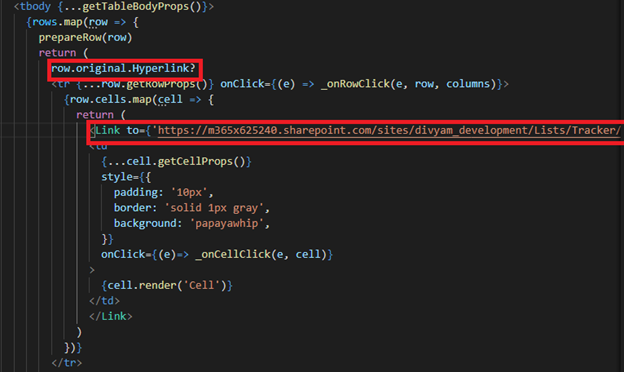
If we click on any of the row it will take you to the specific link provided in the link tag.
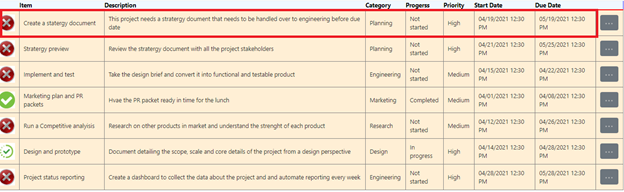
After clicking on the row it will take you to
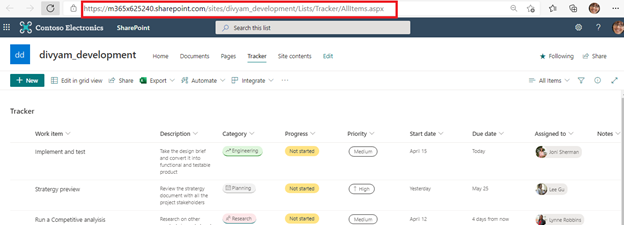
Making a single cell clickable in a row

We can make a single cell clickable in row by applying an onClick event on the data of that cell and make it an anonymous function for passing cell value. In the “showDescriptionData” function are getting “Description” as a parameter and passing it in “alert” function.

NOTE: If we are using the “Cell” property then, return function should not be empty, otherwise column will not display any value.
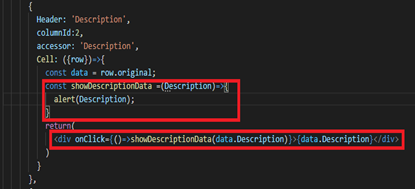
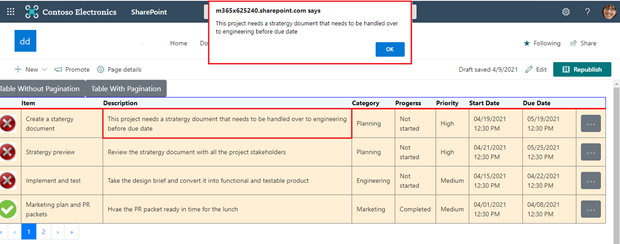
After we click on the description cell it will display an alert on the webpage showing the description data.
Maintaining Pagination with react-table component

Pagination is used for breakdown of large data and displaying it in a particular manner with a specific page size. In our solution we have used reactstrap pagination because it comes with inbuilt functionality and is very easy to use. For more details refer to this document (https://reactstrap.github.io/components/pagination/).

For using pagination in our solution, we have made two separate react-table component, react-table without pagination and react-table with pagination (providing page size). This gives us freedom whether we want to use pagination or not because sometimes there are scenarios where one page requires a table that has pagination in it while other page requires a table without pagination, so this logic makes our work easy.

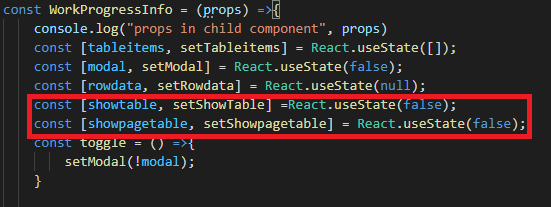
We have two buttons that displays specific table based on conditional rendering. We have maintained two state showTable and showPageTable to manage our conditional rendering in table.
When we click on “Table Without Pagination” button it sets showTable state to true and showPageTable to false and similarly if we click on “Table With Pagination” button it sets showPageTable to true and showTable to false.
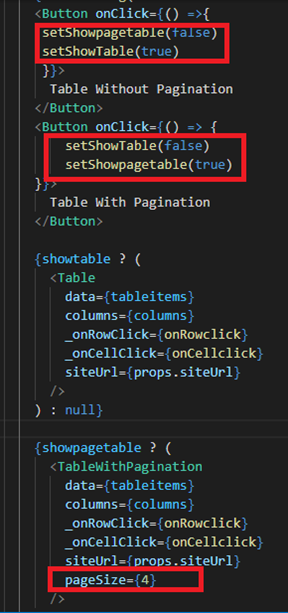
Table Without Pagination” is the original react-table component where all the table data is displayed, we have used its instance in “Table With Pagination” component and included reactstrap pagination separately. We have calcuated total number of pages and breaked the data according to the page size.

We have passed pageSize property while calling the component (as shown above) which specifies how many items are to be shown in table in one page. We have set currentpage to 1 by default and after that we will calculate index of last item which will be currentpage*pagesize (suppose currentpage is 1 and pagesize is 4 so index of last item will be 4), now we will calculate index of first item which will be index of last item-pagesize (index of last item is 4 and pagesize is 4 so it will be 0). Now we will split our data on the basis of index of first and last item (we have used data.slice() method for this, now it will split our data from 0 to 4th index i.e, data(0,4). After that we have calculated the totalPages by dividing data.length and pageSize (we have used Math.ceil() function for this, suppose data.length is 14 and pagesize is 4 it will divide 14 by 4 which will give 3.5. So Math.Ceil() will convert it to 4 which are the number of pages). pageCount is an array which will display the page number under the table.
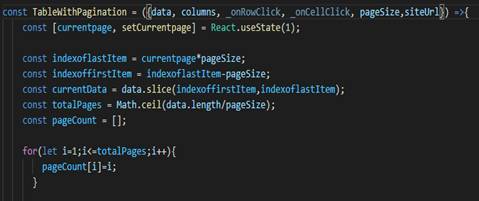
After we have done all the calcultions, we can add react-table component and pagination separately.
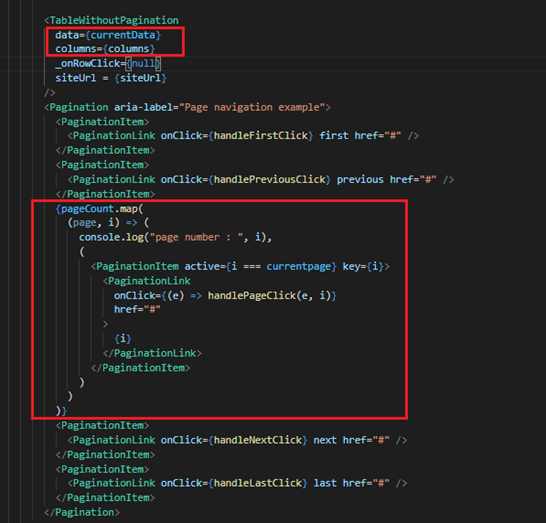
We have passed currentData in the data property and columns in the column property and _onRowClick and _onCellClick  are null as these are not required in this scenario.

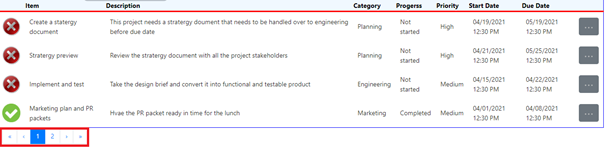
Now in pagination part we have used reactstrap pagination, for displaying page number we have used pageCount array. We have applied map() function on pageCount array and each item of pageCount array will become a pagination item. We have used hadlePageClick() event for navigation between pages, which will set currentpage to the page number which is clicked.
Column customization scenarios

Adding image in row

We can apply images in row from table columns by creating a separate column.
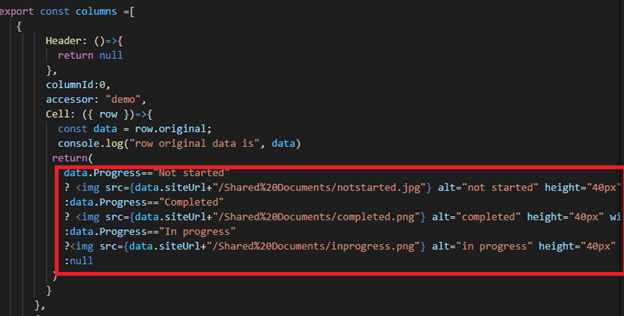
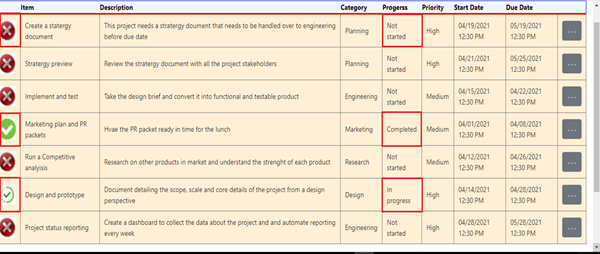
Here Header is returning null as we are not displaying the column name, we are receiving the row data in the cell which we are storing in data variable as row.original, each table item has its status defined in the data according to which we are applying conditions to apply specific image to its status type.

Note: I have used images from document library which is stored in SharePoint site. You can use image from your source.
Adding Dropdown Modals in row

Modals in table row can be added with the help of table columns. We can create a separate column for this functionality. We will use reactstrap dropdown to display the modal items. For more detailed information on reactstrap dropdown you can refer to this link( https://reactstrap.github.io/components/dropdowns/).

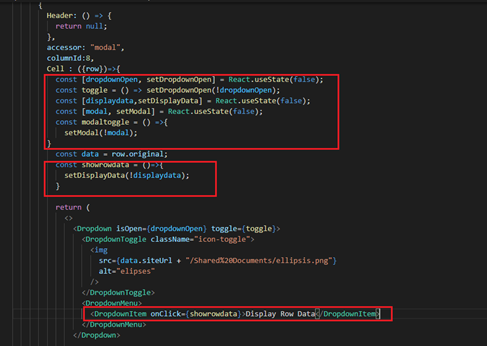
Header is returning null because we are not displaying column name. We are maintaining two dropdown state as open and close modals. We have used an ellipses icon in dropdown. After clicking on ellipses icon, reactstrap modal dropdown opens and displays the button “Display Row Data”.

dropdownOpen” state is maintained to open and close the ellipses icon. After we click on “Display Row Data” button “showrowdata” function sets “DisplayData” to not equal to “displaydata” (which means if it is true it will set to false and vice versa). “modal” state is maintained to open and close modal.
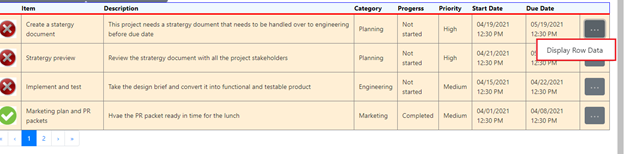
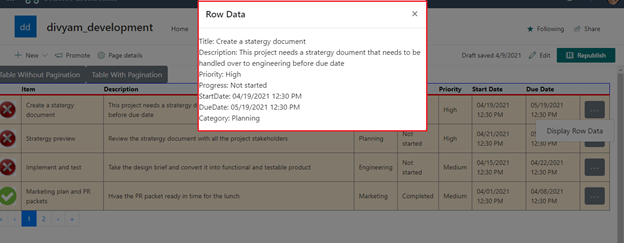
After clicking on ellipses icon “Display Row Data” button appears, further on clicking on this button reactstrap modal appears displaying row data.
This is how our modal looks like.
Inbuilt configuration options

Applying filters and Column sorting

Table sorting is very useful feature, and it arranges data in good manner. In react-table sorting can be applied directly in the header, it is an inbuilt configuration provided by react-table.
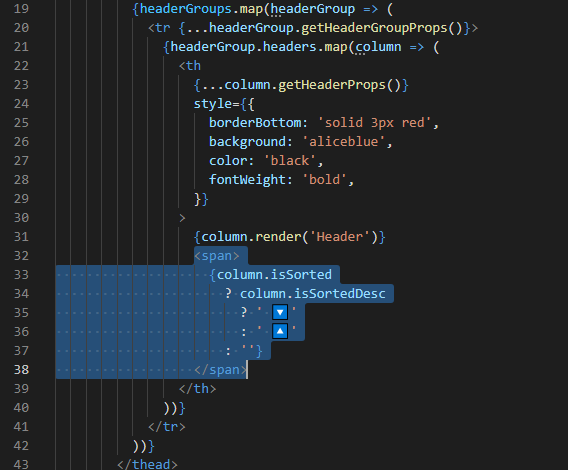
Table filtering is also an inbuilt configuration provided by react-table and is used for searching data in the table. This scenario has not been covered in the blog nor in our code. For more detailed information refer to this link (https://react-table.tanstack.com/docs/examples/filtering).   

Conclusion

We have seen various customizations can be done with react-table under different scenarios. We also saw specific use cases which can help you customize react-table according to your requirements.

You can view the full code at GitHub: https://github.com/penthara/Customization-in-react-table-in-SPFx-solution

Written By-  Divyam Garg

(Software Developer Trainee)

Written By-  Divyam Garg

(Software Developer Intern)

Jasjit

Peer Reviewed By-  Jasjit Chopra

(CEO)

Peer Reviewed By-  Jasjit Chopra

(CEO)

Sanika

Graphics Designed By- Sanika Sanaye

(Creative Design Director)

Graphics Designed By- Sanika Sanaye

(Creative Graphic Designer Trainee)
Quickly work with SharePoint API calls with Postman

Overview

SharePoint APIs are used in various platforms to perform basic as well as complex actions.

Two places where these APIs are used vigorously are:

The challenge faced while developing these solutions is that, there is no easy and quick way to test or execute these API calls in a time saving manner.

There is another alternative to do the API calls from POSTMAN, but it requires you to register an app in AZURE APP DIRECTORY and then use client IDs and Client Secrets to generate the Bearer Access Token and then use it to authenticate your API calls.

But today we will discuss another simple way which is very quick to implement and saves a lot of time.

Pre-Requisites

Preparing SharePoint for Postman

In this blog, we will leverage the existing authorization tokens that you have in your browser from visiting an existing SharePoint list. This will save us tremendous amount of time and effort and will not require any additional admin rights to use Postman calls.

First, we will be having a SharePoint List on which we are going to do all these API calls from Postman.

Steps to create SharePoint list and change view:

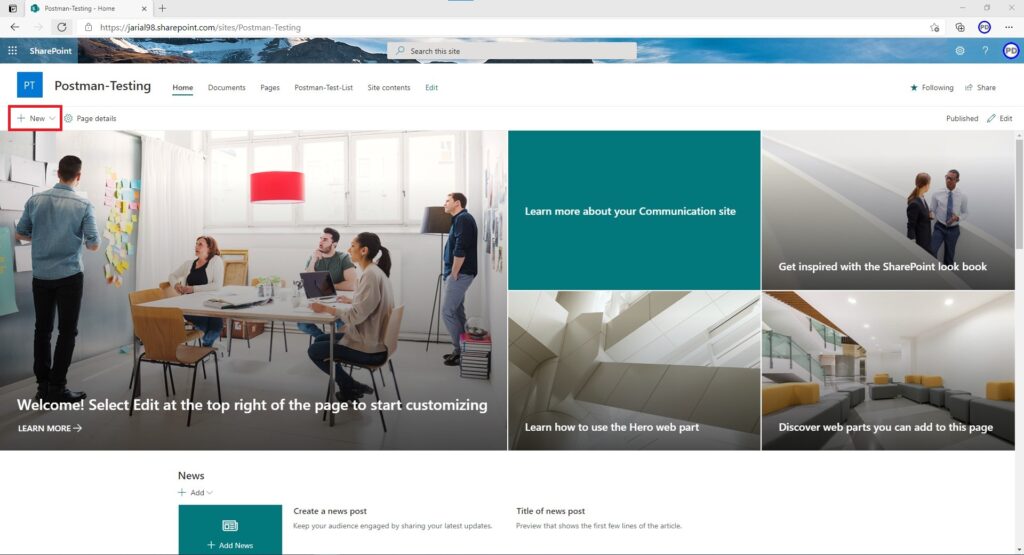
          1. We will navigate to our SharePoint site and Click on “New” on Action bar.

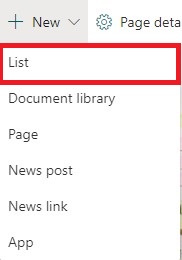
2. Click on the “List” option in the dropdown menu.

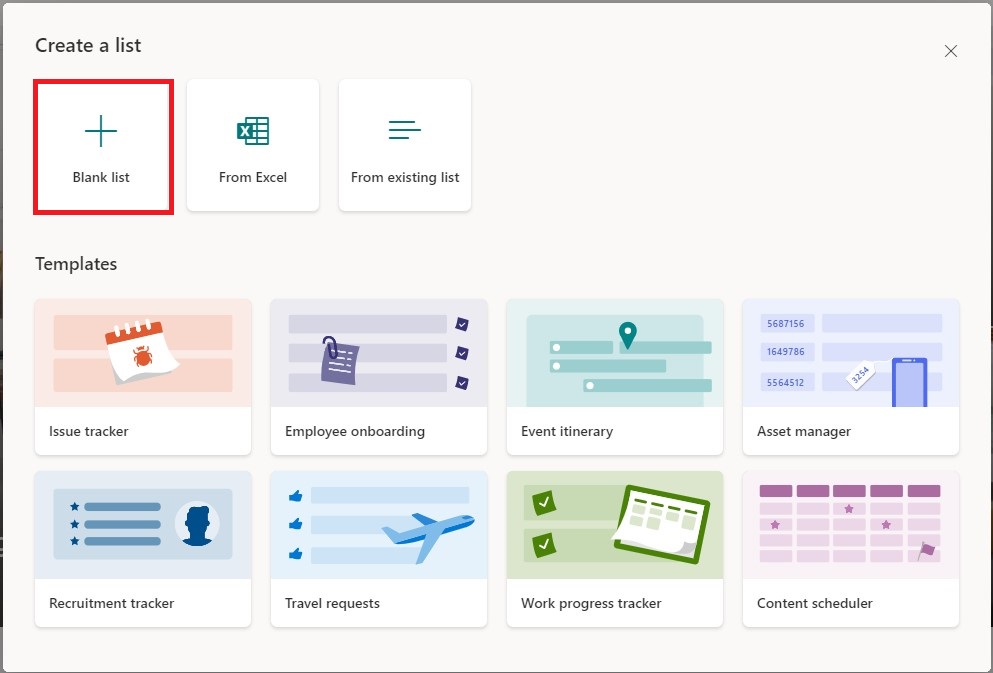
3. A new “Create a list” window will open. We will create a “Blank list”.

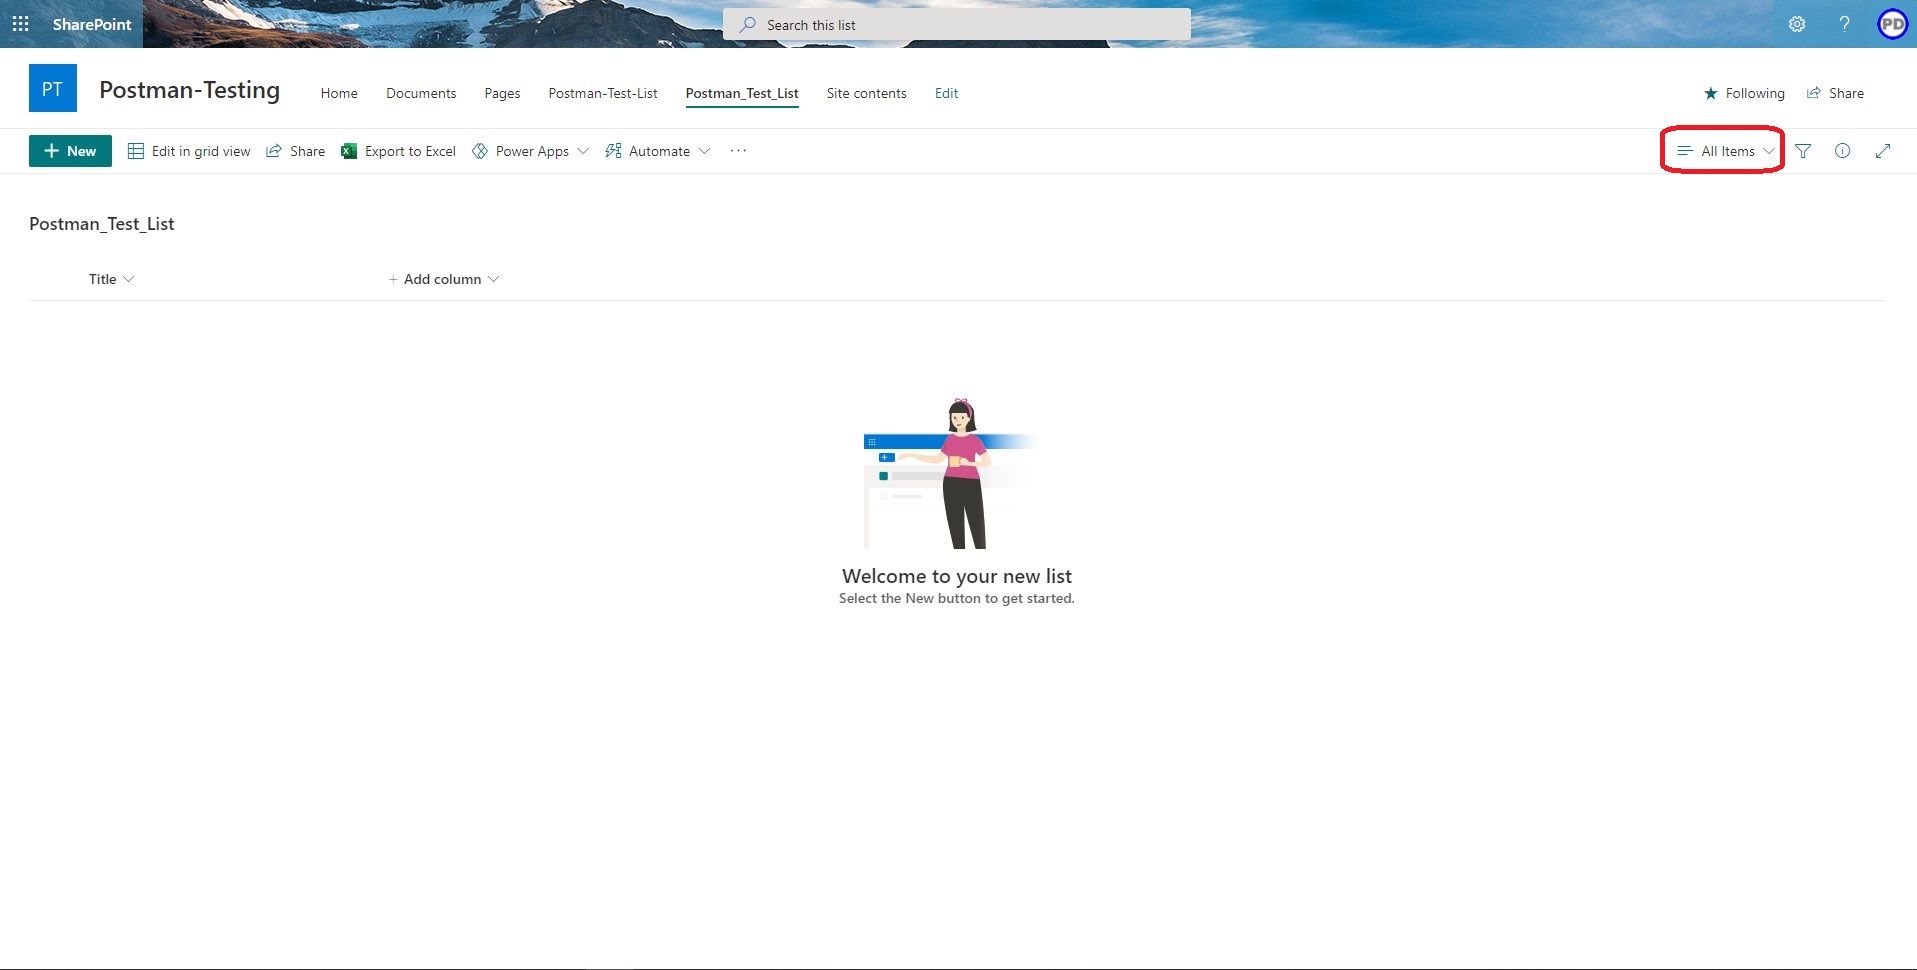
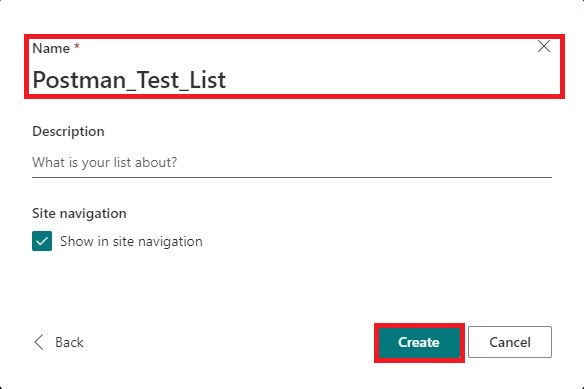
4. We will provide the Title as “Postman_Test_List” for our new list and click on “Create”.

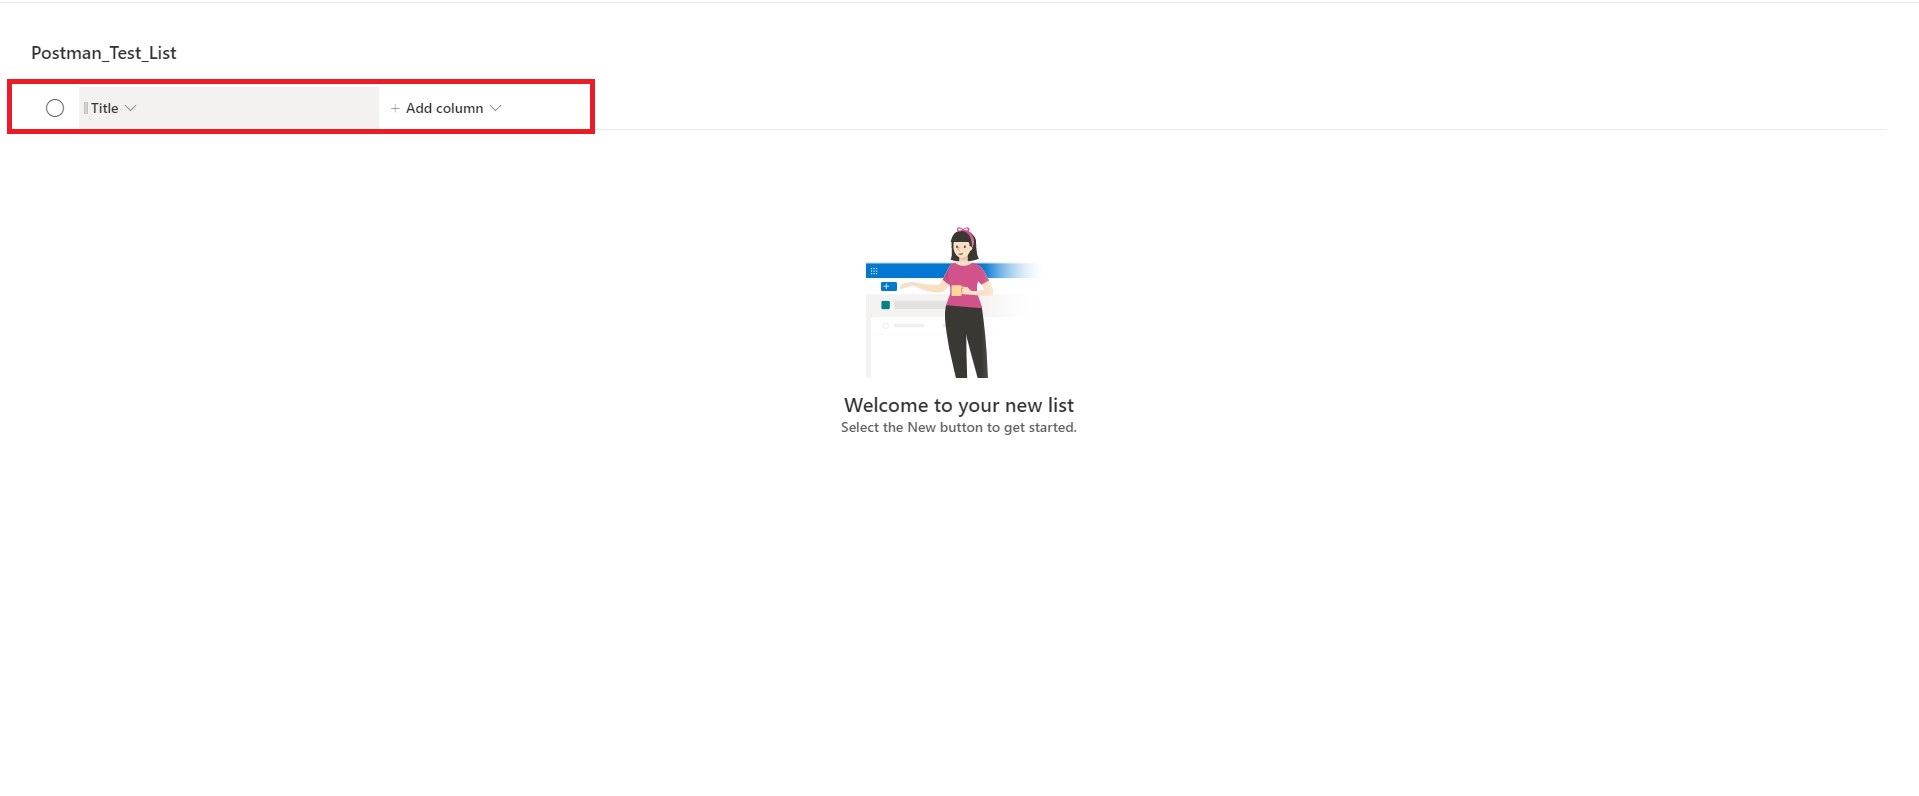
5. We can see, there is only one column “Title”. We will change the view of this list and show another column “ID” in this view.

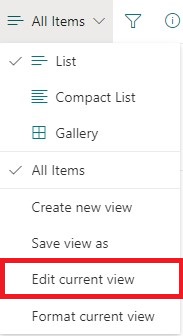
 6. To Change View, we will click on the “All Items” dropdown on Action bar.

7. From the dropdown menu we will select “Edit Current View

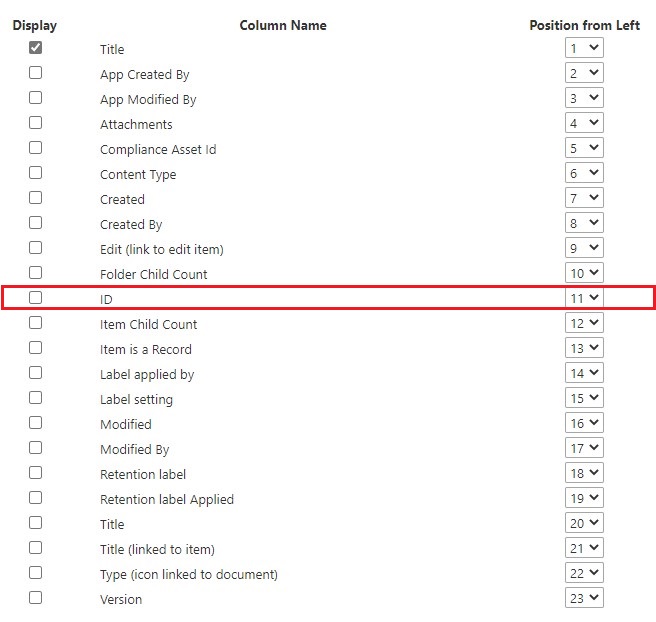
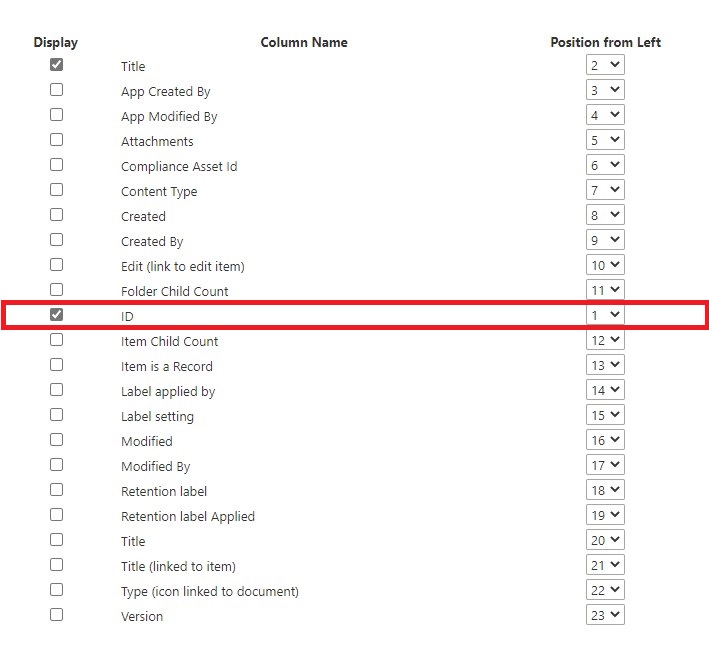
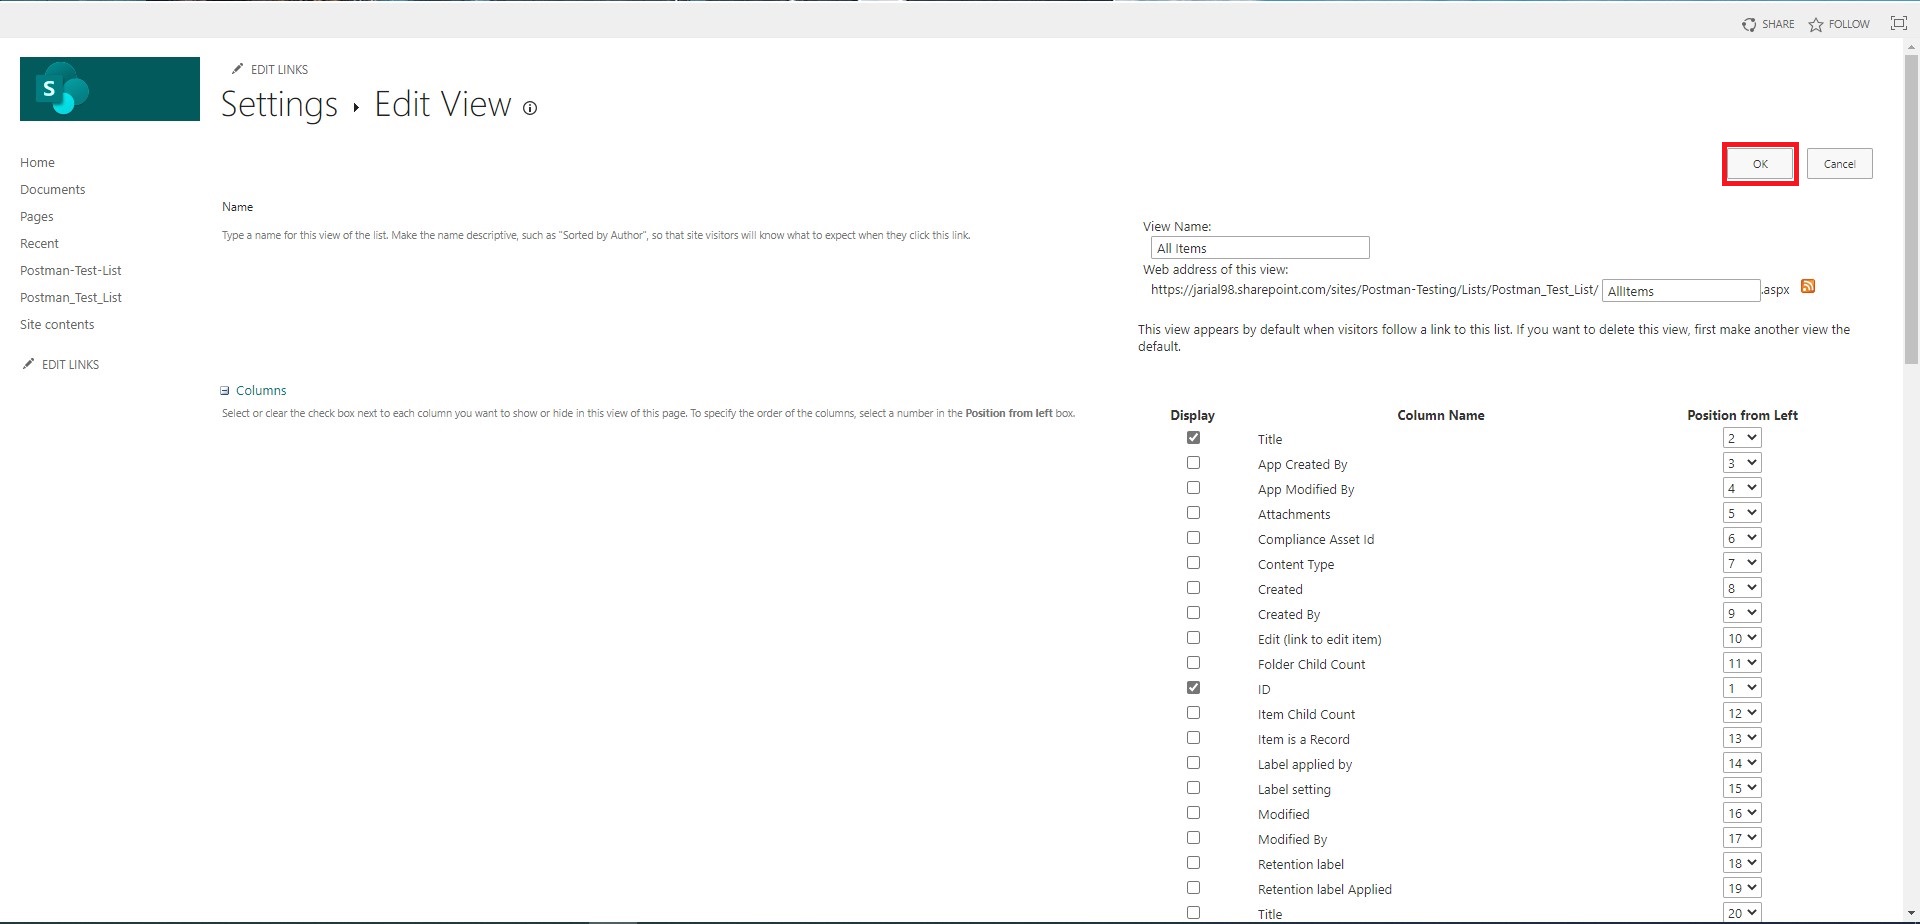
 8. Here we will select the column we want to show. We will check the “ID” column and change its “Position from Left” to 1.

After checking and changing position of “ID” your settings should look like this:

9. Now Click on “OK” button on the top right corner of the Page.

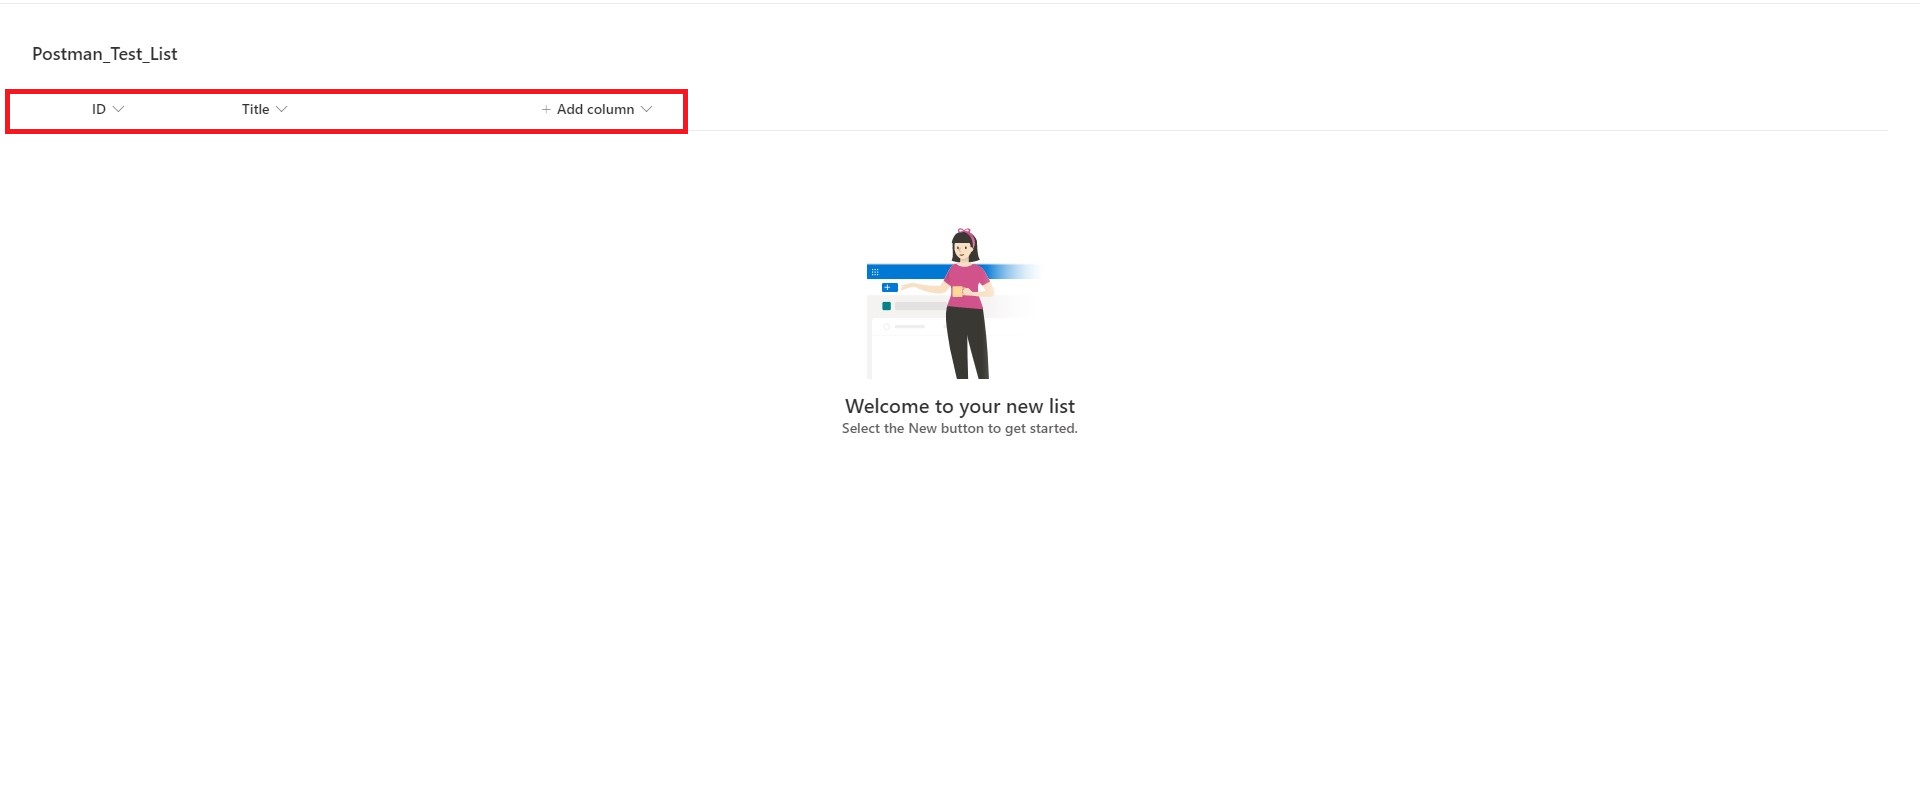
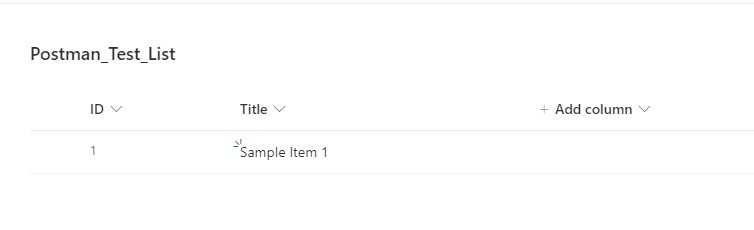
10. After Clicking on “OK”, we will see the “ID” column has been added to the left.

We are ready with our list called “Postman_Test_List” for further experimenting.

Getting Relevant Headers to Use in Postman

Steps To get Cookies for API call

We will focus on getting the cookies that we need for our API calls. Follow the below steps:

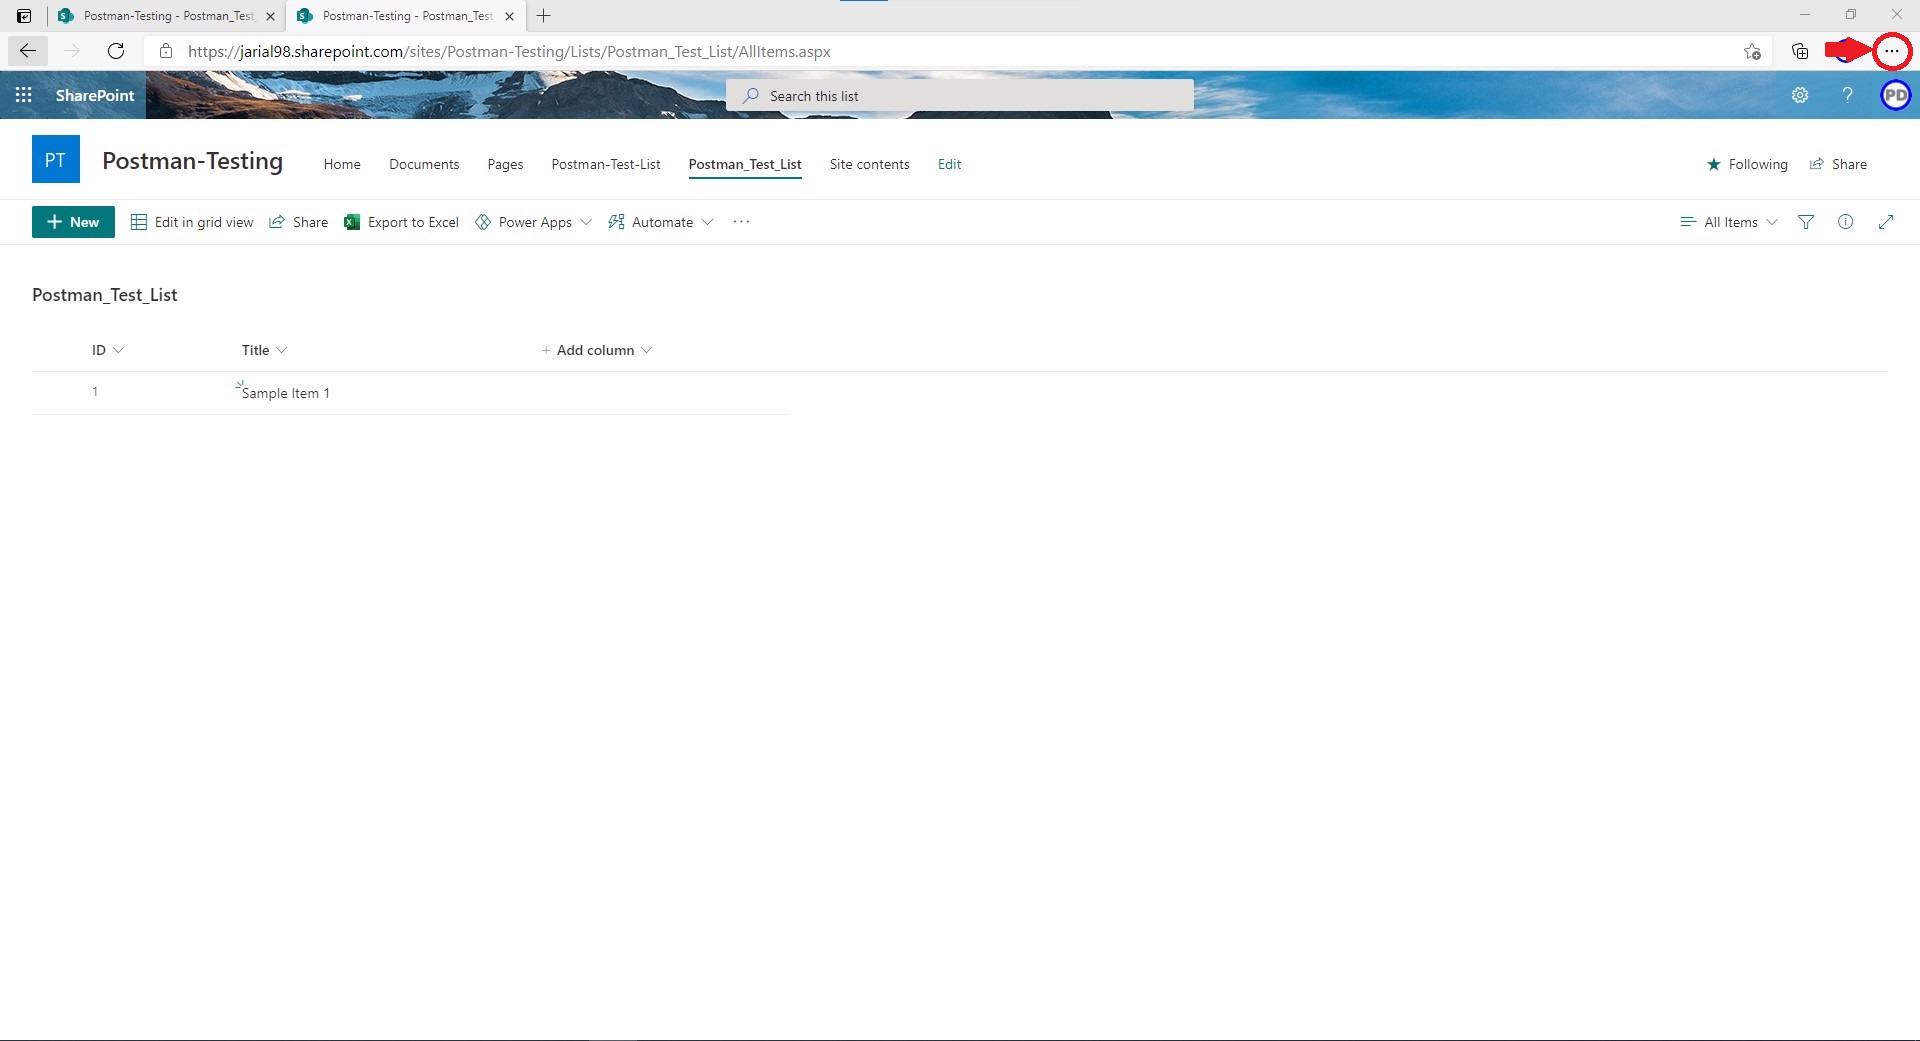
  1. While you are on your SharePoint list, open the developer tools. Click on the three dots “” (also known as ellipses).

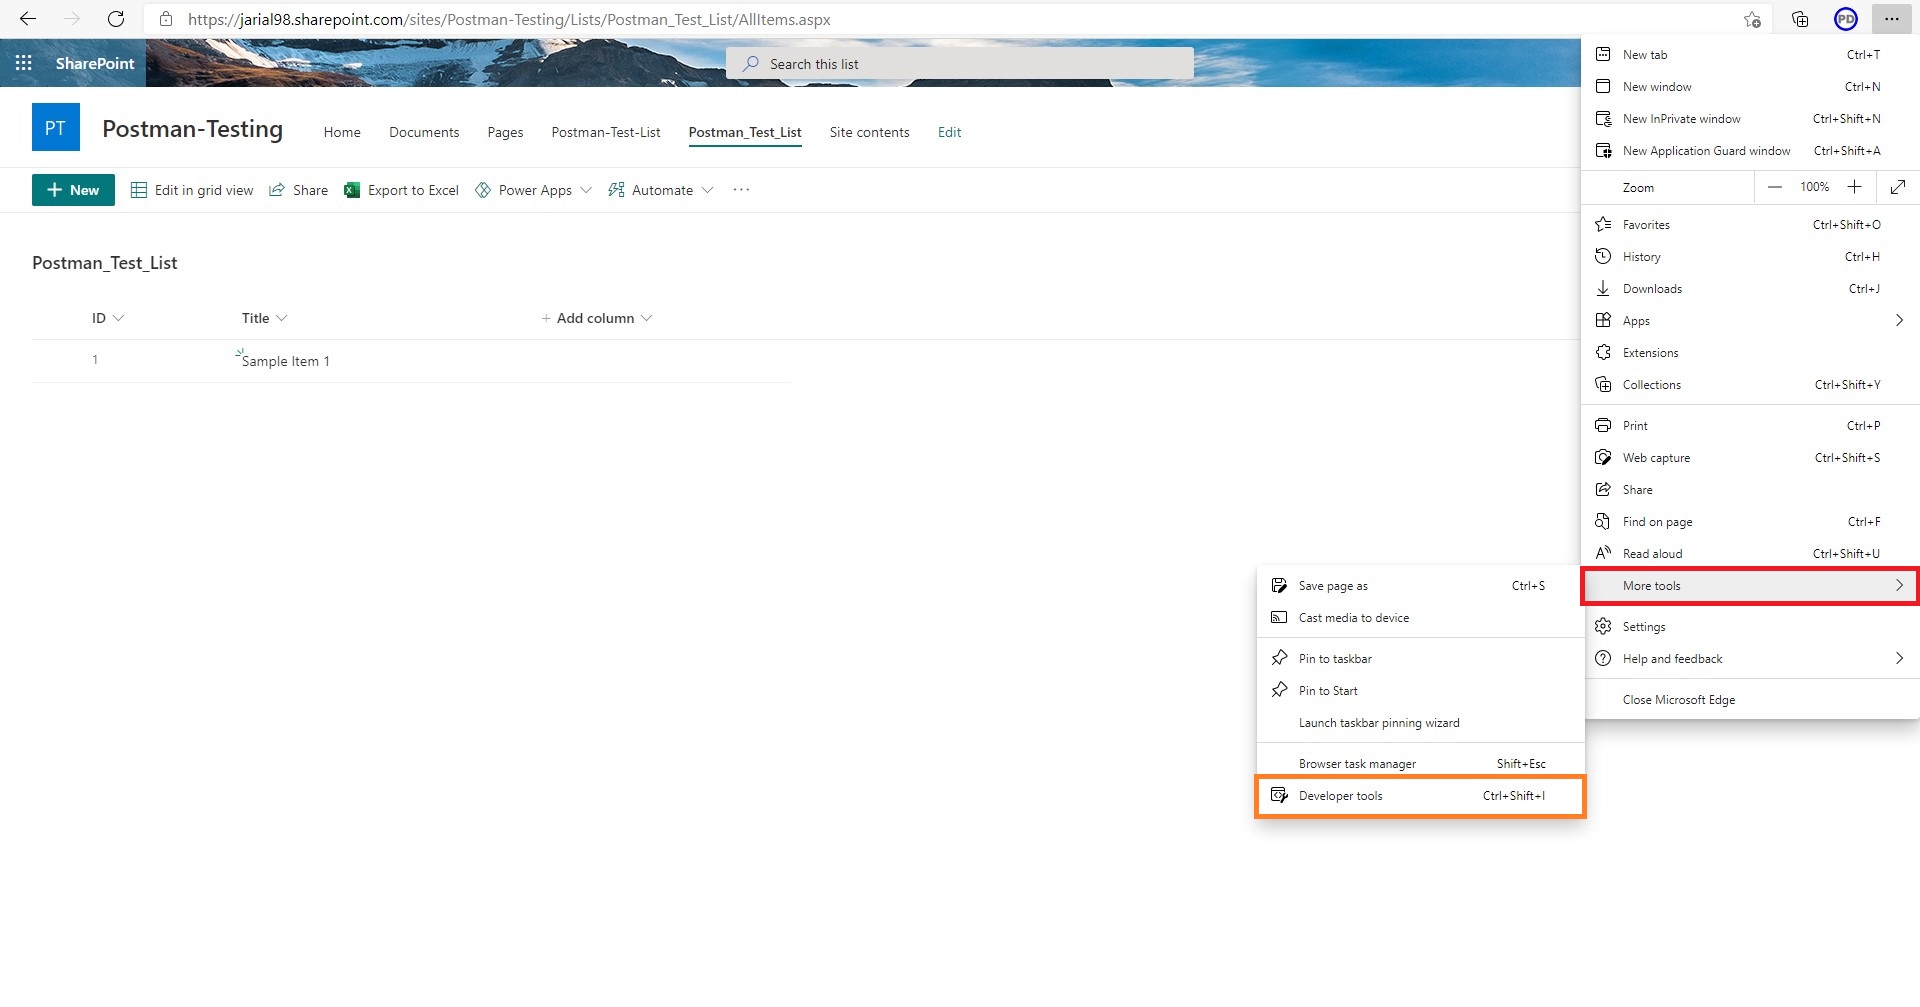
 2. Next select “More Tools” and then “Developer Tools”. Prefer using Microsoft Edge or Chrome browser for this activity.

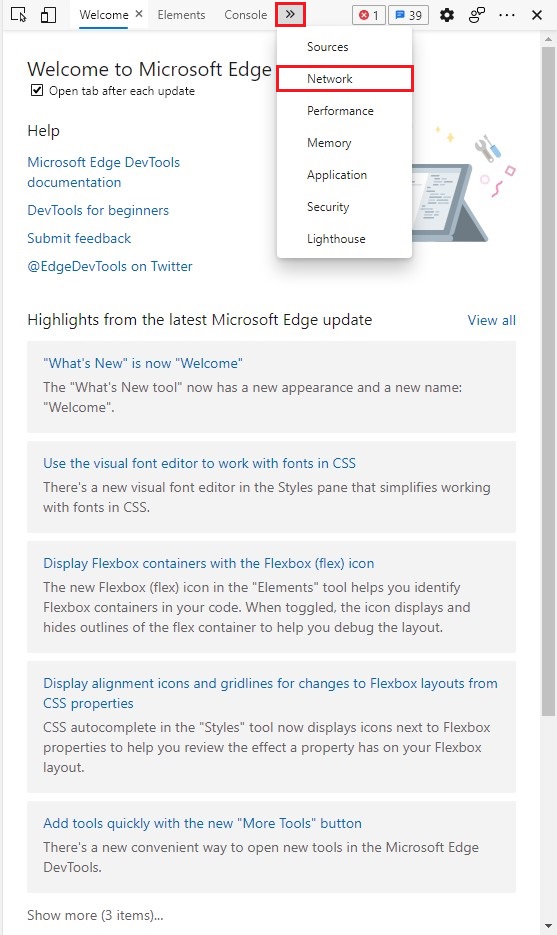
3. We need to see network calls in order to get our cookie details. Click on the double right arrow chevron “>>” and then click on Network as shown below:

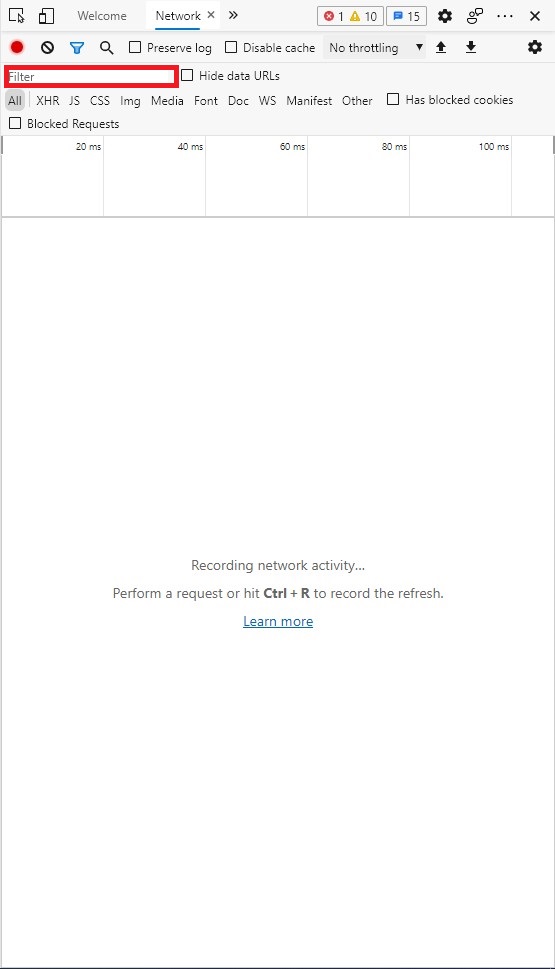
 4. We need to filter Network calls to get the specific call.

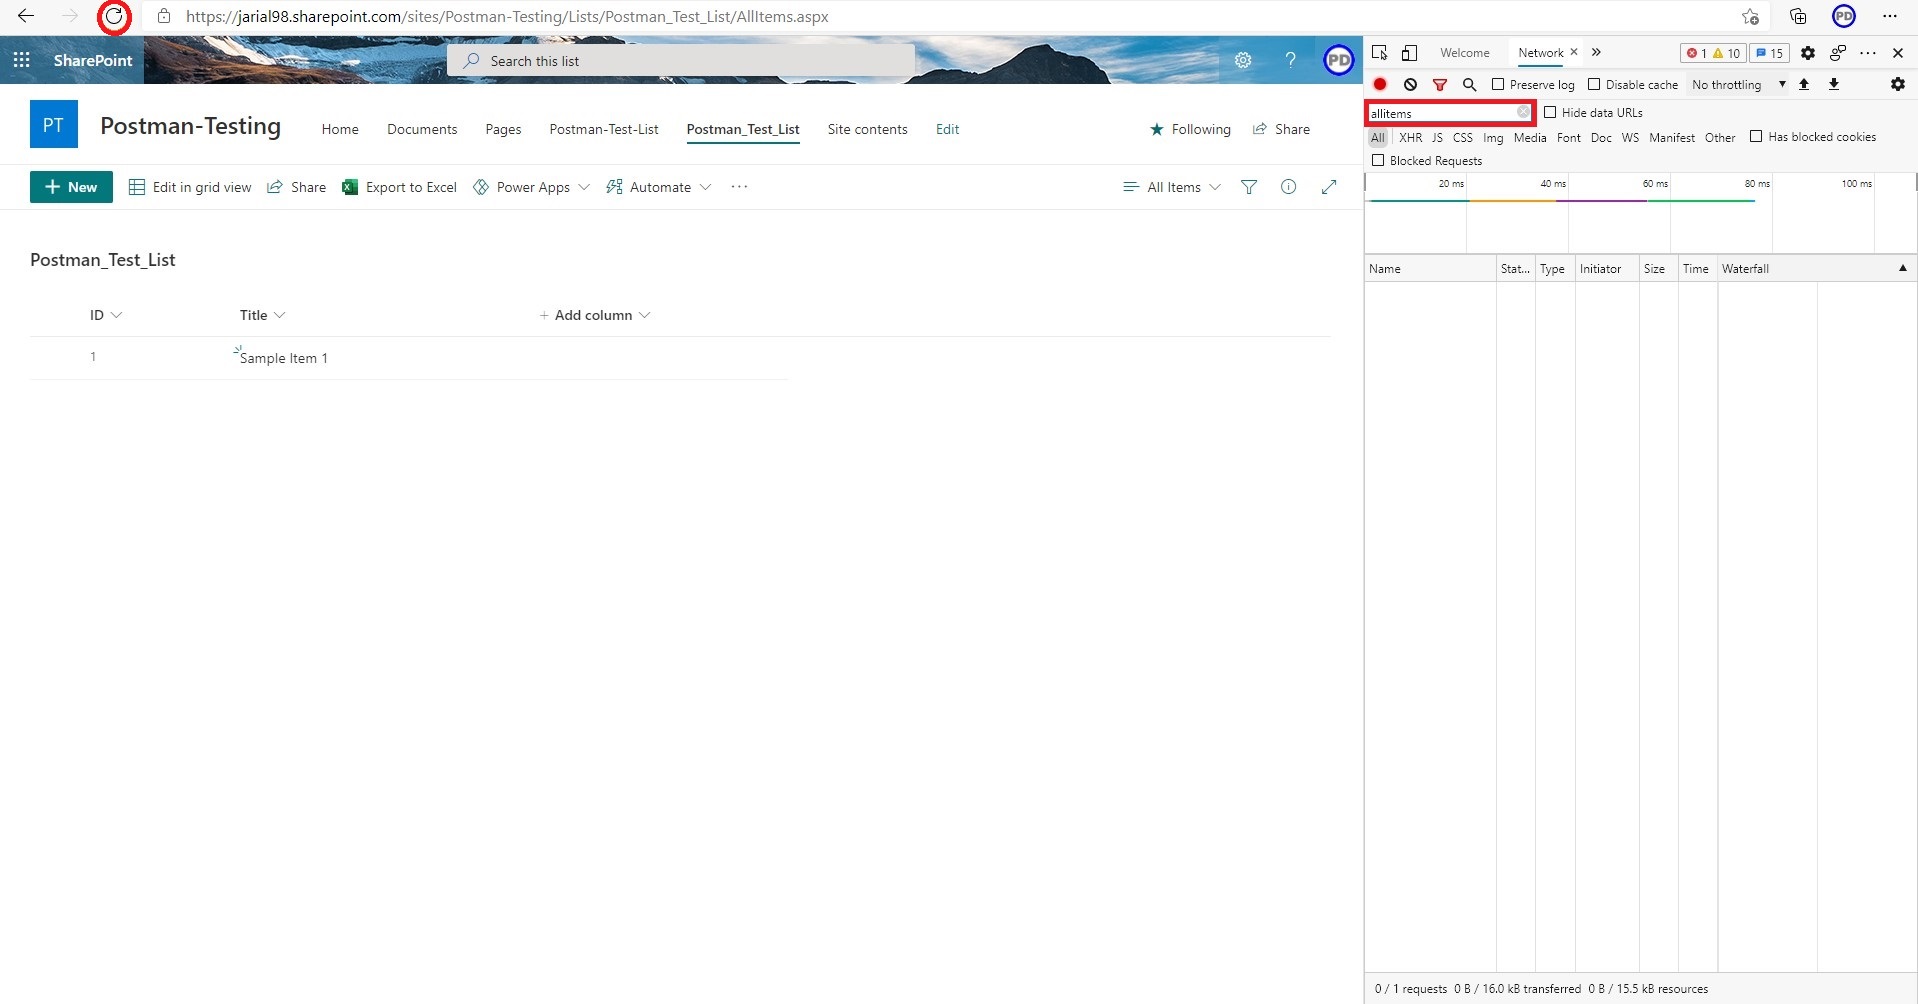
 5. We will type “AllItems” in Filter Input Field and then we will refresh the page to get the network calls. Note: This is the name of the view in the url as AllItems.aspx.

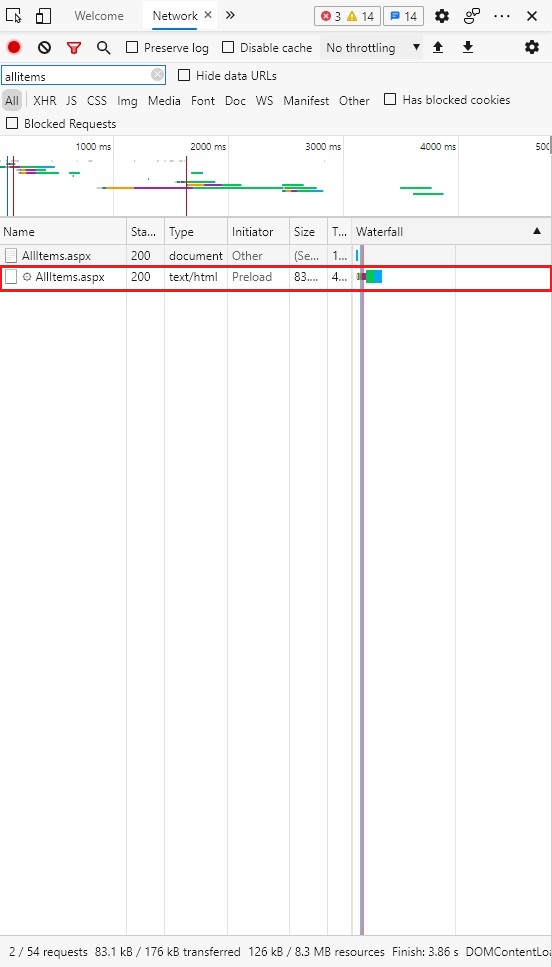
 6. After refreshing the page, we will get 2 “AllItems” calls in our network tab. We will select the row by clicking on it once where Type column is “text/html”.

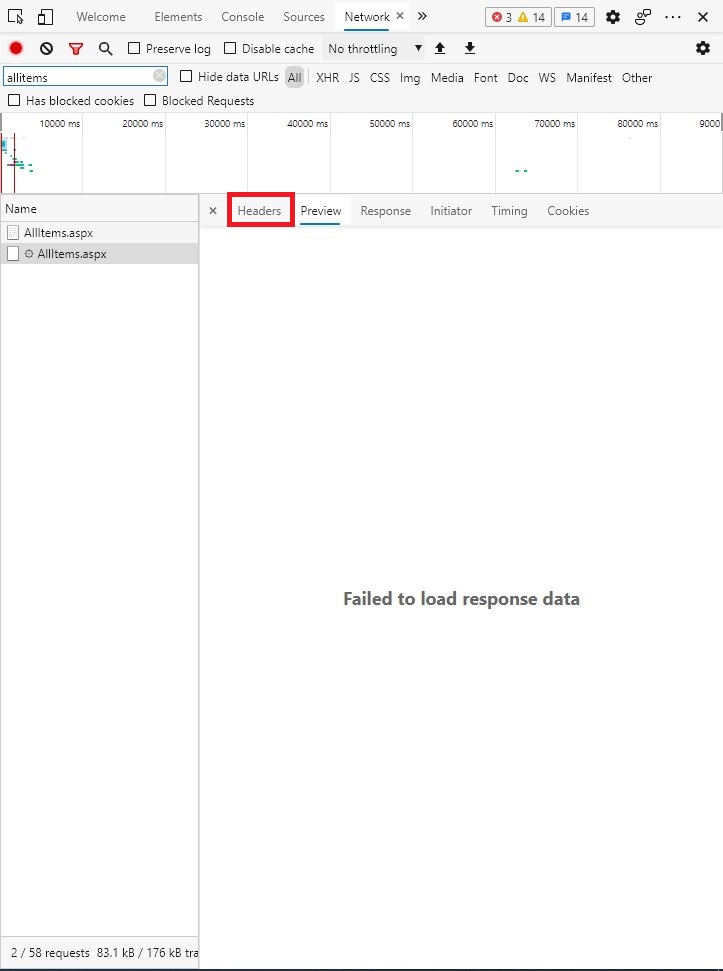
 7. By default, we will be in the “Preview” tab. We need to go to the “Headers” tab by clicking on it as shown below:

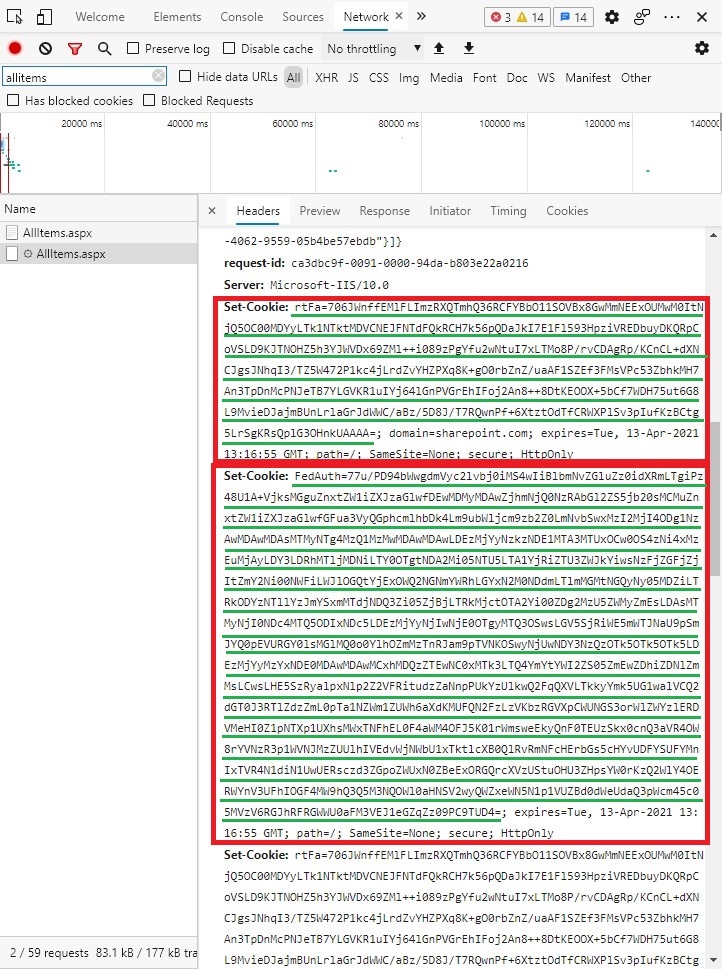
 8. To find cookies, we have to scroll down until we find “Set-Cookie”. We will now try to copy two cookies from here named “rtfa” and “FedAuth”. Copy the values in these cookies and paste it in your notepad for further use. Copy the part which is underlined in green. Do not copy the semi-colon at the last.

Note: It is better to copy these values in a notepad, so that if you enter these values in another API call you are not coming to the SharePoint list and doing the same process again and again.

Make sure you have postman installed for your next steps. You can download it from here.

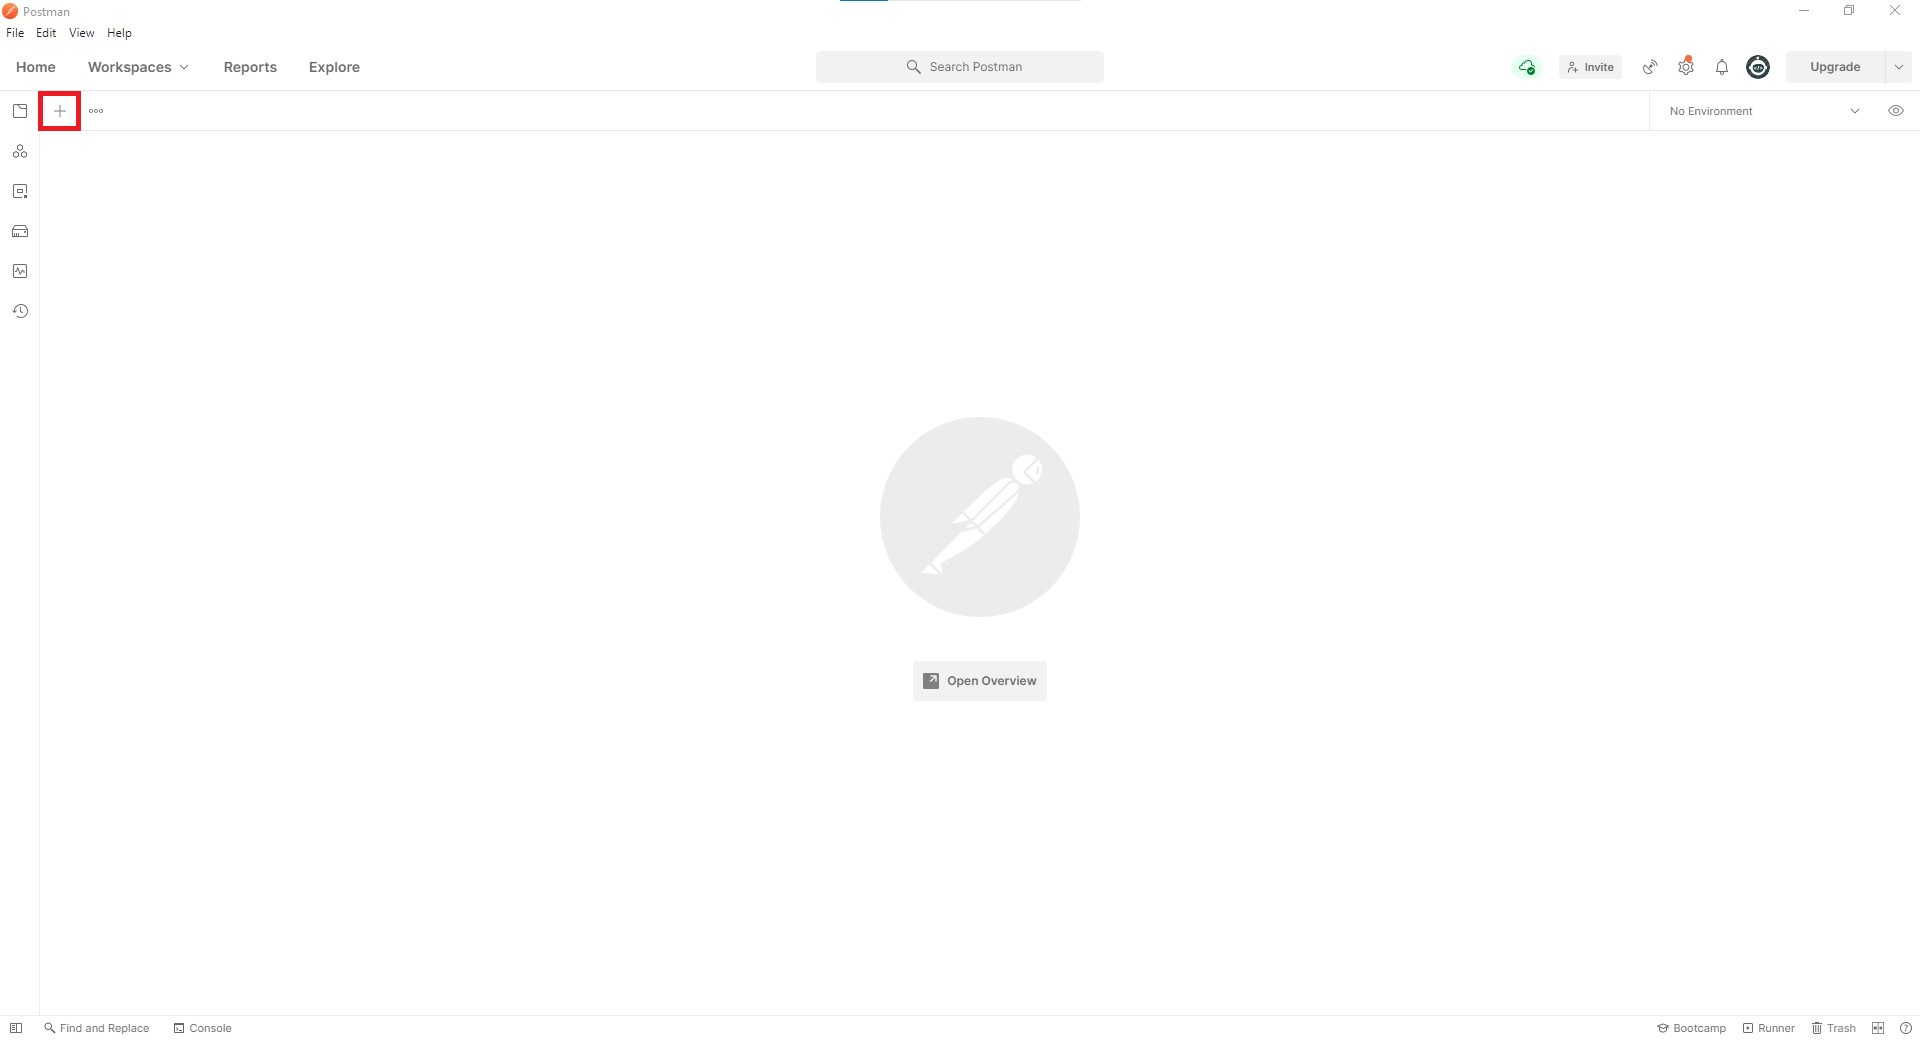
After starting Postman, you will come on this screen and then click on “+” button on top left corner of the window to add a new API request.

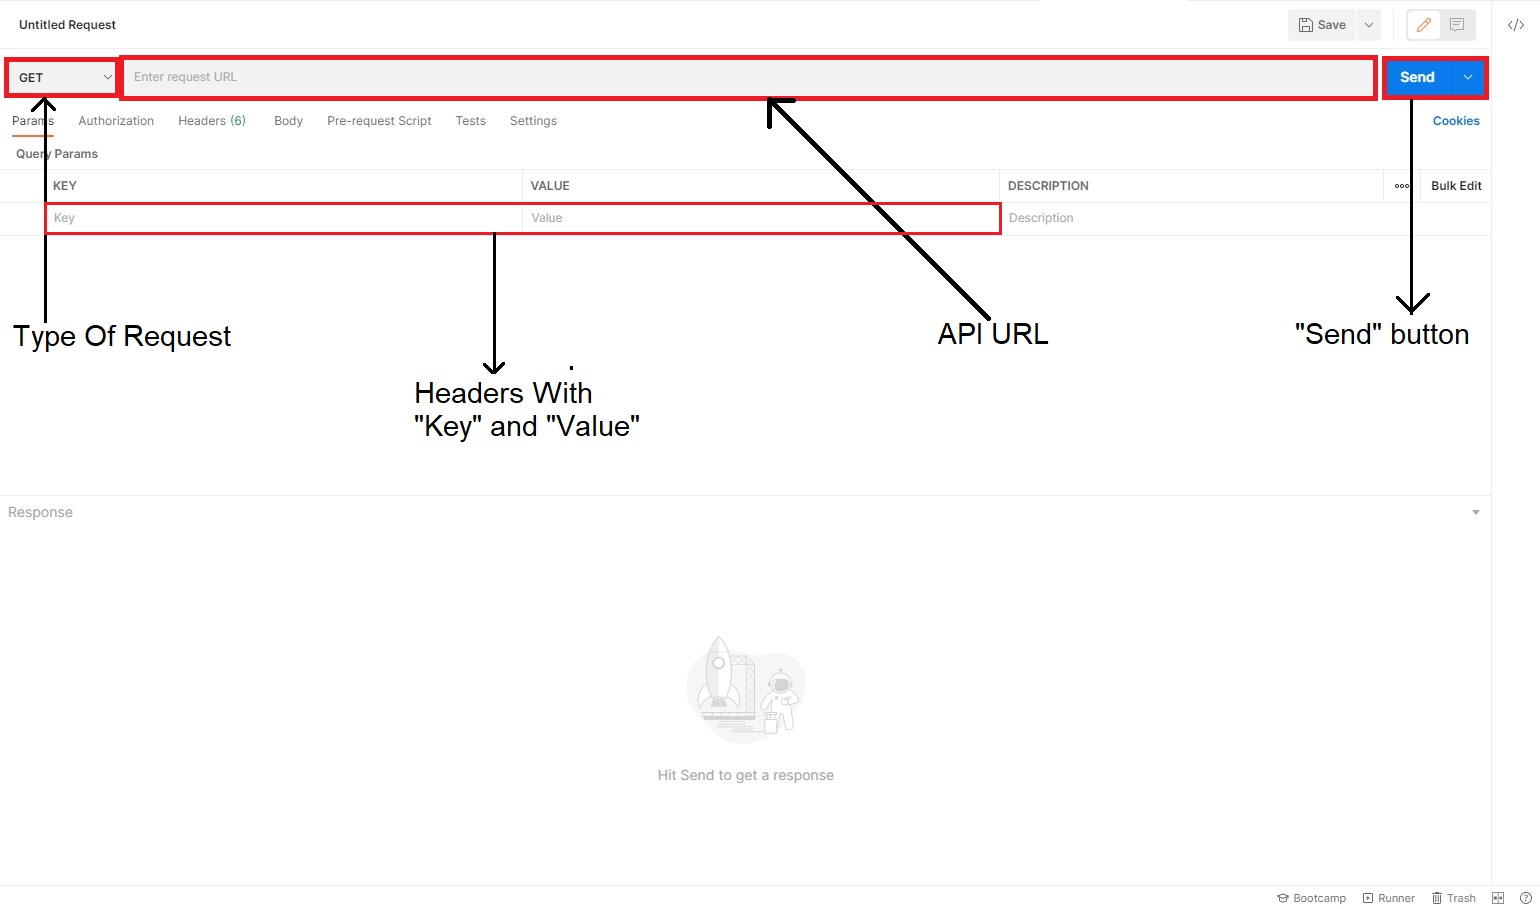
We must enter the API request URL, and then in the headers part we must give some headers that will authenticate and validate our API request.  We are clearly not going to use the bearer authorization token, instead we are going to use the cookies to authenticate our request.

Getting “__metadata” for API call’s body

To make the post Request API calls we need “__metadata” of the list. To get the “__metadata” we do a Get request from postman. Which is as below: -

  1.  In the new tab of postman, we will give the Url in URL field to get the “__metadata” of the list.

In our scenario above we have used the following request URL:

https://jarial98.sharepoint.com/sites/Postman-Testing/_api/Web/Lists/getbytitle('Postman_Test_List')?$select=ListItemEntityTypeFullName

In your scenario make sure to change the [Sharepoint_Site_Collection_Url] and [List_Name] in your URL as shown below:

https://[Sharepoint_Site_Collection_Url]/ _api/Web/Lists/getbytitle(‘[List_Name ]’)?$select=ListItemEntityTypeFullName

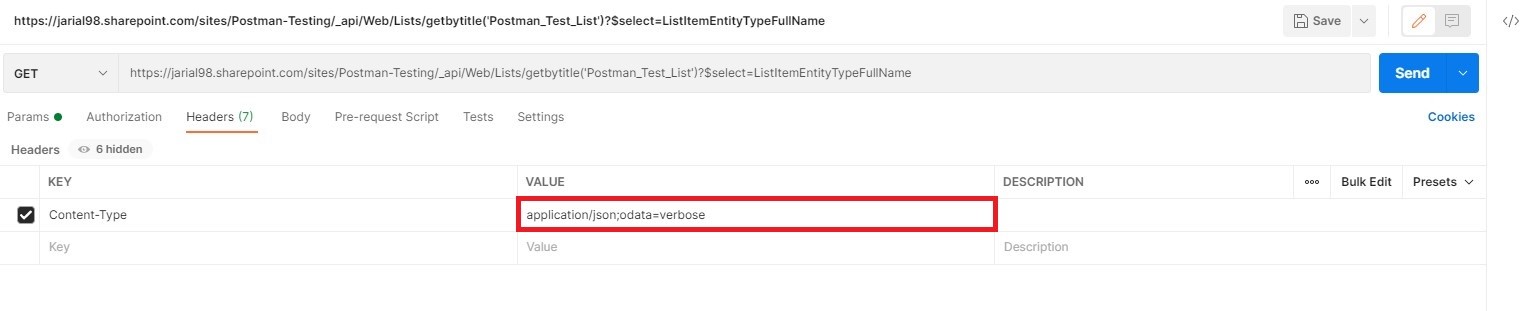
 2. We will now set our headers. First, we will configure “Content-Type”. Click on the “Key” field in the Headers and type “Content-Type”.

 3.  For our “Content-Type” key, we will configure the value as “application/json;odata=verbose” as shown below:

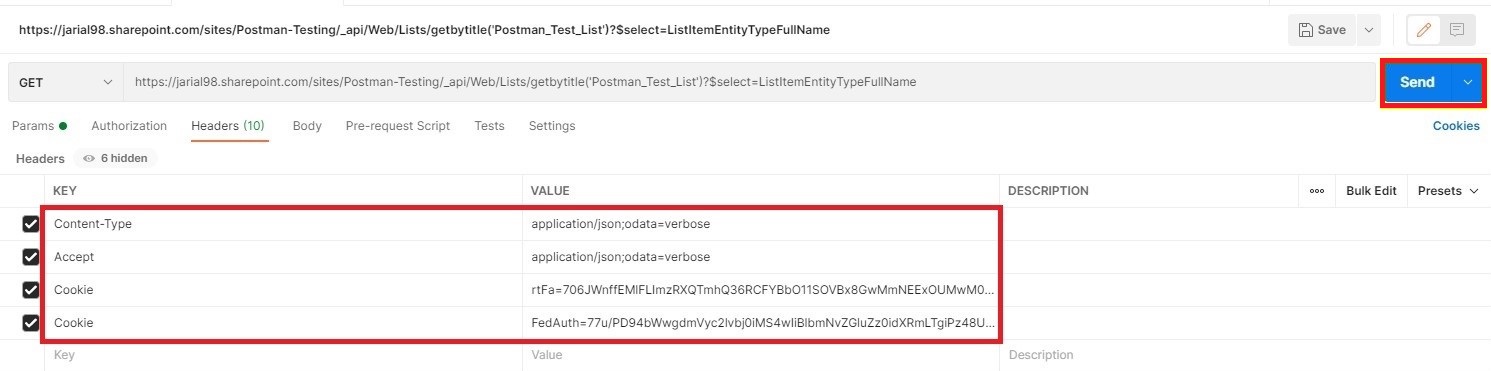
 4.  Similarly, setup other headers as shown below. Refer to the table and the screenshot below.

In the “Cookie” key we will paste the two cookies separately that we got from our previous steps.

Key Value
Content-Type application/json;odata=verbose
Accept application/json;odata=verbose
Cookie rtFa=706JWnffEMlFLImzRXQTmhQ36RCFYBbO11SOVBx8GwMmNEExOUMwM0ItNjQ5OC00MDYyLTk1NTktMDVCNEJFNTdFQkRCH7k56pQDaJkI7E1Fl593HpziVREDbuyDKQRpCoVSLD9KJTNOHZ5h3YJWVDx69ZMl++i089zPgYfu2wNtuI7xL

TMo8P/rvCDAgRp/KCnCL+dXNCJgsJNhqI3/TZ5W472P1kc4jLrdZvYHZPXq8K+gO0rbZnZ/uaAF1SZEf3FMsVPc53ZbhkMH7An3TpDnMcPNJeTB7YLGVKR1uIYj64lGnPVGrEhIF

oj2An8++8DtKEOOX+5bCf7WDH75ut6G8L9MvieDJajmBUnLrlaGrJdWWC/aBz/5D8J/T7RQwnPf+6XtztOdTfCRWXPlSv3pIufKzBCtg5LrSgKRsQplG3OHnkUAAAA=

Cookie FedAuth=77u/PD94bWwgdmVyc2lvbj0iMS4wIiBlbmNvZGluZz0idXRmLTgiPz48U1A

+VjksMGguZnxtZW1iZXJzaGlwfDEwMDMyMDAwZjhmNjQ0NzRAbGl2ZS5jb20sMCM

uZnxtZW1iZXJzaGlwfGFua3VyQGphcmlhbDk4Lm9ubWljcm9zb2Z0LmNvbSwxMzI2M

jI4ODg1NzAwMDAwMDAsMTMyNTg4MzQ1MzMwMDAwMDAwLDEzMjYyNzkzNDE

1MTA3MTUxOCw0OS4zNi4xMzEuMjAyLDY3LDRhMTljMDNiLTY0OTgtNDA2Mi05NT

U5LTA1YjRiZTU3ZWJkYiwsNzFjZGFjZjItZmY2Ni00NWFiLWJlOGQtYjExOWQ2NGNmYW

RhLGYxN2M0NDdmLTlmMGMtNGQyNy05MDZiLTRkODYzNTllYzJmYSxmMTdjNDQ3

Zi05ZjBjLT

RkMjctOTA2Yi00ZDg2MzU5ZWMyZmEsLDAsMTMyNjI0NDc4MTQ5ODIxNDc5LDEzM

jYyNjIwNjE0OTgyMTQ3OSwsLGV5SjRiWE5mWTJNaU9pSmJYQ0pEVURGY0lsMGlMQ

0o0YlhOZmMzTnRJam9pTVNKOSwyNjUwNDY3NzQzOTk5OTk5OTk5LDEzMjYyMzYx

NDE0MDAwMDAwMCxhMDQzZTEwNC0xMTk3LTQ4YmYtYWI2ZS05ZmEwZDhiZDN

lZmMsLCwsLHE5SzRyalpxNlp2Z2VFRitudzZaNnpPUkYzUlkwQ2FqQXVLTkkyYmk5UG1

walVCQ2dGT0J3RTlZdzZmL0pTa1NZWm1ZUWh6aXdKMUFQN2FzLzVKbzRGVXpCWUN

GS3orWlZWYzlERDVMeHI0Z1pNTXp1UXhsMWxTNFhEL0F4aWM4OFJ5K01rWmsweE

kyQnF0TEUzSkx0cnQ3aVR4OW8rYVNzR3p1WVNJMzZUUlhIVEdvWjNWbU1xTktlcXB

0QlRvRmNFcHErbGs5cHYvUDFYSUFYMnIxTVR4N1diN1UwUERsczd3ZGpoZWUxN0Z

BeExORGQrcXVzUStuOHU3ZHpsYW0rKzQ2WlY4OERWYnV3UFhIOGF4MW9hQ3Q5

M3NQOWl0aHNSV2wyQWZxeWN5N1p1VUZBd0dWeUdaQ3pWcm45c05MVzV6R

 GJhRFRGWWU0aFM3VEJ1eGZqZz09PC9TUD4=

Let us understand what these headers are for.

Content-Type: This is the header which Tells the SharePoint that the request is coming with JSON data.

Accept: This header tells SharePoint that we need the result in JSON format and odata means we need maximum data to be returned from the result.

Cookie: - These will contain two cookies namely, “rtfa” and “FedAuth”.

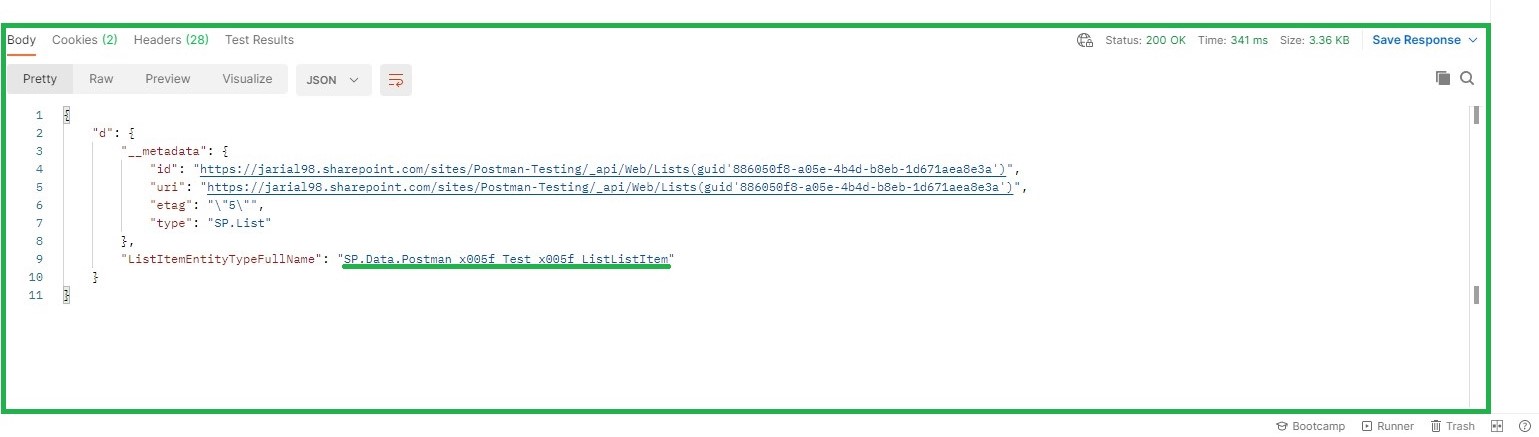
 5.  Click on “Send” button on the right of the URL Field. We will get a response with status code of “200”. This is our “__metadata”. Copy the part which is underlined in green and paste it in notepad for further use.

Getting X-RequestDigest

There is one more key that we need to configure in Header. It is called X-RequestDigest.

This header authenticates all the requests that are made to SharePoint except Get requests. The value of X-RequestDigest expires soon, so we need to get the value again and again to do our API calls. It is a good option to save our request so that we can easily go there and get the updated X-RequestDigest values.

Please make sure to keep previous headers as configured in the above steps as is. Follow the next steps as below:

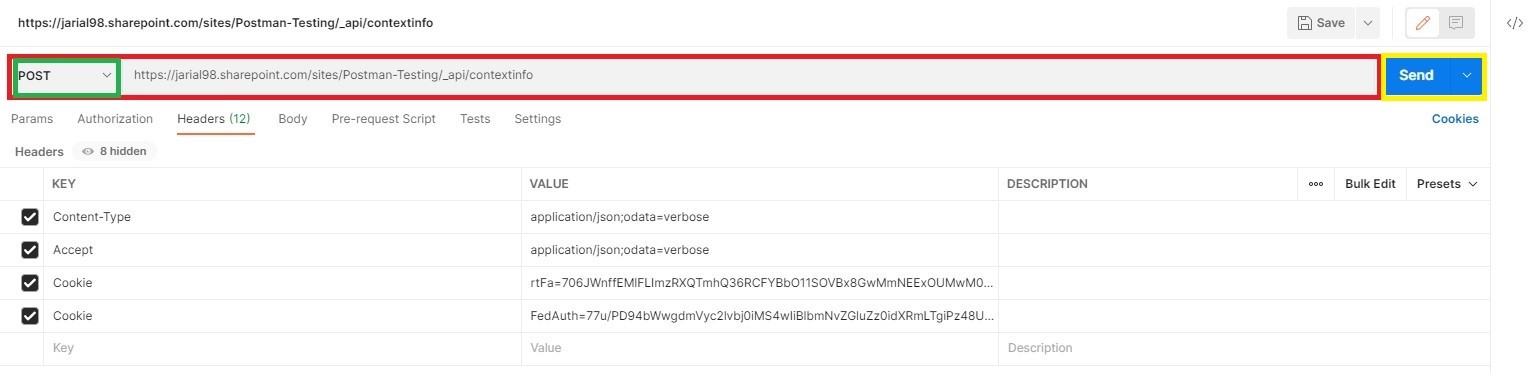
 1.  Open new Tab in Postman and type the following URL. Headers will be same as we had for “__metadata” request. Remember this is a POST request type.

After entering the relevant data click on “Send”.

 In our scenario above we have used the following request URL:

https://jarial98.sharepoint.com/sites/Postman-Testing/_api/contextinfo

In your scenario make sure to change the [Sharepoint_Site_Collection_Url] in your URL as shown below:

https://[Sharepoint_Site_Collection_Url]/_api/contextinfo

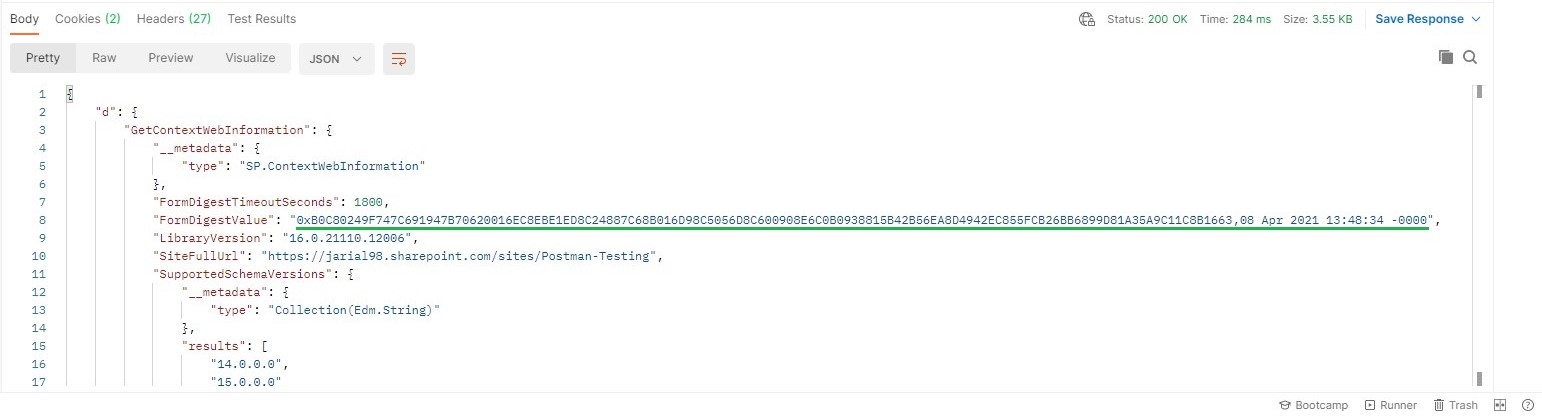
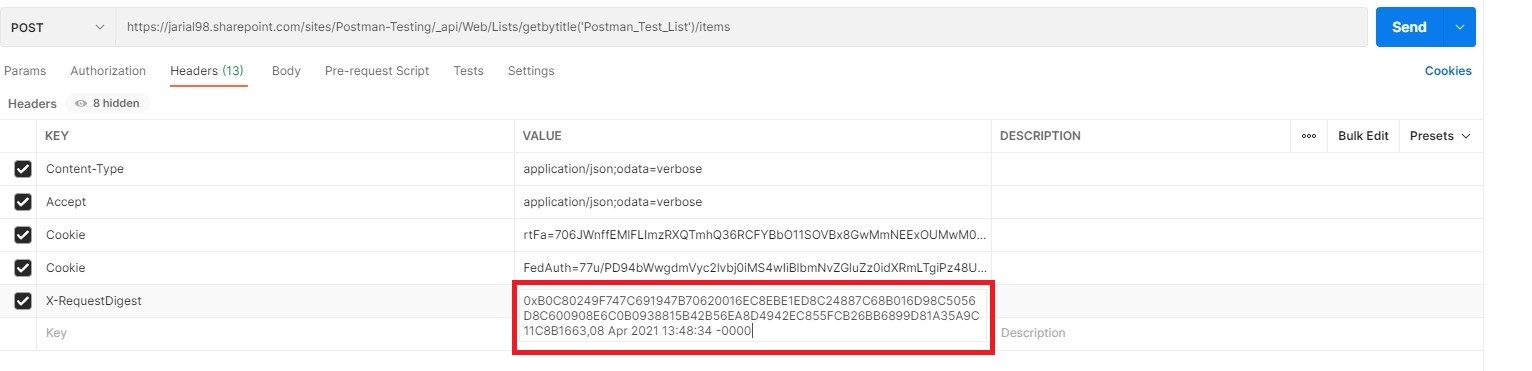
2.  We will get a response and will copy the “FormDigestValue”. This is our “X-RequestDigest” header. Copy the value which is underlined in green and save this in notepad.

Note: - Form Digest Value has an expiration time of 1800 seconds. So, we have to do this request again when this value is expired.

Now, we have all the headers we need to make API requests.

Few Examples of CRUD operations on SharePoint List

Reading Items from SharePoint List

Now we will make our first API call to get the items from the SharePoint List. We will use the getbytitle API option available in the Lists API from SharePoint. For more details refer to the documentation here.

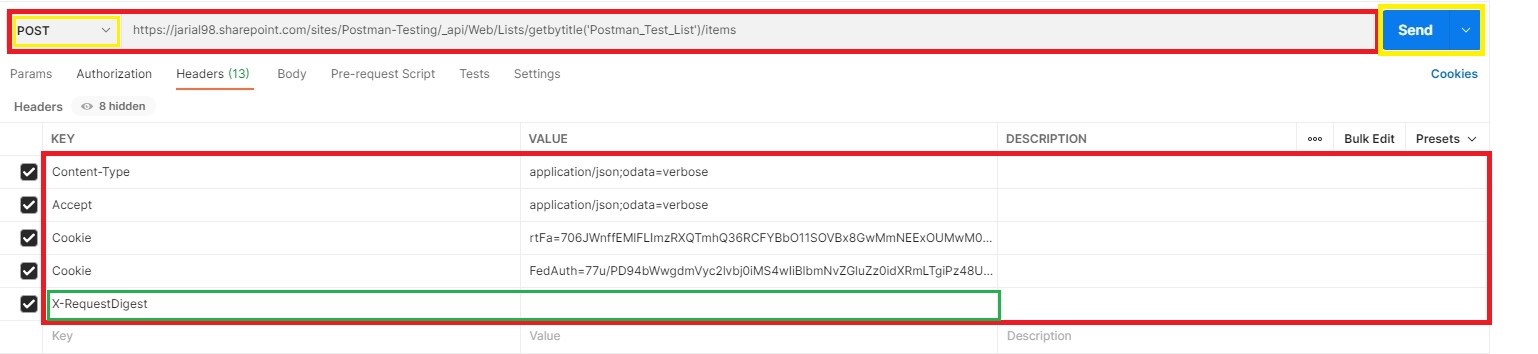
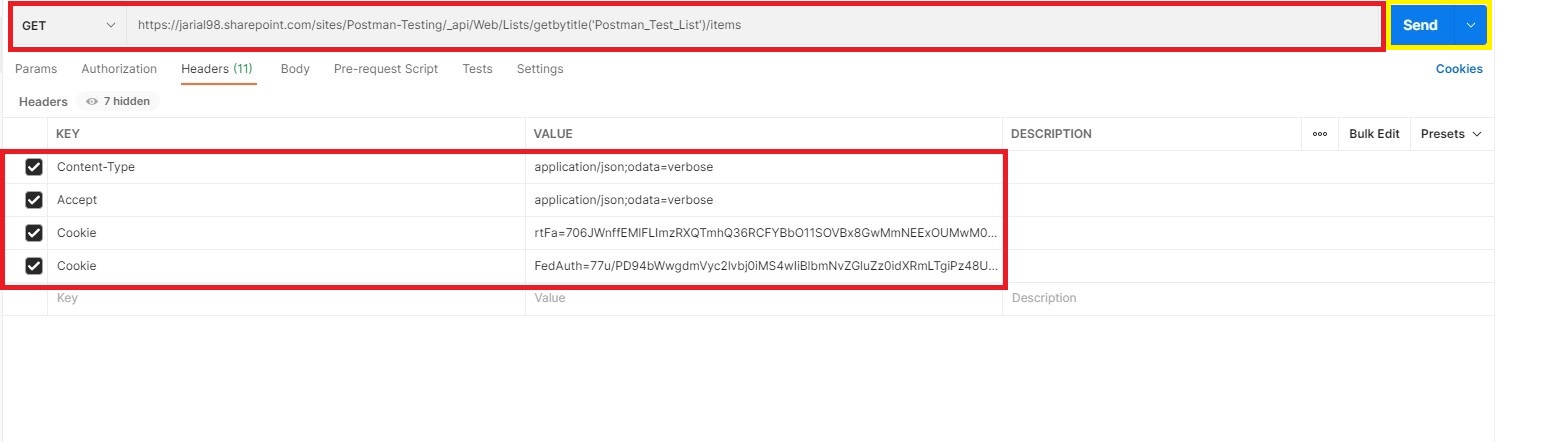
  1. Open new tab in Postman and type the below URL in the URL Field. There are no new Headers that we will use. After Entering all the values as shown below click on “Send”.

In our scenario above we have used the following request URL:

https://jarial98.sharepoint.com/sites/Postman-Testing/_api/Web/Lists/getbytitle('Postman_Test_List')/items

In your scenario make sure to change the [Sharepoint_Site_Collection_Url] and [List_Name] in your URL as shown below:

https://[ Sharepoint_Site_Collection_Url]/_api/Web/Lists/getbytitle(‘[List Name]’)/items

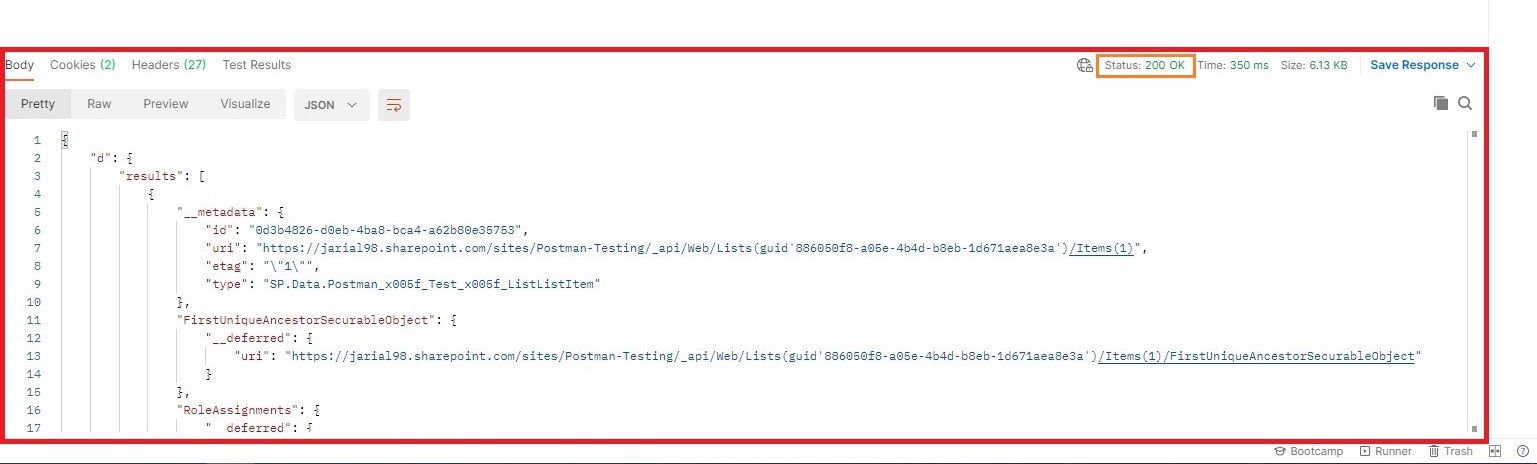
2.  We will get response with Status of “200”. Which means our request was successful and the response will contain all the items from our “Postman_Test_List” list.

Create A new item in SharePoint List.

The URL endpoint from SharePoint REST API for creating an item is the same as it is for reading an item. The difference is in the nature of “request type” and other information that needs to be sent along as a POST request. Follow the below steps to create a single item in SharePoint list:

  1. We will open a new tab in Postman and write the URL and configure relevant headers to do a create item API request.

X-RequestDigest

0x68636B840B370DEC00213AC2C1A66C14F97C6DACC22815FFD27A0D3804D70793B1EB6B911969BDD03387F81212EA631722E66FD9C8A219755B0C97655BE906D0,08 Apr 2021 14:21:18 -0000

The “X-RequestDigest” header is used here because this is a POST request, and we need to validate this request. Every other header is same as above calls i.e Reading Items.

In our scenario above we have used the following request URL:

https://jarial98.SharePoint.com/sites/Postman-Testing/_api/Web/Lists/getbytitle('Postman_Test_List')/items  

In your scenario make sure to change the [Sharepoint_Site_Collection_Url] and [List_Name] in your URL as shown below:

https://[Sharepoint_Site_Collection_Url]/ _api/Web/Lists/getbytitle([List Name])/items

This is a POST request, so we need to send our Sharepoint list item data in the body of the request.

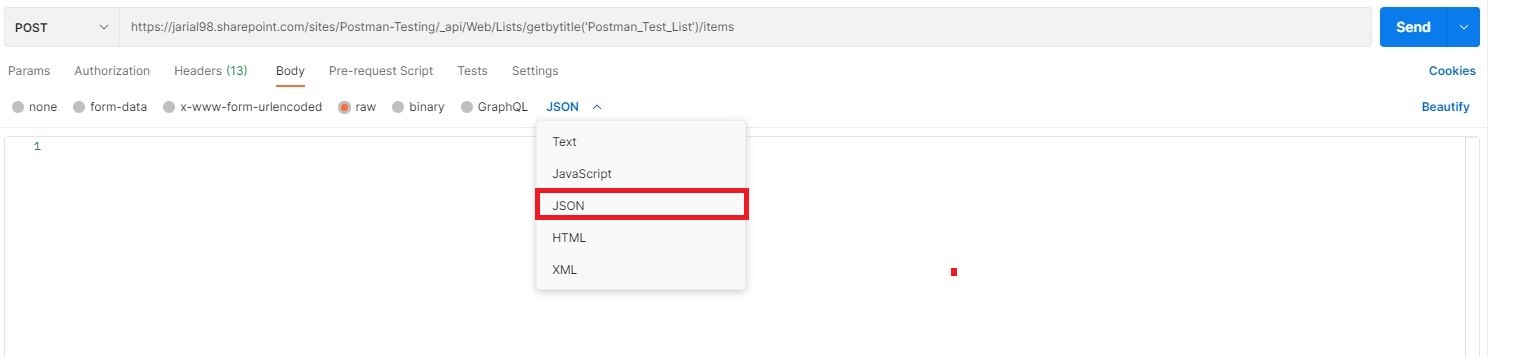
2.  Just below the URL field, we are having various options. We will select “body” and then select “Raw” radio button.

 3.  After Clicking on “Raw” radio button, we will select on what format we want to send the data. Select “JSON” from the dropdown list.

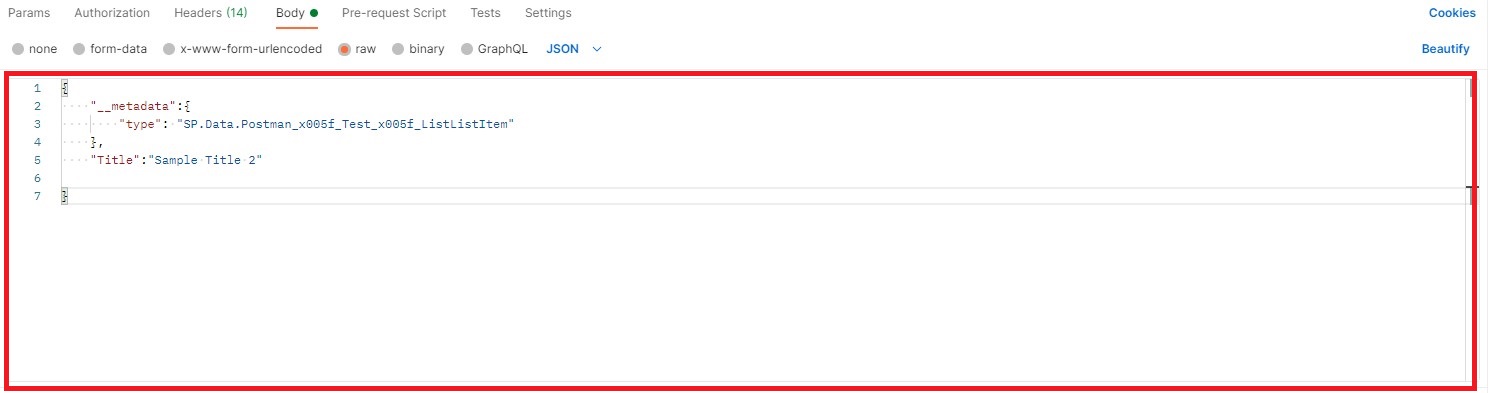
 4.  Now we need to write the body of the Request. Which looks like this.

 “__metadata”: This is the metadata of the List. We got this by following steps above to get “__metadata”. We will paste the “ListItemEntityTypeFullName” value that we pasted in Notepad earlier.

Title: This is the data that we will send in the “Title” column of our SharePoint list.

{

    "__metadata":{

        "type": "SP.Data.Postman_x005f_Test_x005f_ListListItem"

    },

    "Title":"Sample Title 2"

}

Let us hypothetically imagine that your SharePoint list had another single line of text column called “Country”. If we were to send “India” as our value, our body request should look like this:

{

    "__metadata":{

        "type": "SP.Data.Postman_x005f_Test_x005f_ListListItem"

    },

    "Title":"Sample Title 2",

    “Country”:”India”

}

After entering the body, click on “Send” button.

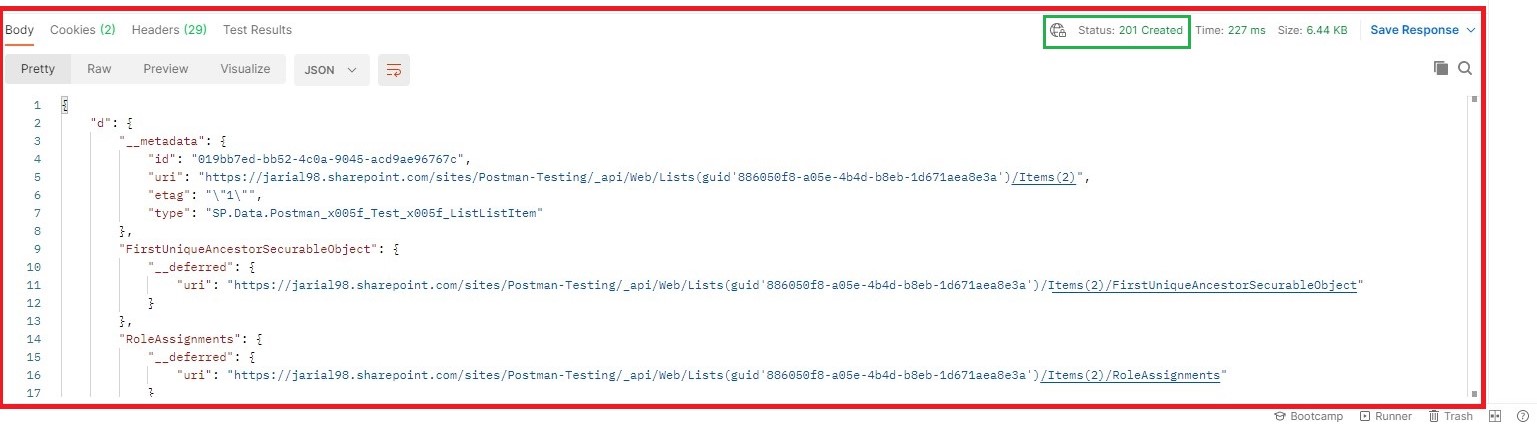
 5.  We will get a response, with the Status number “201”.

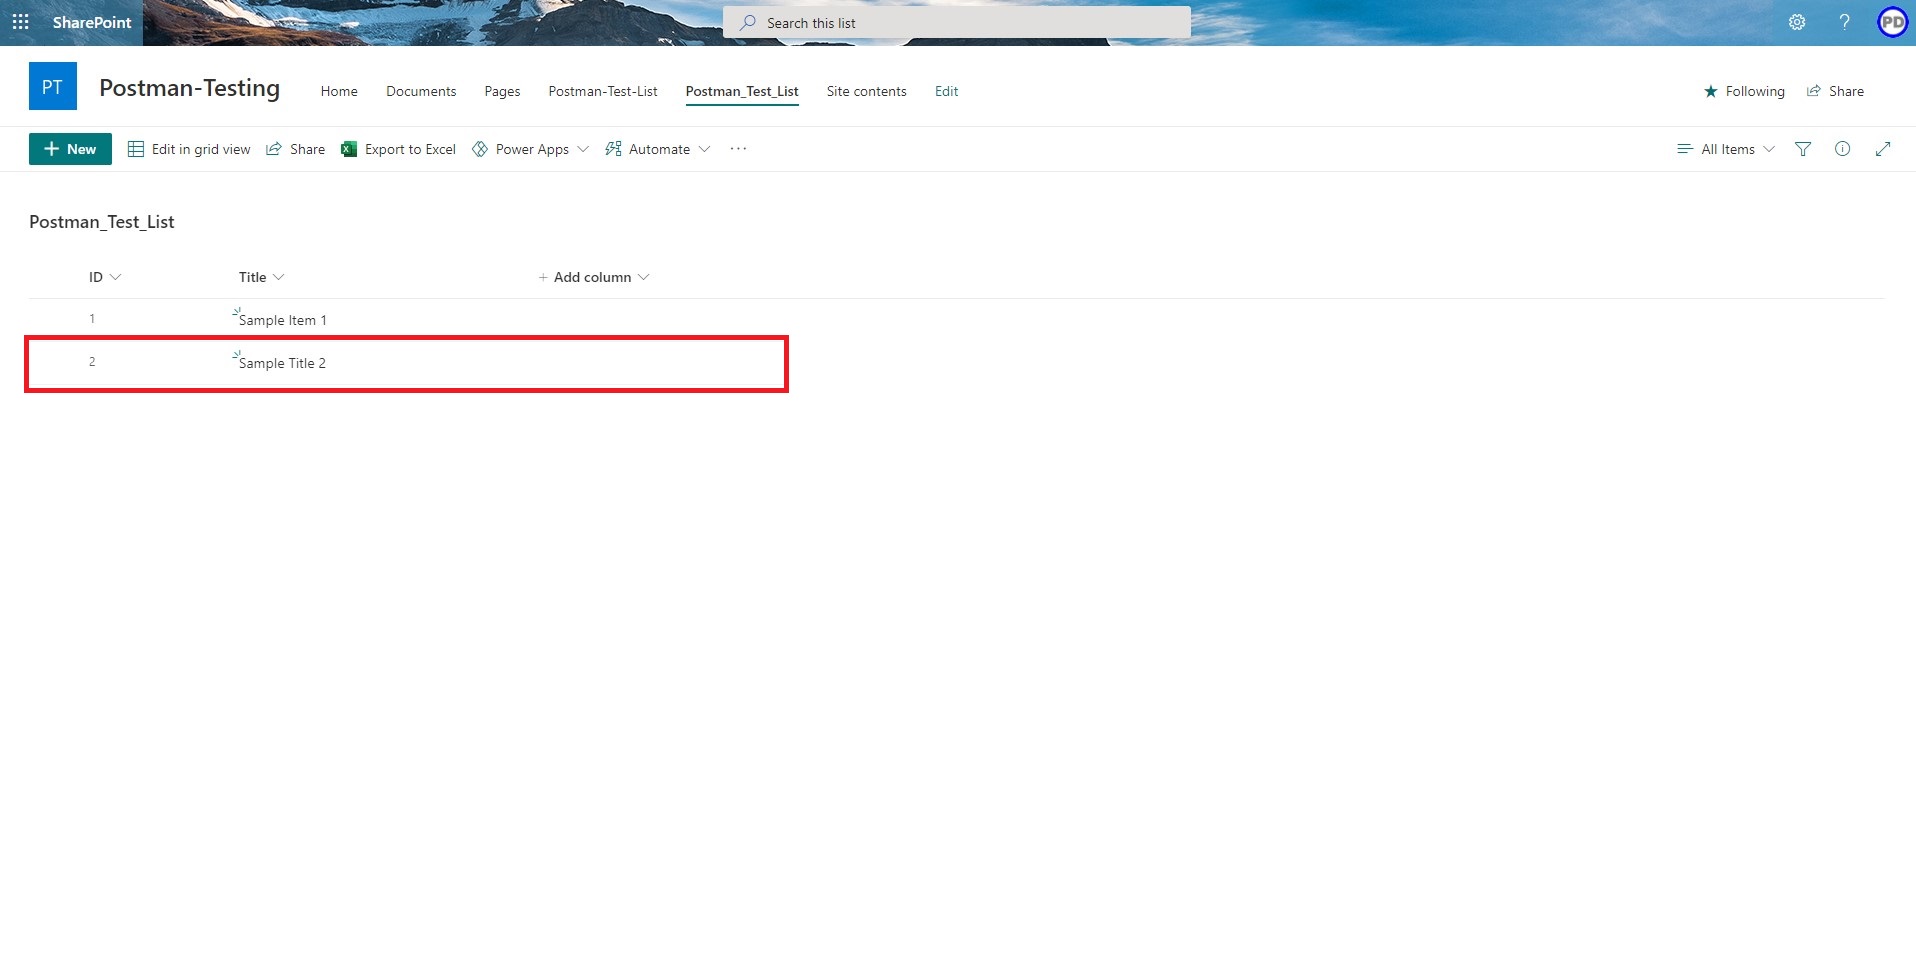
 6.  To Confirm whether the item has created or not, we will go back and check our list.

Update an Item in SharePoint List

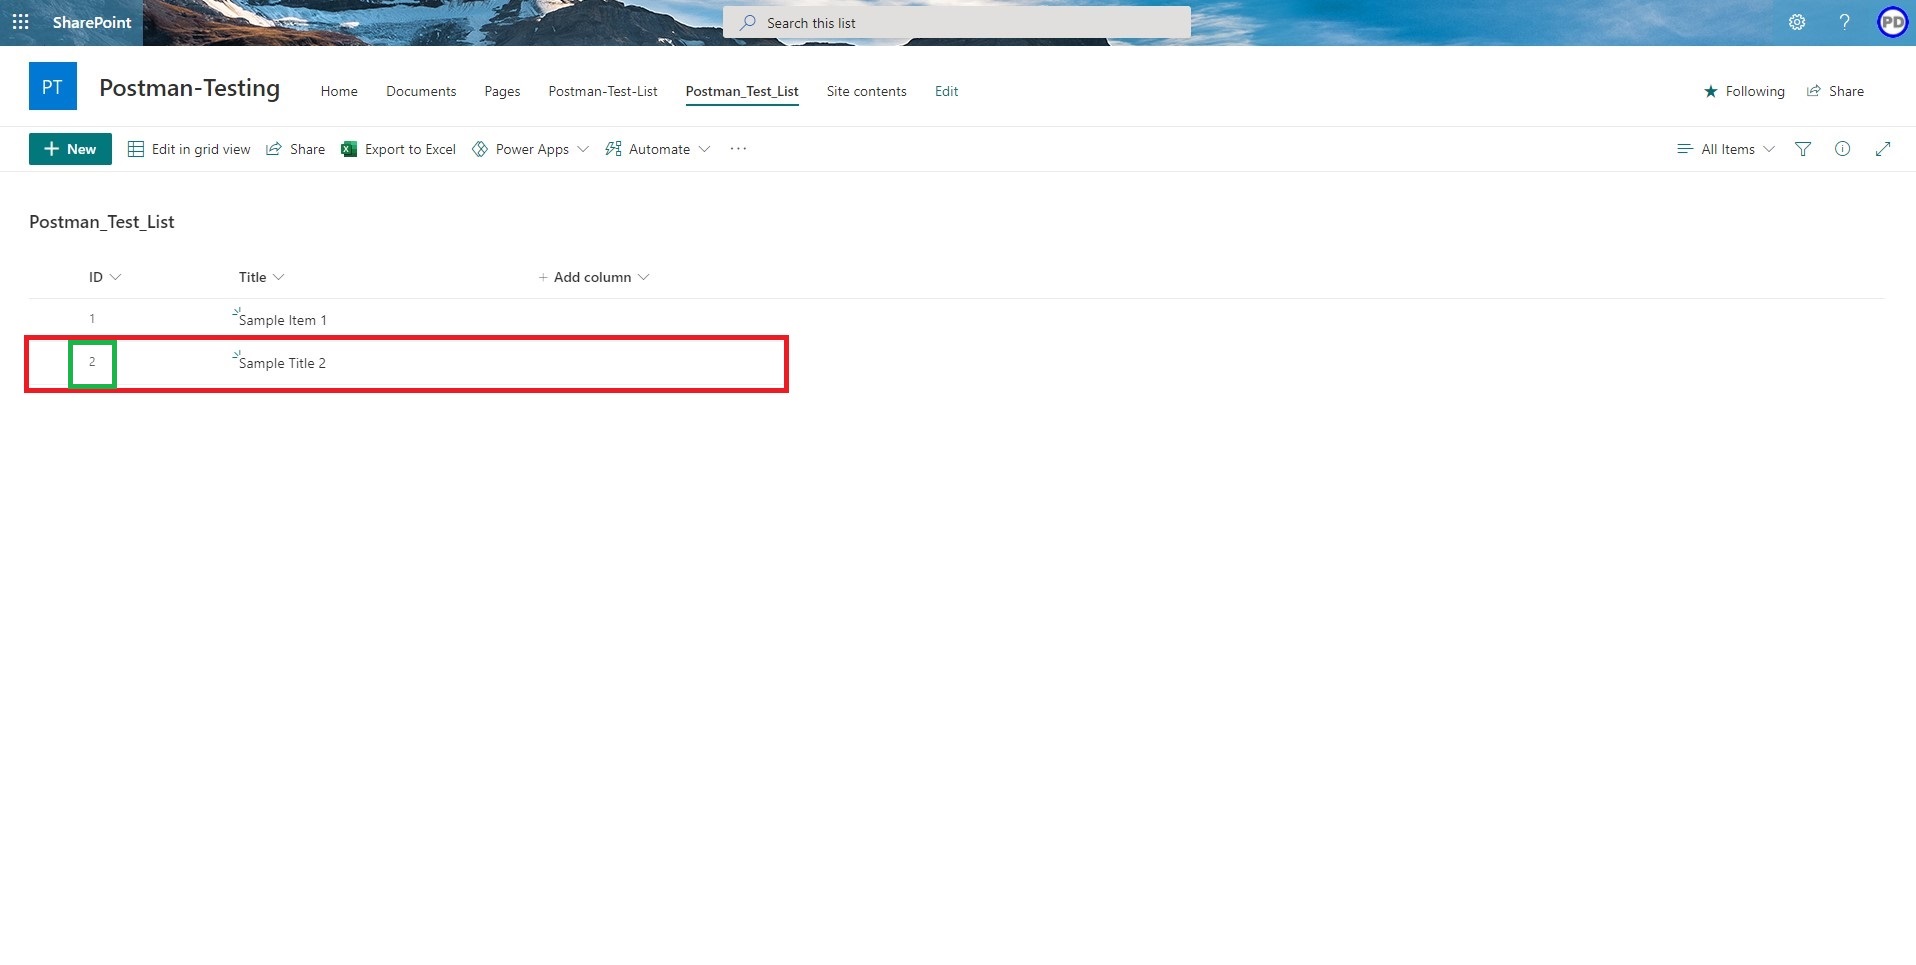
We will update a particular item in our SharePoint list. To get that item, we need to get its ID. So, we will navigate back to our SharePoint List and grab the ID of the item to be updated. In our case we are going to update the item with “ID” 2.

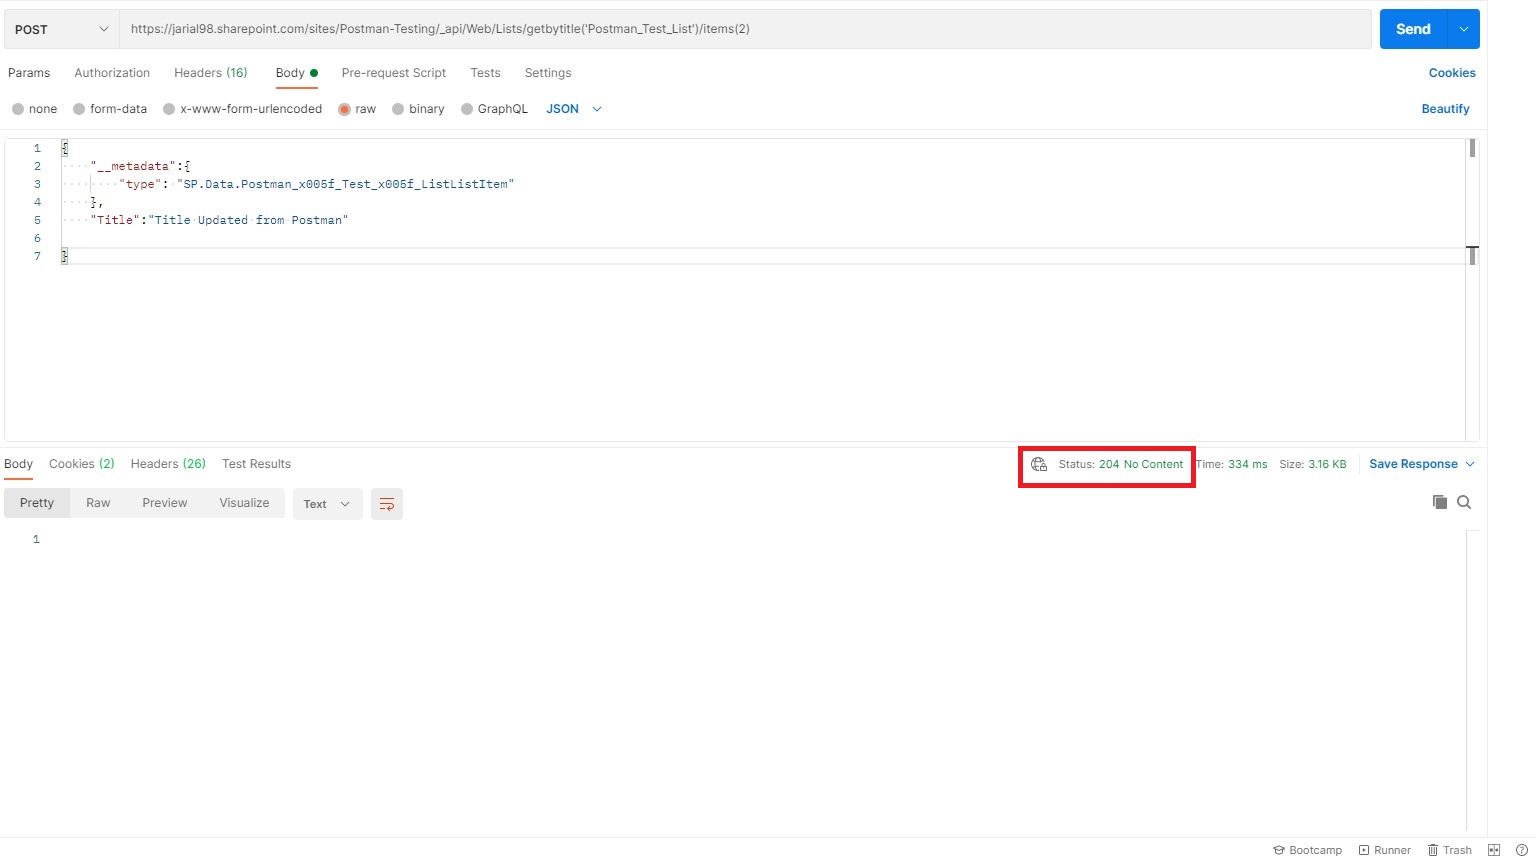
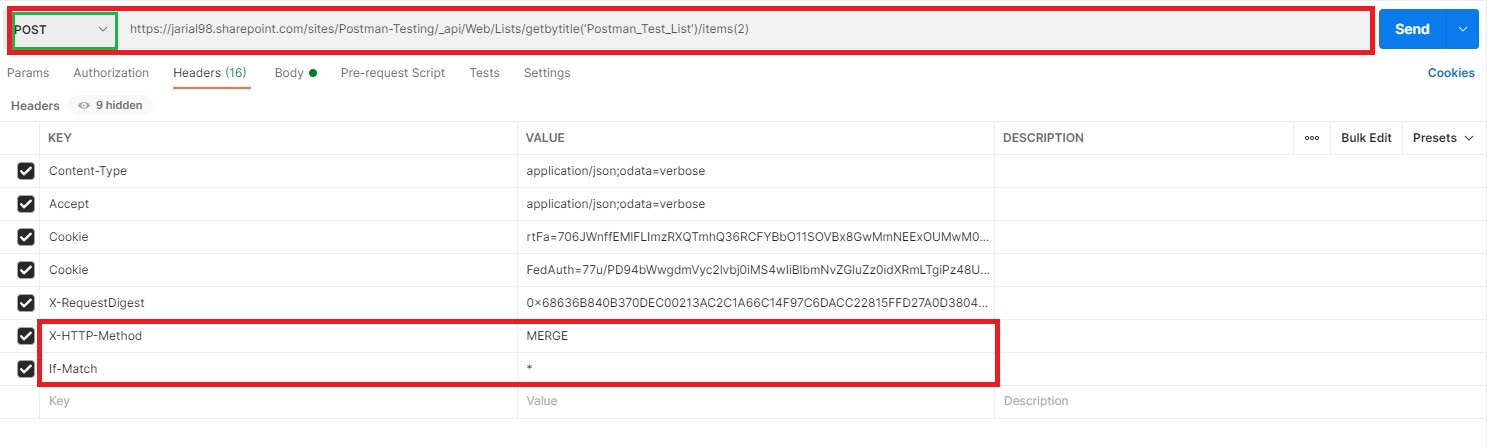
Update request is identical to Create request. There are only two new Headers that will be included, and the body of the request will be same as create item’s body. This is a POST request.

There are two new headers, X-HTTP-Method and If-Match

X-HTTP-Method: This basically means what type of request it is. Why we are not using Patch and Delete is because in some networks at application layer these requests can be blocked but, POST and GET requests are rarely blocked. You can read more about X-Http-Requests from here.

If-Match: This basically matches the eTag value but here we are not giving the e-tag value we are giving “*”.

X-HTTP-Method

MERGE

If-Match

*

In our scenario above we have used the following request URL:

https://jarial98.sharepoint.com/sites/Postman-Testing/_api/Web/Lists/getbytitle('Postman_Test_List')/items(2)

In your scenario make sure to change the [Sharepoint_Site_Collection_Url], [List_Name] and [ID] in your URL as shown below:

https://[Sharepoint_Site_Collection_Url]/ _api/Web/Lists/getbytitle([List Name])/items(ID)

 1.  After entering all the data click on “Send” button.

We will get status of “204” because this was an update request, it did not send any data in response.

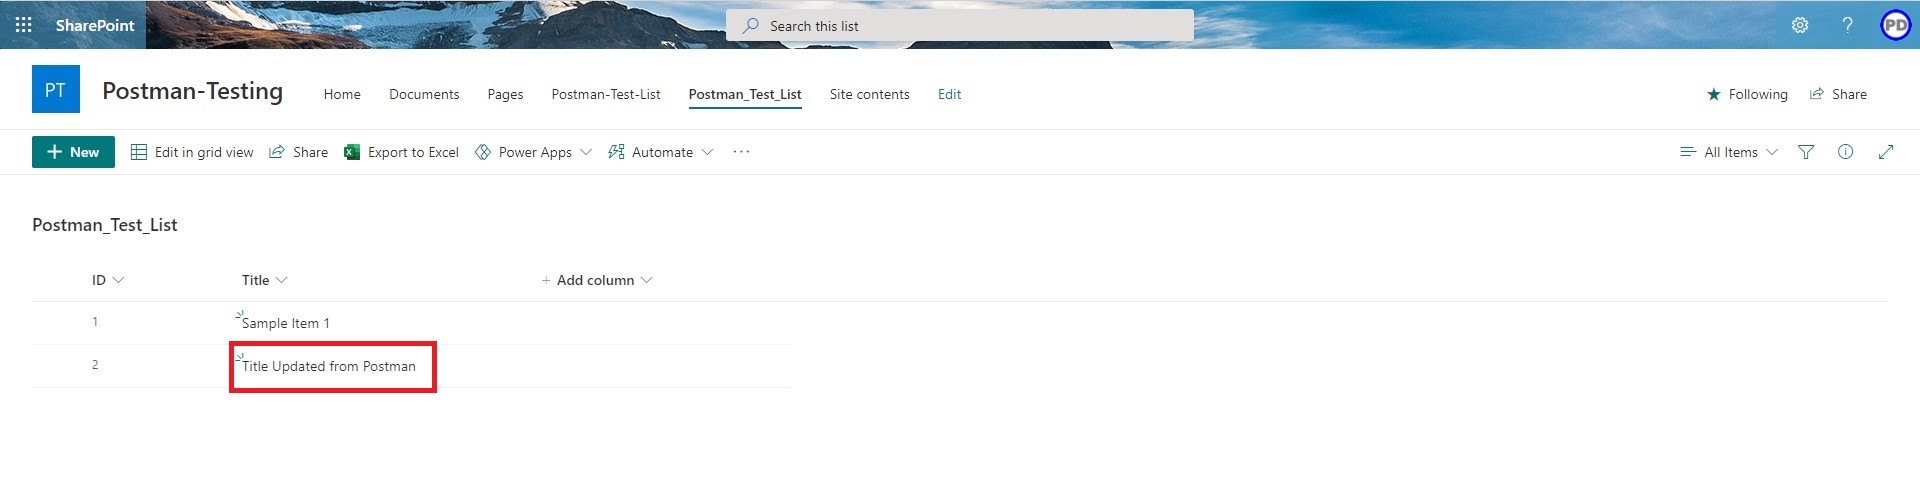
2.  We will go to the SharePoint List to verify the updated item.

Delete an Item from SharePoint List

We will delete a particular item in our SharePoint list. To get that item, we need to get its ID. So, we will navigate back to our SharePoint List and grab the ID of the item to be deleted. In our case we are going to delete the item with “ID” 2.

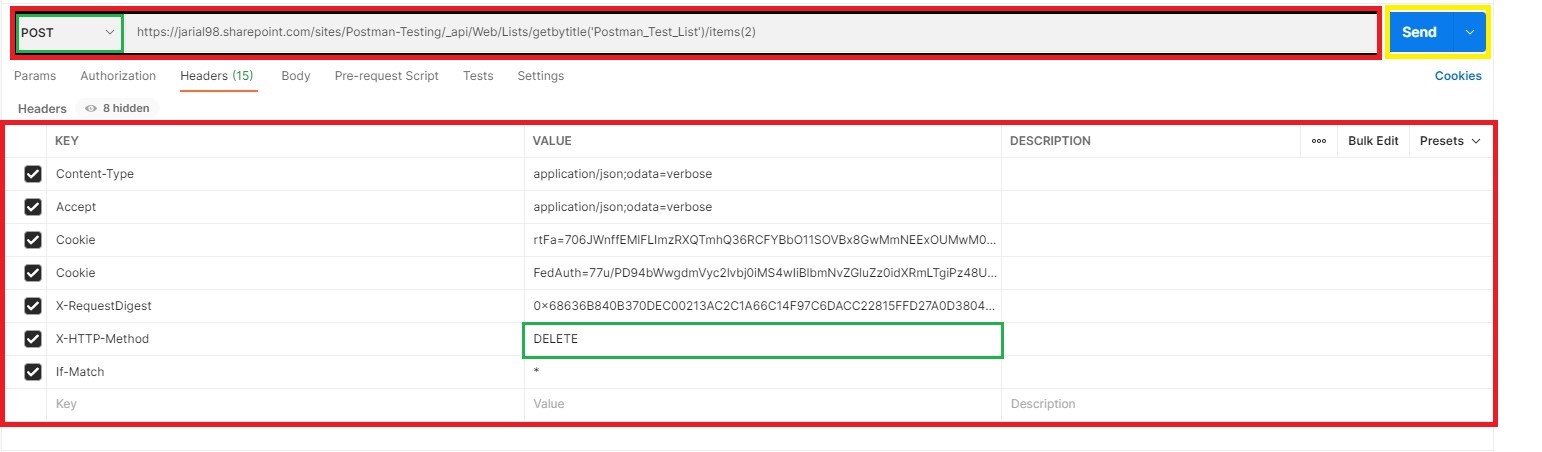
All the headers will be same as update request’s Headers. Only the value of “X-HTTP-Method” will be changed to “Delete”.

 1.  We will create a new tab and enter the URL same as update request. All the headers will be same. After Entering all the values click on “Send”. As this is a “Delete” request we do not need to send body.

Key

Value

X-HTTP-Method

DELETE

In our scenario above we have used the following request URL:

https://jarial98.sharepoint.com/sites/Postman-Testing/_api/Web/Lists/getbytitle('Postman_Test_List')/items(2)

In your scenario make sure to change the [Sharepoint_Site_Collection_Url], [List_Name] and [ID] in your URL as shown below:

https://[Sharepoint_Site_Collection_Url]/ _api/Web/Lists/getbytitle([List Name])/items(ID)

2.  After, clicking on “Send” button we will get response with status code of “200”, stating that our request was successful.

3.  Now, we will check whether our API call deleted the specified item in SharePoint list.

Sample Item 2 is deleted, because the ID given in the URL was “2”.

Conclusion

Here we have accomplished the task of doing API requests to Sharepoint List using Postman. We got the cookies from our browser and used them to authenticate our API requests. We did not used Azure Application account setup here, which eliminated the requirement of user having admin level permissions in SharePoint list. This process can be used by developers where they need to test an API request in a time saving manner. You cannot automate any of these processes because cookies have an expiration time.

Written By-  Ankur Jarial

(Microsoft 365 Developer)

Written By-  Ankur Jarial

(Software Developer Trainee)

Jasjit

Peer Reviewed By-  Jasjit Chopra

(CEO)

Peer Reviewed By-  Jasjit Chopra

(CEO)

Sanika

Graphics Designed By- Sanika Sanaye

(Creative Design Director)

Graphics Designed By- Sanika Sanaye

(Creative Graphic Designer Trainee)
The Importance of Happiness at work

Introduction

Are you still living in the era where you think that solely paying incentives and bonuses will keep your employees happy at work? If yes, read this post further to understand the importance of happiness and what drives individuals beyond financial gains to keep them happy.

Employee happiness creates a positive atmosphere and this inevitably encourages them to improve their personal well-being. Highly engaged employees bring positive energy to the workplace as well as in his/her local community and social circle.

The Importance of employee happiness

The link between employee happiness and productivity is not new, employee happiness counts for a lot. Being happy is not just feeling happy at the workplace, it is about feeling happy in what you do. It is obvious that how we feel at work affects other areas of our lives. If it makes us happy it can create a positive impact on our surroundings as well.

Effects of being happy at work

Happiness provides satisfaction in the workplace. When employees are happy it gives them a sense of satisfaction and belongingness. They also love doing their daily tasks and put their best effort into their work without it being a burden. As such there are numerous effects of being happy at work, we have listed some of them below:

What generates happiness

Making employees happy is not rocket science. Study after study has shown that happy employees are a direct correlation with the success of an organization. Below are some examples which help an organization to generate happiness:

Providing Wellness Programs and Challenges

The importance of wellness programs should be focused on bringing positivity and a healthy lifestyle for all employees. With the help of the right education, motivation, skills/tools, and a bit of support, every organization can implement a meaningful wellness program. At Penthara Technologies we are providing a basic health insurance program along with preventive healthcare services from our healthcare partner ekincare. Some of the benefits include yearly health checkups, unlimited doctor consultation, and access to a one-on-one personalized stress therapy program. Our healthcare partner also enables us to implement preventive healthcare maintenance for all our employees. It also helps in providing a platform where we can run various challenges, such as pushup challenge, Healthy meal challenge, Steps challenge, and many more.

Mental Health

Mental Health at work matters, no matter where you are. When you are facing mental health issues, your overall health gets affected. People are often reluctant to discuss mental health problems, especially at work. Eliminating mental health issues such as depression and anxiety would increase employee happiness. Organizations can deal with mental health issues by building a culture that prioritizes psychological well-being, it will help employees who are struggling to feel safe, and it also encourages them to improve their mental health. One of the ways you can evaluate the mental health of your employees is by sending small surveys and getting their feedback on how they are feeling regularly. At Penthara Technologies, we have implemented a small application that collects various mood levels for every employee at the end of the week. We ask for a score from 1 to 5 for feelings such as happiness, sadness, gratitude, frustration etc. This way we maintain a log of these scores by week for all our employees and can calculate an overall happiness score for our company.

Inclusive and Fair Policy

Employees who get fair treatment in their workplace trust their employers and enjoy their work with more dedication. When employees feel that they are treated fairly, the relationship becomes strong, trust increases, and they enjoy their work. At Penthara Technologies, we have spent a great amount of time and emphasized creating a highly inclusive culture and developed fair and flexible policies for our employee-centric approach.

Candid Feedback

Candid feedback is crucial for the entire organization to remain aligned with the organizational goals and improve relationships with the employees. Candid feedback helps in adjusting and improving current and future actions & behavior. This is one of the best ways to elevate employee morale and create a more positive and happier work environment. If employees feel free to share what they think about the organization, management, and other employees, they are more likely to be happy and engaged with an organization.

Approachable Culture

Being approachable is the foundation of building a good relationship with employees. We believe in the approachable culture at Penthara Technologies, where we break down barriers between employer and employee so that we can create an environment of trust. We do not have a culture of any hierarchy in our management.

Being Valued  

 Apart from salary and perks, the most important aspect of job satisfaction is to be valued at work. It helps in creating strong workplace culture. When employees are doing good in an organization, it is important to acknowledge their work impartially to make sure their efforts are celebrated appropriately. One can implement recognition programs that can help in implementing a culture that knows how to value their employees appropriately.

Work-Life Balance

Work-Life Balance is beneficial for employees as well as for the organization. If there is a good balance between work and personal life, it leads to improved mental health. A healthy work-life balance is not only important for health and relationships, but it can also improve employee’s productivity, and ultimately performance. We expect our employees to be as productive as possible and give their best during the 8 hours that they commit every day to our company.  Beyond those 8 hours, they should practice disconnecting completely from their work and enjoy time for other commitments.

Employee engagement

It is of utmost importance to engage employees in an organization to achieve job satisfaction. This always helps in better communication and team building. Engaged employees are happier, both at work and in their personal lives. We conduct weekly fun activities so that we can have some time off from work and relax. This also helps in building better relationships and bonds among our employees.

Summary

For this article, we will leave you with some inspiring quotes related to happiness. We hope that every organization can think and implement measures for their employee’s happiness.

"There is only one happiness in this life, to love and be loved." — George Sand

"Happiness lies in the joy of achievement and the thrill of creative effort." — Franklin D. Roosevelt

"Be kind whenever possible. It is always possible." — The Dalai Lama

"Spread love everywhere you go. Let no one ever come to you without leaving happier." — Mother Theresa

"Resolve to keep happy, and your joy and you shall form an invincible host against difficulties." — Helen Keller

NidhiPandey

Written By-  Nidhi Pandey

(Chief Happiness Officer)

Written By-  Nidhi Pandey

(Chief Happiness Officer)

Jasjit

Peer Reviewed By-  Jasjit Chopra

(CEO)

Peer Reviewed By-  Jasjit Chopra

(CEO)

Sanika

Graphics Designed By- Sanika Sanaye

(Creative Design Director)

Graphics Designed By- Sanika Sanaye

(Creative Graphic Designer Trainee)
Generating detailed Microsoft 365 migration report for individual users in a batch via PowerShell

Introduction

When performing mailbox migrations, it is utmost important that you stay on top of the progress. However, given the current user interface (UI), it is next to impossible to identify the most current status of mailbox migration. As a result, you find it difficult to report exact status to the concerned teams.

Using this PowerShell script, we can export migration status summary of not only the mailbox for which the migration is complete but also for the mailbox that is still being migrated. Best part of this is that the script runs in the background and saves a separate migration report for each mailbox. This can also be used for auditing purpose post migration, if needed.

Note: Below listed process will only work if the migration batches (containing the email IDs of the users that have been added to the CSV File) exist in the Exchange Admin Center (EAC). It will not work if you have deleted the batches.

Pre-Requisites

Exchange Online (EXO) Service Admin Access

How to get Exchange Online Service Admin Access?

The user will have to log out and log back in again so that the role change becomes effective.

Exchange Online PowerShell Module V1 (EXO V1) or Exchange Online PowerShell Module V2 (EXO V2) installed on the machine being used

Exchange Online PowerShell Module v1 (EXO V1) does not support Multi-Factor Authentication (MFA). So, if the account that you are using for performing the action has MFA enabled, consider using Exchange Online PowerShell Module v2 (EXO V2).

How to check which Exchange Online PowerShell version is installed? 

At the time of writing this content, latest version of EXO V2 module was 2.0.4. You can refer to the Release Notes section of this article to get the version of Current Release:About the Exchange Online PowerShell V2 module | Microsoft Docs

How to install

As stated above, only Exchange Online PowerShell version v.2 (EXO V2) requires installation, to install the EXO V2 module for the first time, complete the following steps

When you are finished, enter Y to accept the license agreement.

How to update

If the module is already installed on your computer, you can run the command we shared above to see the version that is currently installed and update it to the latest version using the below command:

How to uninstall

To uninstall the module, run one of the below command (in an elevated PowerShell window)

List of users in .csv format

Ensure the CSV file is in the same folder where you run this PowerShell script from

Below is the sample for CSV file:

Email Address

John.doe@contoso.com

Ricky.Ponting@contoso.com

Getting detailed migration report

Now that you have clarity on whether you are using EXOV1 or EXO V2 PowerShell Module, it should be easy for you to decide which path to follow.

EXO PowerShell V1 execution process

Before you run the script, please ensure you have met all the pre-requisites so that you get the desired outcome. After you confirm having met all the pre-requisites, copy and save the below script in your favourite script editor and save it as a GetMigrationReport.ps1 file ensuring that the script and the CSV File are saved in the same location.

Don’t forget to create a blank folder named Reports at the same location. This is where all the reports will be saved.

#Make sure the csv file is in the same folder where you run this PowerShell from

#Connect to Exchange Online PowerShell

Set-ExecutionPolicy RemoteSigned

$UserCredential = Get-Credential

$Session = New-PSSession -ConfigurationName Microsoft.Exchange -ConnectionUri https://outlook.office365.com/powershell-liveid/ -Credential $UserCredential -Authentication Basic -AllowRedirection

Import-PSSession $Session -DisableNameChecking -AllowClobber

#Change this to path of the csv file that contains EmailAddress of all User Mailboxes you want to get a report for

$List = import-csv ".MigrationReportUsers.csv"

#Loop through each row in csv

ForEach ($User in $List)

      {

            $UserID = $User.EmailAddress

            $mailbox = Get-MigrationUserStatistics -Identity $UserID -IncludeReport

            $mailbox.Report.Entries | FT -Property CreationTime,ServerName,Type,TypeInt,Flags,FlagsInt,Message -Wrap -AutoSize | Out-String -Width 50000 | Out-File .Reports"$UserID.txt" -Encoding UTF8

      }

Remove-PSSession

EXO PowerShell V2 execution process

Before you run the script, please ensure you have met all the pre-requisites so that you get the desired outcome. After you confirm having met all the pre-requisites, copy and save the below script in your favourite script editor and save it as a GetMigrationReport.ps1 file ensuring that the script and the CSV File are saved in the same location.

Don’t forget to create a blank folder named Reports at the same location. This is where all the reports will be saved.

#Import Exchange Online PowerShell Module

Import-Module ExchangeOnlineManagement

#Connect to Exchange Online PowerShell

Connect-ExchangeOnline -UserPrincipalName <UPN>

#<UPN> is your account in user principal name format

#Change this to path of the csv file that contains EmailAddress of all User Mailboxes you want to get a report for

$List = import-csv ".MigrationReportUsers.csv"

#Loop through each row in csv

ForEach ($User in $List)

      {

            $UserID = $User.EmailAddress

            $mailbox = Get-MigrationUserStatistics -Identity $UserID -IncludeReport

            $mailbox.Report.Entries | FT -Property CreationTime,ServerName,Type,TypeInt,Flags,FlagsInt,Message -Wrap -AutoSize | Out-String -Width 50000 | Out-File .Reports"$UserID.txt" -Encoding UTF8

      }

Remove-PSSession

Checking Migration Progress status

You can check migration status for a single mailbox using this command:

You can check migration status for a single batch using this command:

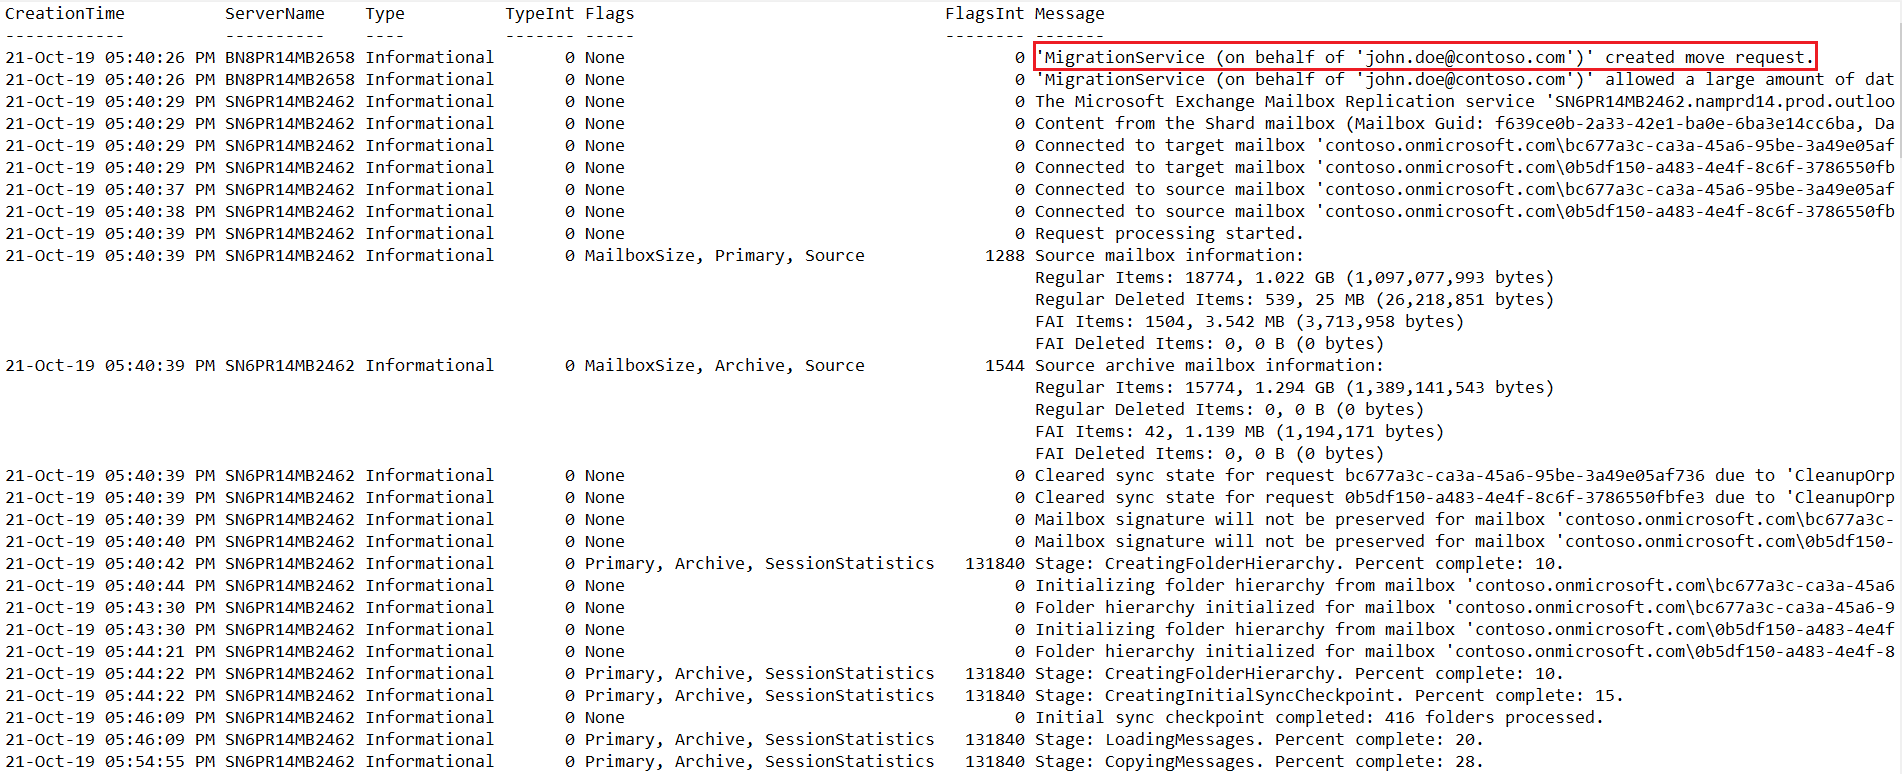
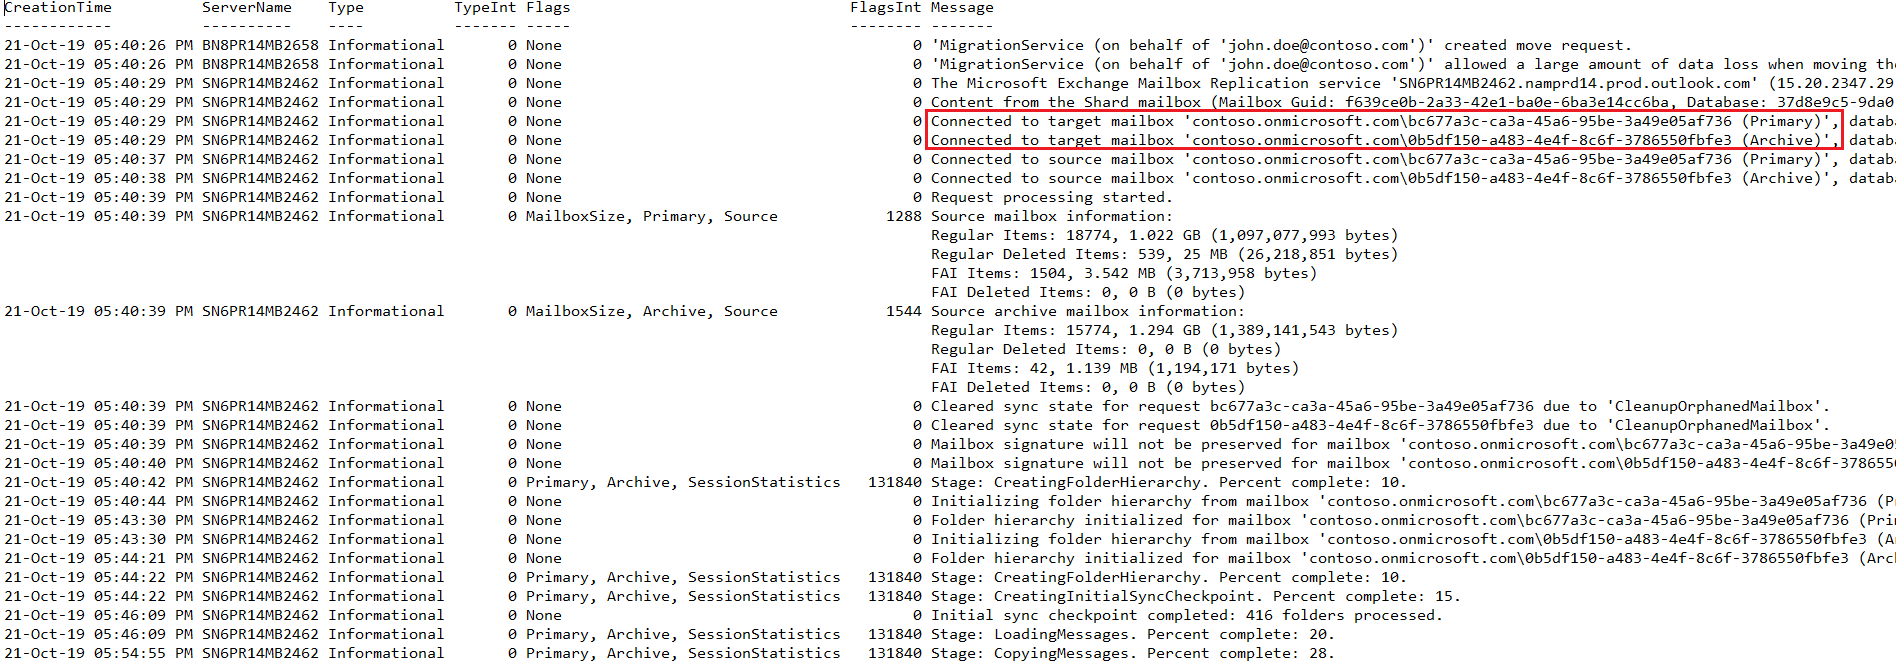
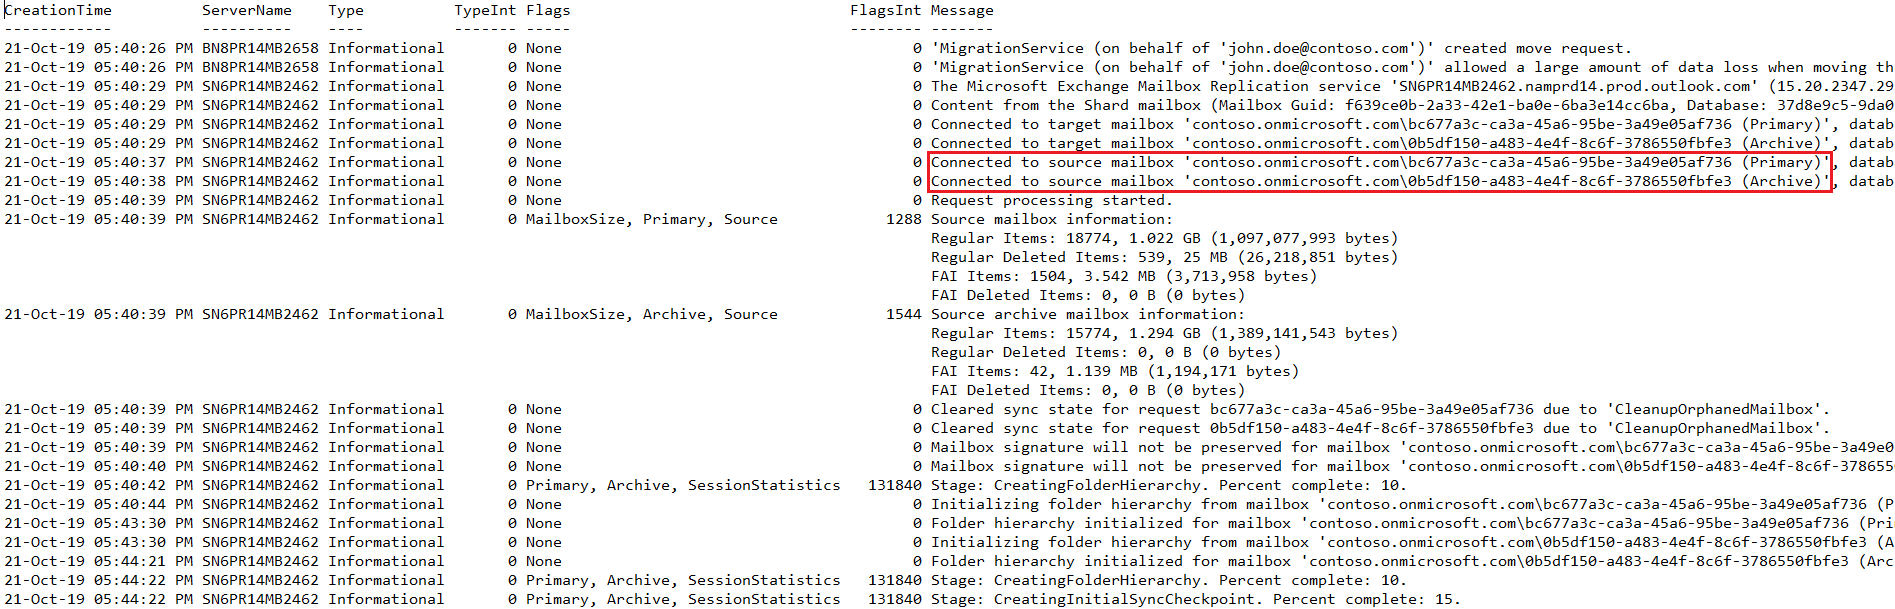
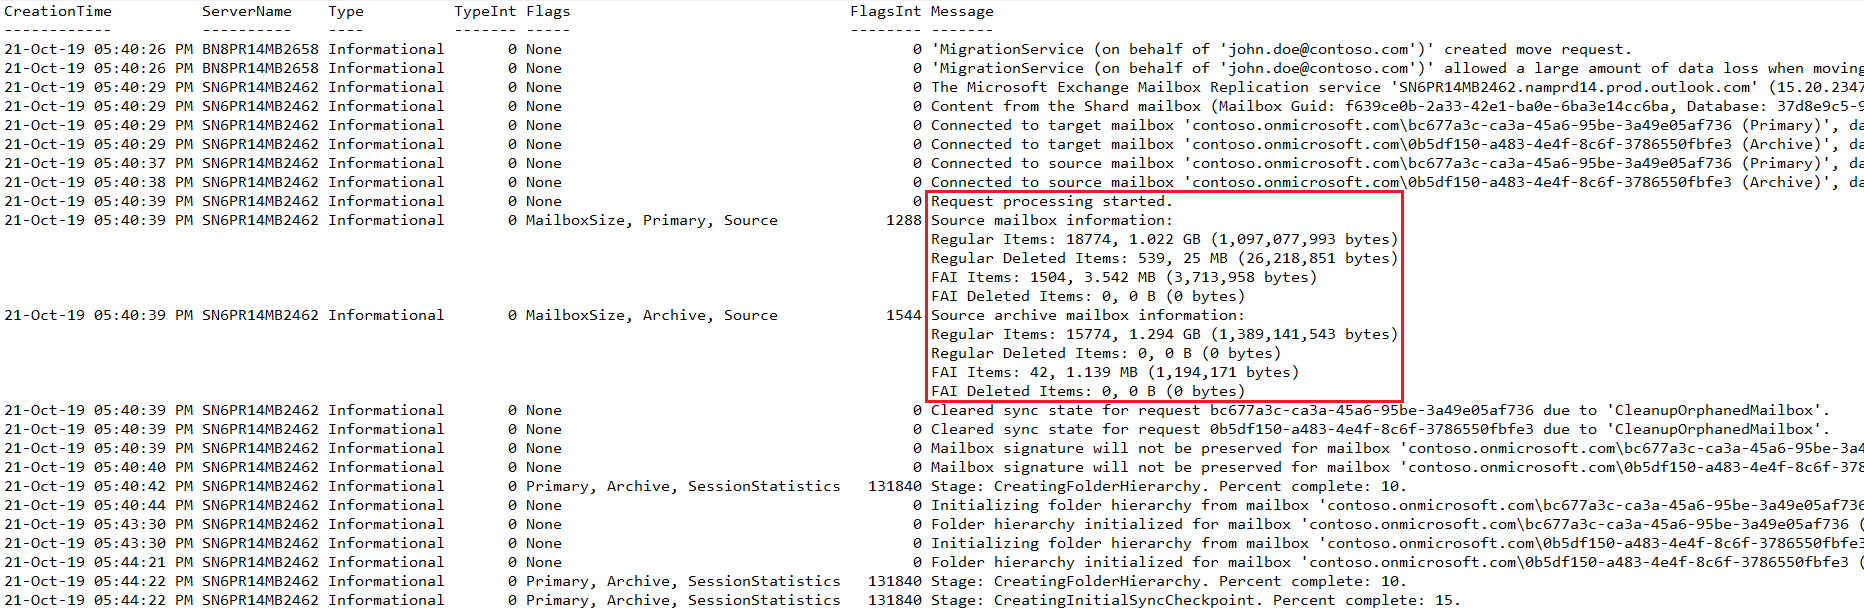
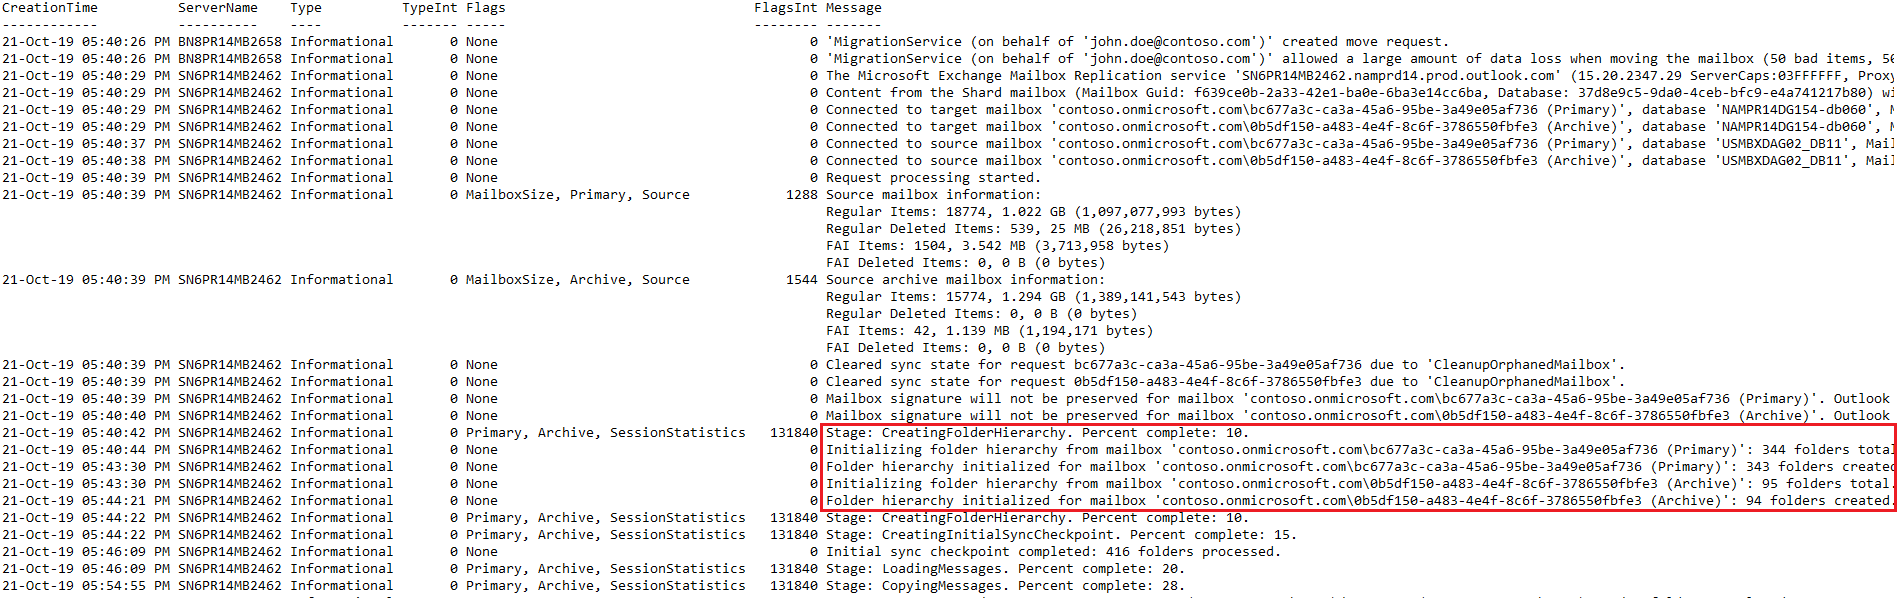
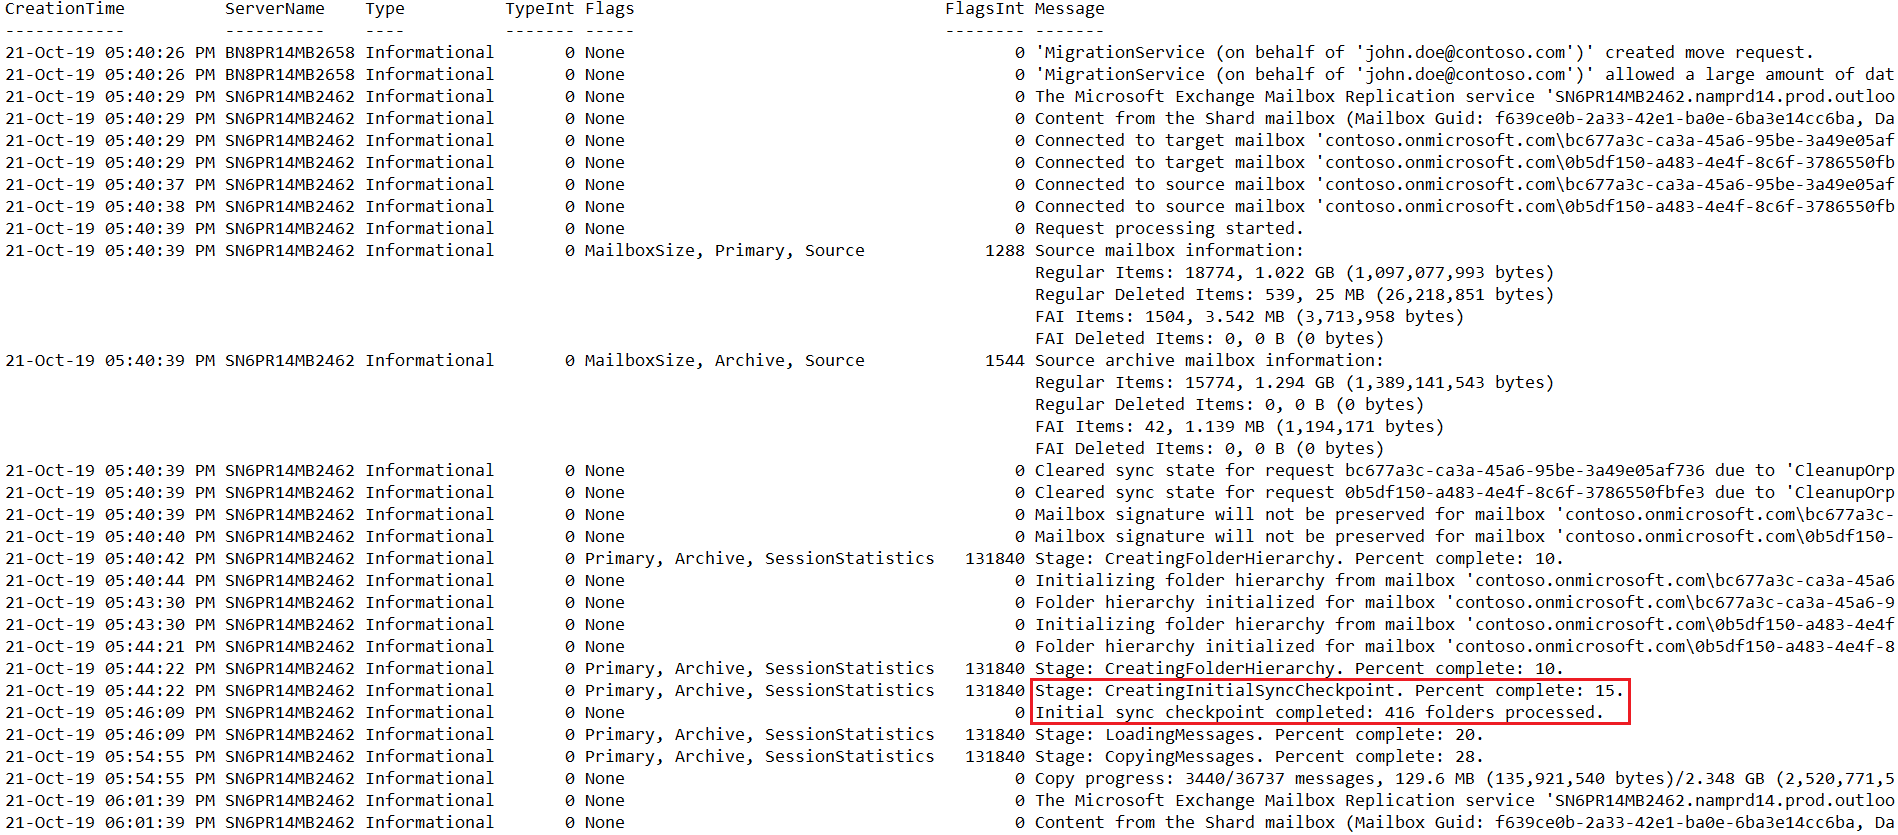
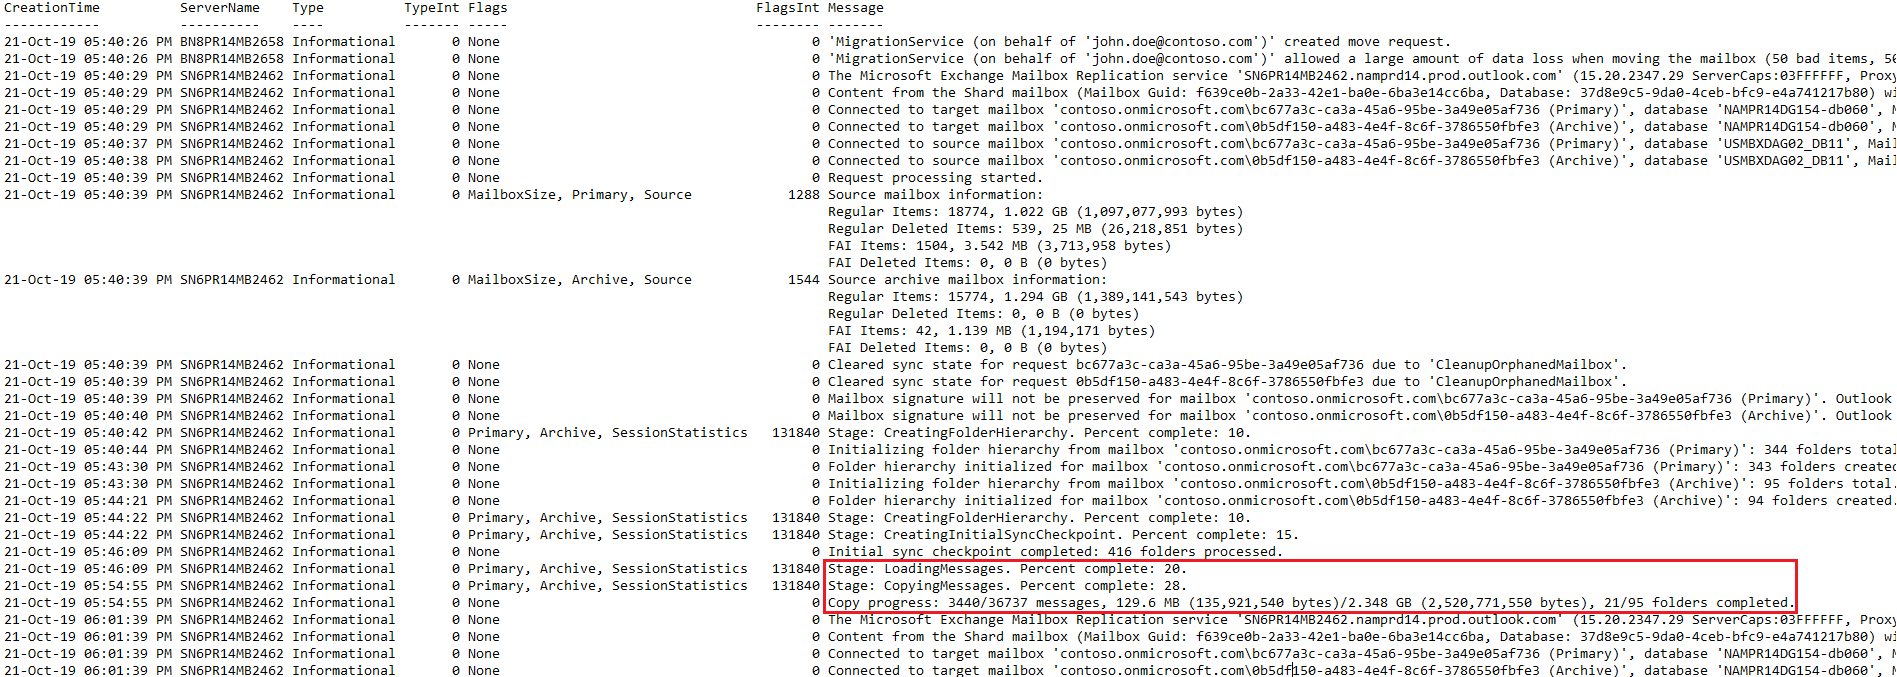
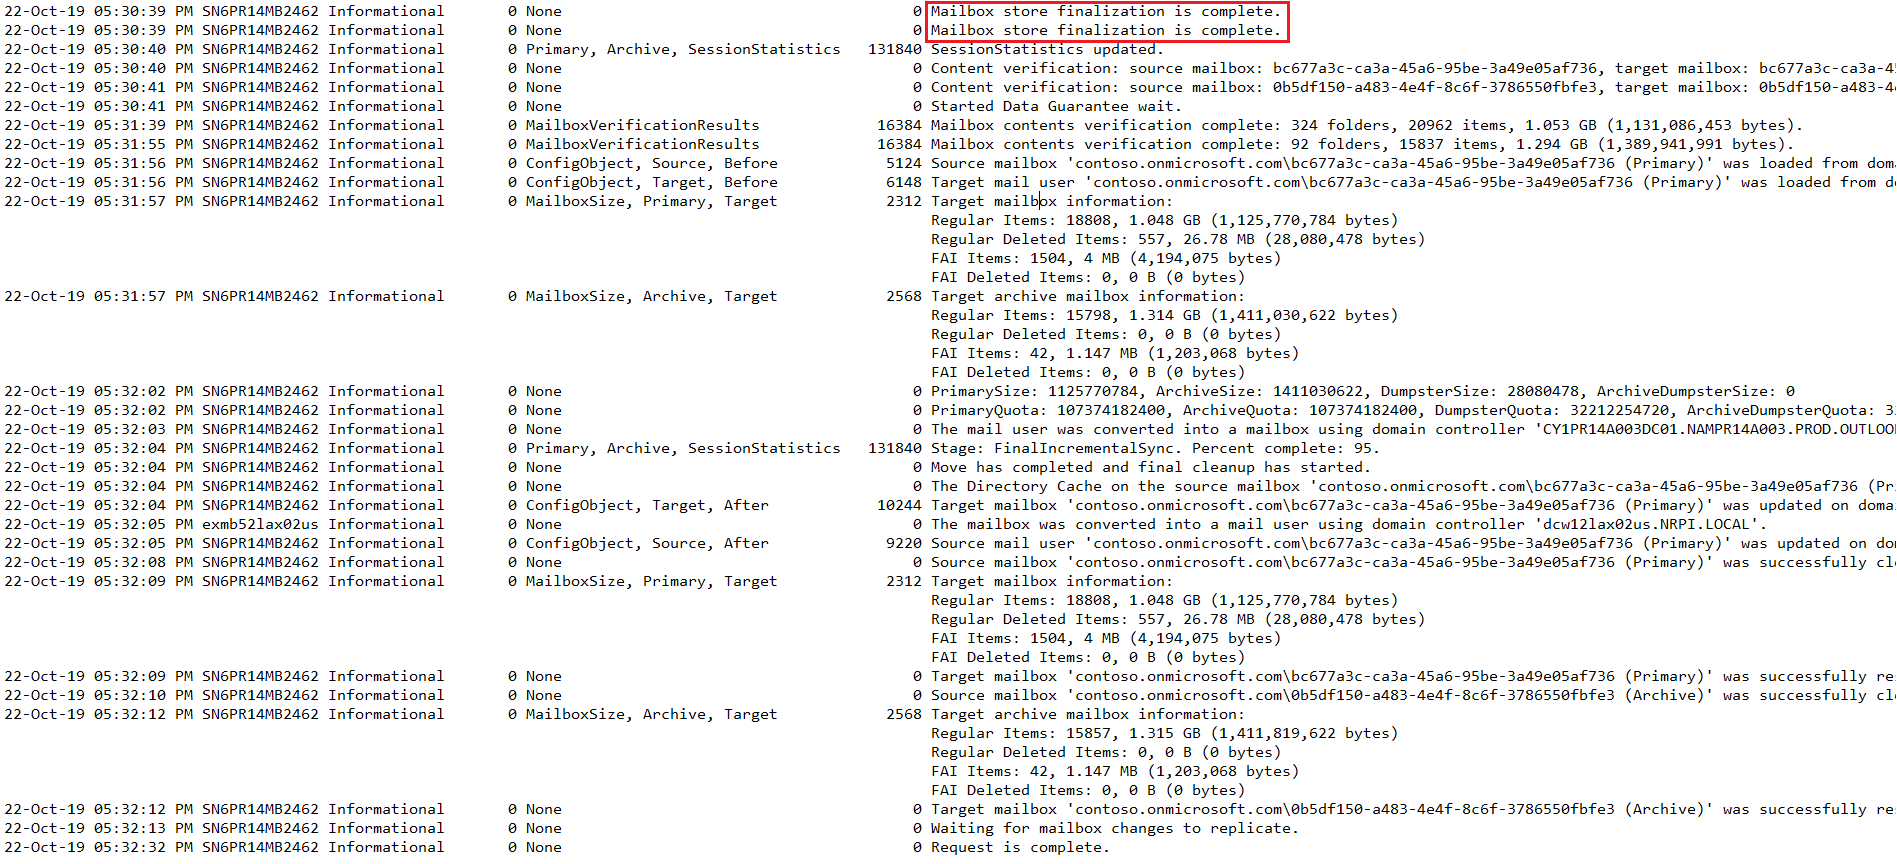
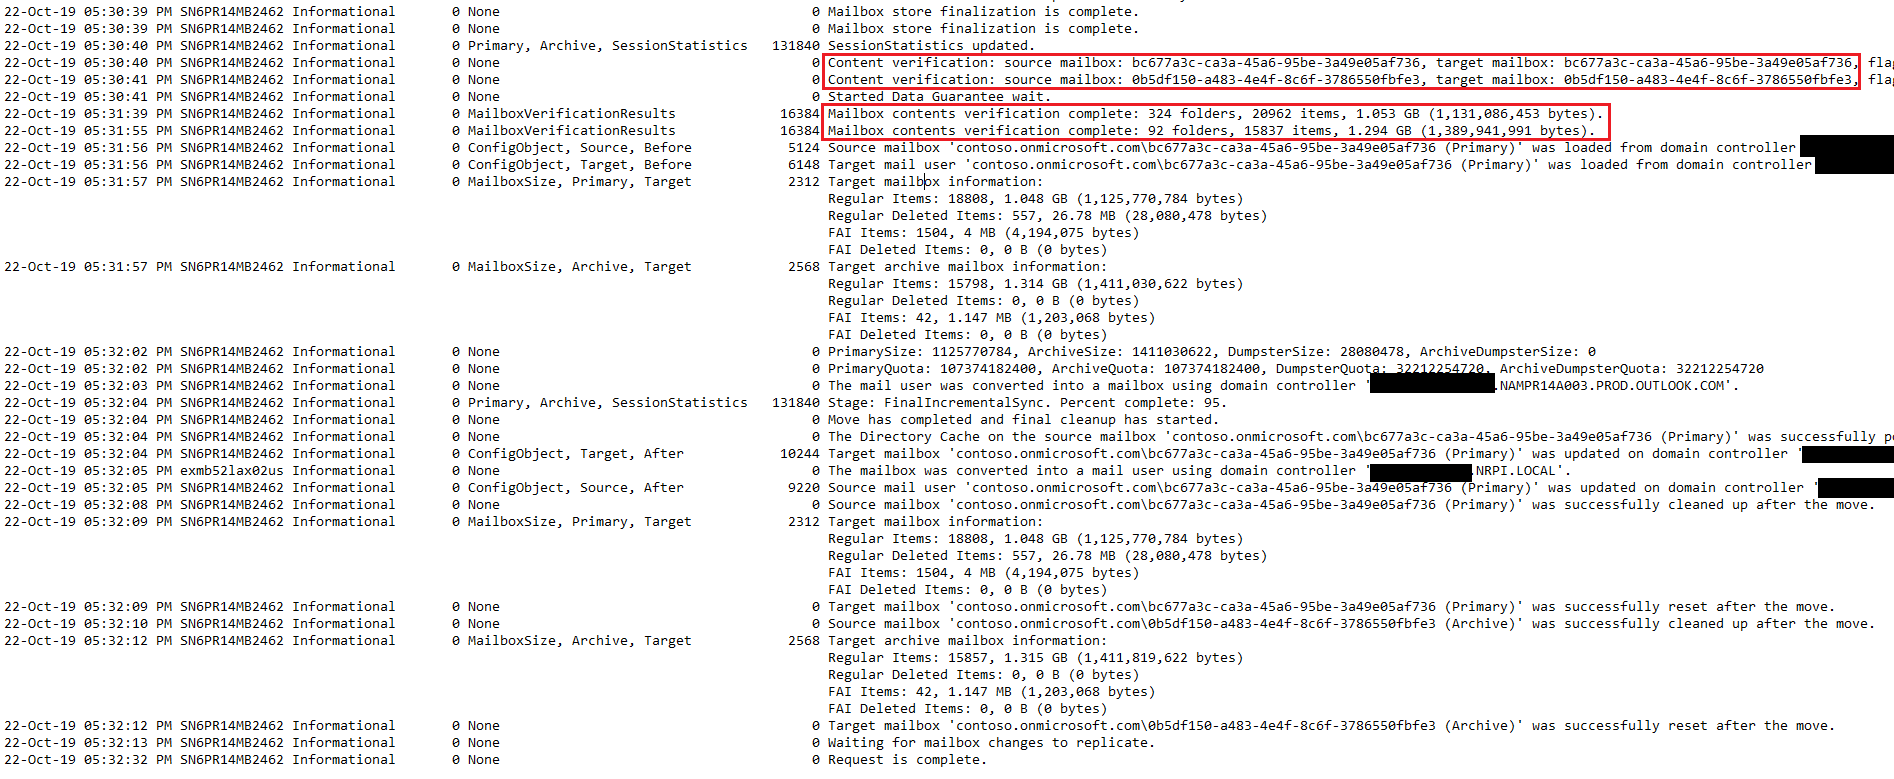
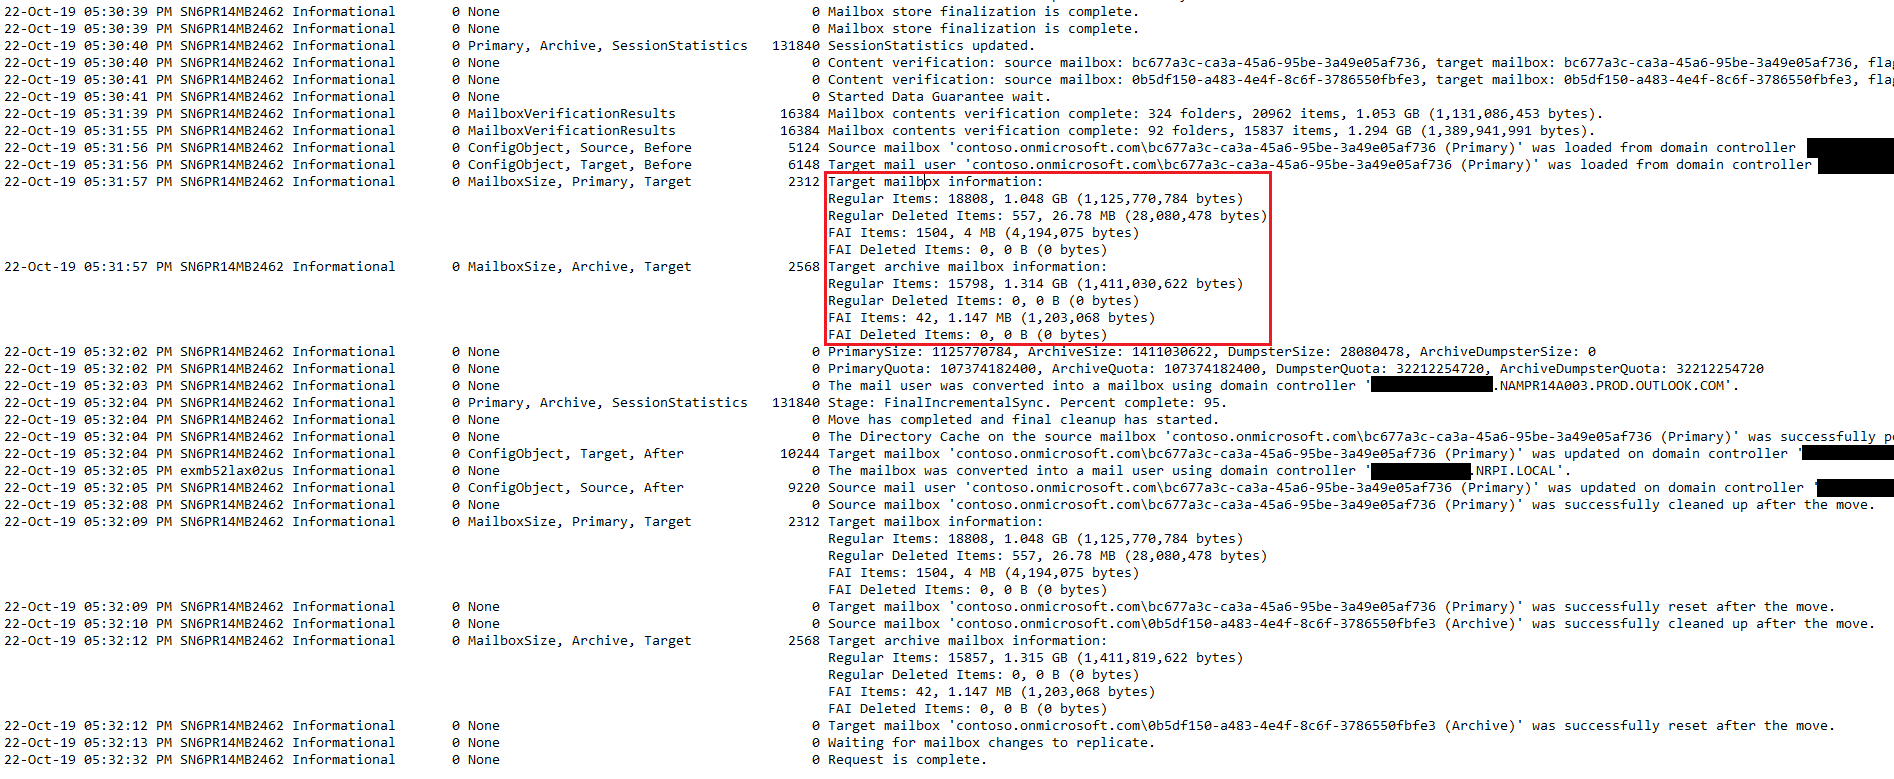
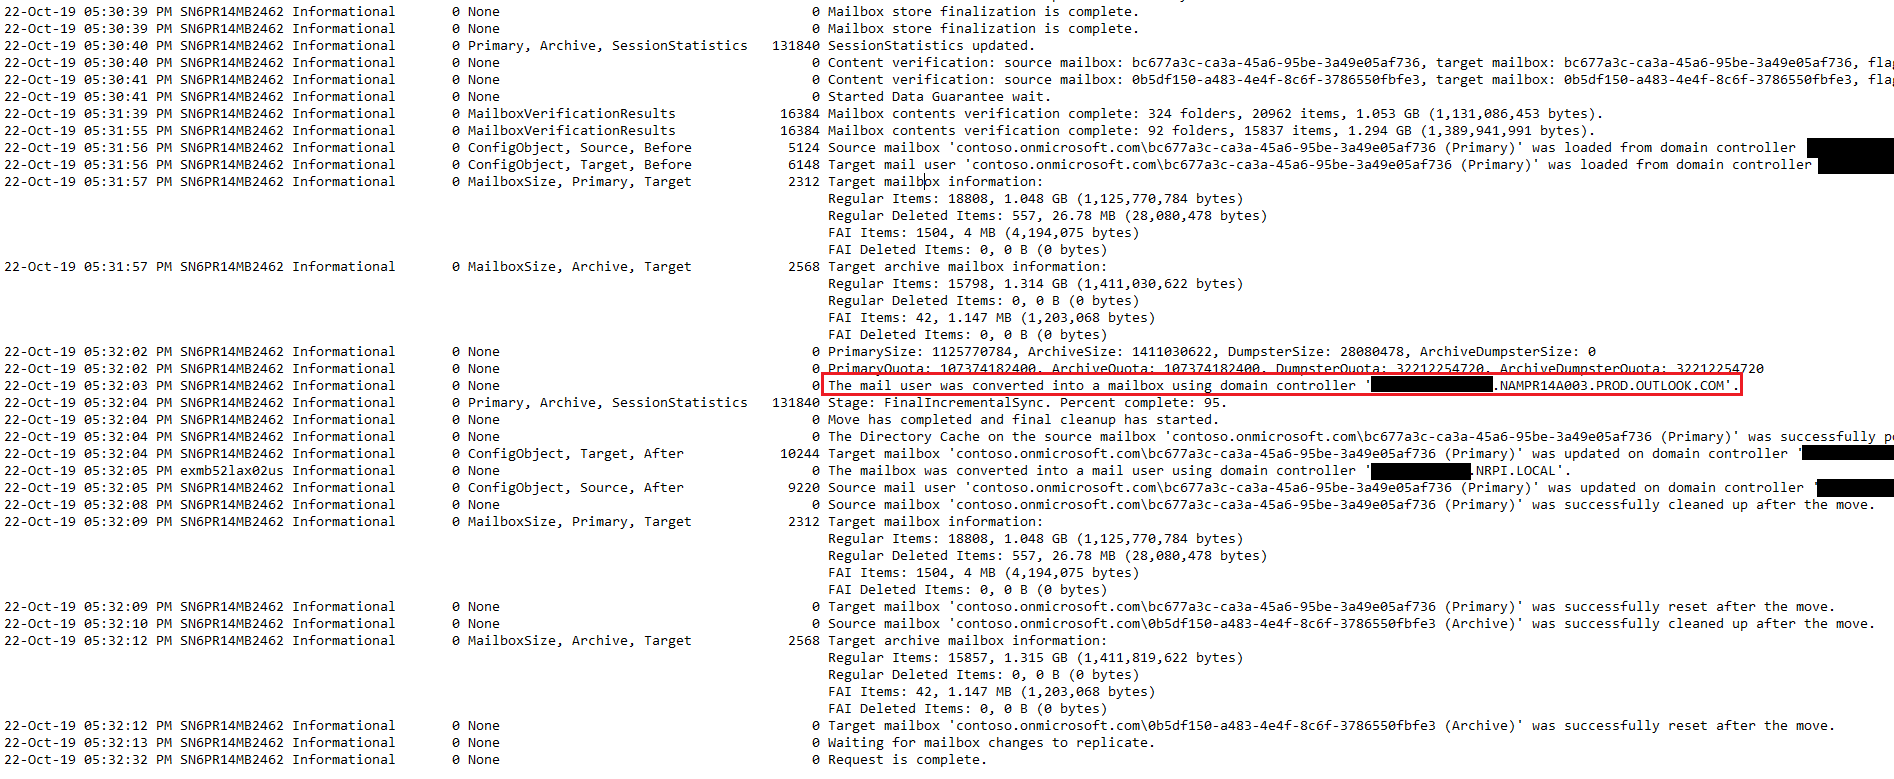
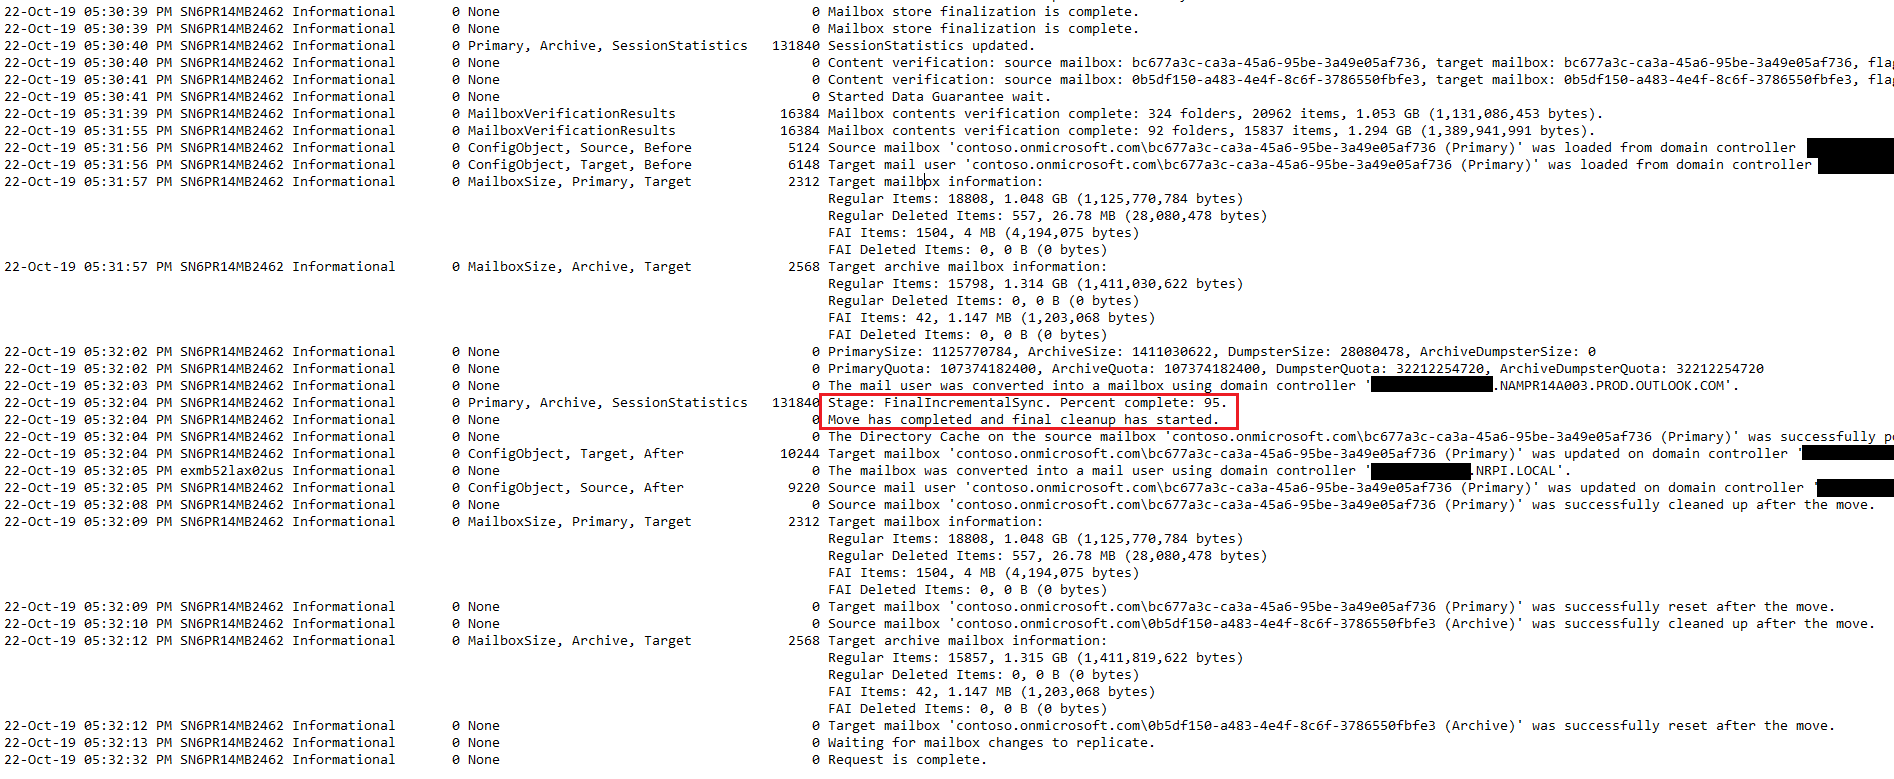
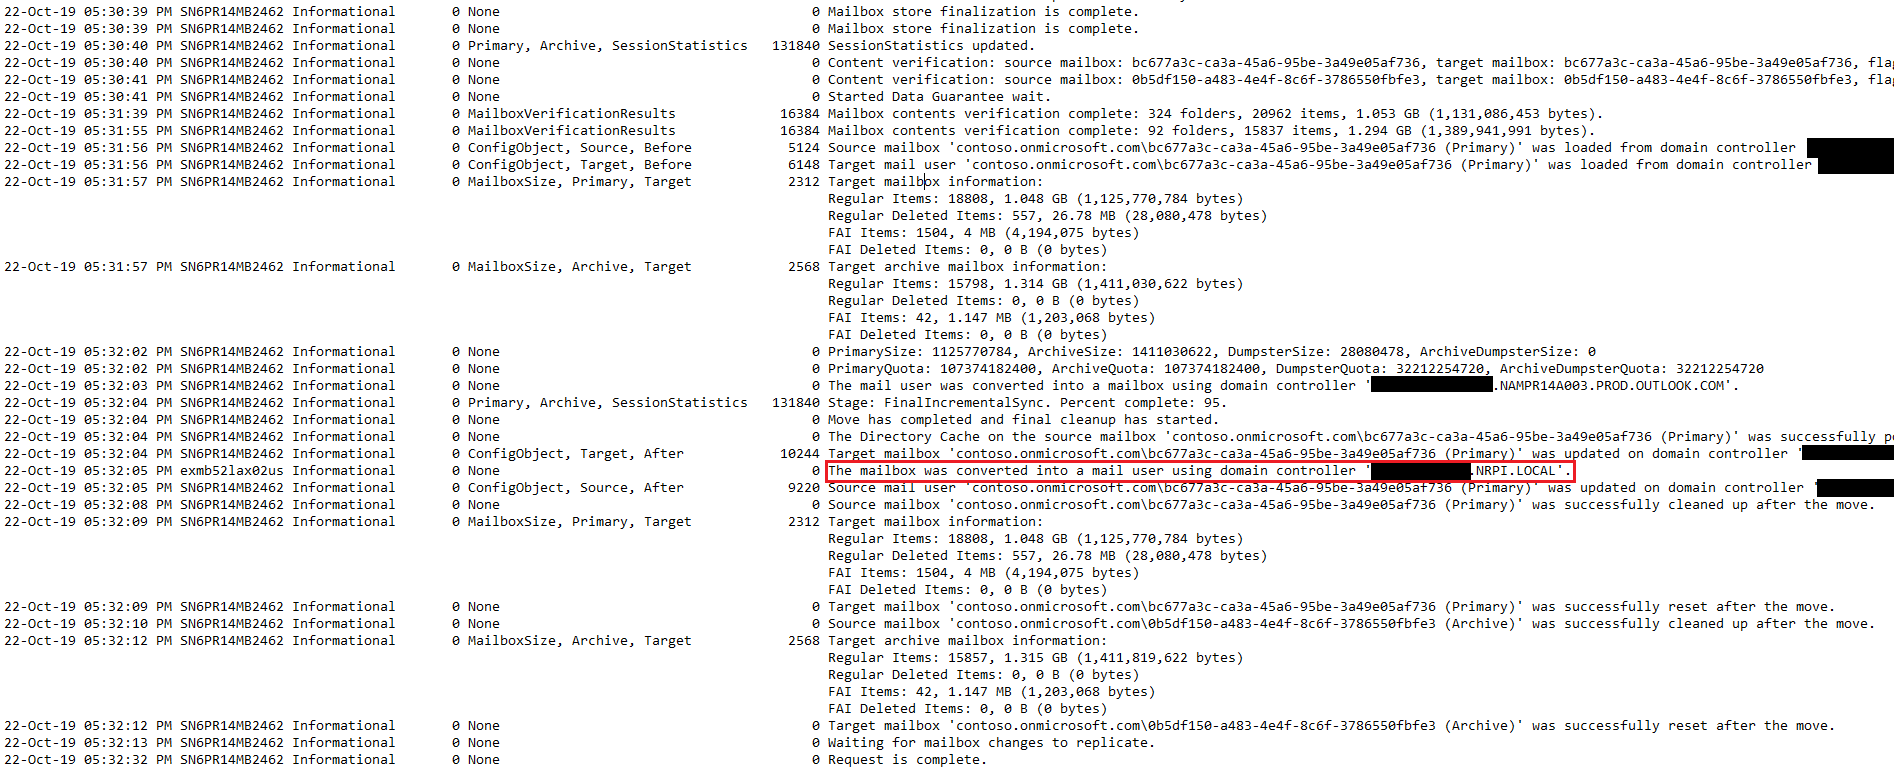
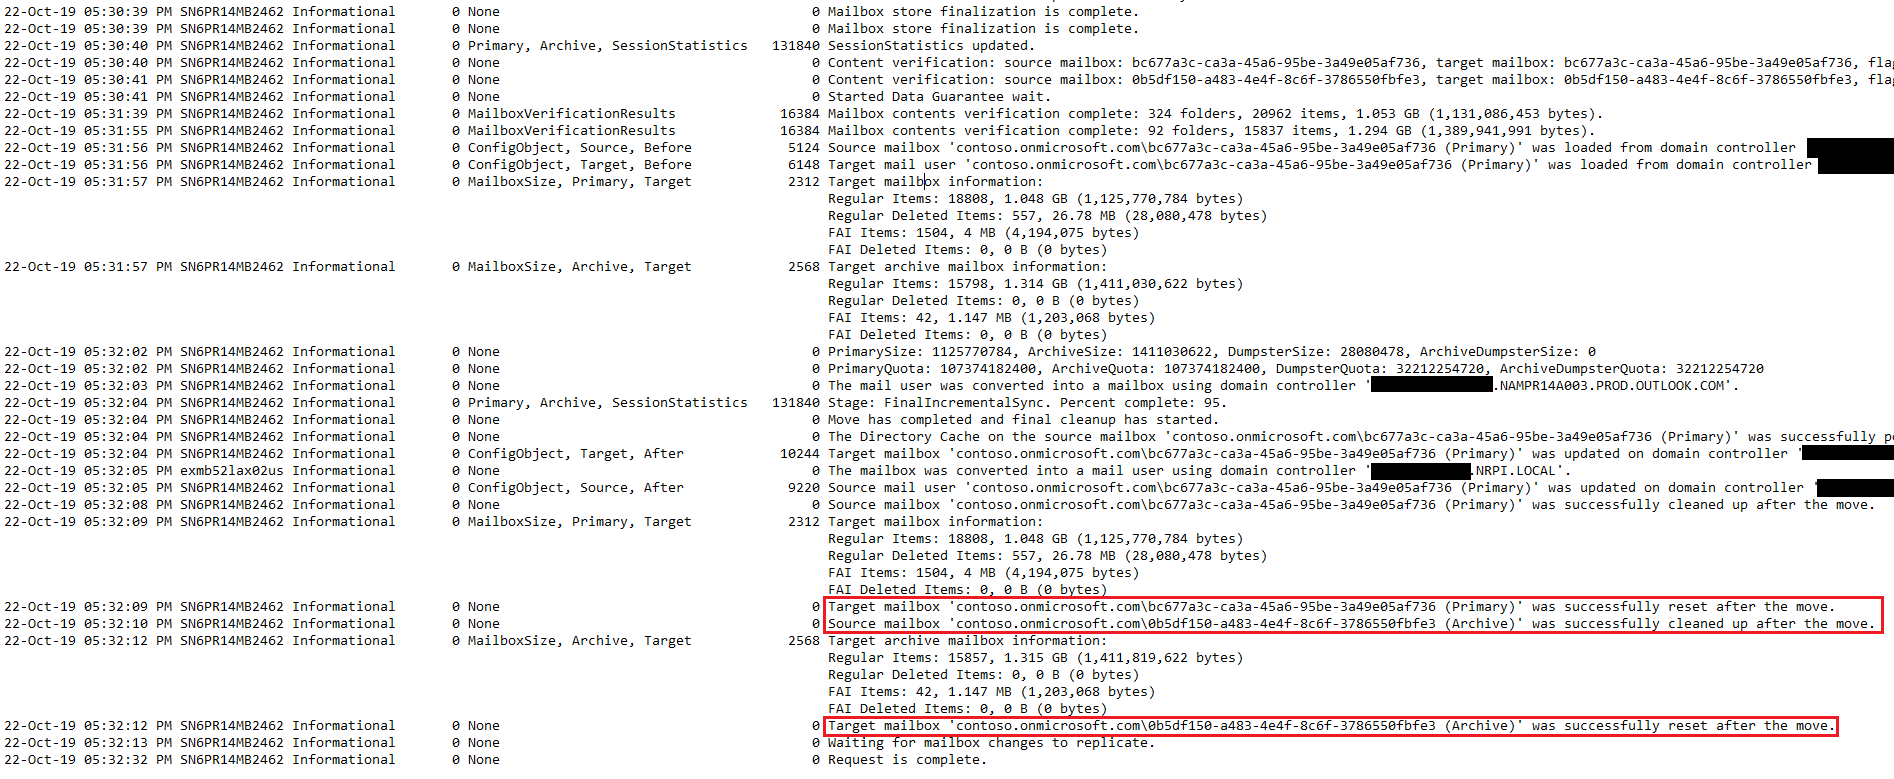
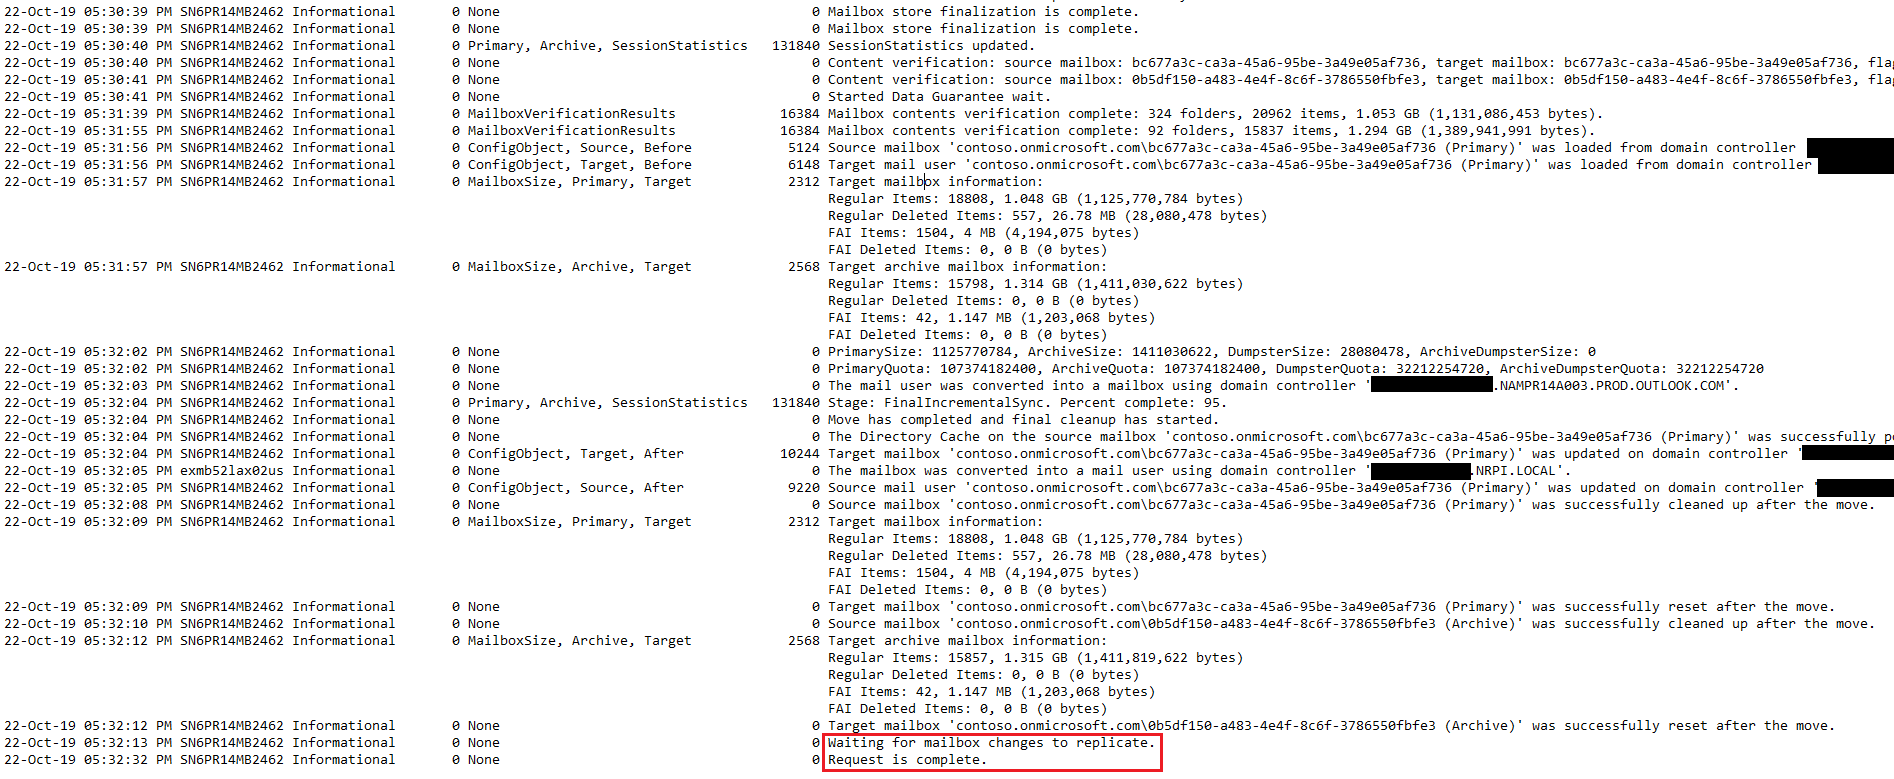
Understanding the report

Conclusion

We just saw how we can generate migration report for each mailbox via PowerShell.

In this demo we first populate the CSV File with the list of users and then install Exchange Online PowerShell Module. After that we connect to our Microsoft 365 environment and extract the migration reports. This saves lot of time when comparted to manually going to each migration batch and viewing details of each mailbox being migrated.

References:

Connect to Exchange Online PowerShell | Microsoft Docs

Basic auth - Connect to Exchange Online PowerShell | Microsoft Docs

About the Exchange Online PowerShell V2 module | Microsoft Docs

Akhil Ohri

Written By-  Akkhil Ohri

(Microsoft 365 Solution Architect)

Written By-  Akkhil Ohri

(Microsoft 365 Solution Architect)

Jasjit

Peer Reviewed By-  Jasjit Chopra

(CEO)

Peer Reviewed By-  Jasjit Chopra

(CEO)

Sanika

Graphics Designed By- Sanika Sanaye

(Creative Design Director)

Graphics Designed By- Sanika Sanaye

(Creative Graphic Designer Trainee)
How to dynamically calculate working business days for a due date in Power Automate

Objective

The objective of this article is to understand how we can use Power Automate aka Flow to calculate the due date for a task excluding holidays and weekends.

Prerequisites

  1. An account with SharePoint Site Collection Admin and Power Automate Access
  2. SharePoint Team Site

Steps to create the lists

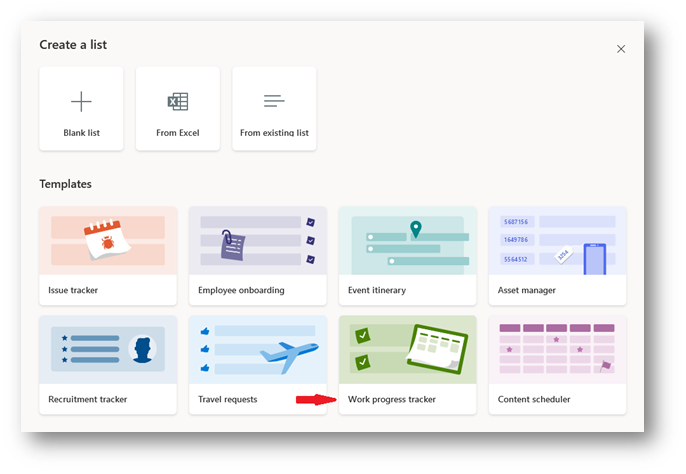
  1. Create a SharePoint list Titled Work Progress Tracker using the default template ‘Work Progress Tracker’ as it has most of the columns needed for our demo. We will use this list to track the work items assigned to the team members.

Tip: While creating the list we used the title as WPT to shorten the url and changed the list title to Work Progress Tracker post creation.

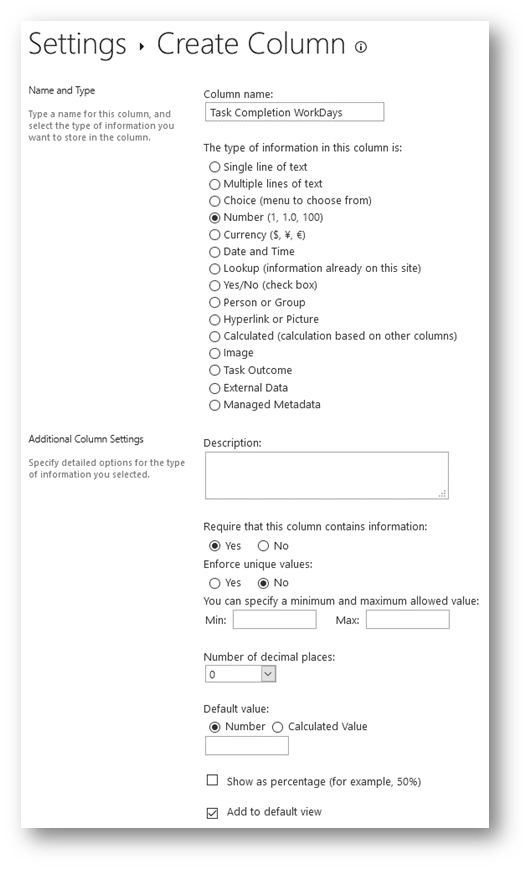
2. Create a column to track the workdays assigned for a task. This will be used to calculate the Due Date excluding the weekends and holidays. The column will be created with the following details:

Name: Task Completion Workdays

Type: Number

Require that this column contains information: Yes

Number of decimal places: 0

Add to default view: Yes

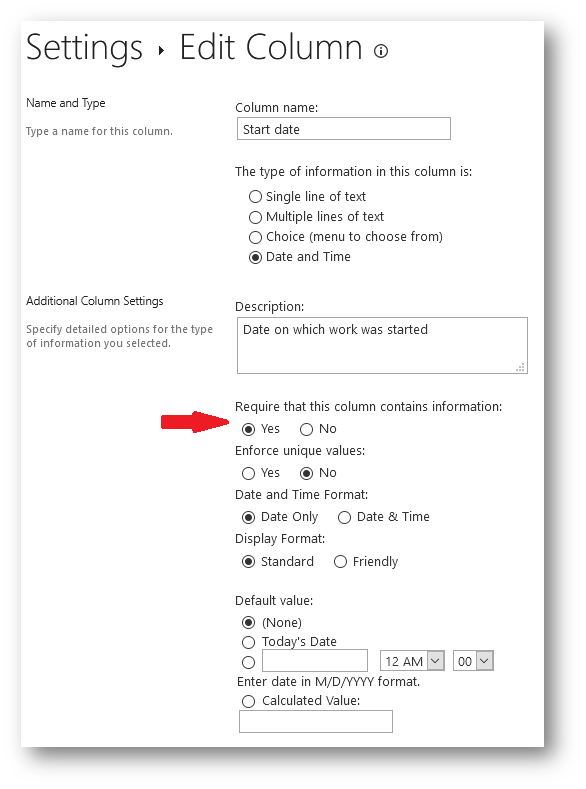
3. Change the Start Date column in the list as a required column. If the item is created without the start date, the flow will fail. Hence we make this a required column.

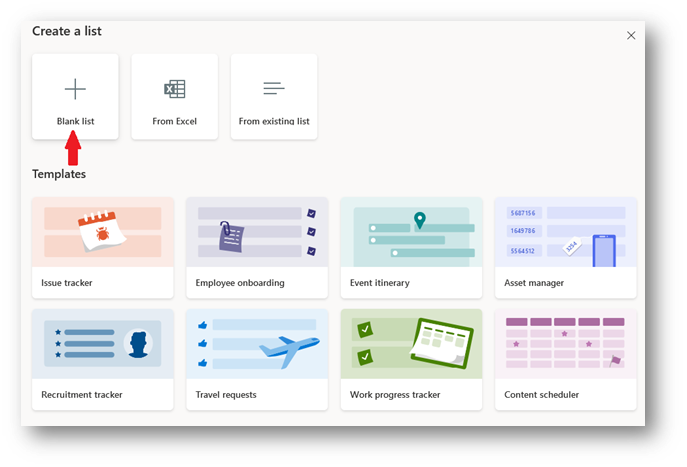
4. Create a new list with the title Company Holiday List with the Blank list This will be used to track the company holidays that need to be excluded from the workdays for due date calculation.

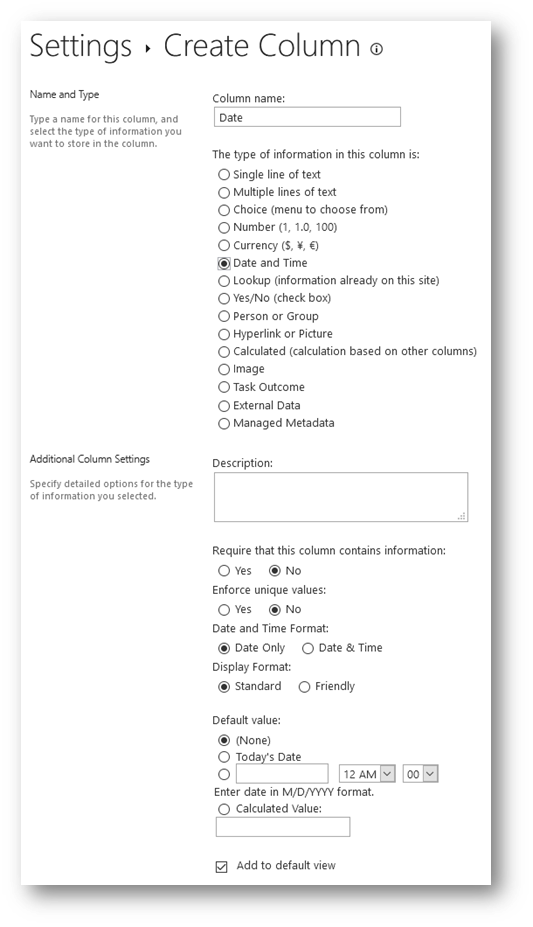
5. Create a new column Date to track the Holiday date in the Company Holiday List with the following details.

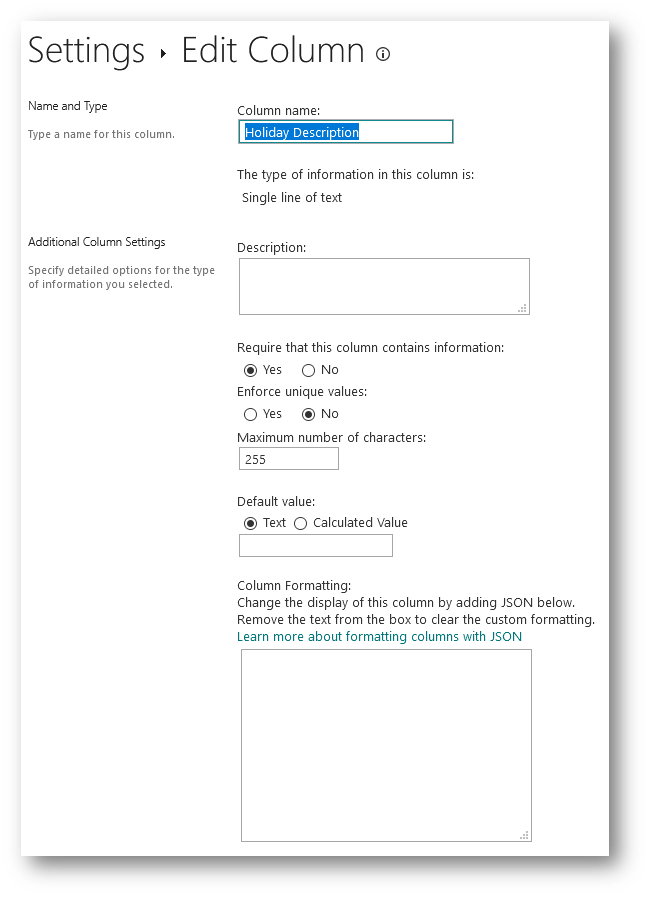
6. Rename the Title column in the Company Holidays List to Holiday Description

Steps to create the flow in Power Automate

  1. We will be creating a new Flow from Power automate to automatically calculate and update the Due Date of a task in Work Progress Tracker list excluding the weekends and company holidays.
  2. Browse to the Power Automate site using the account that has Power Automate License to create a new Flow
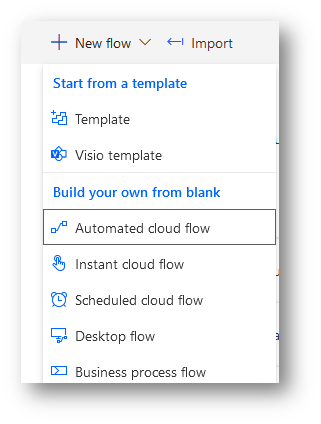
  3. Selected New Flow > Automated Cloud flow

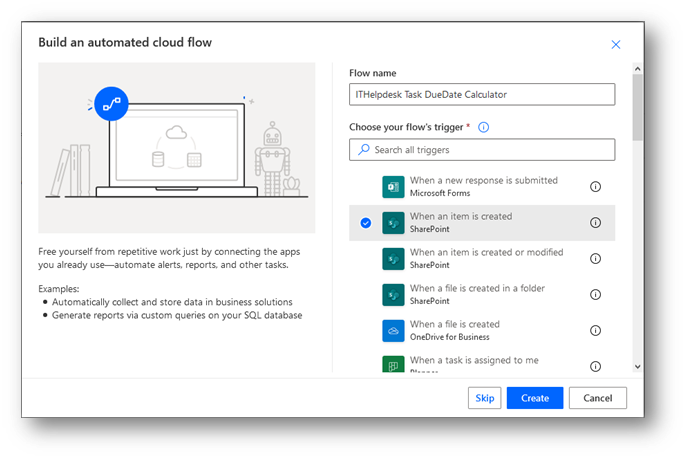
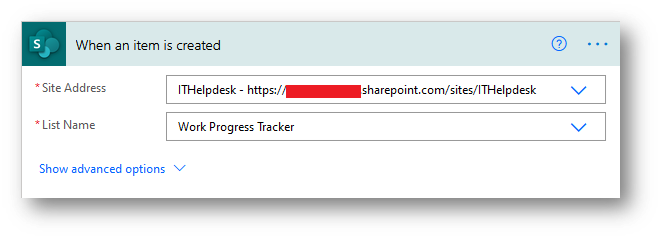
4. Specify the desired name (we have named it ITHelpdesk Task DueDate Calculator) and under the triggers select When an item is created (SharePoint). This will trigger the flow as soon as an item is created our Work progress tracker

5. In the trigger specify the site URL and the list name as shown below. The list is the work progress tracker list we created earlier to track work tasks.

6. Initiate the following variables which will be used further in the flow for calculations.

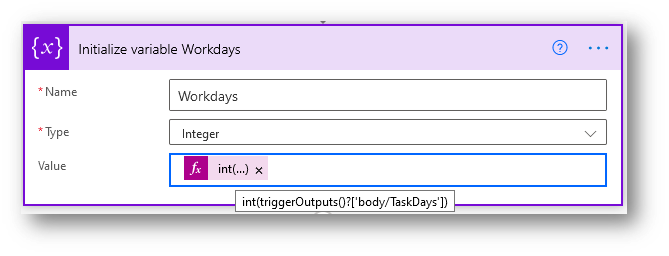
(a) Workdays – This will be used to keep a count of how many workdays have passed in our process to derive at a Duedate excluding the Holidays and Weekends.

  1. Type: Integer
  2. Value: int(triggerOutputs()?[‘body/TaskDays’])

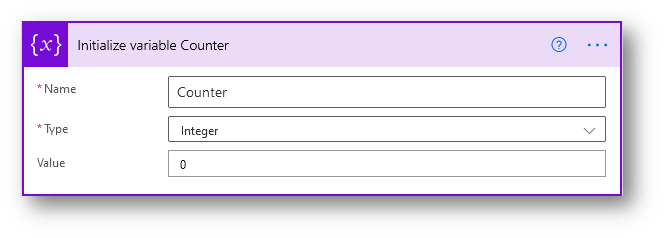
(b) Counter – This will be used to keep a count on the number of loops needed in calculation of the Due date in the Do While loop further.

  1. Type: Integer
  2. Value: 0

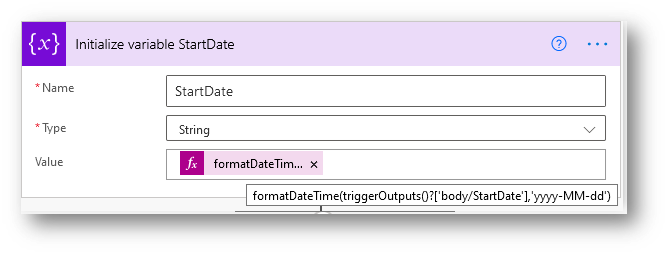
(c) StartDate – This variable is used to capture the value of the StartDate field in the list and will be further used in calculating the due date

  1. Type: String
  2. Value: formatDateTime(triggerOutputs()?[‘body/StartDate’],’yyyy-MM-dd’)

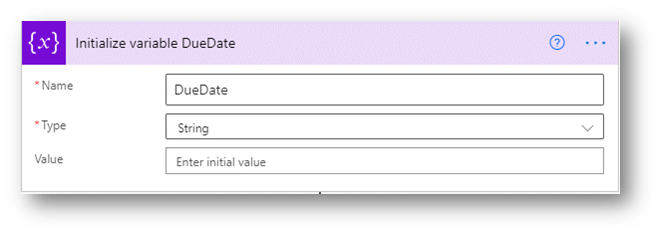
(d) DueDate – This variable will be used to store the value of the due date during the calculation in the Do While loop further.

  1. Type: String
  2. Value: @{variables('StartDate')}

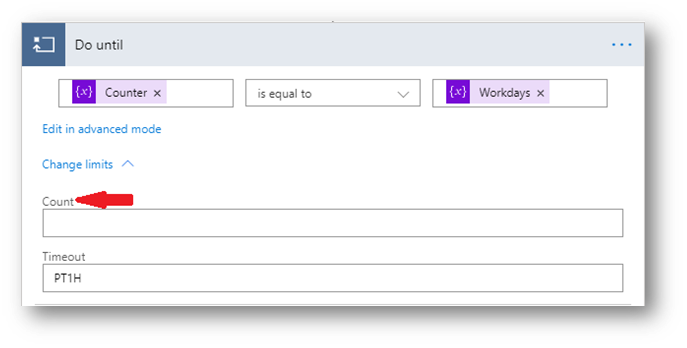
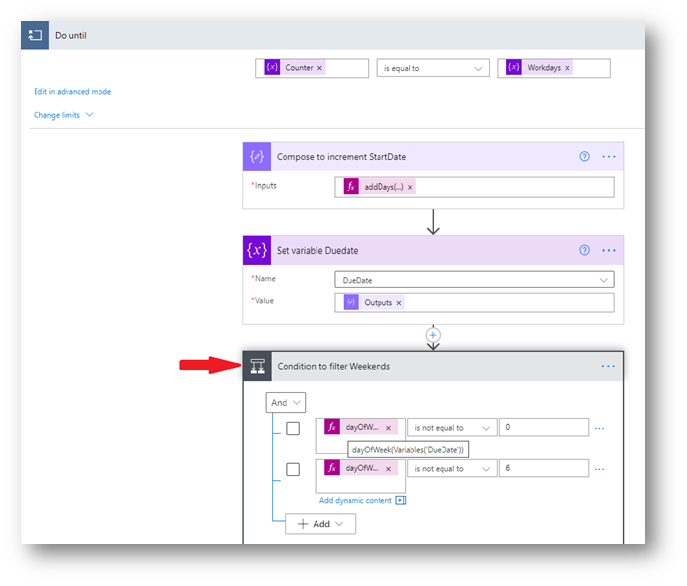
7. Add a Do Until control to loop the actions within, until the counter variable is equal to the variable workdays.

The purpose of this action is to create a loop to calculate working days, by excluding the weekends and company holidays. This is achieved by using the dayOfWeek expression and matching against the dates in the Company Holidays List.

Expression values:

Counter: variables(‘Counter’)

Workdays: variables(‘Workdays’)

Also change the limits in the Do until loop and set the count to blank which means this will be set to unlimited loops.

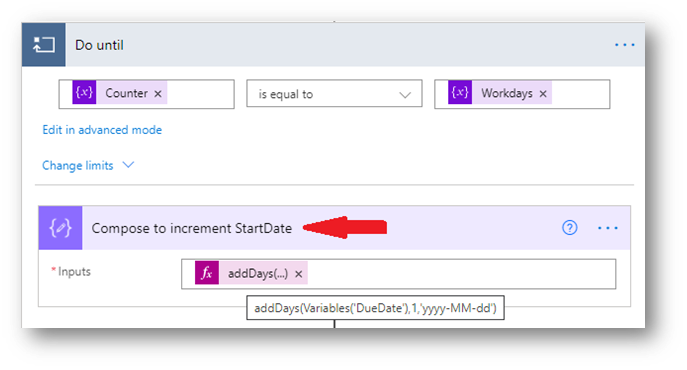
8. Add a Compose action in the Do until loop to increment the due date by a day.

Expression: addDays(Variables(‘DueDate’),1,’yyyy-MM-dd’)

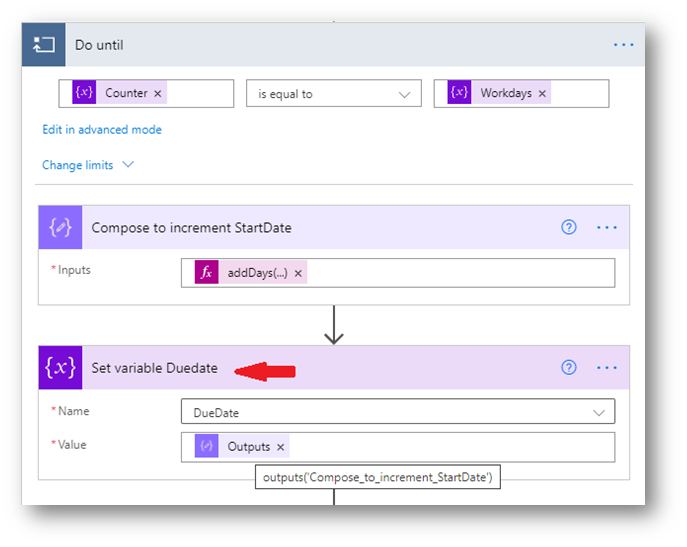
9. Add a Set variable action in the Do until loop to set the variable DueDate. This will be further used to filter weekends and holidays.

Expression: outputs(‘Compose_to_increment_StartDate’)

10. Add a condition to filter the weekends. Expression: dayOfWeek(Variables(‘DueDate’))

  1. dayofWeek value for Sunday is 0 and for Saturday is 6
  2. Our condition is to filter out weekends from DueDate and loop to the next date if it does not match the condition.
  3. If the DueDate matches our condition, it moves to the next calculation step.

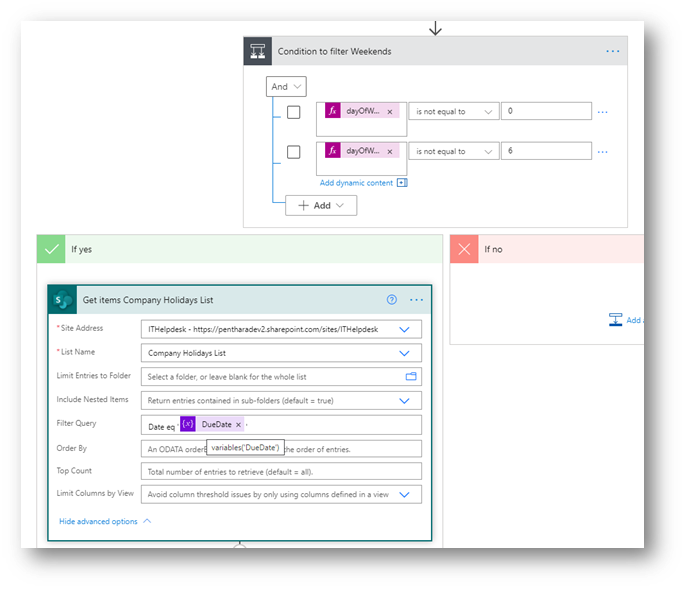
11. If the DueDate matches our condition (it is not a Saturday or Sunday), it moves to the next calculation step. Here we add a Get Items action from SharePoint list Company Holidays List with a filter query Date field equals DueDate variable value.

Expression: Date eq ‘@{variables(‘DueDate’)}’

This will give us an output if the DueDate value is a Company Holiday.

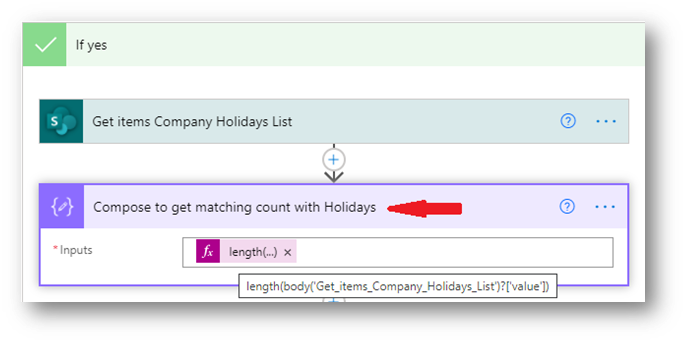
12. The next step is to add a compose action to calculate the length of the output from the Get Items action. This will help us calculate of the current DueDate is a holiday if the output is not Zero.

Expression: length(body(‘Get_items_Company_Holidays_List’)?[‘value’])

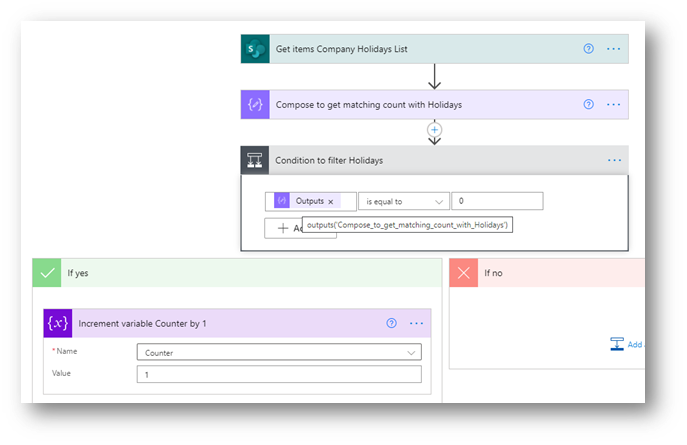
13. In the next step we add the Condition action to filter the holidays. If the output of the previous step of getting items where Date field does not match the Due date variable, the output length would be 0. This means that the current DueDate value isn’t a holiday and ehnce will be counted as a working Day for the Task. We use this logic to filter out the holidays.

Expression: @outputs(‘Compose_to_get_matching_count_with_Holidays’)

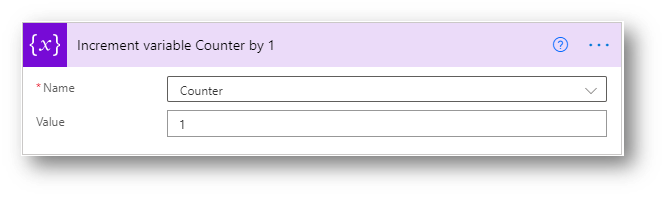
14. If the condition output is true (number of items in the Company Holiday List where Date equals Due Date is Zero), we increment the Counter Variable by 1

15. The Do Until loop will complete until the variable counter matches the variable workdays.

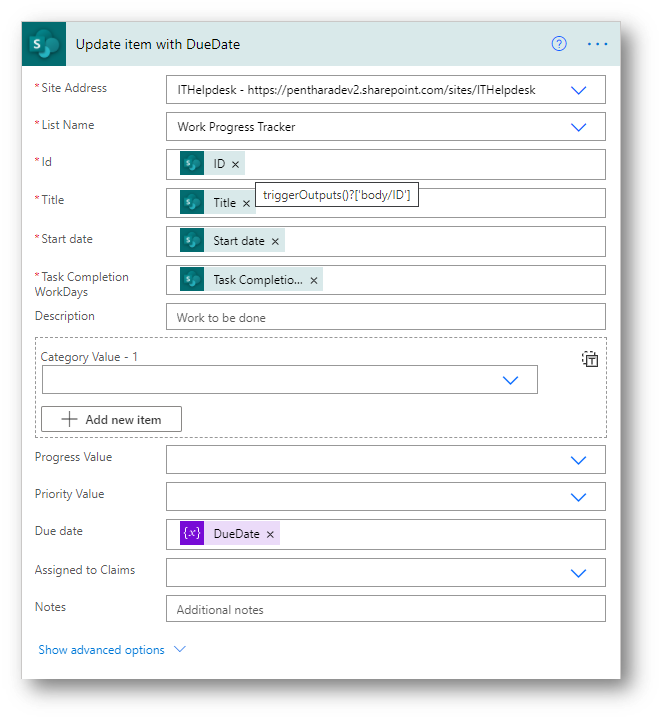
16. In the final step we update the DueDate in the Work Progress Tracker list for the current item using the SharePoint – update item action.

Expressions:

  1. ID
    1. Value: @{triggerOutputs()?[‘body/ID’]}
  2. Title
    1. Value: @{triggerOutputs()?[‘body/Title’]}
  3. Start date
    1. Value: @{triggerOutputs()?[‘body/StartDate’]}
  4. Task Completion WorkDays
    1. Value: @{triggerOutputs()?[‘body/TaskDays’]}
  5. Due date
    1. Value: @{variables(‘DueDate’)}

Conclusion

As you can see in the example, we will calculate the Due date when start date is 1st April’21, with 5 days duration. Consider 2nd April’21 to be a holiday.

The day for 2nd April’21 being a Company Holiday has been skipped hence the counter stays as 0. Also the days 3rd April’21 and 4th April’21 are skipped as it’s a weekend. Hence the Counting the Business Days, the DueDate will be 9th April’21.

Start Date Running Due Date Counter SKIP (YES/NO) NOTES
1 April 2021 2 April 2021 0 Yes Company Holiday
Cell 3 April 2021 0 Yes Weekend
4 April 2021 0 Yes Weekend
5 April 2021 1 No Weekend
Cell 6 April 2021 2 No Business Day
Cell 7 April 2021 3 No Business Day
Cell 8 April 2021 4 No Business Day
Cell 9 April 2021 5 No Business Day

AneeshKumar

Written By-  Aneesh Kumar

(Microsoft 365 Solution Architect)

Written By-  Aneesh Kumar

(Microsoft 365 Solution Architect)

Jasjit

Peer Reviewed By-  Jasjit Chopra

(CEO)

Peer Reviewed By-  Jasjit Chopra

(CEO)

Sanika

Graphics Designed By- Sanika Sanaye

(Creative Design Director)

Graphics Designed By- Sanika Sanaye

(Creative Graphic Designer Trainee)
Different use case scenarios of useEffect in SPFx React solutions

What is useEffect in React

UseEffect is a hook in react which was created to be used in a functional component. useEffect hook can be used in different scenarios depending on our need i.e.

it can provide lifecycle functionality of class component as componentWillMount or componentDidMount.

For more detailed information you can refer to the following link: https://reactjs.org/docs/hooks-effect.html

Pre-requisites

Why do we need useEffect() Hook

Whenever we make an API call in react component, usually we store the retrieved data in a state. A react component re-renders after any change in the current state. As soon as we store our retrieved data in the state our component will re-render and the API call will be triggered again. This cycle will continue, and we will be facing the issue of an infinite loop in our component. That is where useEffect() hook comes in the play and can save the day for our re-rendering problem.

Variations in useEffect() Hook

UseEffect can work as componentWillMount and componentDidMount.

useEffect as componentWillMount

ComponentWillMount comes in action after and for each render cycle. The syntax for using useEffect as componentWillMount is:

useEffect(() => {});

This gets into play when we set data in the state coming from some other component as a prop. This useEffect() will set the data in the state whenever the component loads.

Note: If you are thinking that you can also do your API call in here then you will be in the same problem of infinite loop.

useEffect as componentDidMount

ComponentDidMount runs just once after the component renders. The syntax for using useEffect as componentDidMount is:

useEffect(() => {}, [ ]);

The empty square brackets at the end are what makes it different from the previous variant. It solves our problem of infinite loops. Now this is the place where we can make all our API calls.

What is a Dependency?

Dependency is what we specify as the second argument in the useEffect. If we have given any dependency, then the useEffect will only be triggered on the change of that dependency.

Use Case Scenarios of useEffect() Hook

UseEffect hook can be used in different scenarios according to the situations. Some examples of how to use it are given below:

Without any Dependency

1. As componentWillMount

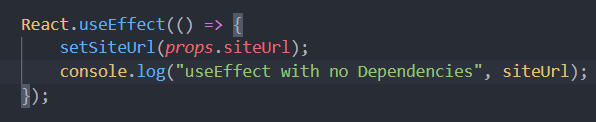
React.useEffect(() => {

SetSiteUrl(props.siteUrl);

Console.log(“useEffect with no Dependenies”, siteUrl);

});

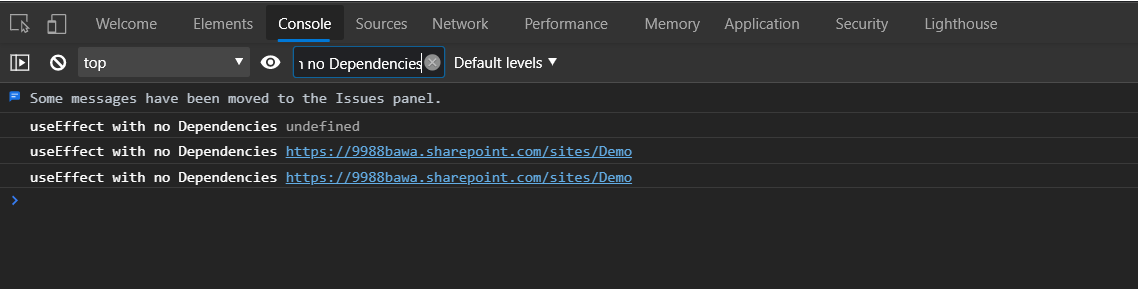
In this situation we are using it as a componentWillMount replacement. It will run after and for every render cycle. Its console output is shown as below:

In the above console output, the first one is running after the first render of the component, that is why the state value is being returned as ‘undefined’. The second and third console output lines are due to re-rendering of the component after every change in the state.

2. As componentDidMount

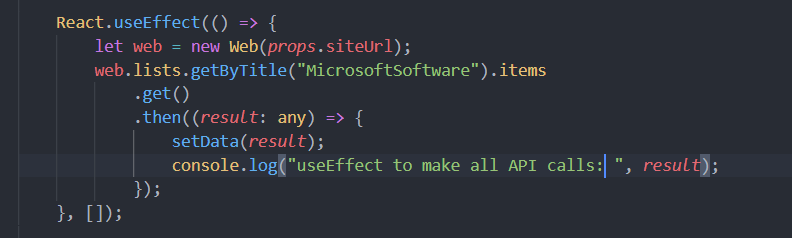
React.useEffect(() => {

Let web = new Web(props.siteUrl);

Web.lists.getTitle(“MicrosoftSoftware”).items

.get()

.then((result: any) => {

SetData(result);

Console.log(“useEffect to make all API calls:”, result);

})

}, [ ]);

In this situation we are using it as componentDidMount. If we make any API calls in our react app then this is where it will be called. In this case useEffect will run only once. Console output for above code is shown as below:

As we can see in the console output above, useEffect is only running once, no matter how many times our component re-renders. 

UseEffect with single dependency 

Below is an example of useEffect having single dependency:

React.useEffect(() => {

Console.log(“useEffect with one dependency:”, data);

}, [data]);

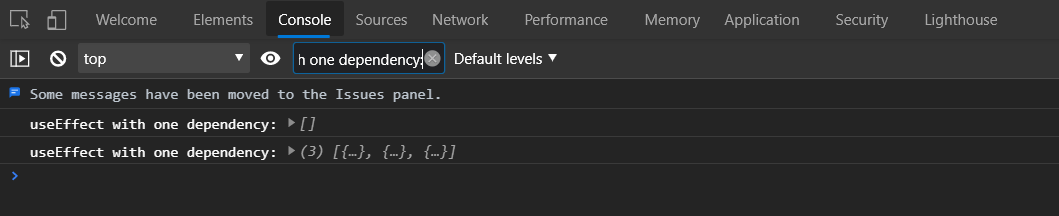
In the above situation the useEffect will run whenever the state of ‘data’ changes. Console output for this useEffect is shown as below:

In the above console output, first we are getting empty array because we have initialised our state with empty ‘data’ array. Then our API call occurs and after maintaining the state our component will re-render and the above useEffect will run again due to the given dependency. Now we can see in the console output, that we have value in our ‘data’ state. 

Multiple dependencies 

Below is the example of useEffect having multiple dependencies.

React.useEffect(() => {

Console.log(“This useEffect will run either data or siteUrl changes”, data, siteUrl);

}, [data, siteUrl]);

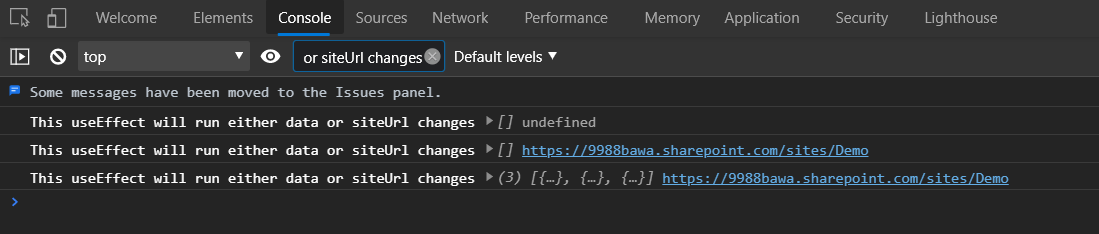
In the above scenario, useEffect will run when either value of ‘data’ or ‘siteUrl’ changes. We can also give more dependencies according to our requirements. Console output for the above useEffect is shown as below:

In the above console output, first we are getting empty array as ‘undefined’ because we have initialised our state with empty array and our ‘siteUrl’ with null. Any change in state of ‘siteUrl’ will trigger useEffect resulting the second line of console output. Then the API call occurs and after maintaining the state of our component, it will re-render and the above useEffect will be triggered due to the given dependency. This gives us the third line of console output where we can value of ‘data’ array. 

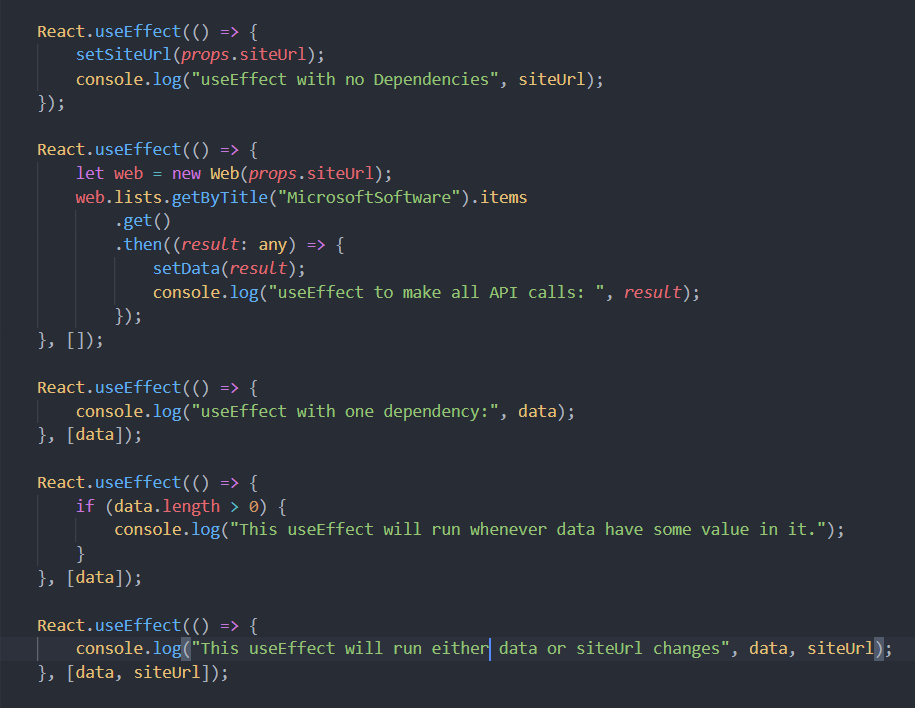
Multiple useEffects in a single component

As we can see in the above reference we can use as many useEffect hooks we want according to our requirement.

Note: Be careful while using multiple useEffect hooks, as it lead to infinite loops. 

Conclusion

After going through this blog now we can assume that you will be able to work with useEffect confidently. For better understanding create your own scenarios and apply useEffect accordingly.

Tanish

Written By-  Tanish Bawa

(Software Developer Trainee)
Written By-  Tanish Bawa

(Software Developer Intern)
Jasjit

Peer Reviewed By-  Jasjit Chopra

(CEO)

Peer Reviewed By-  Jasjit Chopra

(CEO)

Sanika

Graphics Designed By- Sanika Sanaye

(Creative Design Director)

Graphics Designed By- Sanika Sanaye

(Creative Graphic Designer Trainee)