10 Inexpensive Ways to Celebrate Employee’s Birthday

Introduction

Celebrating employee birthdays on office premises never gets old. It shows that an organization value employee’s milestones and achievements too. It also helps in creating happiness and motivation and what can be a more effective way than to have a wonderful birthday celebration on their special day?

Secretly, we all expect to get recognition at work during our birthdays. It is our special day, and we want to get more attention than usual and when it comes to celebrating employee birthdays at work, we often fall short of unique and budget-friendly party ideas.

Let us look at some Inexpensive and unique birthday celebration ideas that will make employee’s birthdays memorable.

1. Surprise Desk Decoration

Office desk space is a crucial part of an employee’s working environment. They spend a lot of time working on their desk, how about decorating an employee’s desk without them knowing it?

This is one of the easiest and inexpensive ways to make an employee’s day special. One can use rainbow-colored balloons, some origami decorations, chocolates, and a big banner with “Happy Birthday” written on it. Place them on the table before the employee login for the day.

2. Thoughtful notes from the whole team

Birthdays are a great time to show how much employee means to the organization and to the team he/she is working for. Instead of using digital birthday cards, colleagues can write a few sentences about the employees and what they like most about working with that person. The HR team can combine all thoughtful notes in a card and present that as a birthday present to the employee. 

It does not take much to put a smile on an employee’s face on his or her birthday; just a sentence or two in an employee’s birthday card can make all the difference!

3. Gift one day off

Some employees may be interested in celebrating their special day with their families or friends. Or an employee might just need a day off to relax & revive. Whatever the case, offering a personal day off on this once-a-year event is something employees will surely appreciate.In case they do not want to take an off, consider one day off as a birthday present that they can redeem on any day of the year as per their need. 

4. Hold a Surprise meeting

Another way of celebrating an employee’s birthday is to hold a surprise meeting for an employee.

One can make it unexpected, so it seems like a regular team meeting. Let everyone join well in advance before the birthday boy/girl, so that when the employee (Birthday boy/girl) enters the meeting room, they will be having a huge smile on their face instantly. Make sure you switch your birthday celebration strategy every now and then so they will not automatically expect a “meeting” like this on their special day. 

5. A custom video from the Team

Sending personalized video from the team can be very special for anyone, ask everyone to film 15-20 seconds video on their personal phone or camera to keep it a secret.

One can make it unexpected, so it seems like a regular team meeting. Let everyone join well in advance before the birthday boy/girl, so that when the employee (Birthday boy/girl) enters the meeting room, they will be having a huge smile on their face instantly. Make sure you switch your birthday celebration strategy every now and then so they will not automatically expect a “meeting” like this on their special day. 

6. Cake Break

Cakes play an important role in birthday occasions.Make sure you find out what employee likes in cake, whether it is chocolate chip, fruit, or red velvet cake. One can also send cakes and sweets to employee’s homes if they are working remotely.

7. Video call celebration for remote employees

If we can’t celebrate employee’s birthdays in the office, there are many alternate ways to make them feel special. Gather all team members together and wish birthday boy/girl online with the help of group chat software.This activity can also help in team bonding and give some space to talk on a personal level, which eventually makes the birthday boy/girl feel special in the spotlight given by the team.

8. Personalized gifts

Select some personalized gifts for an employee that will be memorable and useful at the same time.From Desk Stationery, Custom water bottles or even Personalized pen. One can also DIY gifts to make it more personalized, such as:

9. Favorite treat

Eating together is a simple way to build stronger team bonds, and being able to celebrate your employee at the same time is the cherry on top.Make sure you know about their favorite cuisine or snacks. Have them order in the office or you can also plan to go out with the team as per their availability. 

10. A Gift Card

A gift card or voucher makes sure that an employee can have exactly what they want, it can be tailored to an employee’s Wishlist or interest.A week before their birthday, ask them to make a few choices from a gift card list, such as gift cards from Starbucks, Groupon, nearbuy, Myntra etc. the employee will appreciate the gesture. Just make sure it is something they are interested in first before you buy gift card for them. An easy way to do that is by talking to your employees directly.

NidhiPandey

Written By-  Nidhi Pandey

(Chief Happiness Officer)

Written By-  Nidhi Pandey

(Chief Happiness Officer)

Jasjit

Peer Reviewed By-  Jasjit Chopra

(CEO)

Peer Reviewed By-  Jasjit Chopra

(CEO)

Sanika

Graphics Designed By- Sanika Sanaye

(Creative Design Director)

Graphics Designed By- Sanika Sanaye

(Creative Graphic Designer Trainee)

How to implement CSS in SPFx in different ways

Introduction

Modern SharePoint is aimed to make the user experience more collaborative, but the users also know that visual customization is not that vast. Where Microsoft makes the Modern SharePoint easy to manage and configure, an organization’s basic need is to render its theme of colors, font or style which still has its own challenges.

The development of SPFx technology allows developers to experiment with the customization of web parts. This not only limits the extent to functionality but also allows them to configure their web pages.

A very common way of styling your page is through CSS (Cascading Style Sheets). CSS handles the look and feel part of a web page.

Why CSS ?

CSS helps you to keep the informational content of a document separate from the details of how to display it. The details of how to display the document are known as its style. You keep the style separate from the content so that you can:

You use HTML to describe the content of the document, not its style; you use CSS to specify its style, not its content. There are exceptions to this rule, of course, and HTML also provides some ways to specify style. For example, in HTML you can use a <b> tag to make text bold, and you can specify the background color of a page in its <body> tag. When you use CSS, you normally avoid using these HTML style features so that all your document’s style information is in one place.

Ways to implement CSS in SPFx

Today we are going to see just two ways of implementing CSS in your SPFx solutions. Ideally, this should suffice for majority of your needs. This is also in no way a complete and comprehensive way of implementing CSS in your SPFx solutions. There are other methods as well that have not been discussed.

Using Inline CSS in SPFx Webpart

Inline CSS is considered useful as it reduces the number of files that the browser needs to download before displaying the web page. With an external CSS, the browser first loads an HTML file and then downloads the CSS file. With an inline CSS, you just need to download one HTML file instead of 2, making the process a little bit faster.

An inline CSS is used to apply a unique style to a single HTML element by using the style attribute of an HTML element. The following example sets the border color of the <div> to black while using React framework within your SPFx solution:

<div className={`ms-Grid-col ms-u-md3`} style={{"border-color": "black"}}>

<p> Hello World </p>

</div>

Similarly, if you want multiple attributes, try comma separated values as below:

<div className={`ms-Grid-col ms-u-md3`} style={{"border-color": "black","font-size":"12px “}}>

<p> Hello World </p>

</div>

Using dynamic classes via JavaScript

Another way of adding CSS is by using dynamic classes.

The definition ${styles.helloSPFx} in the TypeScript/JavaScript code is a called template literal. This reference to the object property styles.helloSPFx gets automatically replaced with the compiled style class name. After this change, the web part renders properly.

By generating this unique class name out of the defined generic class name, SPFx makes sure that the CSS added to the page only affects the web part and not the rest of the page.

Below is the react code for our helloWorld.tsx file

public render(): React.ReactElement< helloWorldProps> {

    return (

      <div className={ styles.helloWorld }>

        <p> Adding CSS in SPFX solution </p>

      </div>

    );

  }

And our index.scss file will look like –

@import "~office-ui-fabric-react/dist/sass/References.scss";

.helloo {

  background-color: $ms-color-themeDark;

  p {

    color: red;

    text-align: center;

  }

}

The compile style sheet corresponding to the web part looks like this with dynamic class.

<div>

<p> Adding CSS in SPFX Solution </p>

</div>

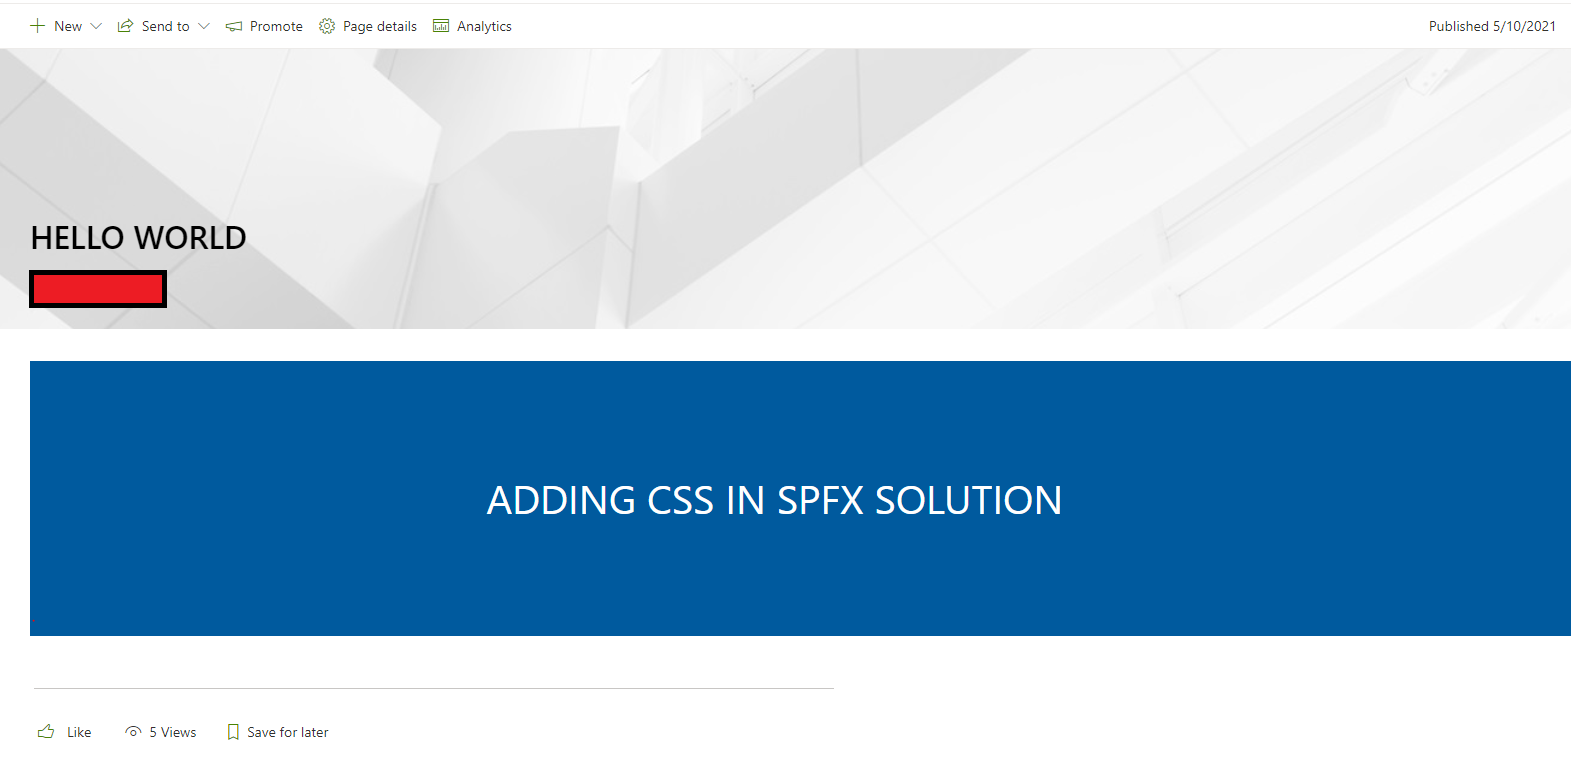
And the output will be –

Dynamic class output

Among the many advantages of inline CSS, putting CSS into the head section of HTML ensures that your web browser doesn’t have to download a separate external file. It saves a round trip to the browser. It’s a good practice to inline the CSS of landing or home pages so they can load faster and be effectively viewed.

Advantages of Inline CSS:

Disadvantages of Inline CSS:

Using External CSS

import "./index.scss";

And adding dynamic loading with SPComponentLoader

SPComponentLoader.loadCss(this.context.pageContext.site.absoluteUrl + 'FilePath.css');

One more thing a developer can do is to use Centralized CSS. By using this we can keep our CSS in the same file and work from there. It makes our CSS a little untidy though, but we can use it for small projects.

So, if we are using a common modal or pop up, we can write its CSS in a Centralized CSS file so that we do not have to write the same code again and again.

Advantages of External CSS:

Disadvantages of External CSS:

Conclusion

Putting your CSS code in a separate file is highly recommended. The primary benefit of an external stylesheet is that it can be reused by multiple components. As a result, if all HTML on your site uses the same external stylesheet, changes to this stylesheet will be reflected in all of the HTML pages of your site.

The most common rule of CSS is to keep your CSS in an external file and only add inline CSS for fancy stuff like animations and all. But do keep in mind to keep it to the minimum. The inline formatting will overwrite all the other styles when used, so keep the CSS Specificity in mind. For more details, please refer to this link.

Nivedietta

Written By-  Nivedietta Singh

(Web Developer)

Written By-  Nivedietta Singh

(Web Developer)

Jasjit

Peer Reviewed By-  Jasjit Chopra

(CEO)

Peer Reviewed By-  Jasjit Chopra

(CEO)

Sanika

Graphics Designed By- Sanika Sanaye

(Creative Design Director)

Graphics Designed By- Sanika Sanaye

(Creative Graphic Designer Trainee)

Invaluable tips for enhancing Power Apps (Canvas) performance

Appropriate use of sequential and concurrent approach

While writing actions we can follow two different approaches. Depending on the scenario any of the following approaches can be chosen.

1. Sequential Approach

In this, all the actions should be written in a series like shown below.
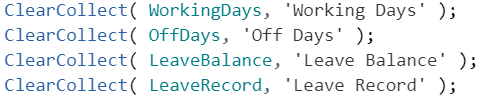
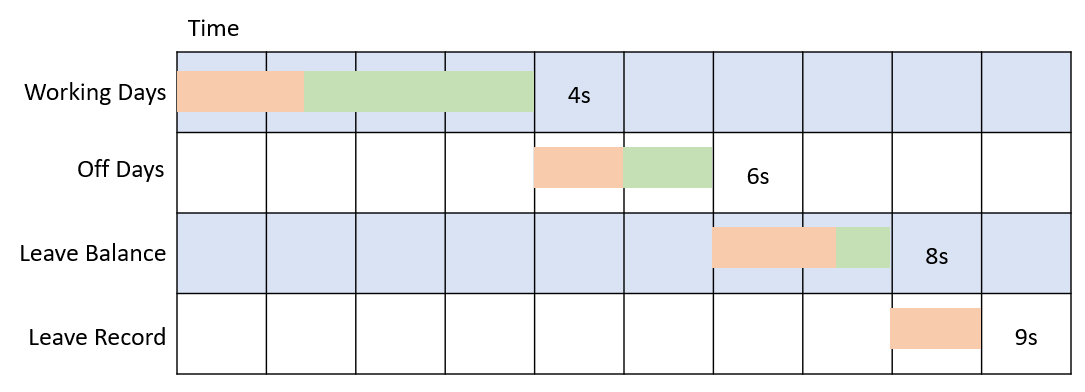
Each action is triggered only when the previous one is completed. It is useful in cases, where the coming action depends on the outcome of the previous action. The image below illustrates the flow of actions.
2.Concurrent Approach

In this, all actions are wrapped in a function name concurrent as shown below:
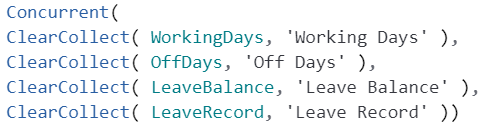
As the name concurrent itself explains, all the actions will run concurrently. This function can be used where any of the functions are not interdependent. The common place to use concurrent function is at onStart() action of an App. It can reduce the load time drastically if we are working with large data sets. The image below illustrates the flow of actions.
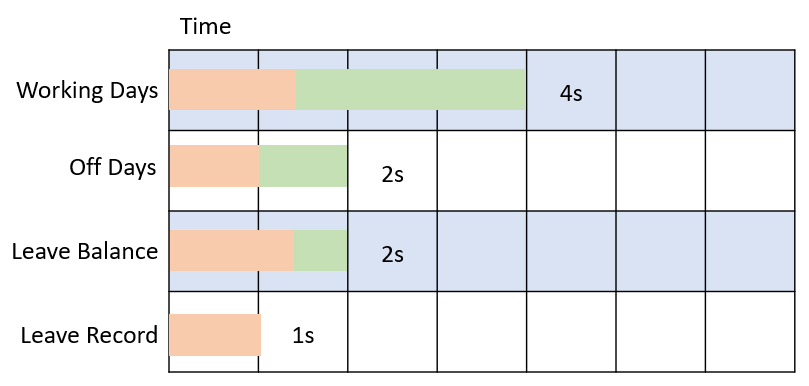
Keynote: - Do not use Concurrent function if actions are interdependent.

Performance difference between both Approaches

 The comparison shown below is calculated on data with more than 5000 entries in total.
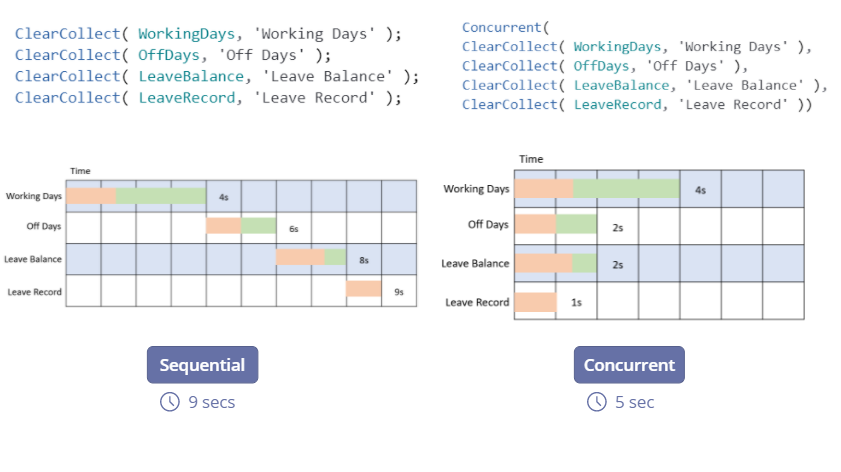
In the above image Sequential and concurrent are two buttons which calculate the request time of a particular query. Below the buttons, the calculated time is shown. By studying the difference, we can imagine how the Performance of the App can be drastically changed just by a single concurrent function if applied correctly.

Controls Optimization and Dependency

Before proceeding, we should be aware of the fact that more than 500 controls on a single screen can cause performance degradation. So, make sure that you do not create 500 different controls like gallery control, text input, label, etc on a single screen. Refer to the documentation here for more details.

Minimizing controls

For optimization of the App, controls should be minimized wherever possible. In the below example we will be replacing 5 button controls with one gallery control and one button control, that will repeat within the gallery.
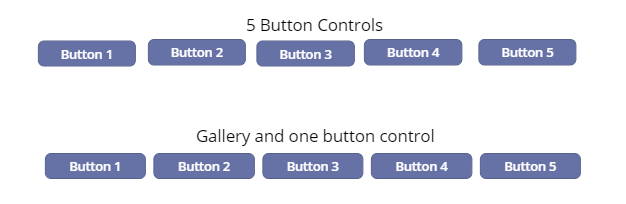
The 5 buttons control shown above are normal buttons that we usually create. Those 5 button controls can be replaced with one gallery control and 1 button control. When we are creating 5 individual buttons then the number of controls is 5. But when we replace 5 button controls with 1 gallery control and 1 button control, it reduces the number of controls from 5 to 2. This trick is effective in reducing the number of controls over a single screen.

In the gallery control shown above we have added a collection of buttons in its Items property as shown below:

Dynamic data can also be added in items according to the scenario. This trick can be used whenever we want to restrict controls in our app. Restricting the number of controls in the app can optimize the app’s performance.

Reusability

 A Component is an excellent example when it comes to reusability. We can make a custom component and use it in our App according to the need. Below is an example of a custom component used as a header.
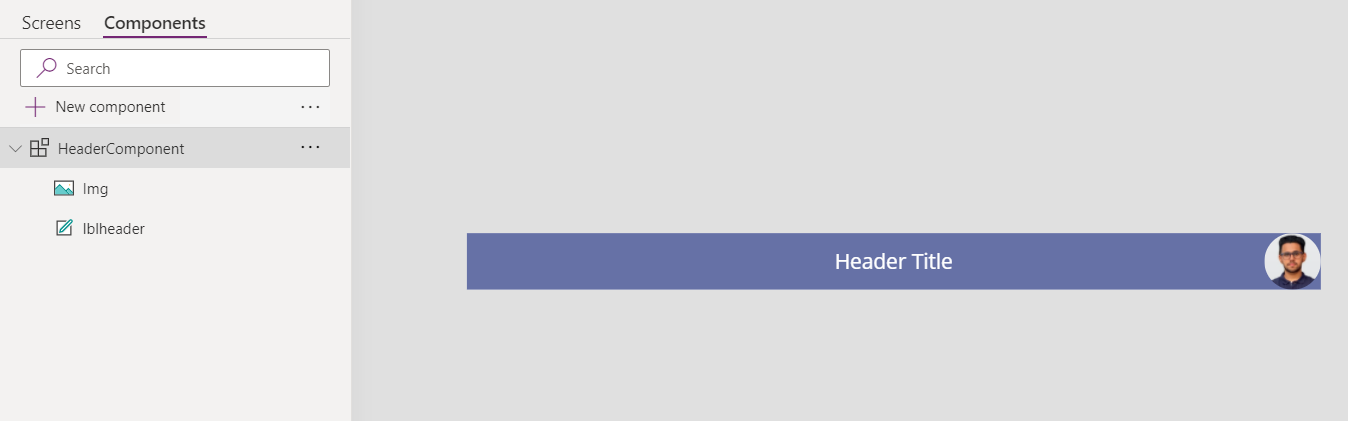
Here we have a simple example of a component. In this, we are using a label control (lblheader) and an image control (img). Components can be very useful where the same control is being used repeatedly. Our example component above has 2 controls, but when we add it to the screen it will be treated as a single control as shown below:
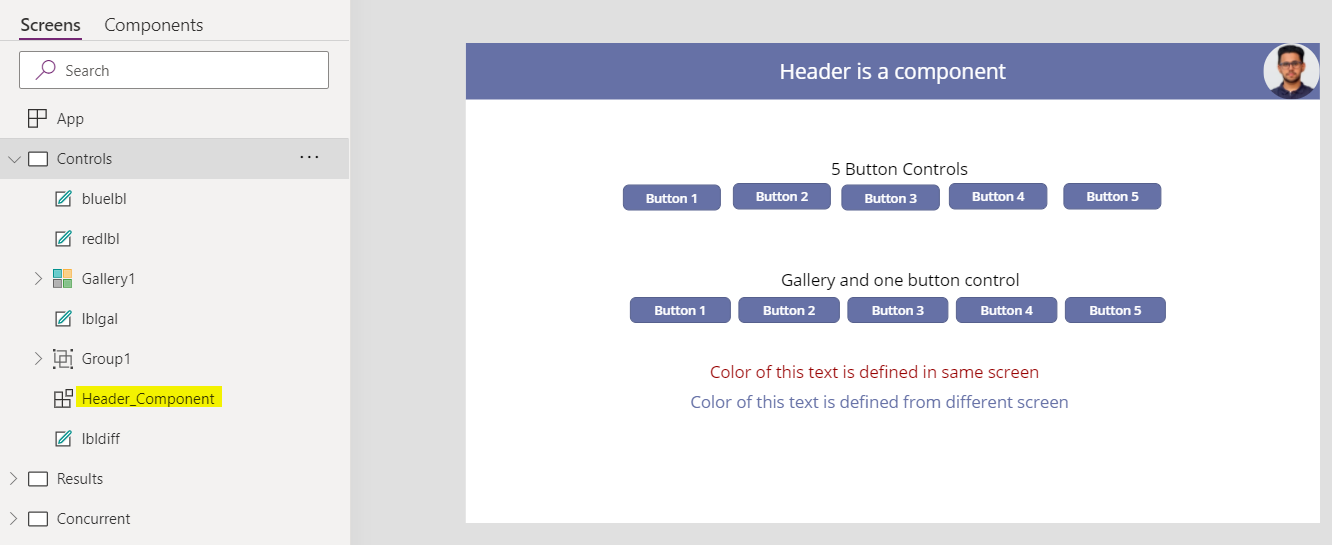
As we can see in the above image, the component is treated as a single control (Header_Component). But we created it with two different controls which are image control and label control as explained above. When any change is being made in a component, it reflects the changes everywhere we are using the component. This can save time if the component is being used several times in the app. Learn more about components here.

Use of Delay output property in input field.

 DelayOutput is a property of the text input field. Default it is set to false. Normally if we are making any search request in the gallery or query in the data set it is made for each letter we type. But suppose, we have a large data set, and we make a normal query through the input field. The query will be made for each letter we type which can lead to performance degradation.
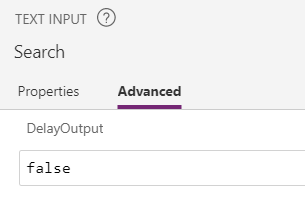
We can use the DelayOutput property by going into the advanced section of input field and setting it to true, which is set to false by default. Now a query will only be made once pause while typing. This trick can make the App look more responsive and lag free.

Control Dependency

We should be keeping an eye on the dependency also. If not, it can lead to performance degradation. Let us study the example below.
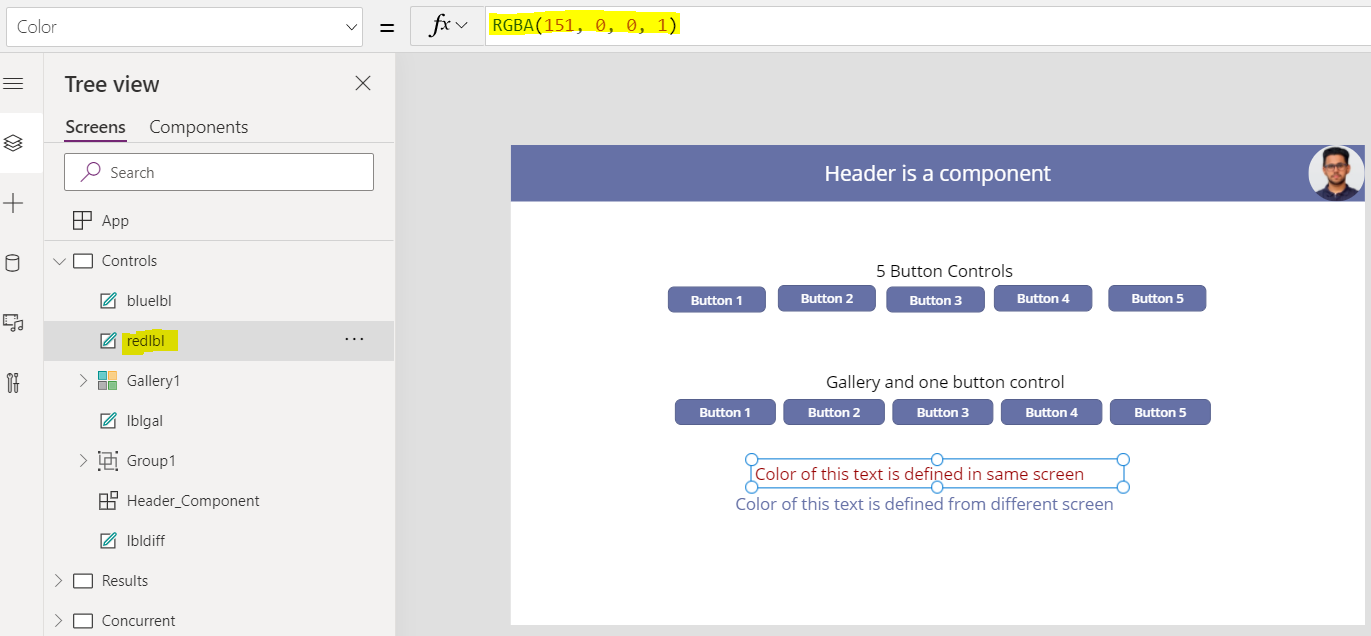
In above example, colour for red label is defined in the same screen it exists.
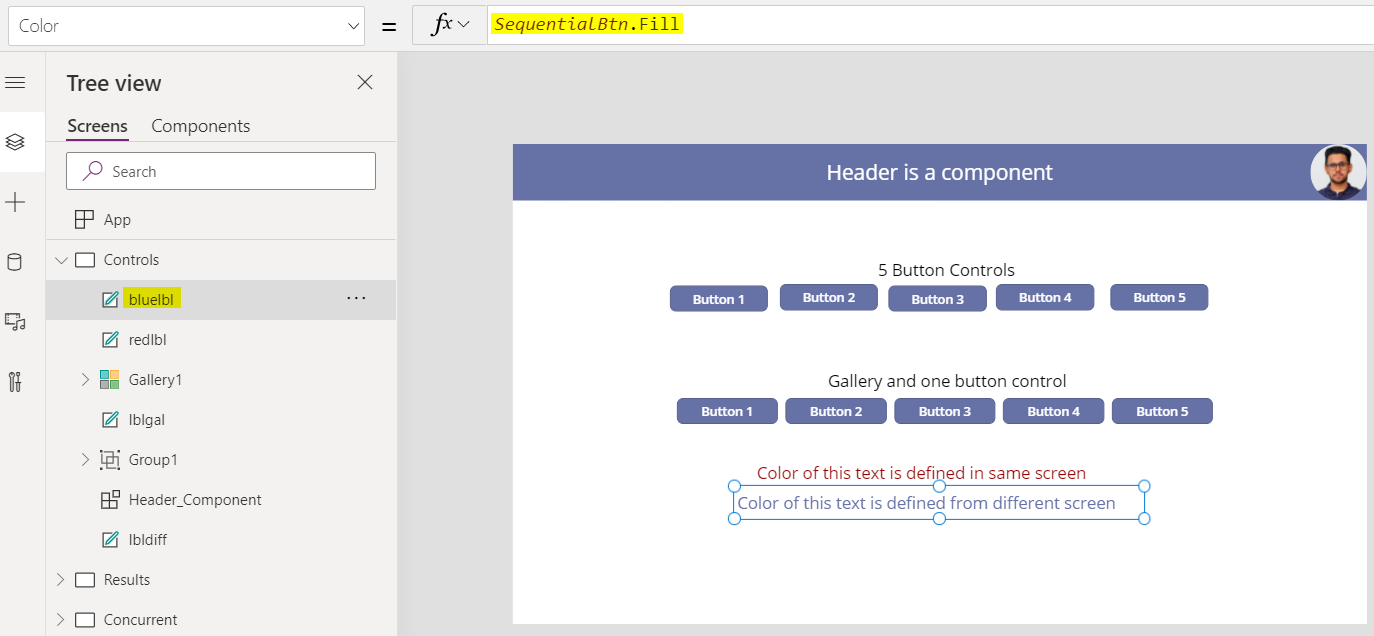
But for the purple label, color is inherited from a button (SquentialBtn) present in a different screen as shown in the above image.

Everything looks fine until we know the following fact, Power Apps renders all the controls and data of the screen currently in use. When we are inheriting color from other screen Power Apps will load all the controls in that screen also, which can lead to unnecessary performance degradation within the App. Also, one other very common scenario is that where form control in one screen is attached to a gallery control in a different screen. Try to avoid such scenarios if possible.

Best Practices: - We can declare global variables at the start of the app and use them anywhere in the App. With this trick only controls under screen getting used will be rendered, hence increasing the performance of the App. Below is the example for declaring a global variable.
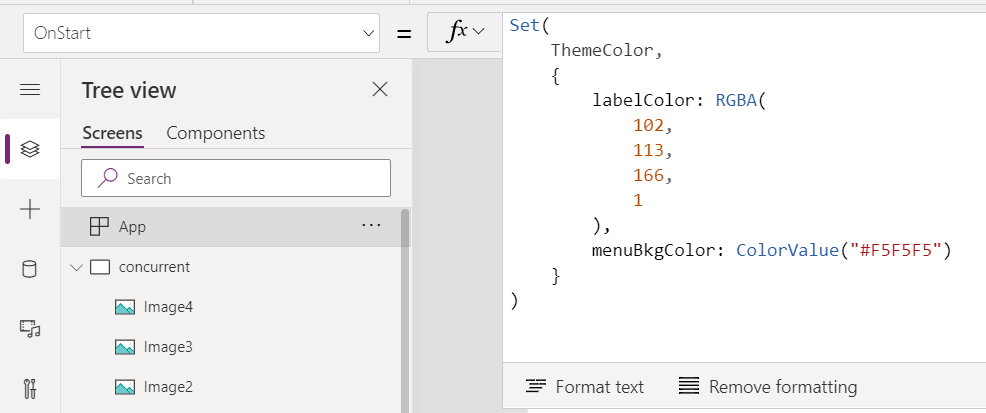
In the above image, we can see that a variable (ThemeColor) is made. It is declared in the OnStart property of the app. That means everything declared here will be processed at the start of the app. If anything is getting used in multiple screens, then best practice is that it should be initialized as a variable in the onStart of the app and then use it anywhere in the app without any issue of control dependency.

Data Connection Queries

This trick is helpful where we are going to use a gallery and having data connectors in it. Suppose the data we are rendering in a gallery control is coming from a SharePoint list. Instead of connecting the SharePoint list directly in the Items property of the gallery control, we should first load the data from the list in a collection. We can immensely improve the performance of the Power App using this method.

Collection can be made at OnStart of the App or OnVisible property of the screen. If we initialize the collection at onStart of the app then the data will only be refreshed at the beginning of the app start. On the other hand, if collection is initialized in the OnVisible property of the screen then it will be refreshed every time the screen gets toggled.

Collection can be made simply by writing the code shown below:
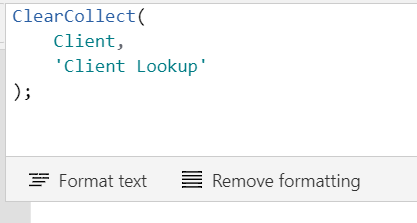
In this, Client is the name given to the collection and ‘Client Lookup’ is the list present in SharePoint. Now you can use a collection called Client in your gallery control.

Note: If other people are making changes to the SharePoint list while another user is working in your gallery control, they will not see the changes unless you provide a mechanism to refresh your collection in some form or fashion. One option that can be applied is by giving a refresh icon somewhere on the screen that will clear collect the collection again from the SharePoint list.

Formula Optimization

First Filter VS Lookup

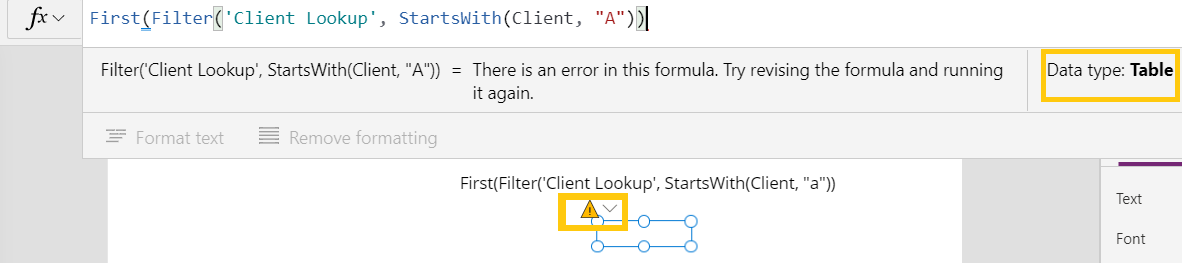
The filter function is not delegable and will not return accurate results if our SharePoint list contains data over a particular delegation limit. Refer to the documentation here for more details about delegation.

Limitations/Disadvantages of using the First filter:

Considering the disadvantages, one must be careful while using First Filter. All these disadvantages lead to the use of an alternate method, which is Lookup.

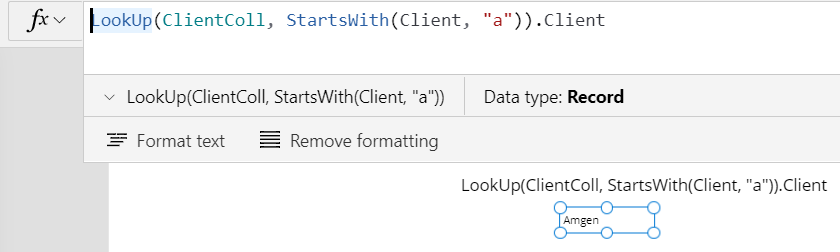
In the image below, LookUp is applied to a collection name ClientColl and getting data starting with letter A. By using LookUp we can overcome limitations faced in First Filter option.
Repeating formulas

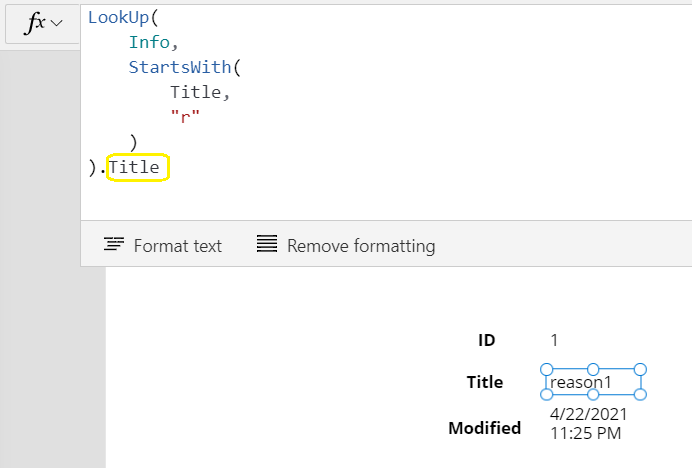
Consider a scenario where we are fetching data from Info collection which has three columns ID, Title and Modified. We can fetch the data individually for each column or reduce our lines of code as follows. In the three images below, you can see we are fetching data individually for each column.

ID
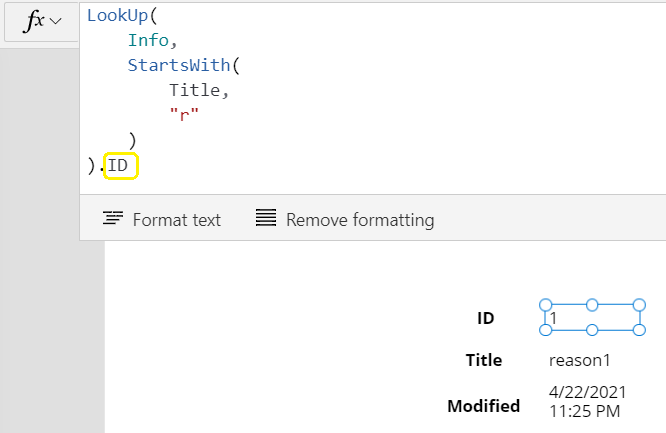
Title
Modified
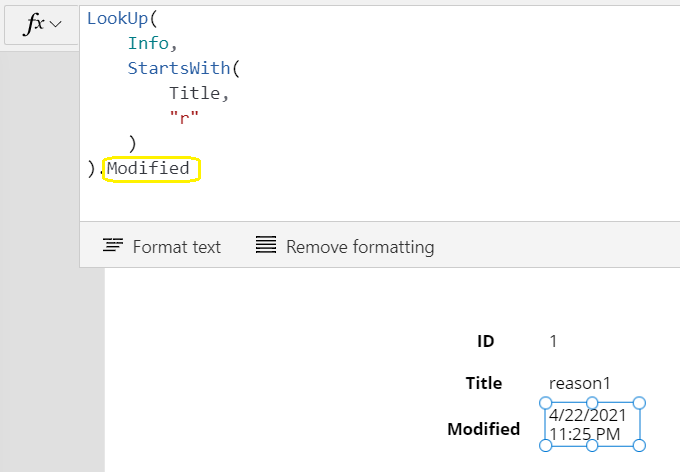
By studying three of the above images, it is observed that most of the formula is repeating itself. There is nothing wrong with this too, but a line of code written can be reduced drastically if we are using a lot of data from the same list or collection. Below is an example of how we can implement improvements.

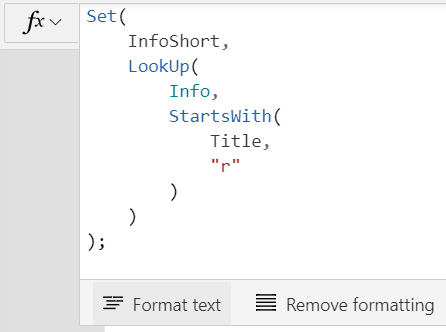
By setting the repeating formula as variable (InfoShort), we can now use this variable in our formula. Below is the implementation. First, we set our variable InfoShort as shown below:
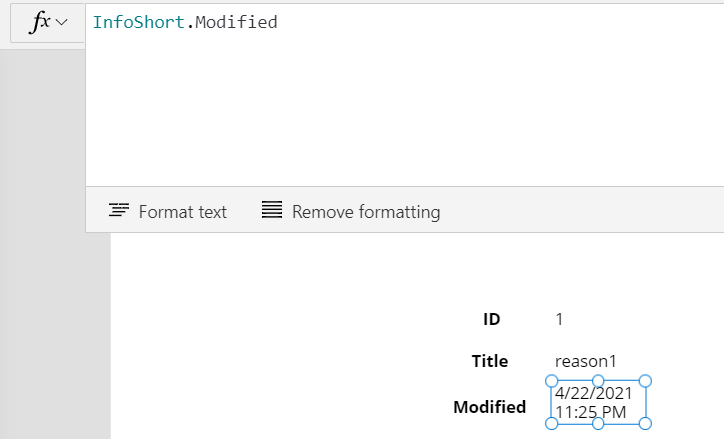
Then we utilise this variable for setting the text property of label as shown below.
Visual and experience Optimization

Use of Spinner

When we load a big amount of data from any source, a lag or latency can be seen. The latency can leave the end user in frustration and can cause a bad experience. By using a spinner, this issue can be tackled. Steps are listed below on how a spinner can be implemented.

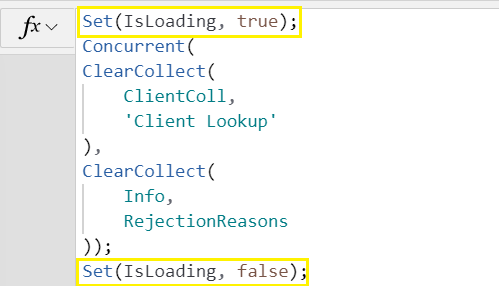
  1. As shown in the below image, set a variable to true at the start of the app. In my case variable name is IsLoading. Then after making all the queries, set IsLoading to false. By doing this we will give a visual representation of spinner loading while our data load operations are being performed.

          Note: If you are using the concurrent function, the variable IsLoading should be set outside of it.
          2.We have used a label with which we have cover the whole screen as shown below.
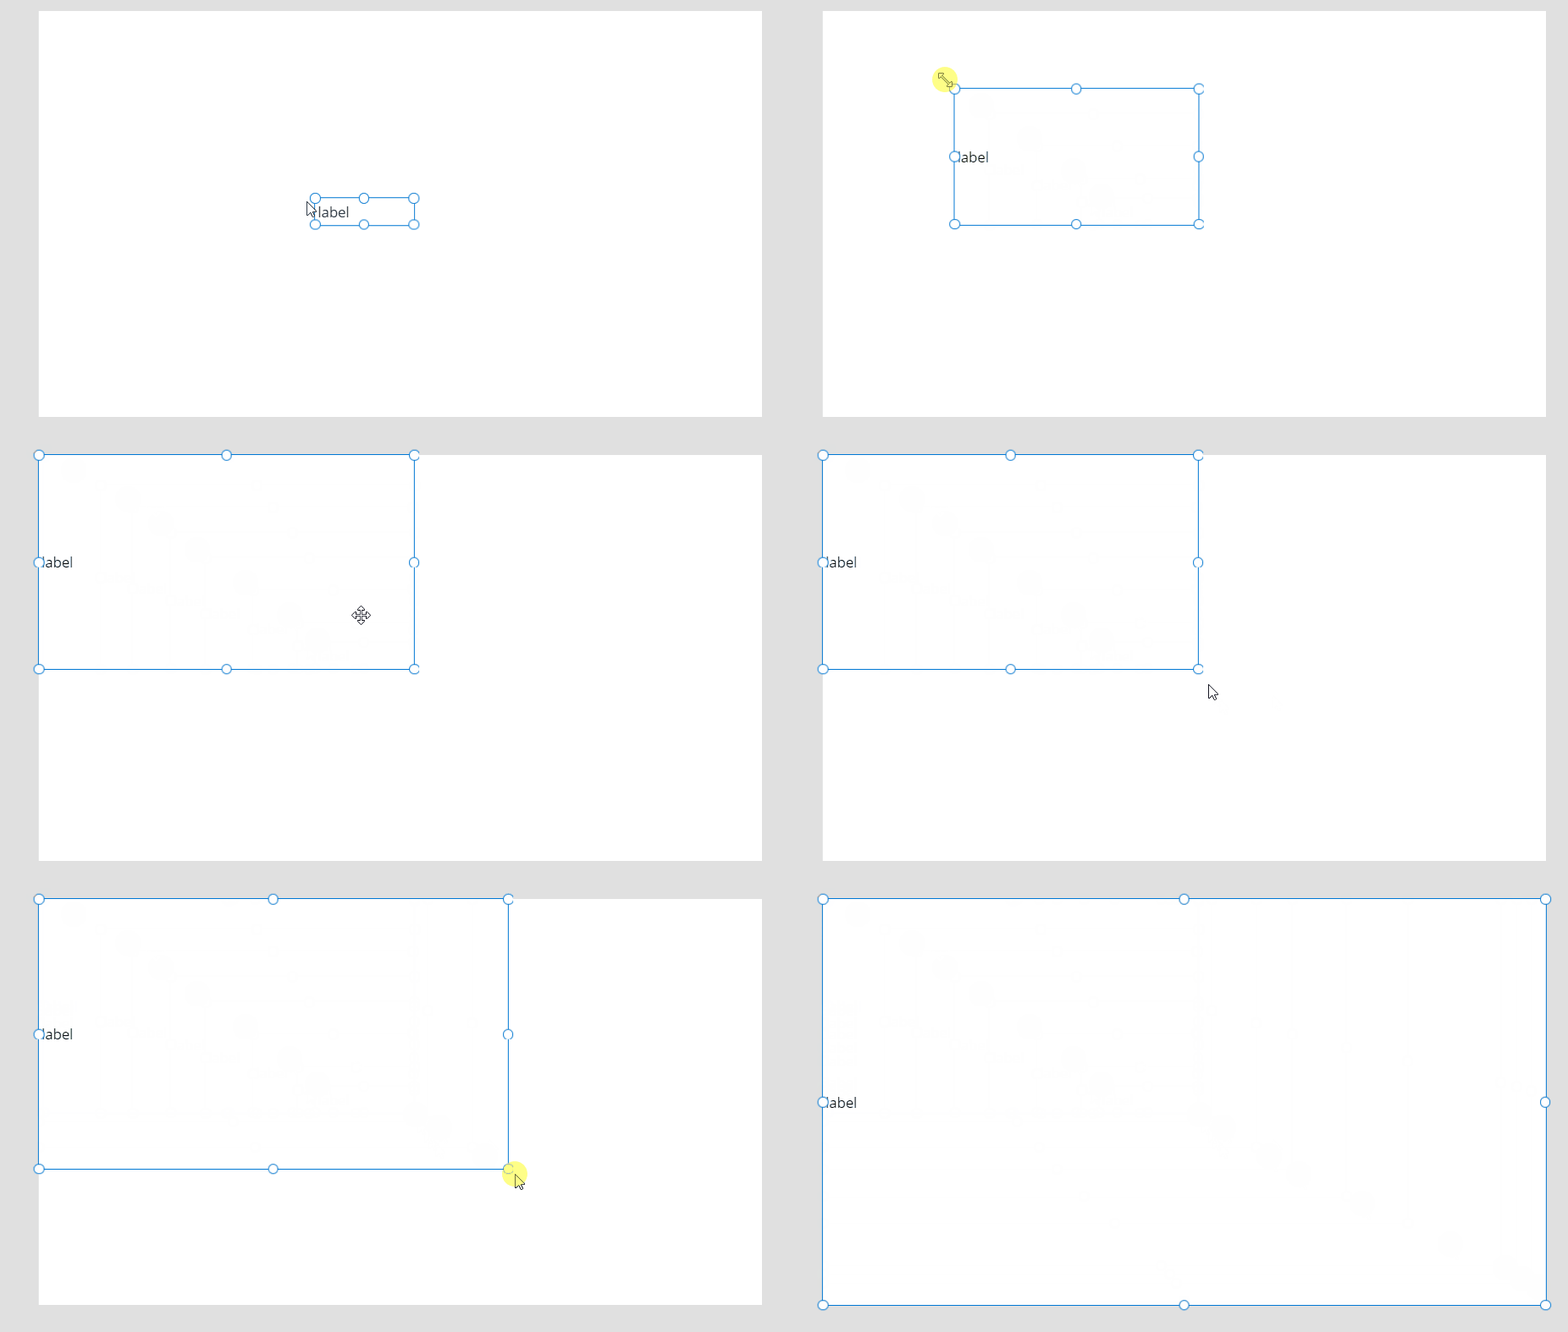
3.Give some background colour to the label so that it looks a bit transparent. This will give a kind of blurry effect to the spinner.

4.Set visible property of the label to IsLoading as shown below.

Doing this, label will only be visible when it is set to true (defined in 1st step).

5.Now insert an image in the middle of the screen and set the spinner of your choice. Set visible property of image to IsLoading, same as step 4.

Spinner will be seen when data is being loaded in the app.
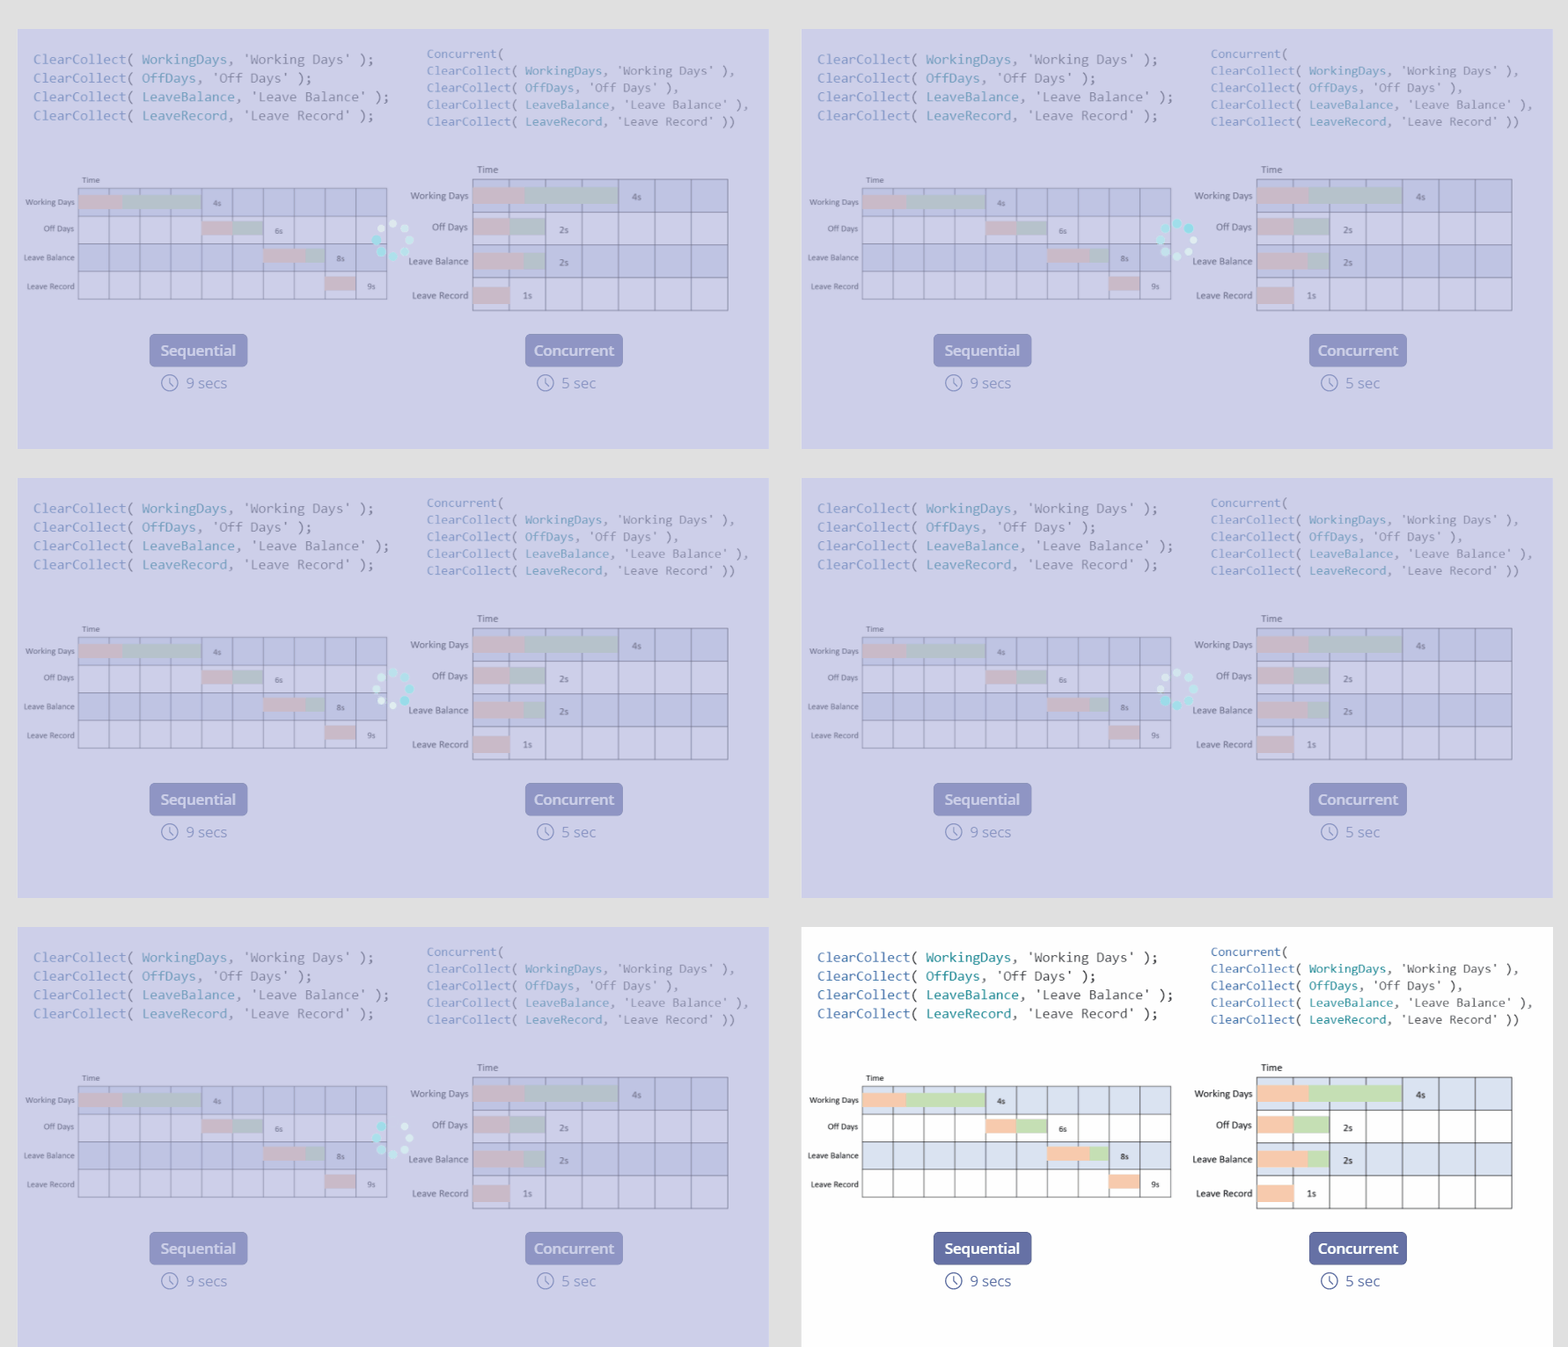
Spinner must be used in every possible action where there can be a time delay for a user to interact. You can refer to this free site called loading.io which provides a bunch of free spinners to get you going. Adding a spinner to an app will provide a better experience for the end user.

Tanish

Written By-  Tanish Bawa

(Software Developer Trainee)

Written By-  Tanish Bawa

(Software Developer Intern)

Jasjit

Peer Reviewed By-  Jasjit Chopra

(CEO)

Peer Reviewed By-  Jasjit Chopra

(CEO)

Sanika

Graphics Designed By- Sanika Sanaye

(Creative Design Director)

Graphics Designed By- Sanika Sanaye

(Creative Graphic Designer Trainee)

How to disable Focus Inbox in Outlook for All/Selective users in Microsoft 365

Introduction

Did your organization recently moved to Microsoft 365 and your users are wondering why are they missing their emails? Well, this could be because of a feature called Focused Inbox that is enabled by default in Microsoft 365 and unless you do not know how to use it, it is nothing but trouble.

Note: This feature has a lot of advantages than you can think of. It can really help you stay on top of things!

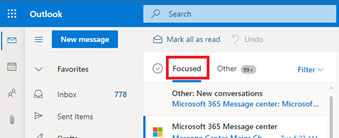
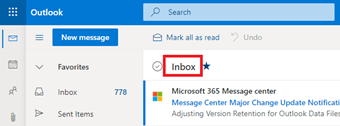
Focused Inbox is not meant to take control of your mail, but rather work with you to prioritize what is actionable for you. What lands in your Focused Inbox is determined by an understanding of the people you interact with often, and the content of the email itself (e.g., newsletters, machine generated mail, etc.). If you need to fine tune your Focused Inbox, just use the “Move to Focused” or “Move to Other” options.

Focused Inbox Enabled

Focused Inbox Enabled

Focused Inbox Disabled

Focused Inbox Disabled

Pre-Requisites

Messaging Policy & Compliance Permissions

You can refer to the below links to understand how to grant these permissions to a user who is required to perform the task of disabling Focused Inbox for the entire organization.

Exchange Online (EXO) Service Admin Access

How to get Exchange Online Service Admin Access?

You will have to reach out to your Tenant’s Global Admin and request him to grant you access.

Login to Microsoft 365 Admin Portal

Expand the Users section and click on Active Users.

Search for the user who needs to be granted the EXO Service Admin role and click on the user’s Display name.

You will be presented with the user details panel.

On the Accounts tab, you will see a section called Roles.

Clicking on the Manage Roles option will present the Manage admin roles panel.

Click the Admin center access radio button and then select the Exchange Administrator option

Click Save changes button.

The user will have to log out and log back in again so that the role change becomes effective.

Exchange Online PowerShell Module V1 (EXO V1) or Exchange Online PowerShell Module V2 (EXO V2) installed on the machine being used.

Exchange Online PowerShell Module v1 (EXO V1) does not support Multi-Factor Authentication (MFA). So, if the account that you are using for performing the action has MFA enabled, consider using Exchange Online PowerShell Module v2 (EXO V2).

How to check which Exchange Online PowerShell version is installed?

EXO V1 does not require any installation. All you need to do is connect and import the module using PowerShell commands (commands discussed later).

Since EXO V2 requires an installation, it is always a good practice to check if the required module is installed or not using the below command:

Get-Module -ListAvailable -Name *Exch*

If the EXO V2 module is installed, check what version is currently installed, you can run the below command:

Import-Module ExchangeOnlineManagement; Get-Module ExchangeOnlineManagement

At the time of writing this content, the latest version of the EXO V2 module was 2.0.4. You can refer to the Release Notes section of this article to get the version of the Current Release:

About the Exchange Online PowerShell V2 module | Microsoft Docs

How to install

As stated above, only Exchange Online PowerShell version v.2 (EXO V2) requires installation, to install the EXO V2 module for the first time, complete the following steps

How to update

If the module is already installed on your computer, you can run the command we shared above to see the version that is currently installed and update it to the latest version using the below command:

How to uninstall

To uninstall the module, run one of the below command (in an elevated PowerShell window)

List of users in .csv format

Ensure the CSV file is in the same folder where you run this PowerShell script from

Below is the sample for the CSV file:

Email Address

John.doe@contoso.com

Ricky.Ponting@contoso.com

Turn Focused Inbox On or Off in your organization

You use PowerShell to turn Focused Inbox on or off for everyone in your organization.

Note: This change cannot be performed from the Microsoft 365 Admin Center.

Executing the script on the mailboxes

Now that you have clarity on whether you are using the EXOV1 or EXO V2 PowerShell Module, it should be easy for you to decide which path to follow.

EXO PowerShell V1 execution process

Before you run the script, please ensure you have met all the pre-requisites so that you get the desired outcome. After you confirm having met all the pre-requisites, copy and save the below script in your favourite script editor and save it as a AllUsers.ps1 file ensuring that the script and the CSV File are saved in the same location.

#Make sure the csv file is in the same folder where you run this powershell from

#Connect to Exchange Online PowerShell

Set-ExecutionPolicy RemoteSigned

$UserCredential = Get-Credential

$Session = New-PSSession -ConfigurationName Microsoft.Exchange -ConnectionUri https://outlook.office365.com/powershell-liveid/ -Credential $UserCredential -Authentication Basic -AllowRedirection

Import-PSSession $Session -DisableNameChecking -AllowClobber

#Change this to path of the csv file that contains EmailAddress of all User Mailboxes you want to get a report for

$List = import-csv ".AllUsers.csv"

#Loop through each row in csv

ForEach ($User in $List)

       {

              $UserID = $User.EmailAddress

              Set-FocusedInbox -Identity $UserID -FocusedInboxOn $False

              Write-Host "Focused Inbox disabled for $UserID"

       }

Remove-PSSession

EXO PowerShell V2 execution process

Before you run the script, please ensure you have met all the pre-requisites so that you get the desired outcome. After you confirm having met all the pre-requisites, copy and save the below script in your favourite script editor and save it as a AllUsers.ps1 file ensuring that the script and the CSV File are saved in the same location.

#Import Exchange Online PowerShell Module

Import-Module ExchangeOnlineManagement

#Connect to Exchange Online PowerShell

Connect-ExchangeOnline -UserPrincipalName <UPN>

#<UPN> is your account in user principal name format

#Change this to path of the csv file that contains EmailAddress of all User Mailboxes you want to get a report for

$List = import-csv ".AllUsers.csv"

#Loop through each row in csv

ForEach ($User in $List)

       {

              $UserID = $User.EmailAddress

              Set-FocusedInbox -Identity $UserID -FocusedInboxOn $False

              Write-Host "Focused Inbox disabled for $UserID"

       }

Remove-PSSession

Verifying the outcome

After we are done running the above script, we now need to verify if the focused inbox has been disabled for the users or not. In order to verify the same, run the below command and then Look for FocusedInboxOn to view its current setting:

Get-FocusedInbox -Identity <john.doe@contoso.com>

Conclusion

Well, you now know that the Focused Inbox can be disabled at the Org level as well as for specific users. You should now be able to decide how you want to implement the change.

References

Configure Focused Inbox for everyone in your organization - Microsoft 365 admin | Microsoft Docs

Akhil Ohri

Written By-  Akkhil Ohri

(Microsoft 365 Solution Architect)

Written By-  Akkhil Ohri

(Microsoft 365 Solution Architect)

Jasjit

Peer Reviewed By-  Jasjit Chopra

(CEO)

Peer Reviewed By-  Jasjit Chopra

(CEO)

Sanika

Graphics Designed By- Sanika Sanaye

(Creative Design Director)

Graphics Designed By- Sanika Sanaye

(Creative Graphic Designer Trainee)

Configuring mail routing for hybrid migration scenarios in Microsoft 365

Objective

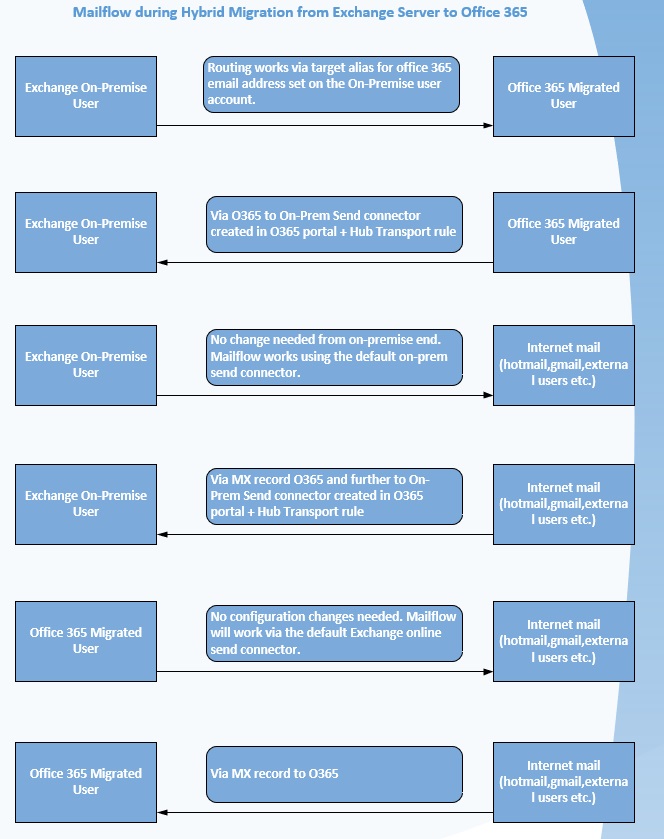
This article will help you configure mail routing during the hybrid migration process from your on-premises mail server to Exchange Online (Microsoft 365). This will ensure zero interruption for your mail flows when some of your user mailboxes will be On-premises while the others have been migrated to Exchange Online.

Scenario

Today, we will cover a scenario where your organization has Exchange Server 2016 On-premises and are planning to migrate to Exchange Online (Microsoft 365) via the hybrid migration, without any 3rd party tools or services.

This involves the process of running the exchange hybrid configuration wizard.

For this scenario, centralized routing is disabled (centralized routing is recommended only for compliance requirements).

Prerequisites

Username Mailbox Type Mailbox Size (GB) Migration Date Successful (Y/N)

John Doe

User

4.52

12th May 2021

Y

Bill Gates

User

66.5

14th May 2021

Cell

Configuration Steps

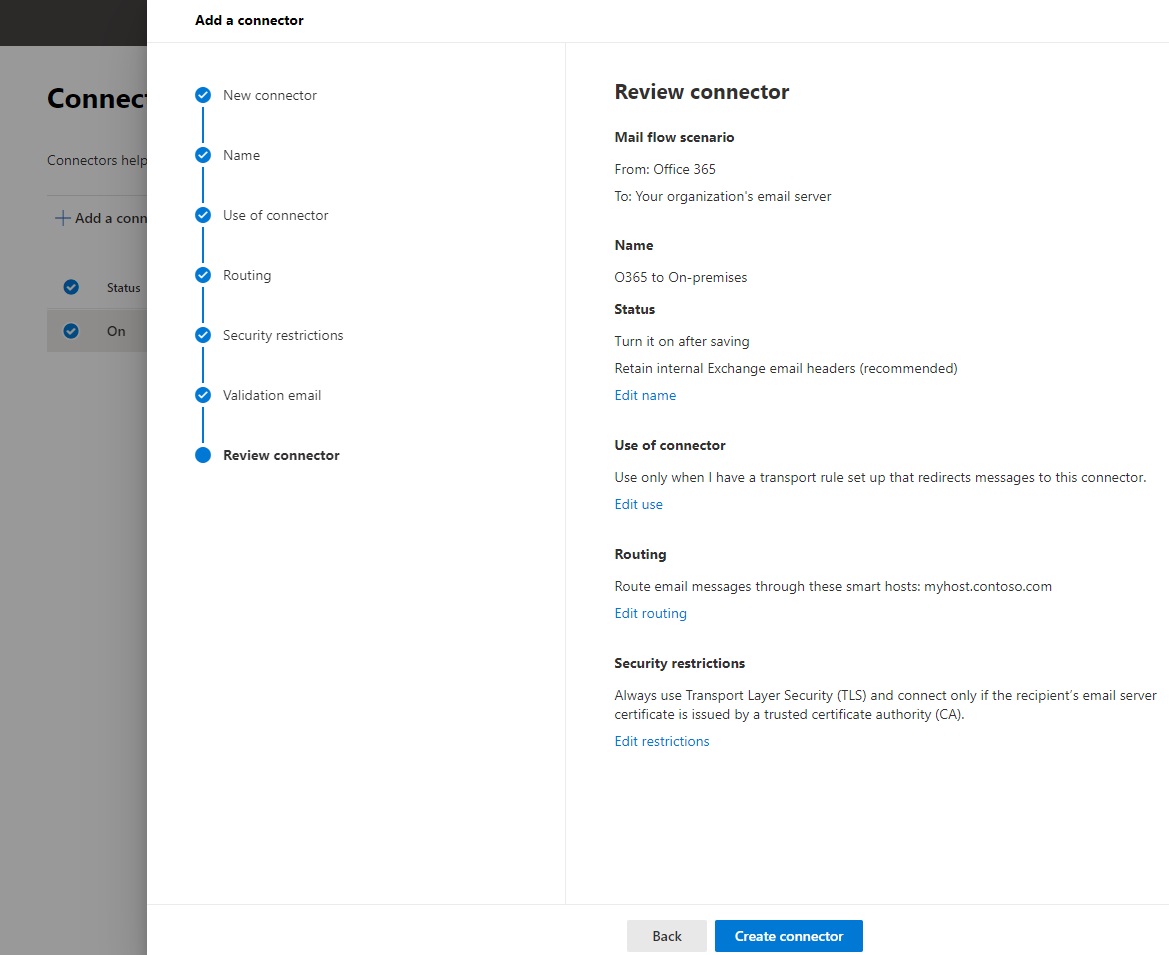
Create a Send Connector

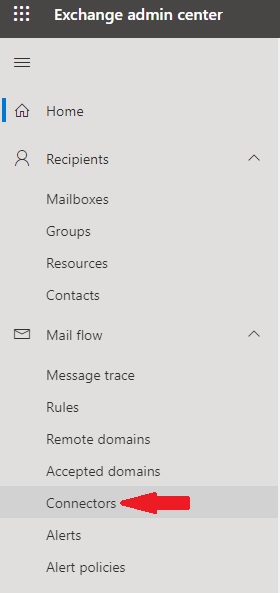
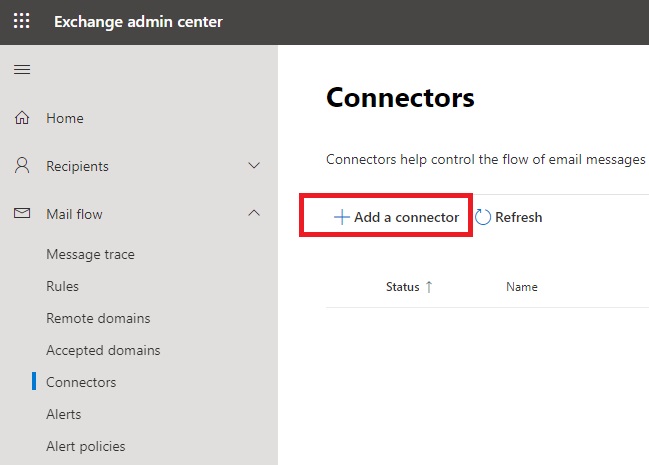
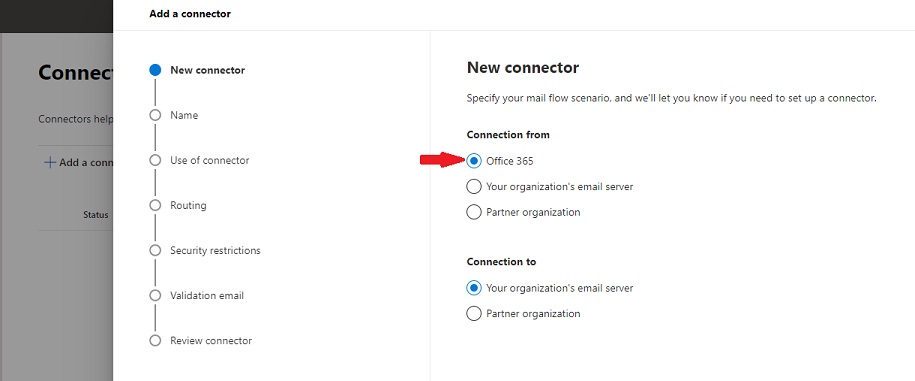
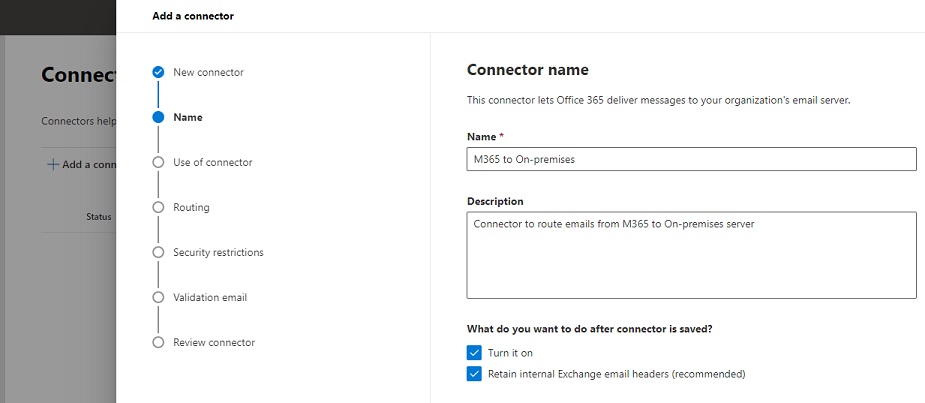
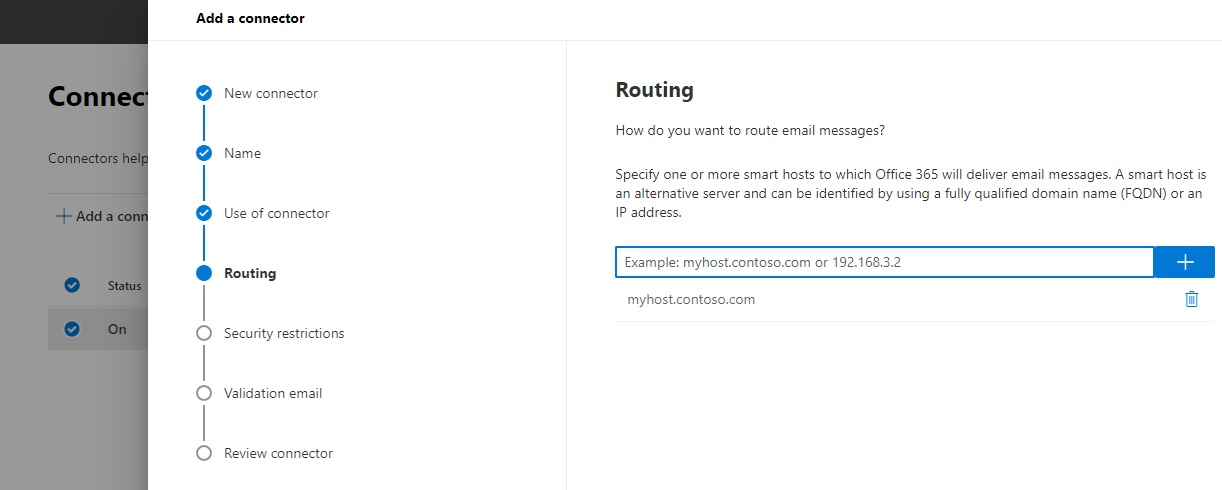
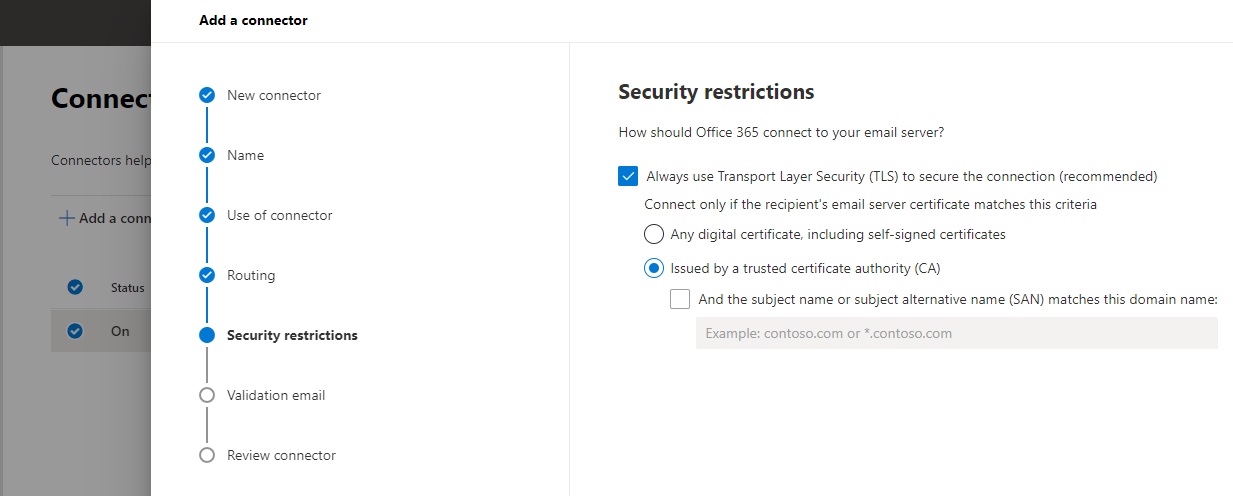
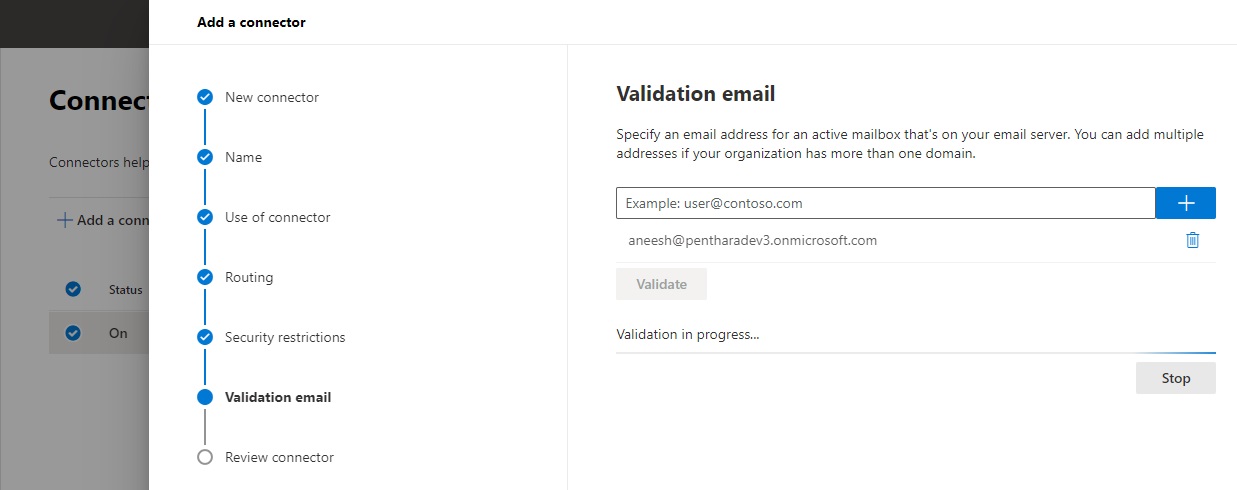
  1. To begin with, we need to create a Send connector in the exchange admin center that will be used to route emails from M365 to your On-premises server. (Note: The Hybrid Configuration wizard will create the connectors for you by default. In case you want to make changes to the connector for TLS etc., you can either create a new connector or edit the existing one.)

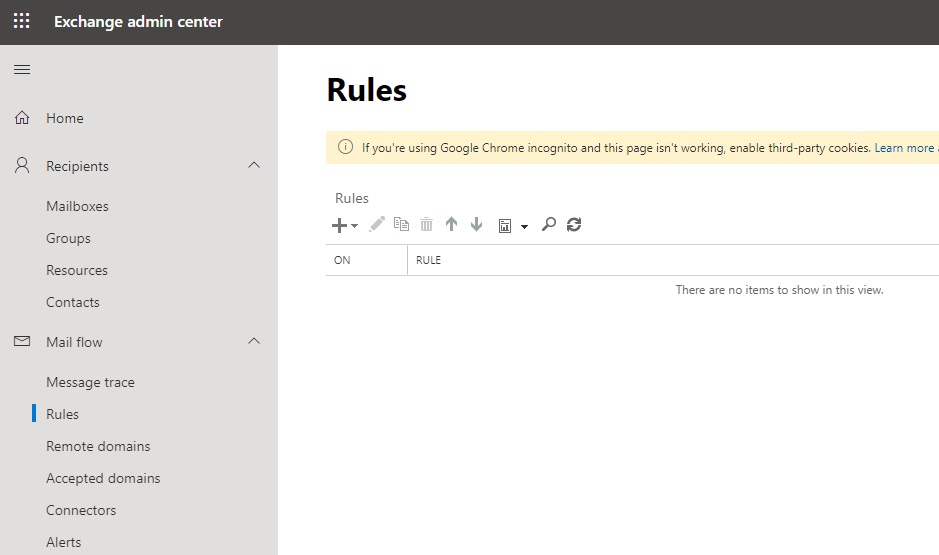
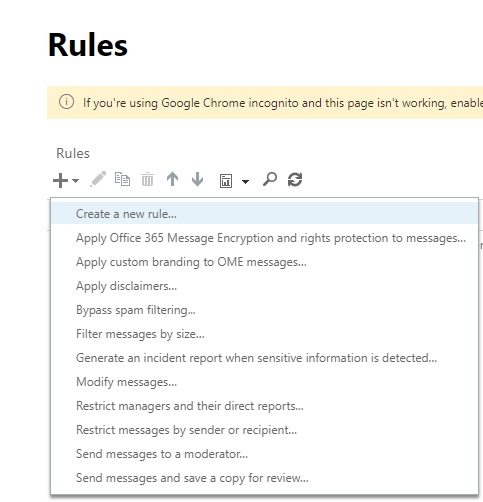
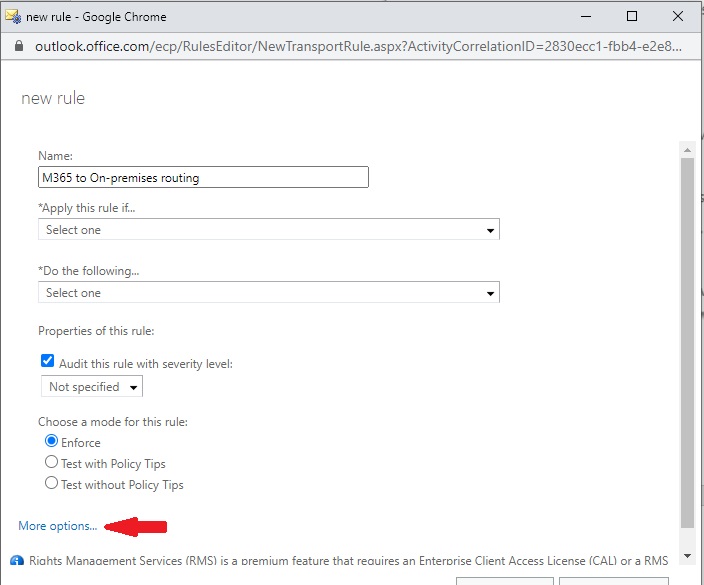
Create a Transport Rule

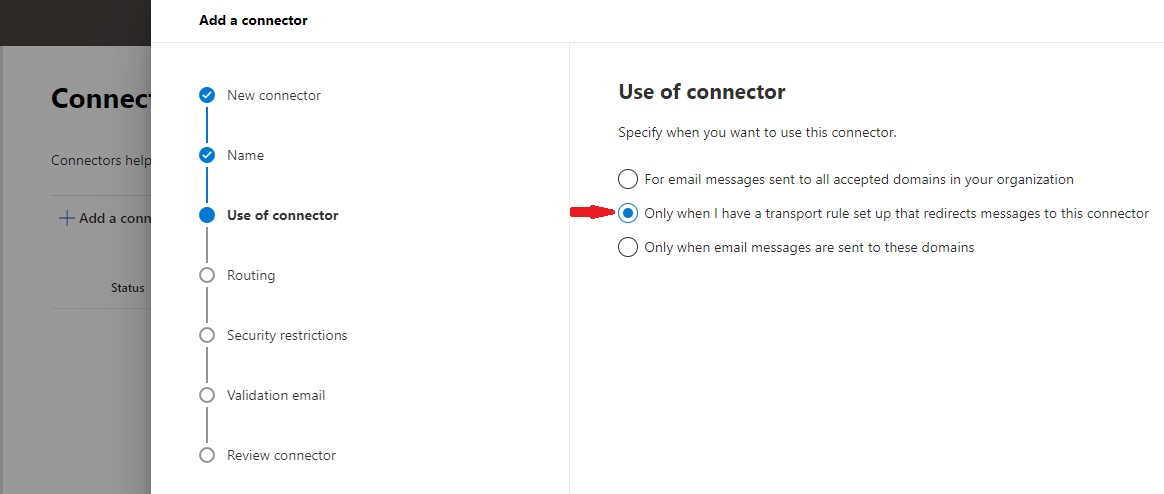
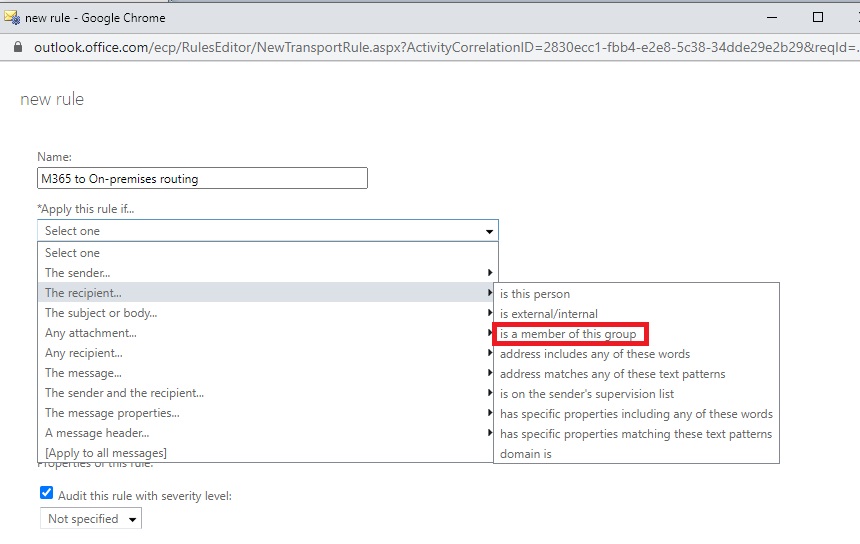
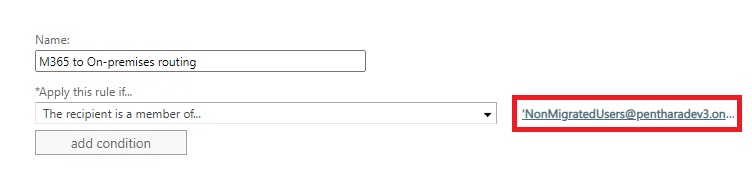
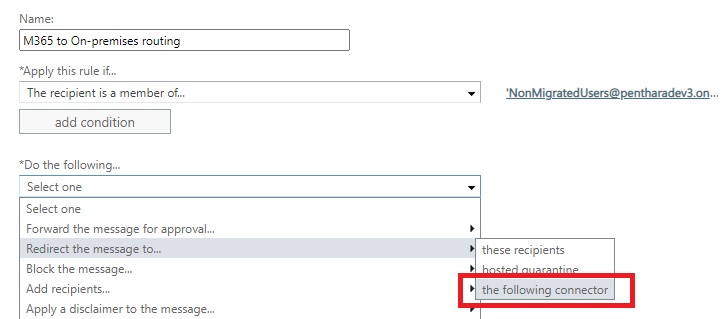
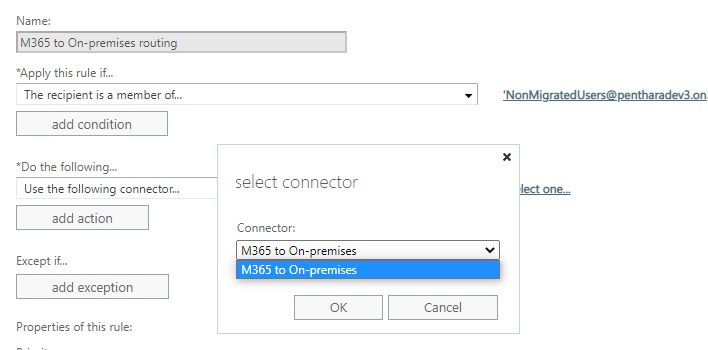
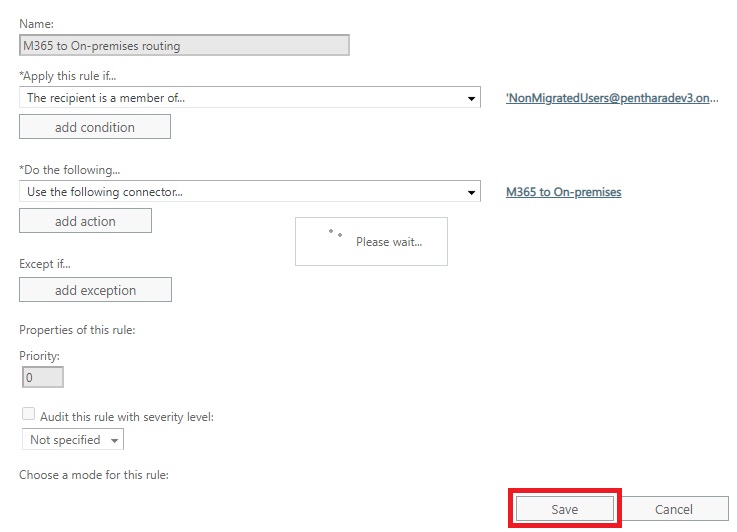
We will create a transport rule to route mails from Microsoft 365 to your On-premises for all users whose mailbox is still in an On-premises environment.

Update the MX record to point to M365

  1. Follow the below link to generate and update the MX Record for your tenant.
  2. Add an MX record for email (Outlook, Exchange Online)

Conclusion

AneeshKumar

Written By-  Aneesh Kumar

(Microsoft 365 Solution Architect)

Written By-  Aneesh Kumar

(Microsoft 365 Solution Architect)

Jasjit

Peer Reviewed By-  Jasjit Chopra

(CEO)

Peer Reviewed By-  Jasjit Chopra

(CEO)

Sanika

Graphics Designed By- Sanika Sanaye

(Creative Design Director)

Graphics Designed By- Sanika Sanaye

(Creative Graphic Designer Trainee)

Is Documentation Enough to clear AZ-104 Exam?

With the increasing demand for cloud-related work within the industry, organizations require their current and future employees to be well skilled with the latest cloud advancements. With the word ‘cloud’, the first few names that strike in our minds are Azure, AWS and GCP. Though Oracle cloud is gaining a lot of success, still the top three leads the race by enough margin. Certification is one of the indispensable ways to benchmark your professional and successful IT career. More than anything, we believe the learning journey is more important than the actual certificate itself.

Therefore, today we are going to discuss the associate level certification provided by Azure i.e., AZ-104 Azure Administrator Associate and discuss whether studying only the documentation will make you clear this exam or not.

Latest Updates:

The course content for this exam will be updated on 25th May 2021. What will be the updated content? Since Microsoft updates its course content based upon new changes or features it has made or added. You can see the updates here.

Roles, Responsibilities and Job Areas:

After successfully clearing the exam, one can manage and monitor identity, governance, networking, storage, cost, instances in a cloud environment (specifically Azure).

An individual can apply for administrator-level roles in an organization. This certificate on your resume could also help in improving your chances of getting selected from the pile of resumes any organization might receive for a particular post.

About the Exam:

About the exam

While appearing for the exam at home, the duration of the exam is 120 minutes, do not forget to add additional 30 minutes to this as you need to log in half an hour before being assigned a resource person on time. Giving an exam at the center does not require than additional half an hour to be assigned a resource person. Moreover, most of the centers are closed due to coronavirus pandemic and it is better to appear for the exam at home.

So, the question here is who should take this exam? It is suggested that candidates for this exam should be experienced with having at least six months of hands-on training in implementing, managing, and monitoring an organization’s Microsoft Azure Environment.

Is documentation sufficient to clear this exam?

The answer to this question is a big NO. An individual with no experience with azure must put in a lot more effort (practical implementation) rather than just going through the documentation. On the other hand, one having good knowledge, hands-on experience, and enough confidence with all the aspects may proceed with reading only the document thoroughly. Microsoft provides a great source of learning through its documentation.

For a student or a fresher who desires to take this exam, they must be atleast clear with the fundamentals of azure. In addition, they would have to read the documentation in detail and implement it practically on Azure.

Experienced professionals having more than 2 years of working experience overall including at least six months of which in Azure may proceed with reading the documents thoroughly. This is because they have been practically working with Azure before and have enough hands-on expertise to clear the exam.

Apart from documentation, it is highly recommended to also test your expertise and understand how the exam is conducted by attempting various practice exams as well.

How to prepare yourself?

How to prepare yourself

Microsoft learn portal is a great source for learning about all Microsoft products and services.

Practice Exams with multiple-choice questions is a great way of clearing the concepts in depth. MCQs include tricky options which become difficult to answer as more than one option seems correct. The more you give the MCQs and practice exams, the more you will be confident and overcome the fear of attempting the actual exam.

For those not having an active Azure subscription and want to do practical implementation; Microsoft provides a free azure trial for 12 months ($200 credits). Click here to sign up for azure now. Also, Microsoft and tech communities organize various conference, events, and virtual training after successful completion of which sometimes they provide with either Azure Coupons or free certification vouchers.

My Experience of clearing the exam.

My name is Raghav Jain. I joined Penthara Technologies in October 2020 as a Cloud Engineer Trainee. Before that, I knew cloud, but it is only after joining the company I started implementing the things practically being provided with $150 worth of credits every month via Visual Studio subscription (formerly MSDN subscription) by the company. As a trainee, I was always guided by my super friendly mentors. Later in December, I cleared my Azure fundamentals (AZ-900) exam and in March 2021 I successfully cleared AZ-104 in one attempt.

Throughout the preparation for the exam, certain topics required more attention in detail to understand. ’Manage Identities and Governance was the module I found a bit complex at first but later interesting. It majorly includes creating and managing users, giving role-based access (RBAC) to a specific user, creating custom roles for Azure resources as per the requirement. Azure Active Directory (AAD) includes a lot of things that require some serious hands-on implementation to understand what is going on, how things are working all together. It is very important to understand the different licenses and their features ranging from free to Azure AD Premium P2. This was the area that I focused on and worked hard implementing everything practically which gave me enough confidence to answer questions from this topic.

I would suggest to practically implement all subsections covered in the ‘Configure and manage virtual networks for azure administrators’ module to understand how the networking operates in azure.  The majority of the questions (25-30%) are being asked from this module and the questions are tricky as well. Giving practice exams will clear these concepts more as it will cover most of the scenarios.  Load Balancing, DNS, Vnet Peering, Azure Bastion are some of the aspects covered in this module.

‘Implement and Manage storage’ is a module that is important to understand thoroughly as it clears all the aspects related to azure Blob, Table, File, Queue and VM disks. Azure provides different series and sizes of its VM disks. It is not possible to remember all VM sizes, but one must at least know which series (A, B, D, H, etc.) is best suited as per the requirement. In the exam, I was given a scenario where I had to choose the right-sized disk which fulfills the given requirements and is also cost-efficient. 15-20% questions (mostly scenario-based) do come in the exam from this module.

‘Deploy and Manage Azure Compute Resources’ module covers the azure compute resources. I found this module very interesting to study and implement except that it lagged more in depth understanding of Kubernetes. For instance, it is mentioned in the documentation about Azure Kubernetes Cluster (AKS) and how to deploy them on Azure but before deploying it, a lot more understanding of Kubernetes is required in advance which needs to be studied from the other resources. Therefore, I felt that it is better to study them through other resources to have an actual understanding of what they are. Also, while giving practice exams I was not confident enough to answer questions on Kubernetes, So I studied these topics, their basic commands watching videos on YouTube. One of the videos I liked was What is Kubernetes. 25-30% of the questions in the exam are asked from this module. Successful completion of this module makes one eligible to deploy and configure virtual machines, containers, and web apps in azure.

‘Monitor and Backup Azure Resources’ is a short module and covers Azure Monitor, Backup, Logs, Alerts and Site Recovery. Monitoring performance of virtual machines by using Azure Monitor for VM’s was the subsection in which I missed to go a step further in understanding the syntax and structures i.e., after successfully deploying the log analytics workspace, which is used to run azure monitor log queries, I simply ran built in queries which are just a click away. Whereas it is very important to understand the syntax of the queries. The queries are written in Kusto Query Language (KQL). In the exam, you will not have to write any query instead you will be asked to choose the correct syntax out of the given four options. In my case, I got confused with two options as they were very similar, but I did not know that KQL is case sensitive (typically in lowercase). As a result, I got my answer wrong as I selected the one written in uppercase. I would highly recommend remembering the syntax and operators used for KQL so that you can easily judge the right query and answer in the exam.

Completing this module makes an individual learn how to monitor resources by using Azure Monitor and implement backup and recovery in Azure. 15-20% of the questions in the exam are asked from this module.

Resources to help you study for the exam.

Resources

There are many ways to study and prepare for the AZ-104 course. Self-learning modules include Microsoft learn portal, official documentation. Also, there is an option of paid instructor led training. Moreover, practice exams and MCQs can be found on learning portals like Udemy, SkillCertPro, etc.

Personal Suggestions:

Raghav Jain

Written By-  Raghav Jain

(Cloud Security Engineer)

Written By-  Raghav Jain

(Cloud Engineer Trainee)

Jasjit

Peer Reviewed By-  Jasjit Chopra

(CEO)

Peer Reviewed By-  Jasjit Chopra

(CEO)

Sanika

Graphics Designed By- Sanika Sanaye

(Creative Design Director)

Graphics Designed By- Sanika Sanaye

(Creative Graphic Designer Trainee)

A newbie’s guide to presenting your design work

Introduction

As designers, we love finding solutions to problems and creating work that has an impact. However, to convince others, especially the clients, we must communicate our idea well. This is what I will be talking about in this post. Whether we are pitching to a client or showcasing our work online, we communicate our reasoning behind a solution through presentations. So, we might as well learn how to make one that will have the most impact on the audience.

Understanding which sections to include in our presentations and why to include them is necessary if we want to get our point across to others. So, we will begin by first understanding what sections you should include and what value they bring to your presentation.

Purpose

It is very important to know the “why” behind a particular project. Whether it is to help a client solve a business problem or contributing to a cause you believe in, the purpose behind a project is what fuels the motivation to create it. Including it in your presentation gives a back story for the audience to relate to your proposed solution.

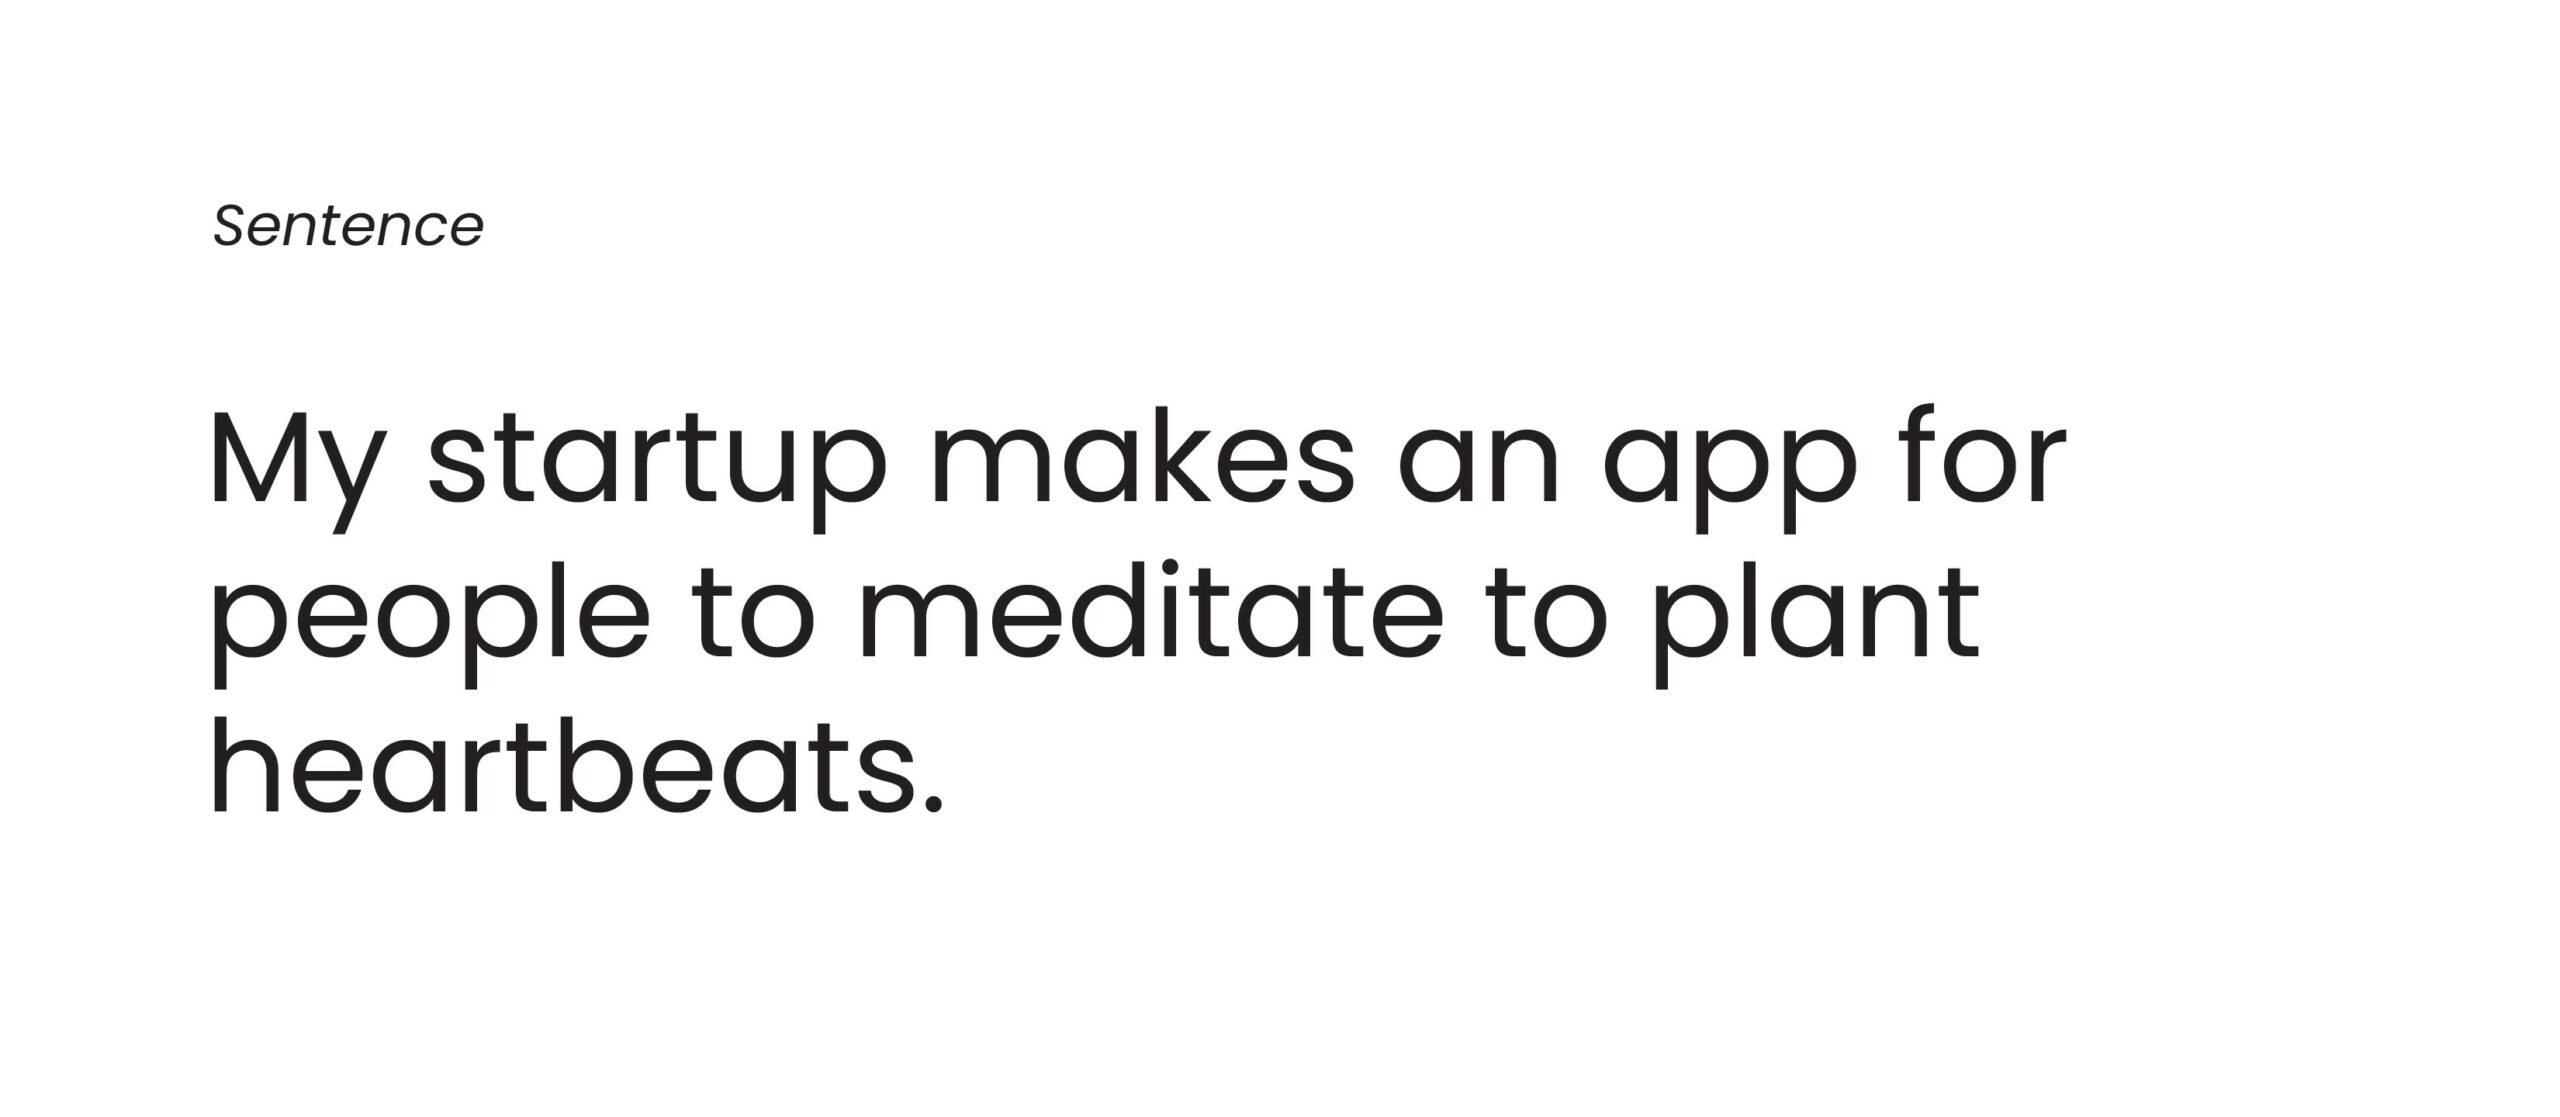
For example, this was the purpose behind a meditation app project I created for my graphic design specialization course from Coursera.

Another important factor is to set clear objectives and key results for the project. Often, when you are working with a client, you might be given a creative brief with all these included. Other times, you might have to set your deadlines, objectives, and key results. Having these in your presentation allows your audience to understand what you were trying to achieve. When you justify your creative decisions concerning the deadline and objectives, you get clarity on the thinking you implemented behind those decisions. This also makes it easier for others to give you constructive feedback.

For example, my capstone project was divided over 6 weeks and, each week, we had to complete a part of the project and submit it for review. There would be a brief to guide us through the assignments which helped us to get a clear idea of what is expected and what is to be delivered. The objectives in the brief were helpful for us in gauging if we had completed the assignment and for others as a framework to review our assignment.

Research

Once you have decided the purpose behind your project, you sort of have an idea about the overall theme of the project. This is the time to take inspiration and research more about the topic. For my project, my theme was developing meditation as a habit. So, I went ahead and read more about the history of meditation, the tools that are out there now such as Calm or Headspace, and the ways to make a habit stick. I used the Calm app as a reference for developing the UI of my project.

In the course, we were asked to come up with three words to describe the feel of our brand. This was yet another research task where I went and researched the words most associated with meditation. Apart from that, I also tried to google words and synonyms for what I wanted the audience to feel about the brand.

Ideation

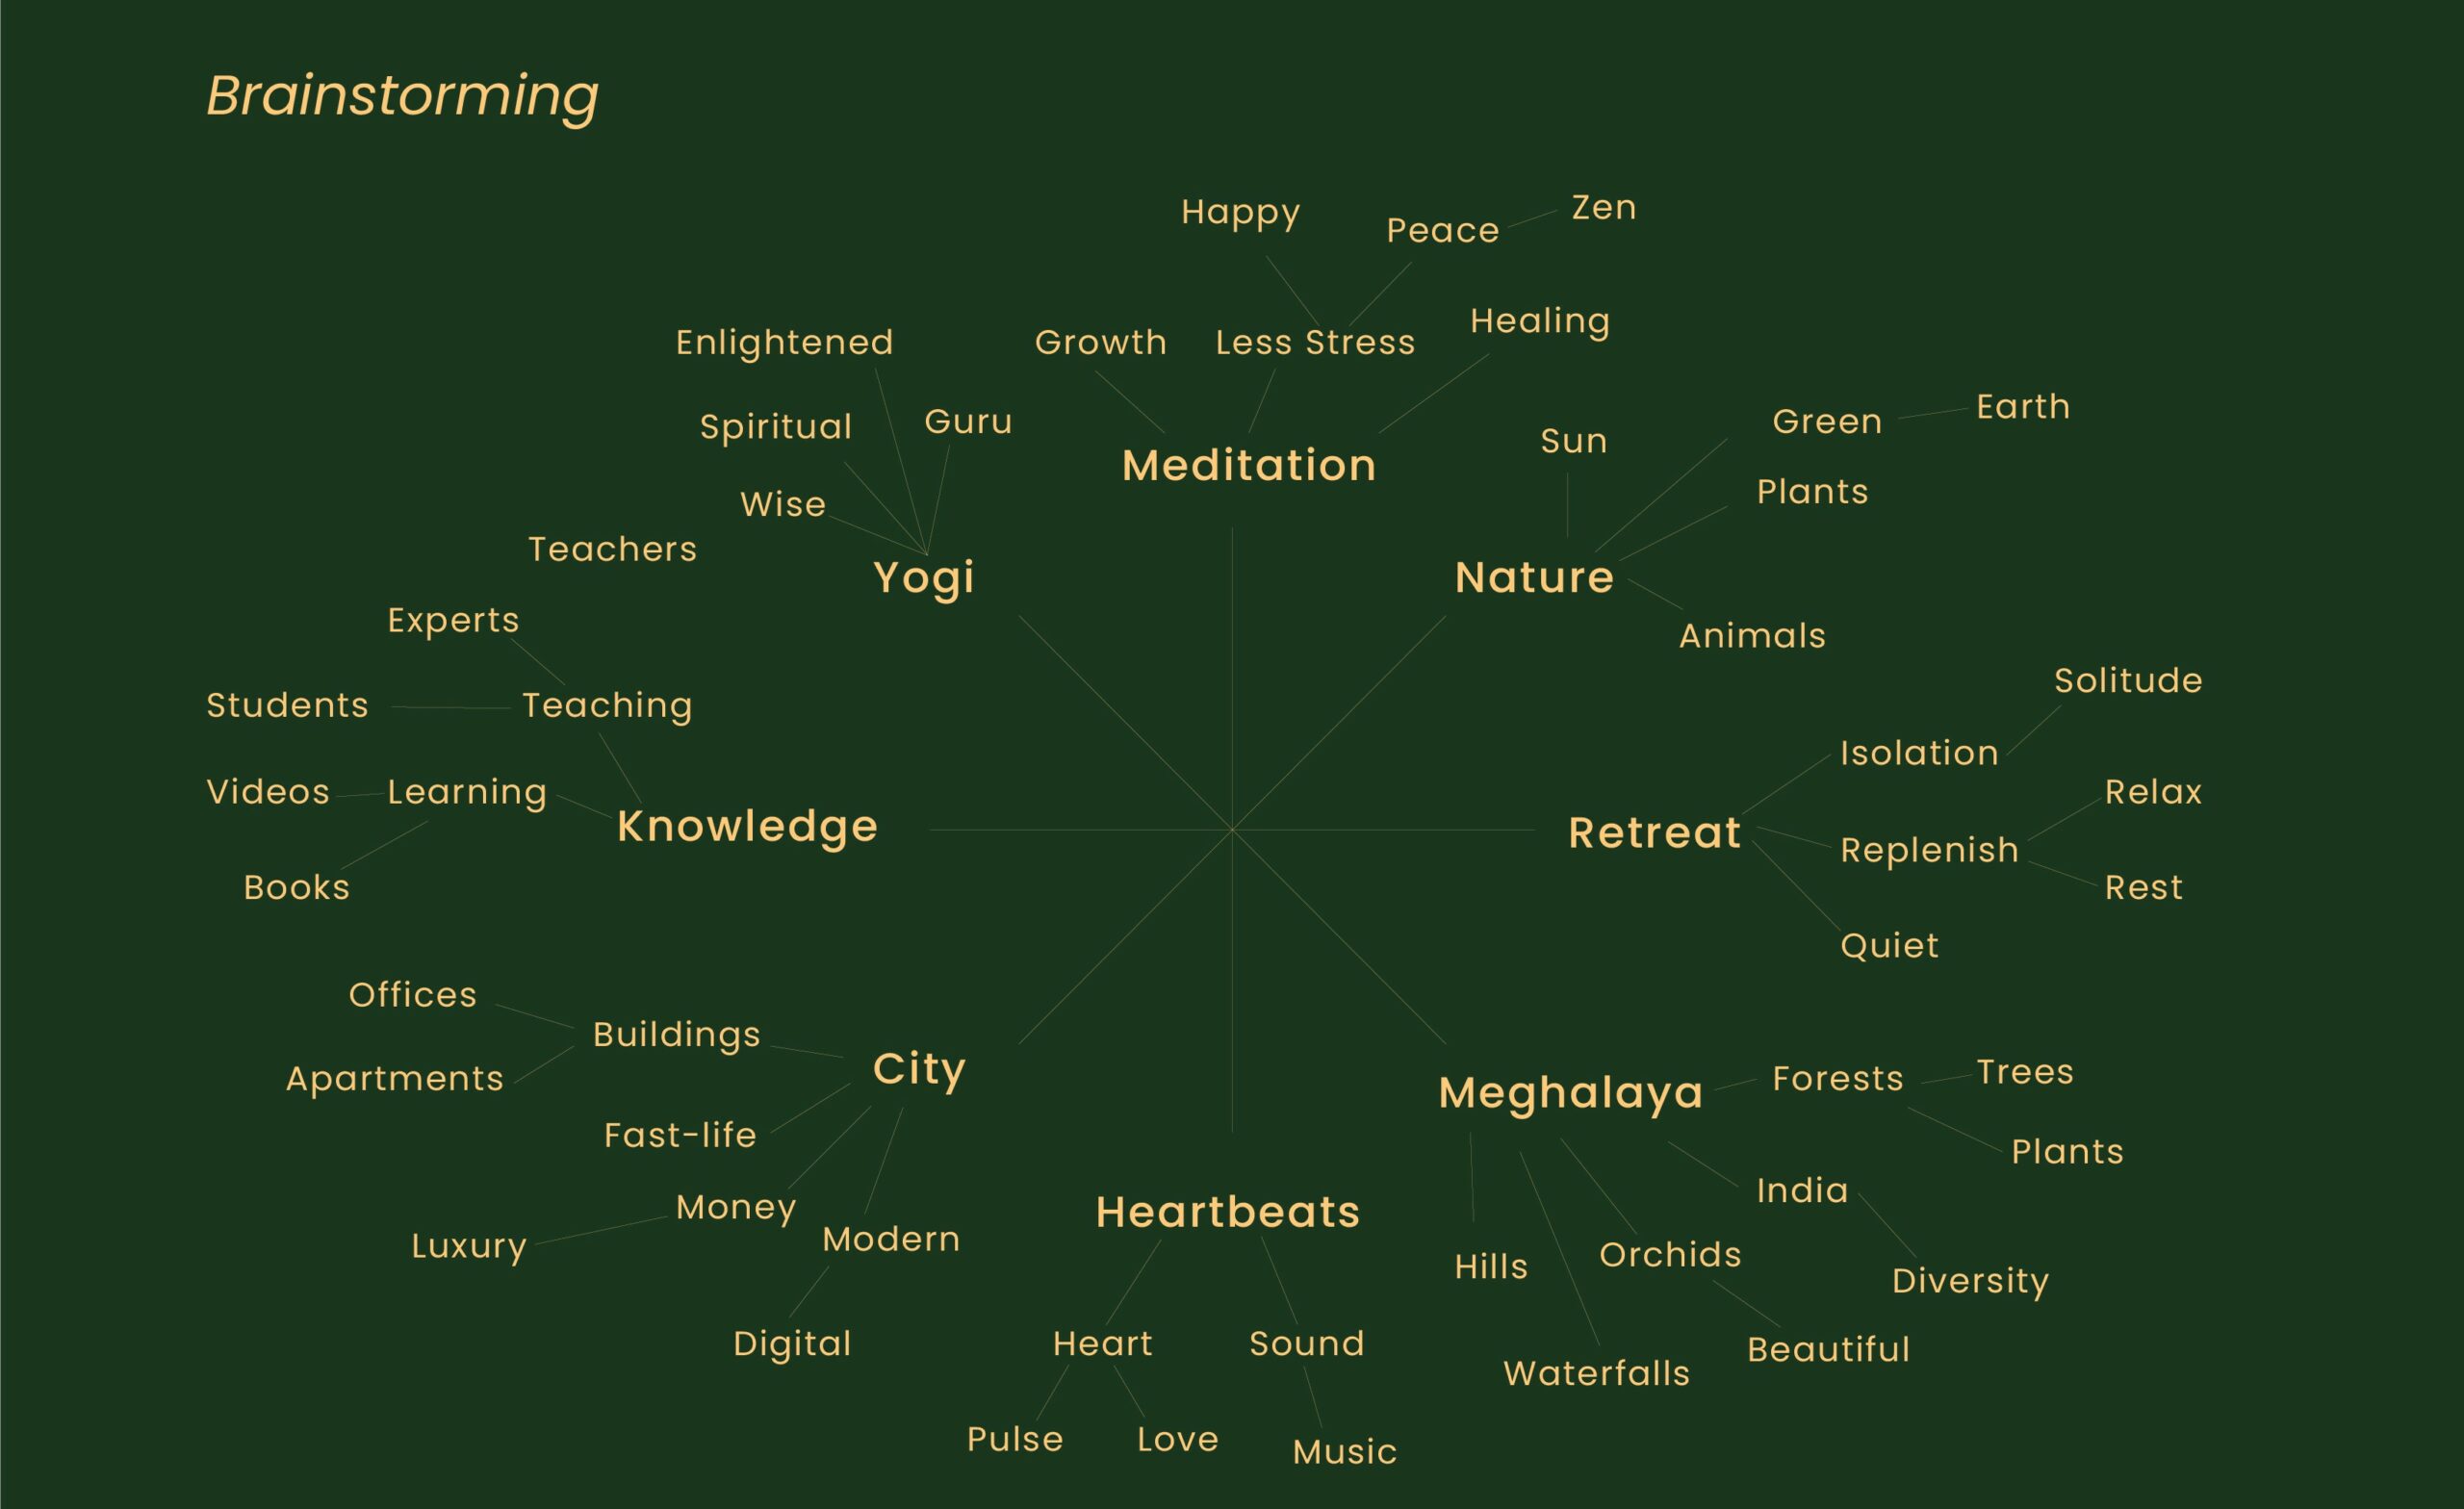
Once we have our research with us, we can go on to ideation to come up with ideas for the project. There are many ideation techniques out there, but we will focus on the mind map for this blog. In a mind map, we start with the theme of the project or the name of the project and map out branches of all the terms associated with it. With each level of the mind map, we go further and further away from the core theme of the project. It allows us to look at every aspect of the background of the project as an individual element instead of one unit. This can lead to some innovative ideas which we may have otherwise overlooked.

This is the mind map I used to come up with the name as well as the entire branding idea of my capstone project.

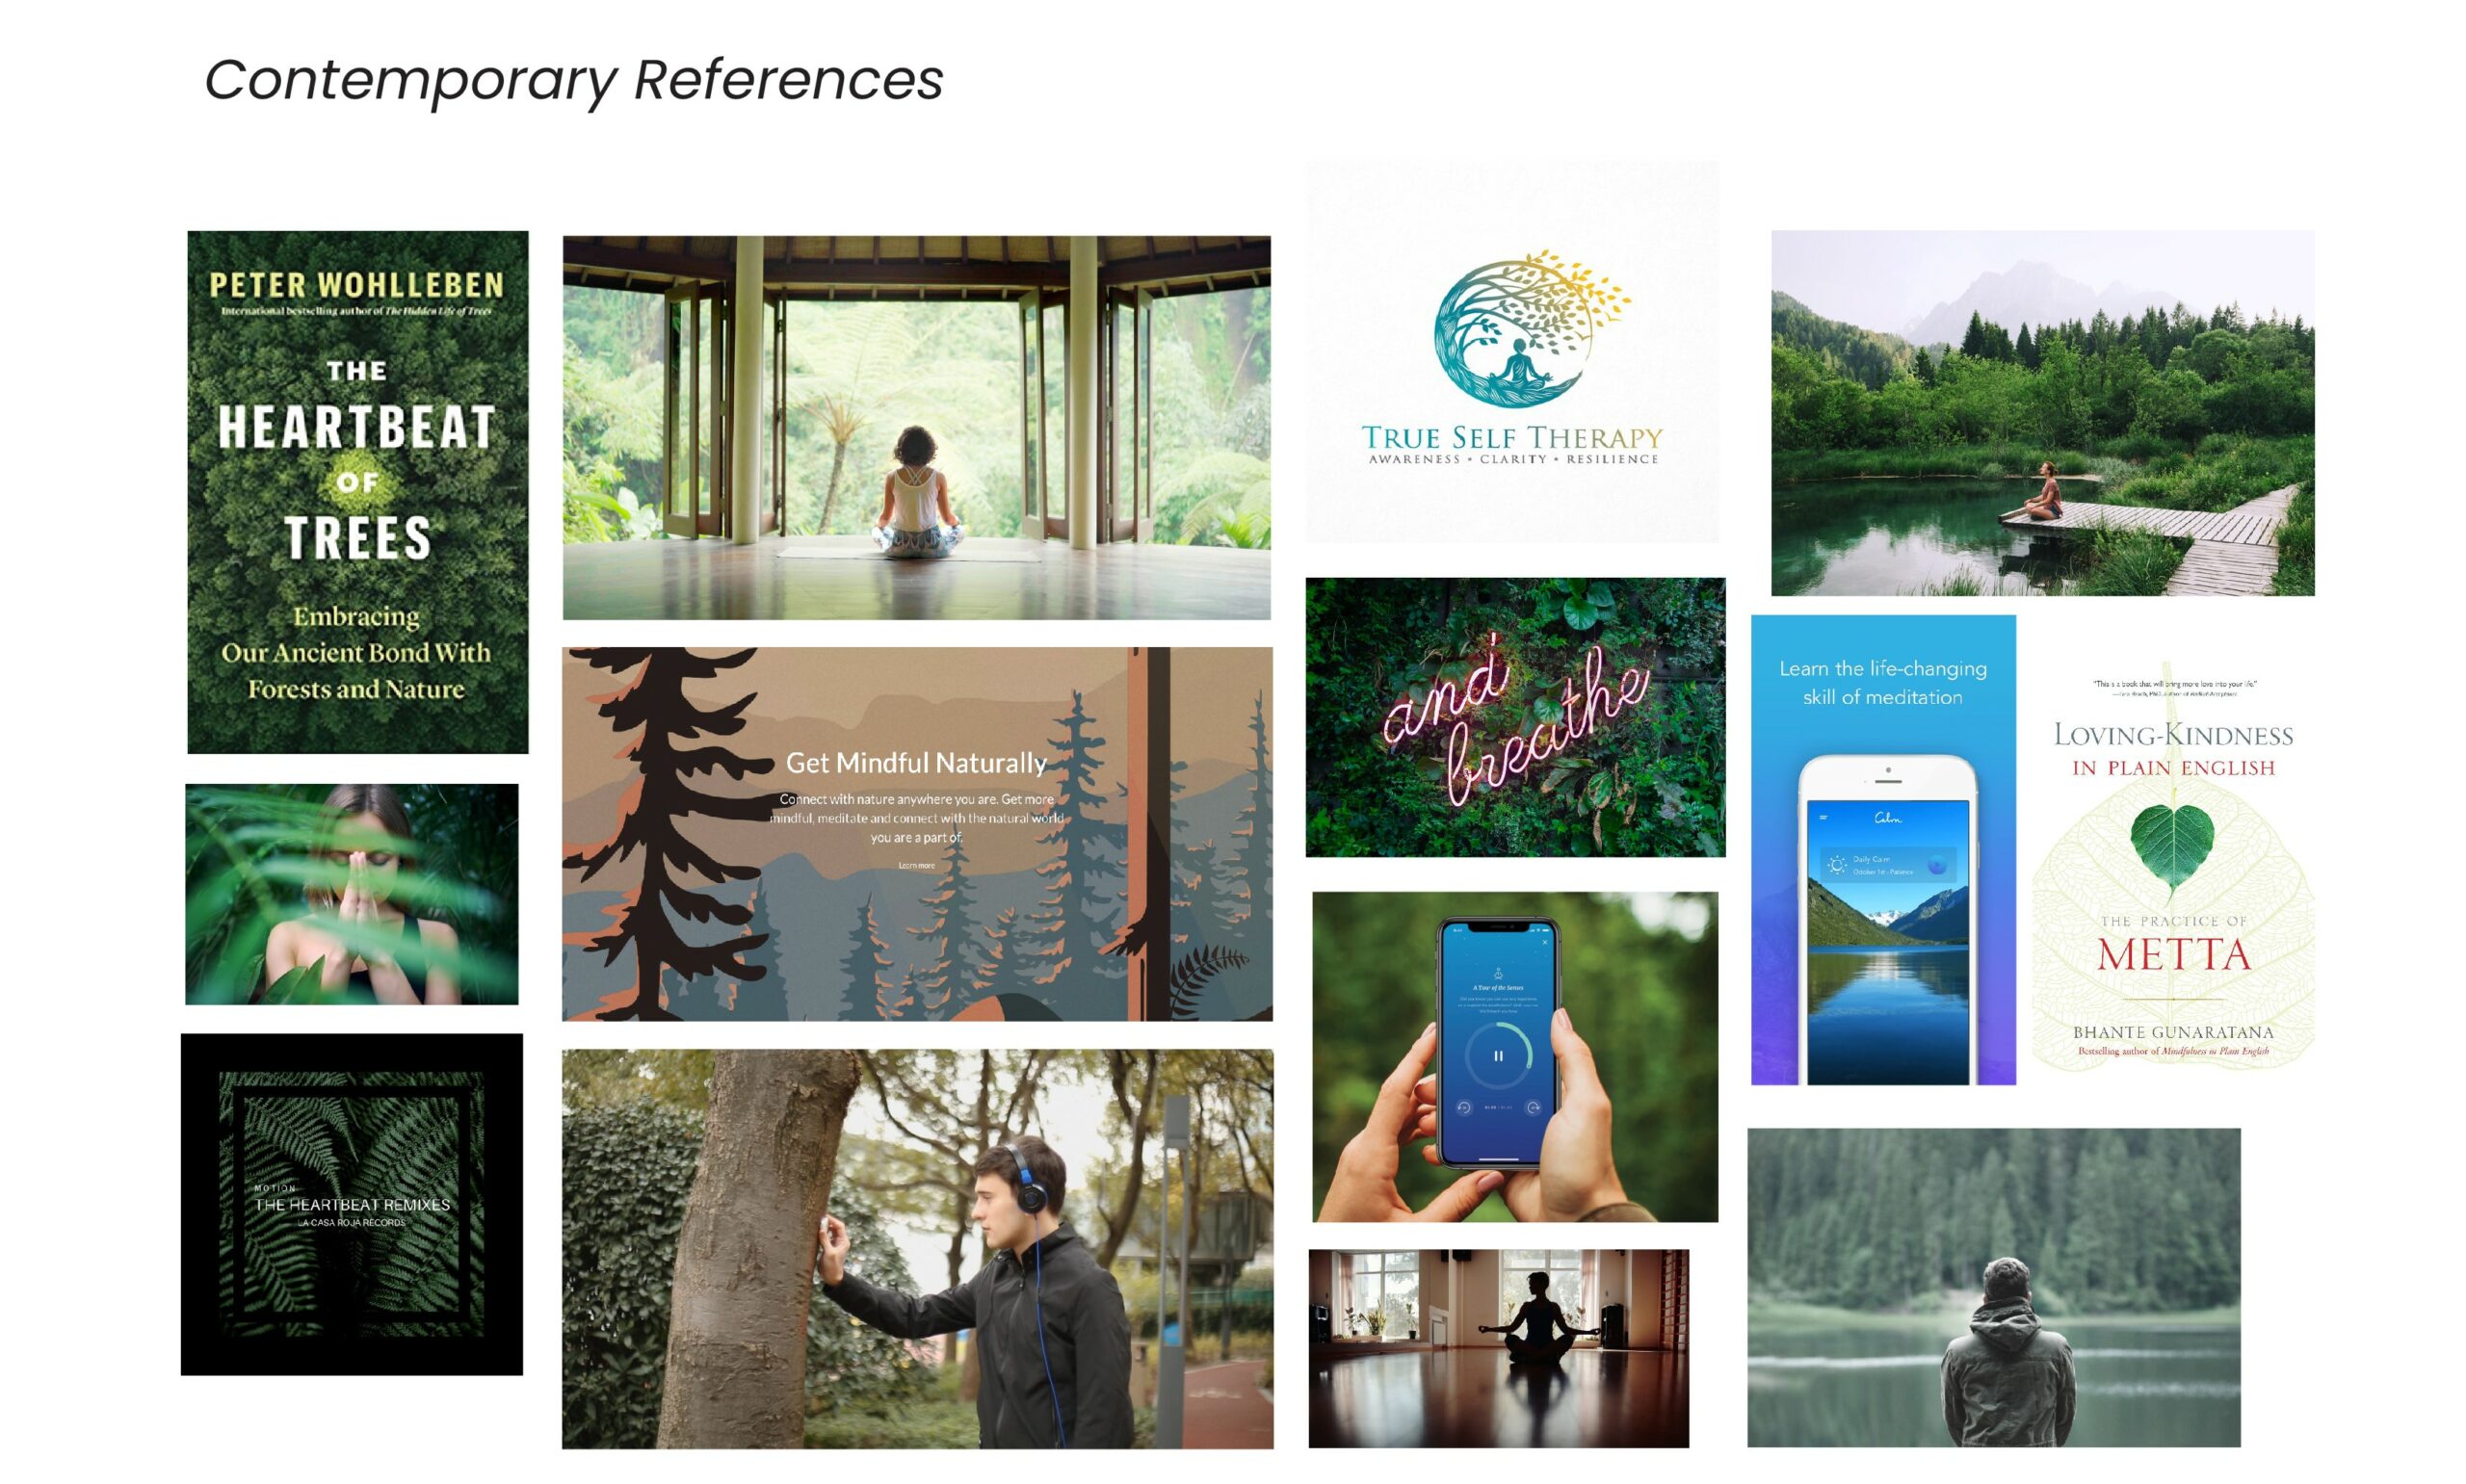
Apart from this, you can also create a moodboard from the references you have collected in your research to draw inspiration and ideas from. These are the moodboards I made using my research for the project.

The goal of the ideation stage is to come up with three words that you can use to define the aesthetics and feel of the project. These are the words on which you will base your design decisions to achieve the result. These words will also help the audience to understand the criteria you used to filter out all non-serving design elements and see whether you did a good job of it.

So, for my project, I wanted my brand to feel – Immersive, Inspiring and Curative.

Creation

Once the ideation stage is done, we roll our sleeves up and get creating. Depending on the project you can have different deliverables such as logo, illustration, user interfaces, packaging and so on. After you have worked out all the different variations of your deliverables, you might make iterations of the one you have finalized upon. When it comes to presentation, it is neither feasible nor advisable to make your audience go through all of them. So, here comes the question - What are the three best options that you are willing to show your client? This question gets the ball rolling for you to make some tough decisions and eliminate all the iterations that do not make the mark. The mark being the design objectives you have decided upon in the earlier stages.

This stage is basically to showcase how well you have executed your objectives and what the design looks like. You can always go a step further and put the design on mockups to help your audience visualize the designs in the physical world.

Here are the deliverables I made for my capstone project –

          1. Logo

Note: When presenting logo do include the sizes for all the various platforms it will be used in like mobile apps, websites, print, etc.

          2. Mockups 

This is the mockup for a business card. It helps to understand how the logo might look on the card.

Since the theme of my app is about sounds generated from plant heartbeats, I have also made a mockup of a CD Album which could be the brand’s extended product.

Below is an advertisement banner mockup where we can see how the brand might communicate the experience of using the app through graphics.

          3. User Interface

This is how the home page of the app looks like. Putting it on a mockup further clarifies the look and feel of the app.

Presentation

Now that we have understood what parts we must include in our presentation, let us have a look at which ones to include for different purposes.

There are largely three categories where we use the presentation as a means of communication for showcasing our projects –

Pitching to a Supervisor or Client

When pitching to a supervisor or a client, you must document the entire process and reasoning that helped you to reach the final result. This includes the design brief (which is somewhat like the purpose section), research as well as ideation. You also must include the creation part but only include the three iterations of the final variation. You do not want to confuse the client too much by showing them all the other choices. If you have made any mockups, include them in the presentation. This helps the client understand how the design will look in a physical space.

Here are a few examples of good creative process presentations–

http://www.helenbentley.com/lyft-rider-redesign

https://www.brehuang.com/uber-scooters

Online Portfolio Website

For online portfolio websites, it is advisable to focus on only the final resulting artwork. Often the process behind these designs can be quite lengthy and it is not a good experience to have to scroll through all that to get to the actual design. Also, the format of such websites is not suitable for showcasing the process as they focus more on graphics than text. You can display your final designs here with a brief introduction about the project, the color or typography that you have used and the mockups as well. If you want to point people towards the process behind the final design, you can include a link to a video or blog post where you can walk them through an in-depth explanation of your process and design choices.

For portfolio websites, you can showcase your creation section with brief snippets from the purpose and research sections.

You can check out my presentation of the capstone project I talked about over here

Blogs

A platform like a blog is perfect for documenting the process that you underwent to get to the result. You can use this medium to post long-form content. Such a format can allow you to go into the details about all the sections we have discussed. Blogs are the perfect place for showcasing case studies as there is an emphasis on both texts as well as graphics.

Here are links to some awesome case studies:

  1. http://dbirman.com/grin
  2. https://blog.tubikstudio.com/case-study-appshack-logo-design-for-digital-agency/
  3. https://watracz.com/project/triniso

Sanika

Authored and Graphics Designed By- Sanika Sanaye

(Creative Design Director)

Authored and Graphics Designed By- Sanika Sanaye

(Creative Graphic Designer Trainee)

Jasjit

Peer Reviewed By-  Jasjit Chopra

(CEO)

Peer Reviewed By-  Jasjit Chopra

(CEO)