How to get inspired to come up with innovative design ideas

As a designer, I know that amazing design ideas don’t just appear out of thin air. Instead, they spark when I am most inspired. Despite that, it isn’t easy to control inspiration. We cannot feel inspired whenever we want to. Forcing inspiration on yourself rarely works. Finding it is, however, a more fruitful option. Now the big question is – So from where do I find inspiration?

Finding Inspiration

finding inspiration

Inspiration varies for everyone, and so do its sources. You can be inspired by anything – a memory, an experience, or your most favorite things. Some of these things can be grouped into common categories mentioned below.

Passions

These are the things you enjoy doing in your spare time. Passion is an excellent source of inspiration and motivation. There are countless things one can be passionate about. For example, if you are a tech geek, you could be passionate about computers and their evolution. That would serve as a great starting point for your next project idea.

Favorites

We all have our favorites: favorite food, song, movie, personalities, and such. Now think about why are they your favorite? Maybe you like a particular style of music, or you like a specific cuisine the most. When we introspect like this, we can break our favorite things down to their core characteristics. The item itself can inspire our project, and the characteristics can set its look and feel. Since these things are our favorite, we are naturally interested in them. This makes it easier to light the spark.

You Yourself

You might be surprised, but you are more interesting than you think! The fact is that the places and situations we all live in are quite different. We may be of different religions, from different regions, have different beliefs, speak different languages, and gather different experiences. All of these have their beauty. For example, if you’re living in the Indian state of Maharashtra, you can be inspired by the rich energy of the Ganesh Festival, which has found its way to the hearts all around the world. Or maybe you have a particular tradition that has been passed down in your family for generations that you love a lot. As you look closely at yourself, your experiences, and your surroundings, you might find a piece of your life worth sharing with the world through your projects.

Major Events

There is generally a sense of huge excitement and change around major events. Is the last movie of your favorite franchise finally being released? Or is there an ongoing movement for a social cause that has inspired you? Major events can be a great source of inspiration. You can share your voice and contribute your part through your projects that root from the happenings in these events. Since these events already have a lot of attention, you automatically get an audience that would take interest in your creation.

Saved Posts

Have you been stocking up on those design inspiration ideas on Instagram and Pinterest? Well, it is time to put them to good use. We are all guilty of not returning to our saved pins or posts, even though we saved them in the first place because they inspired us. There are talented people putting out some super awesome work. Revisiting them can get your creative juices flowing and might as well trigger a superb idea. You can also turn your saved bookmarks into a moodboard, which is another good way of seeking inspiration.

Here’s a good blog about creating moodboards –

Techniques to use inspiration to come up with innovative ideas

Now that we have talked about where to find inspiration from let’s learn how to turn that inspiration into innovation.

The dictionary meaning of innovation is –

“ To make changes in something established, especially by introducing new methods, ideas, or products. 

Innovation involves modifying what exists by combining new methods or ideas to improve on it. As such, many techniques can lead to innovation. You can easily find them by simply typing “innovation techniques” in the Google search. But for the sake of this blog, I will talk about four techniques I use to come up with innovative design ideas and a bonus tool recommendation.

Techniques to use inspiration to come up with innovative ideas

X + Y

X + Y

This technique is what I call “takes two to innovate.” You take two things and then combine them into a single idea. For example, with soccer and fashion, you can create a shop-the-look recommender app. The app recommends clothes like those worn by soccer stars to their fans at affordable costs. For my graphic design specialization project, the brief was to make a heartbeat monitor app. It was up to me to decide for whom to make it. So, I combined two things - heartbeat and meditation. In the end, I came up with an app that allowed people to meditate to plant heartbeats. This is a good way to spark some great out-of-the-box ideas.

Finding Gaps

There are so many instances in our own life where we wish that something was better. It could be a product, a service, or even an experience. Maybe ordinary mortals think about their pain points and forget about them later in the day. But not us design wizards! Think carefully. Have you ever thought that something could be easier or improved? If yes, then designing a solution for it could be an excellent project idea. Take Amazon as an example. The platform made it big by filling the logistics gap between consumers and products. The gap was huge, and that’s why Amazon was so disruptive. Hence, keep an eye out for market gaps. They can be a great opportunity to innovate.

Finding Gaps

Love makes a Good World

Love makes a Good World

Image Credit - TheFutur

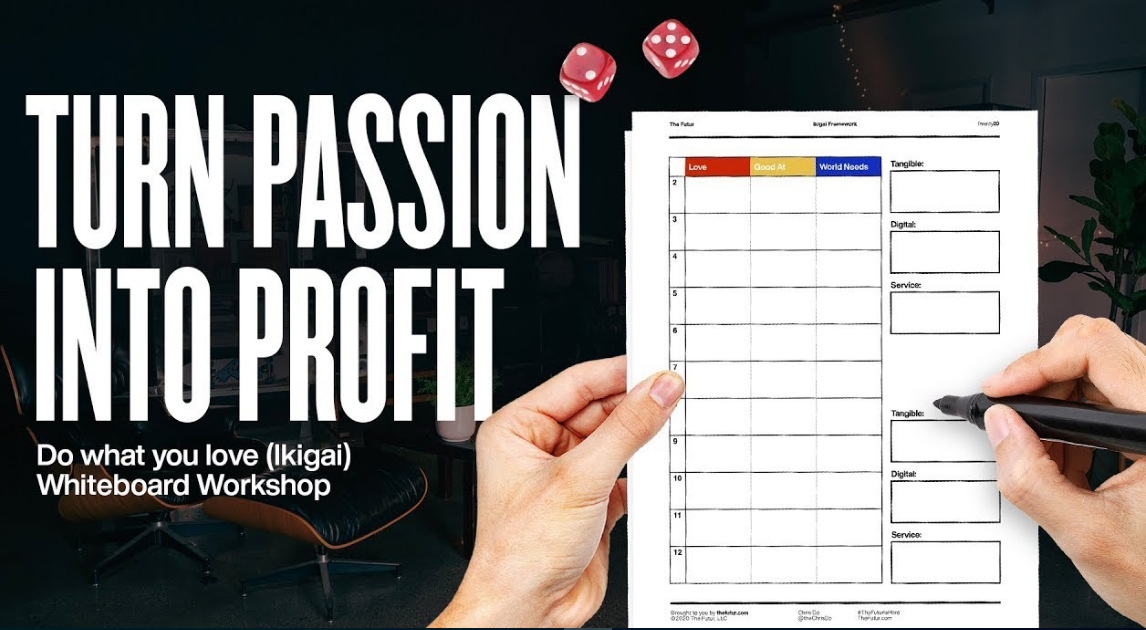
Don’t get too hung up on the name of this technique. It is just a mnemonic I came up with to remember the three parts in Chris Do’s IKIGAI technique. In this technique, you have three columns, namely what you love, what you are good at, and what our world needs right now. Follow along with these steps -

1. Write down the things you love doing in the first column, something you know you are good at in the second one, and things you feel the world needs in the third.

2. Then shuffle up these entries to come up with one entry from each column.

3. Lastly, think about a good solution that connects all the three things you have selected.

Like in Chris’s video, as an example, the entries you select could be working out (you love), community building (good at), and affordable, high-quality education (world needs). So, the project idea could be an app that teaches people to work out in social groups.

Chris’s main objective of this technique was to help others find what they love and then make a living out of it. But I found it to be extremely helpful in brainstorming innovative ideas as well.

If you would like to explore this technique more, Chris has made a whole video about it. You can find the link below:

The Futur: Ikigai Workshop– Build A Business That Combines What You’re Good At, Love, & The World Needs

A Different Angle

A Different Angle

This is very famous advice for when we are stuck, and that is “to look at things from a different angle.” No matter how hard we deny it, but we do have preconceived notions about things. Looking from a different angle allows us to eliminate those assumptions and get more creative in our approach. It is kind of basic principle used in a lot of miniature art made today. To get an idea, have a look at the work of miniature artist Tatsuya Tanaka. The innovativeness in his creations is genuinely inspiring.

We can use this different angle perspective to think about our projects as well. It allows us to come up with fresh, innovative ideas that we might have otherwise overlooked.

Prompt Generator
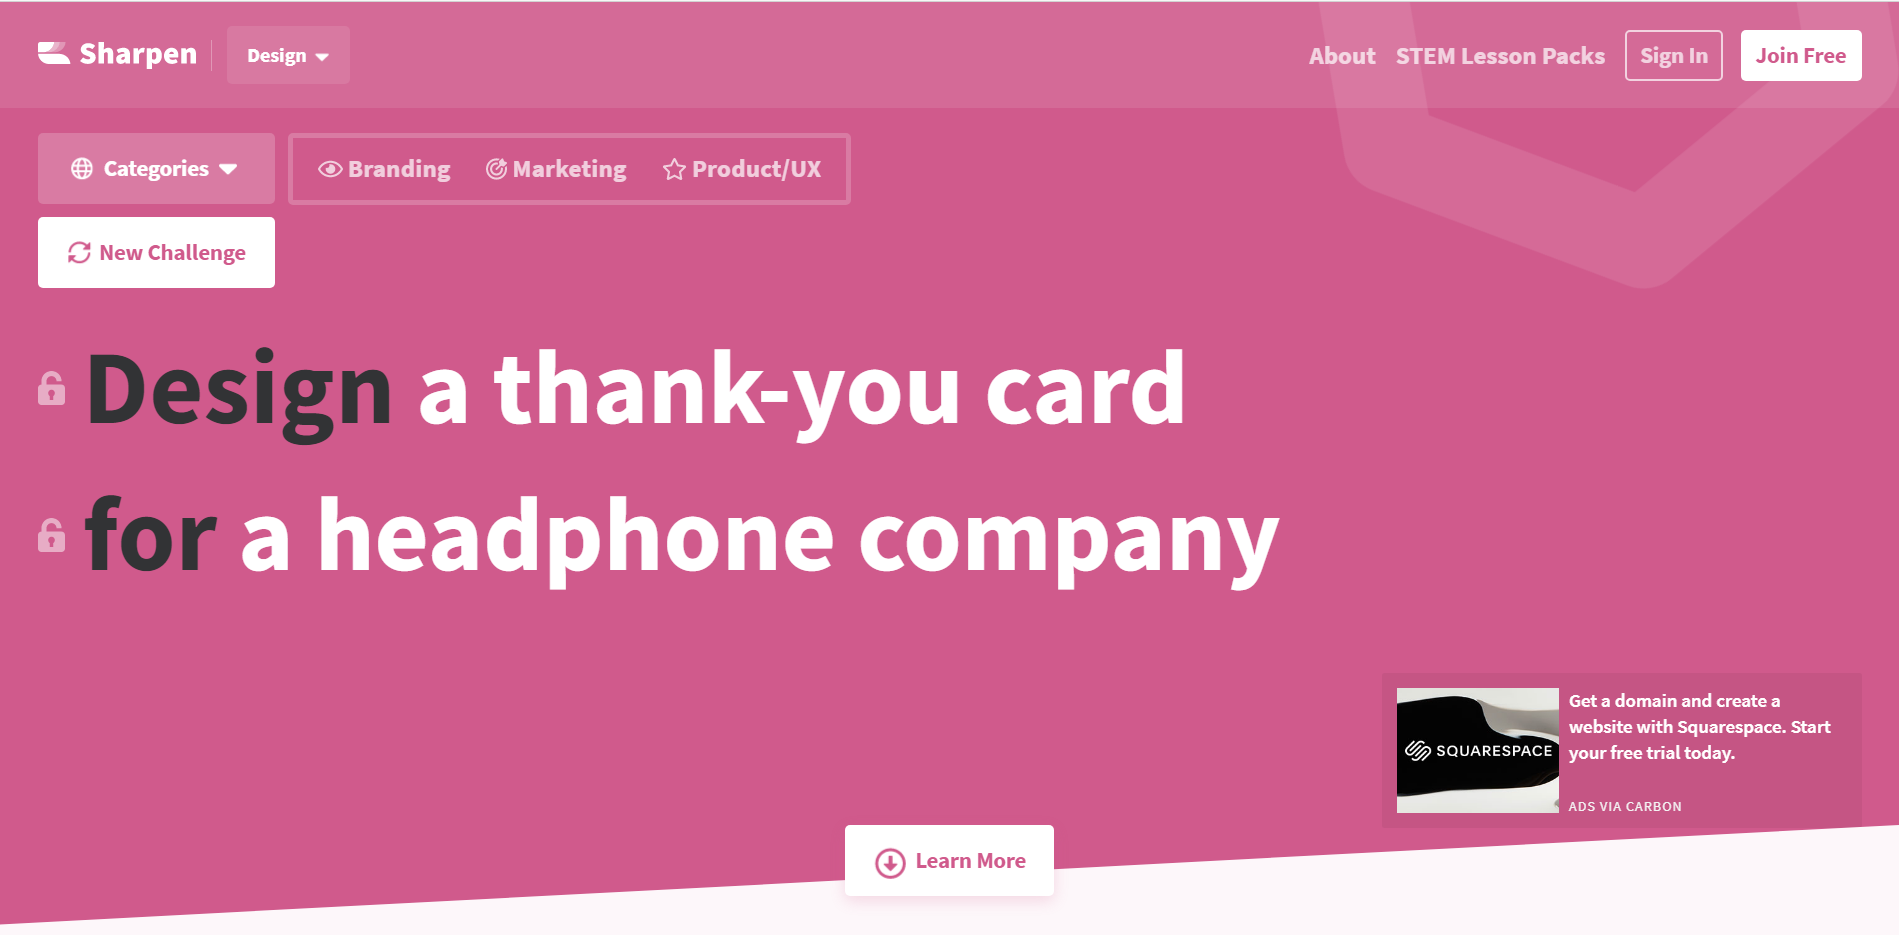
Prompt Generator

Image Credit – Sharpen Design

The above techniques, though the most useful, do require you to invest some hours in them. However, if you need a quick prompt to get you going with your daily practice, you can try one of the online prompt generator tools. Sharpen Design is one such prompt generator. It is customizable according to categories like branding, marketing, and UX. However, it is not customizable to a specific industry.

Here is a good blog on Dribble about more such prompt generators.

You can achieve the same result by having two bowls filled with post-it notes – one for the product type and the other for the industry. Then choose one note from each bowl, and you have your prompt. This gives you more control over the combinations you might come up with. It is similar to the first technique where we combine two things to generate an innovative idea.

Conclusion

And that’s it! Five useful techniques to come up with innovative ideas for your next project. No need to get overwhelmed by all the techniques. We all are different, and so is how we get inspired. Just observe what gets you in the zone. It could be one of the techniques mentioned above or something altogether different. If you have your unique way of ideating innovative ideas, we would love to hear about them. You can share your thoughts with us in the comments section below. Thanks for reading!

Sanika

Authored and Graphics Designed By- Sanika Sanaye

(Creative Design Director)

Authored and Graphics Designed By- Sanika Sanaye

(Creative Graphic Designer Trainee)

Jasjit

Peer Reviewed By-  Jasjit Chopra

(CEO)

Peer Reviewed By-  Jasjit Chopra

(CEO)
Configuring Conditional Access Policy to restrict access from specific IP or Location

What is Conditional Access?

Conditional access is a set of policy configurations that controls what devices and users can have access to different applications. Specifically talking about the Microsoft environment, conditional access policies work with Office 365 and other Software-as-a-Service (SaaS) applications configured in Azure Active Directory.

In the simplest term, conditional access policies are if-then statements, i.e., if a condition is met, then the necessary action can be taken for that condition. Example: A user wants to access any Office 365 application and must perform multi-factor authentication (MFA) to access it.

Setup

In this blog, I will demonstrate how to restrict access to different applications from different IP addresses based upon the location of the offices.

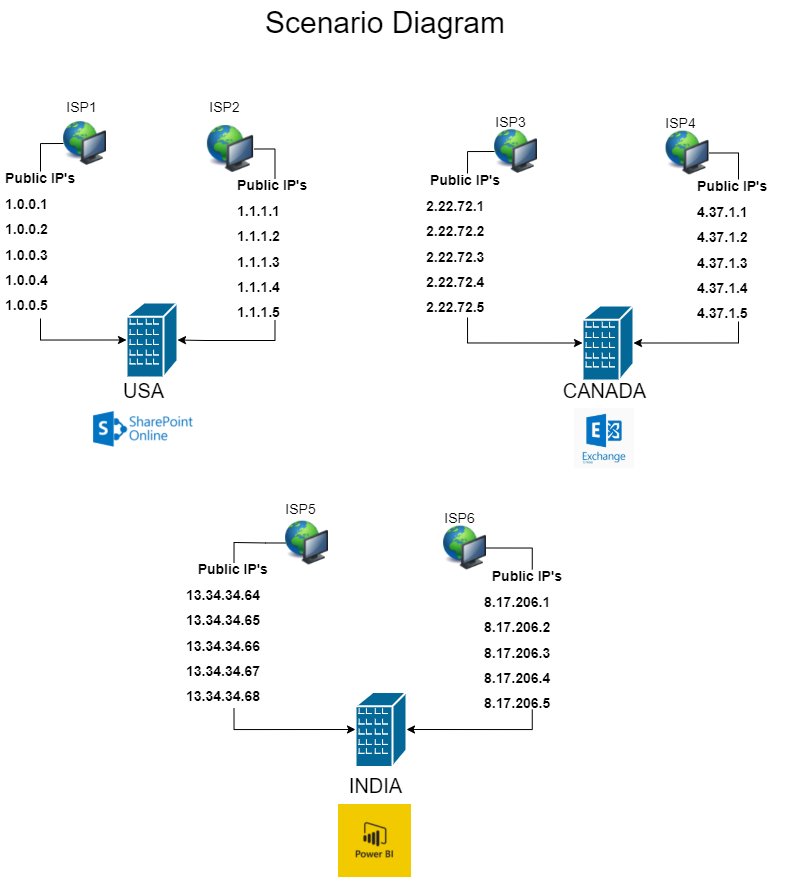
Consider that there are three physical offices of an organization, one in the USA, one in Canada, and one in India. Each office has two different Internet Service Providers where each ISP provides five static public IPs to the office location. This means that a single office is provided with a total of 10 public IPs. Based on this setup, we will implement the following scenarios:

Note: This is just an arbitrary scenario for our demo purposes for writing this blog to showcase the capabilities. You can learn the implementation aspect and tweak your plans according to your requirements.

Prerequisites:

Configurations

Named Locations

Before setting up our conditional access policy, we need to define named locations. This can be done by logging into the Azure portal under Azure Active Directory > Security > Conditional Access > Named Locations.

We will configure three named locations by adding public IP addresses of the respective offices:

ScenarioDiagram

Note: - We are taking arbitrary IPs in this case by picking a range from defined public IP addresses range for all three countries. If you are implementing your scenario, make sure to change the IP addresses according to your requirements.

IP Addresses

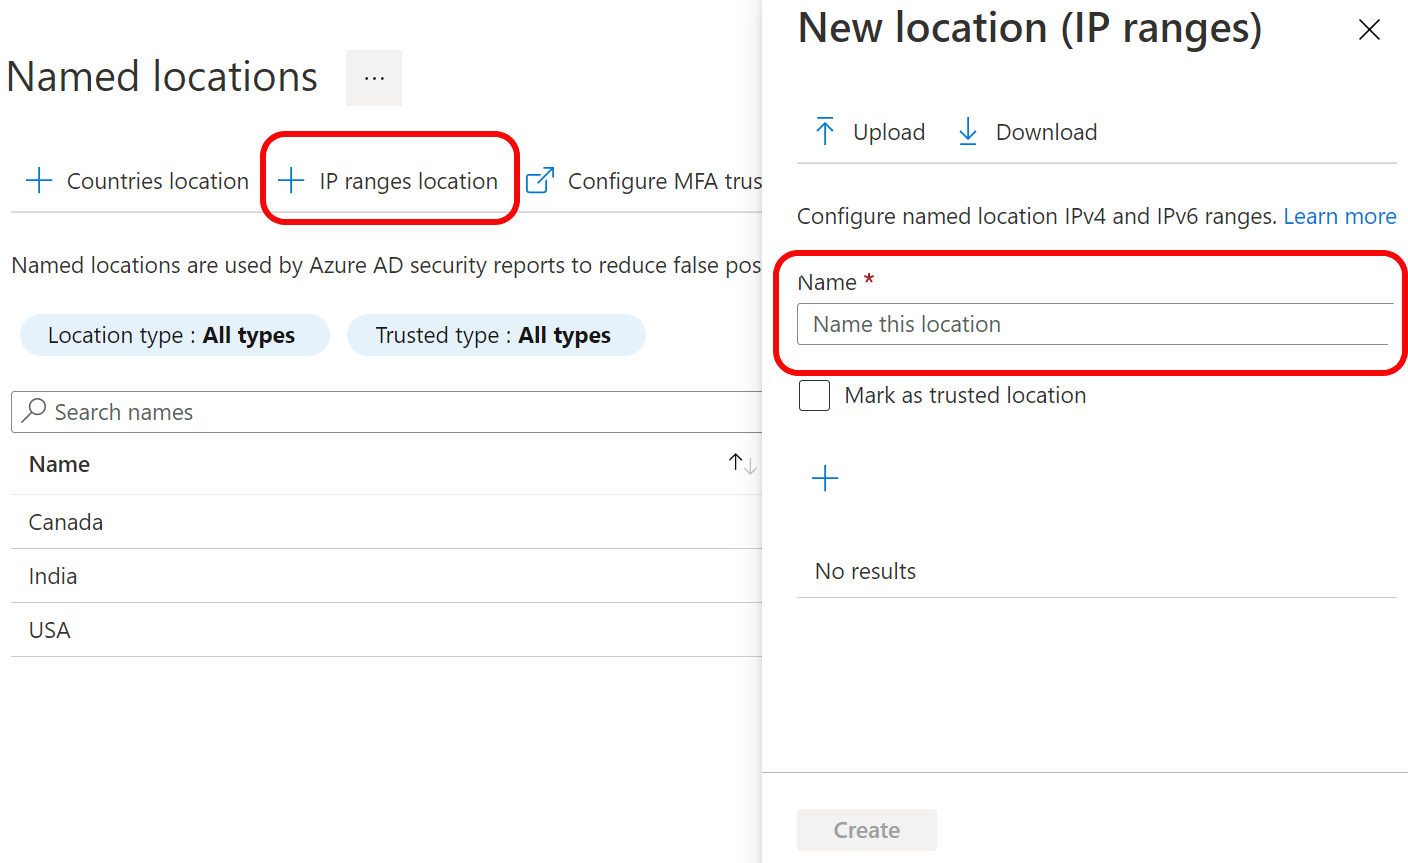
For restricting access from a specific IP address range, click on ‘IP ranges location’ to add an IP address range from where you want to block or limit access to your application.

To define a named location by IPv4/IPv6 address, one needs to provide:

A Name for the location

One or more IP (IPv4 or IPv6) ranges (in CIDR notation)

Login to Azure Portal, then navigate to Azure Active Directory > Security > Conditional Access > Named Locations.

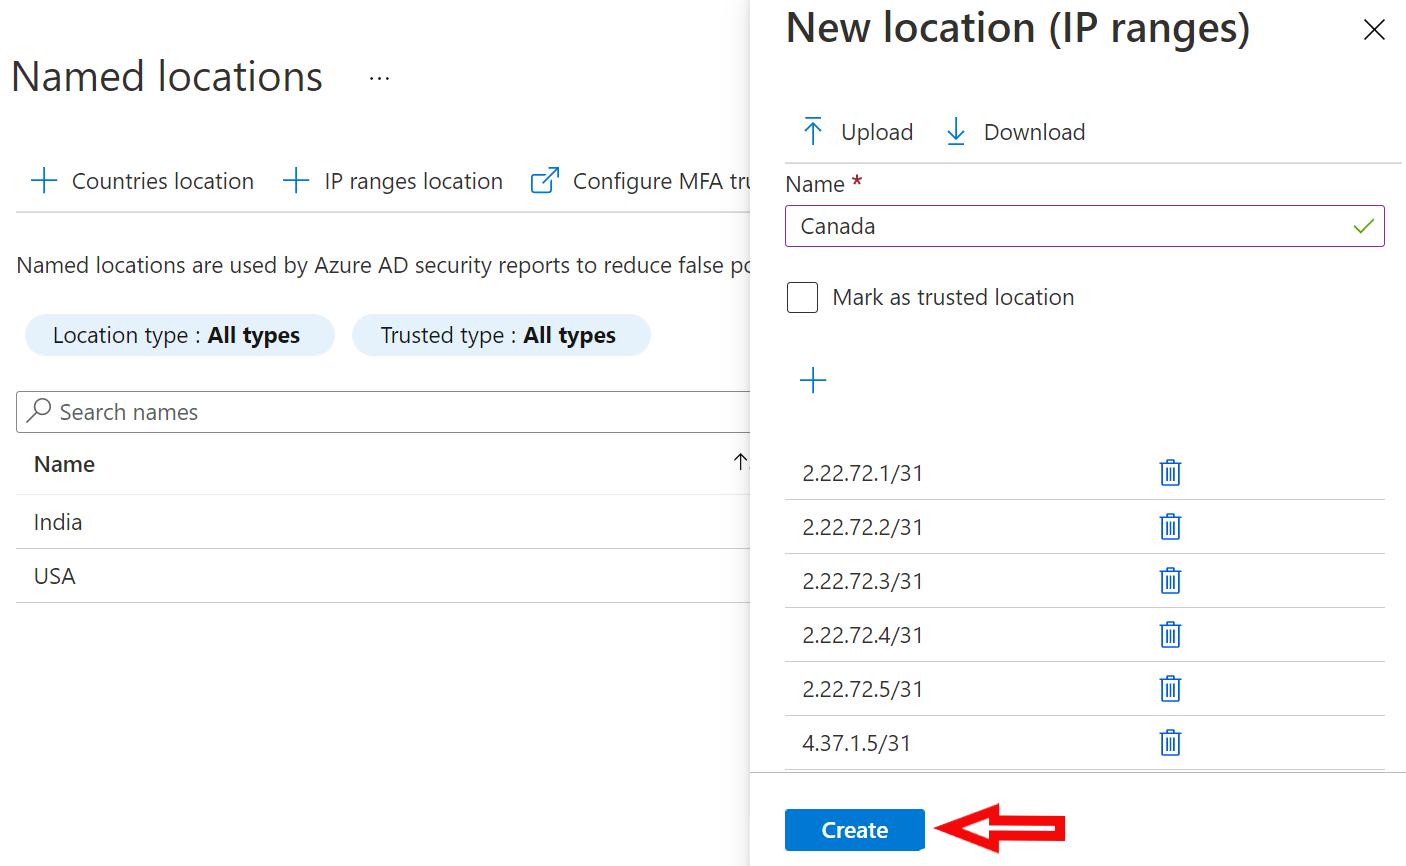
1. Click on ‘IP ranges location’ to add IPs and enter the name of the location as shown below:

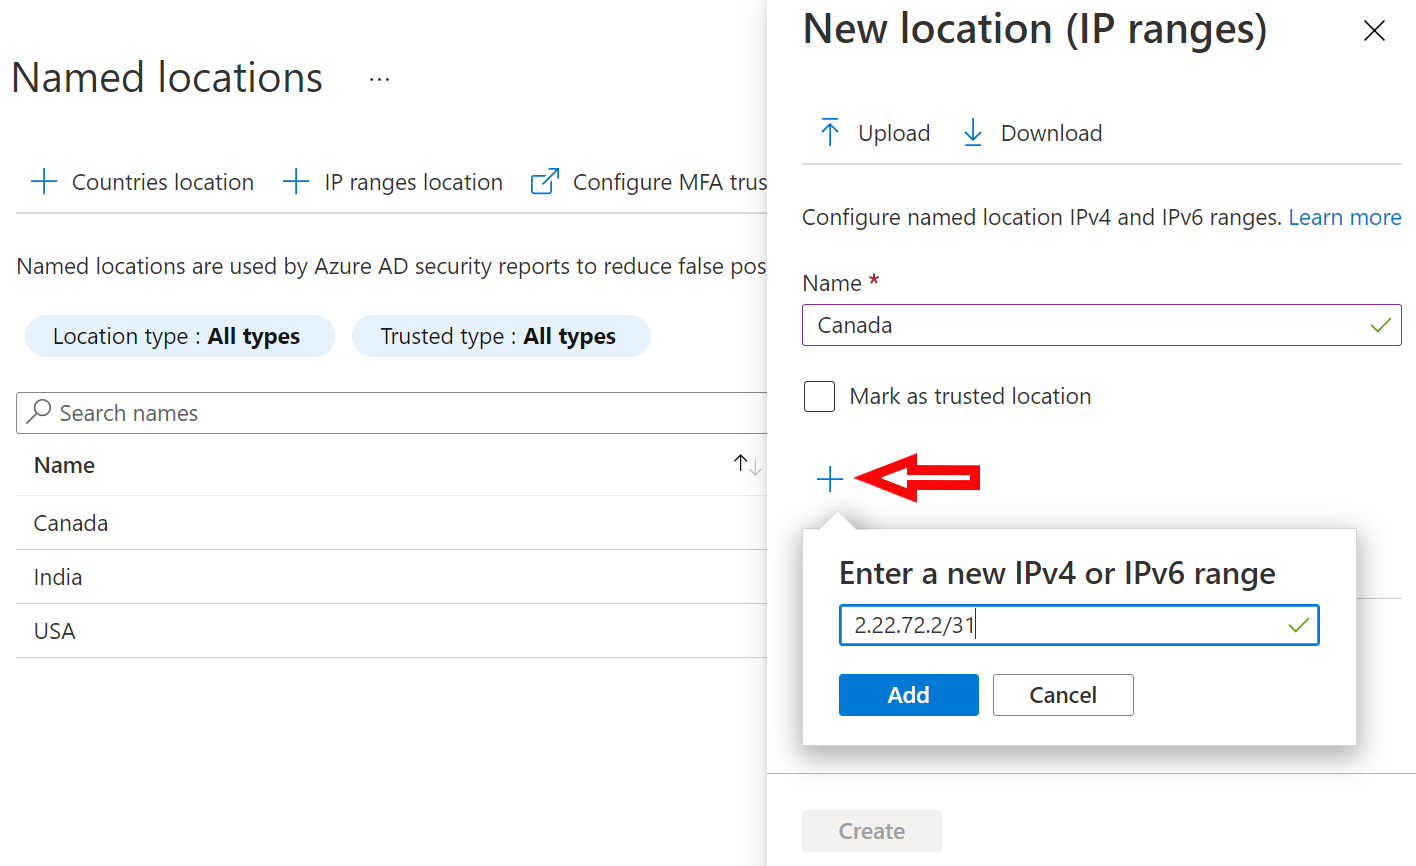
locationName2. Click on the ‘+’ button to add IP address in CIDR format and click Add. To add more than one IP, click on the plus button again.addip

3. Finally, click on create, and you will have your IP ranges and your location defined.

createip

We have configured and shown the named location only for Canada. Adding IP range would be the same procedure for the USA as well as India, as shown above.

MFA Trusted IP’s

To grant access from the given set of public IP addresses without requiring multi-factor authentication, we will add a range of IPs for trusted MFA’s specifically.

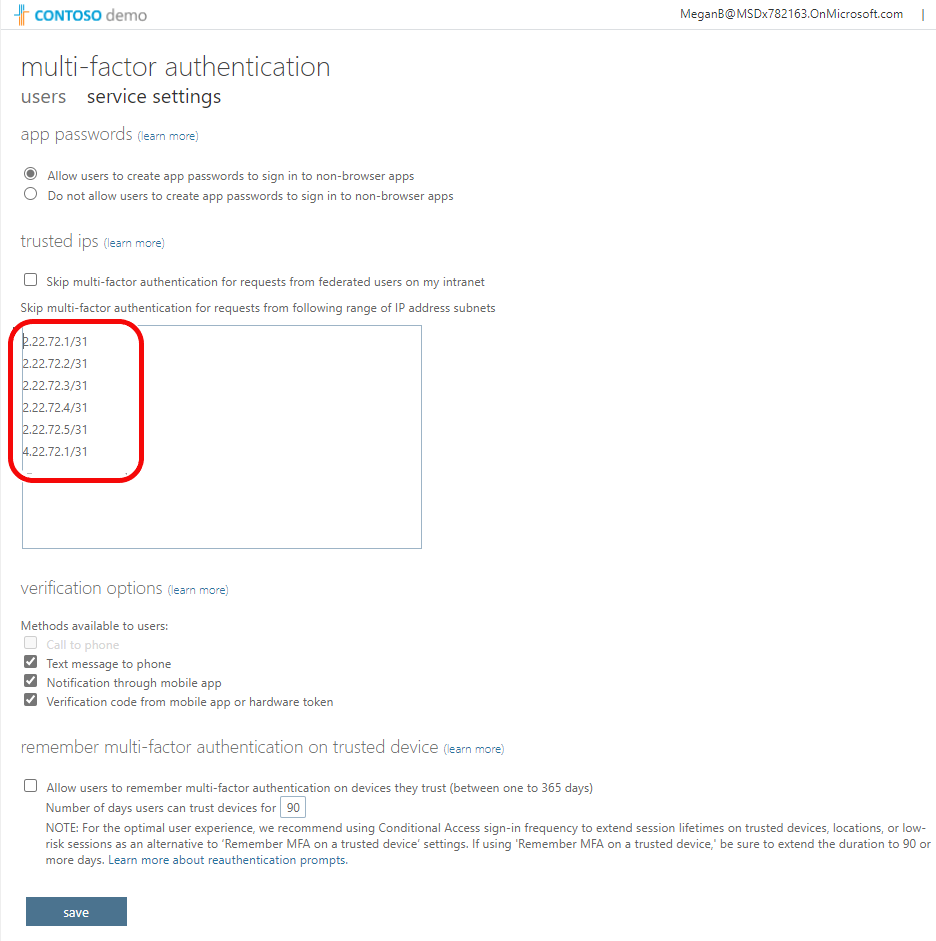
To configure MFA trusted IPs, login to Azure Portal > Azure Active Directory > Security > Conditional Access > Named Locations > Configure MFA Trusted IPs.

1. Once you click on ‘Configure MFA trusted IPs’, you will be prompted to a new page where the required configurations can be done. Enter IPs in the text field area.

mfaip

2. Click Save.

As a result, the users trying to access the application from the IPs defined in the trusted range will skip MFA and be granted access by only entering their username and password.

Countries

We can restrict access for a country as well. But it is not required in our situation as we have already set up the named location for IP addresses. All other IPs or countries will be restricted access automatically. Therefore, there is no need to set up the named location for the country.

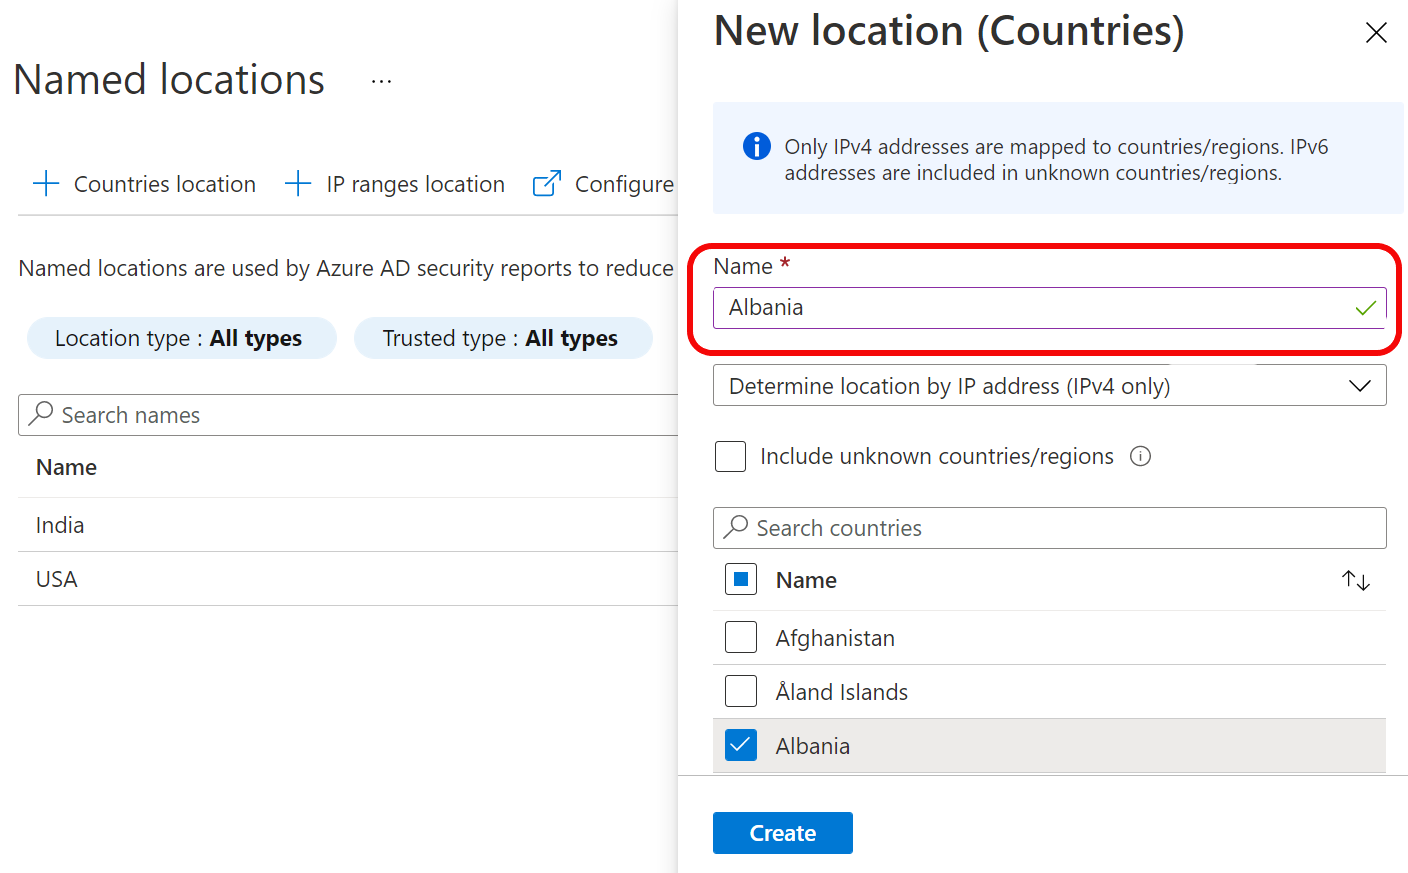
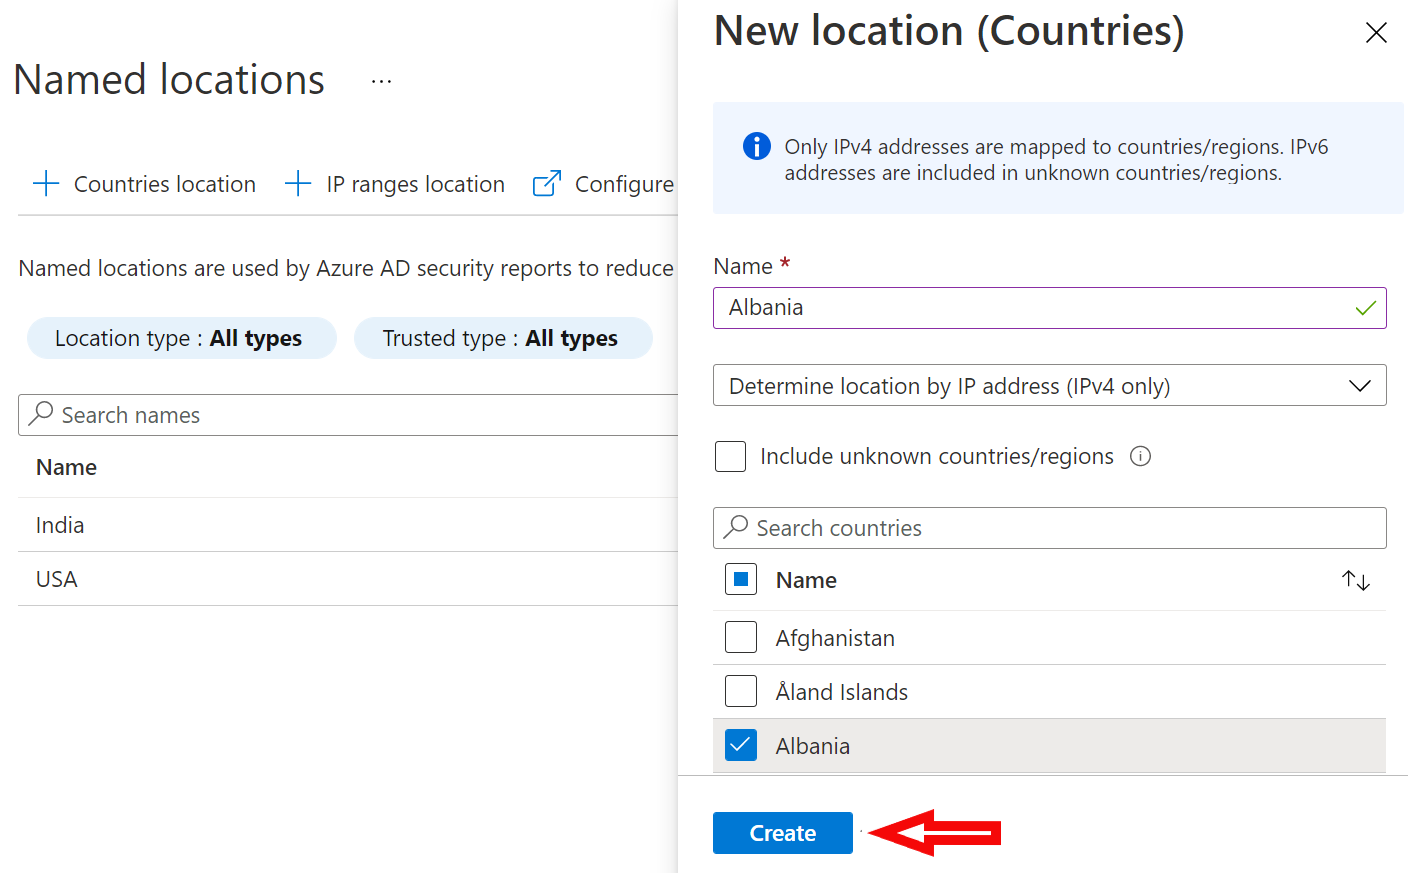
Defining named location for a country varies from case to case. Still, I will be showing how you can configure it if required. For restricting/allowing access from a country, we will first go to named locations and then click on ‘countries location’ to add countries.

To define a named location by country, login to azure portal > Azure Active Directory > Security > Conditional Access > Named Locations > Configure MFA Trusted IPs. an individual needs to enter:

1. Name of the location/country.

namecountry

2. Select the country/countries you wish to block/allow access and click Create.

createcountry

Conditional Access Policy:

Now that we have set up the named locations for IP addresses, we will be configuring the conditional access policy. To create a new conditional access policy, log in and go to Azure Portal > Azure Active Directory > Security > Conditional Access > Policies.

To configure a conditional access policy, we need to define:

Note: Make sure that you do not assign the policy to all users and administrators at once. Always assign the policy to some users with no assigned roles first, enable policy in Report-only mode to test, and make sure the policy works as expected. Otherwise, you have the potential to lock yourself out.

To know more about all other components, you can check out Microsoft’s official conditional access documentation.

SharePoint Online should be accessible through US office locations and restricted for Canada and India.

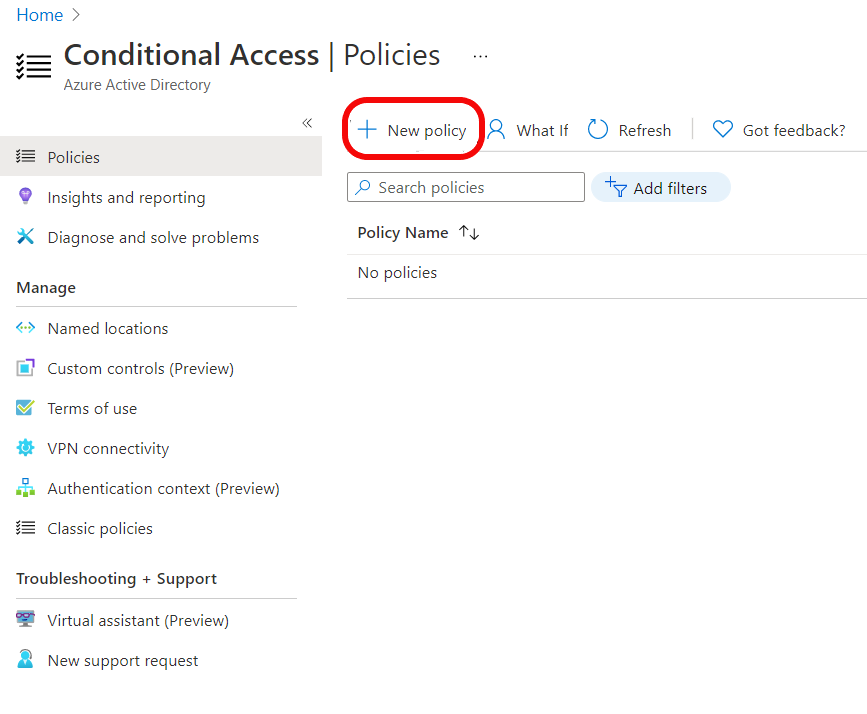
1. Log in to azure, go to Azure Active Directory > Security > Conditional Access > Policies. Click ‘New Policy’ to create a new conditional access policy.

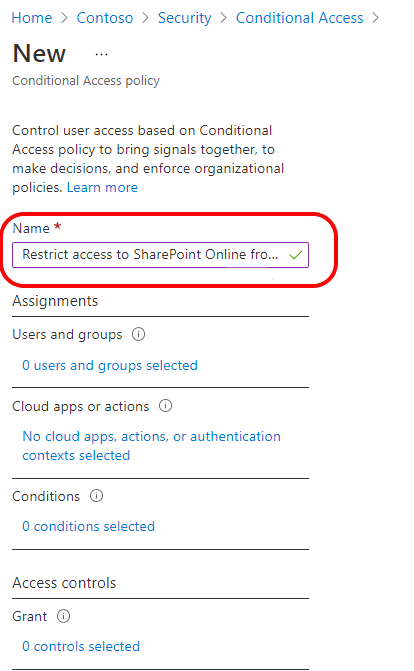
newpolicy2. Name the Policy.namepolicy

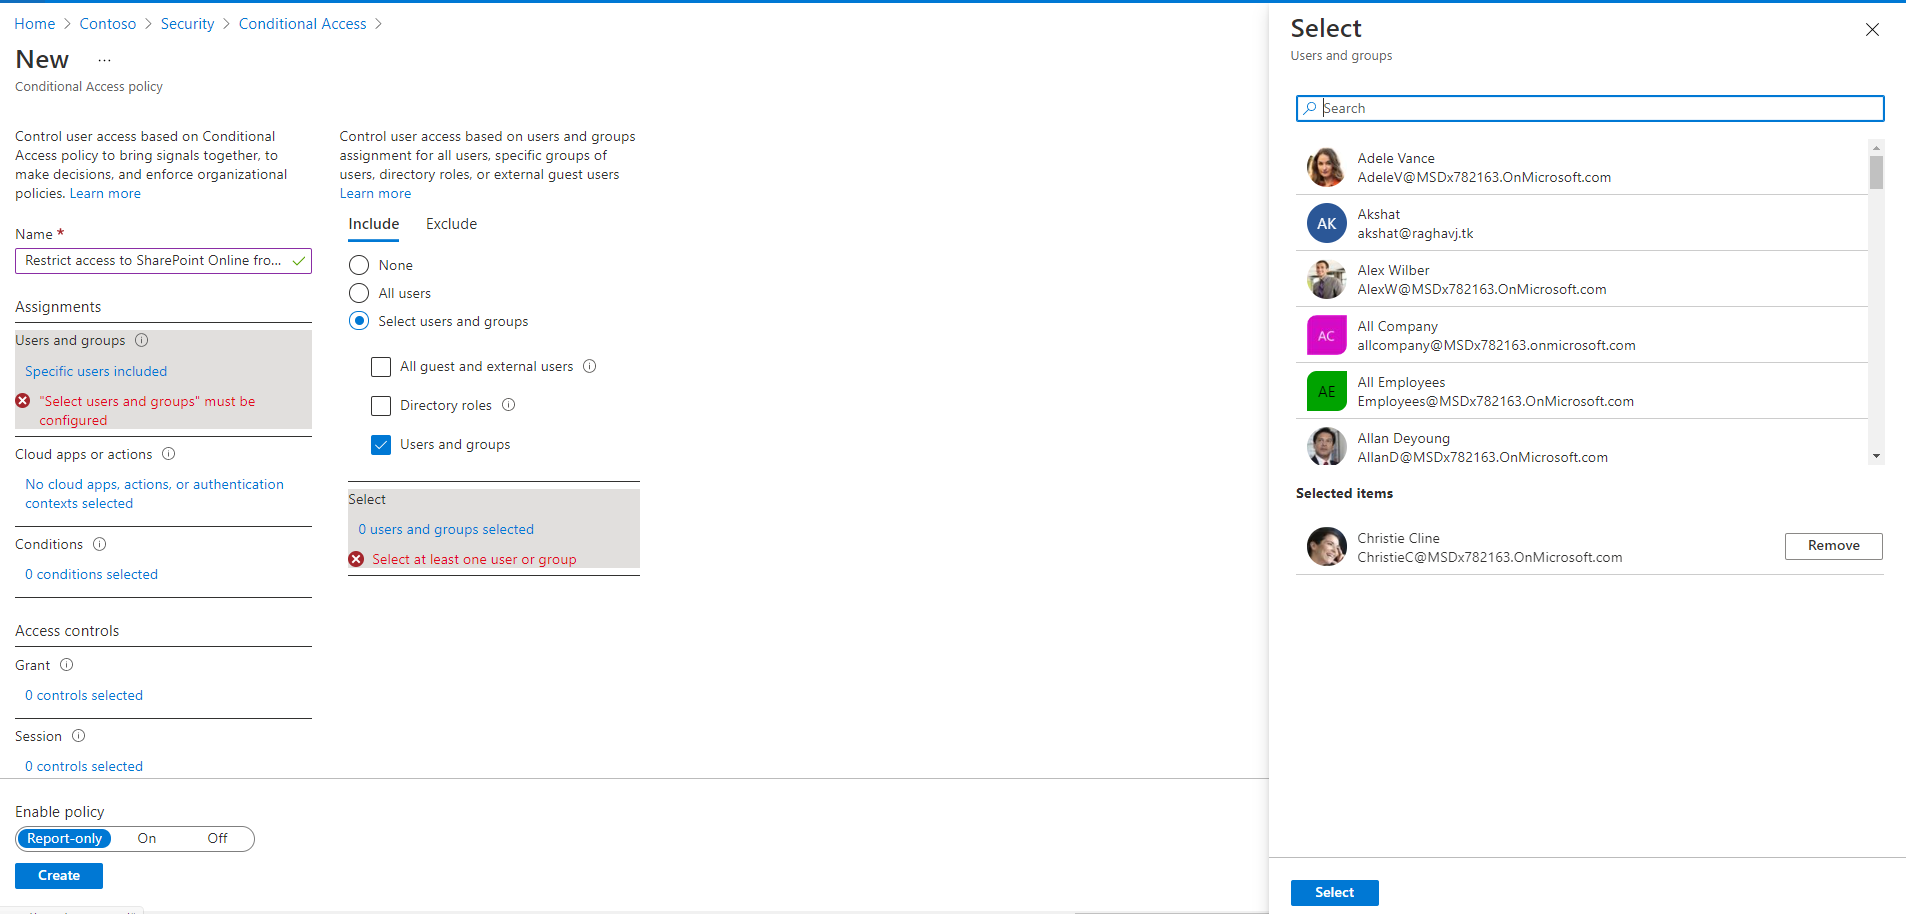
3. Select the user(s) to whom this policy should be applied.

Users and Groups > Select users and groups > search the name of the user/group. Click Select.

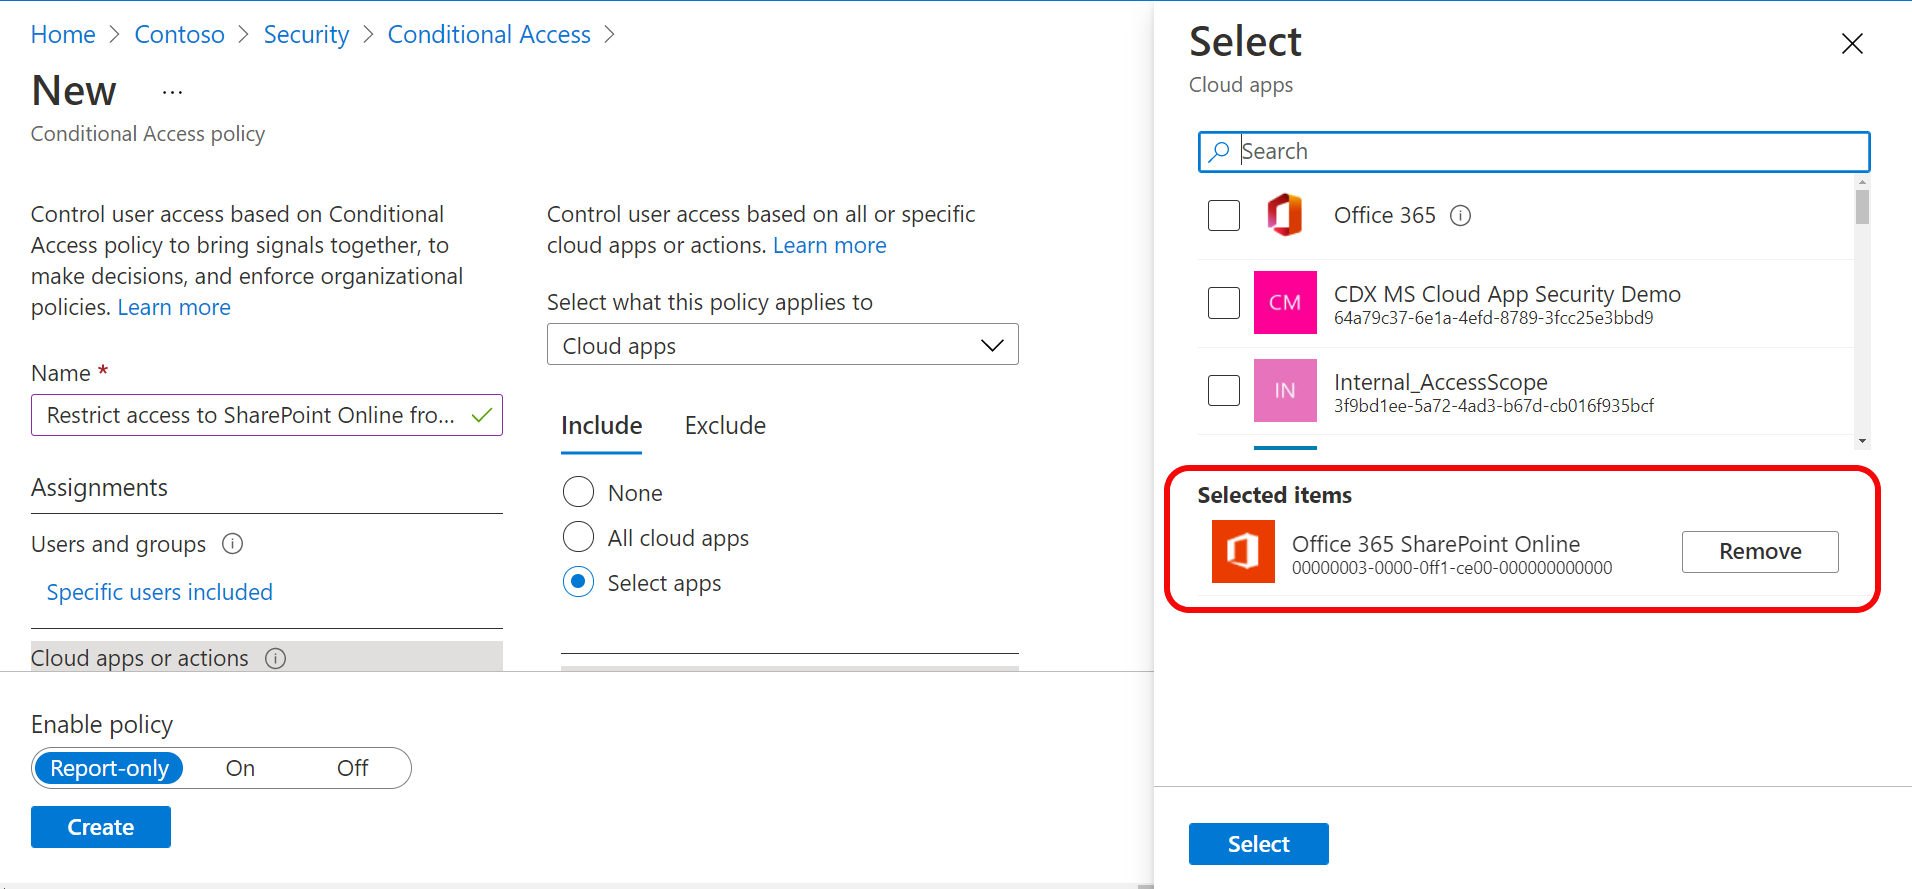
assignuserpolicy4. Select the application that needs to be granted/restricted access to.

Application Name: Office 365 SharePoint Online.

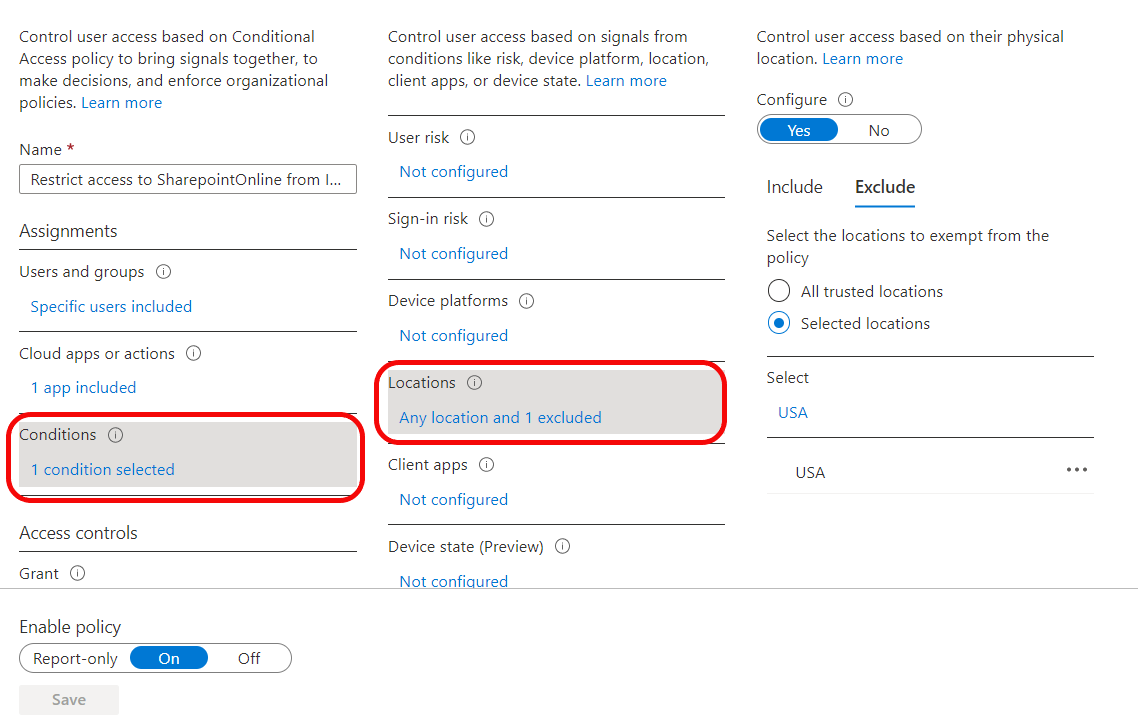
selectapppolicy5. Select the condition for location.

includelocationpolicy

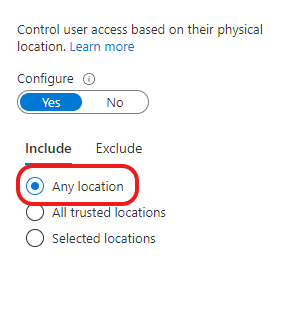
6. Include location.

Select any location.

anylocation

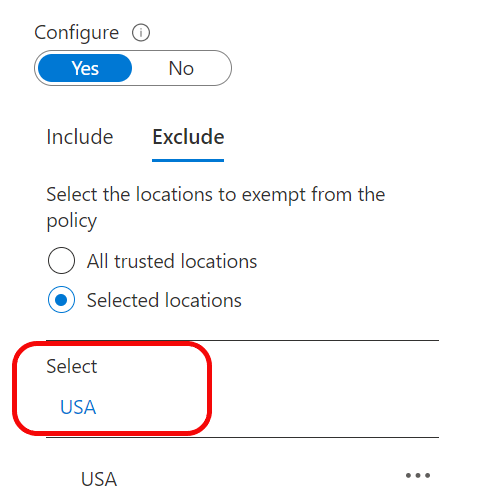
7. Exclude the named locations.

Selected Locations Name: USA

usapolicy

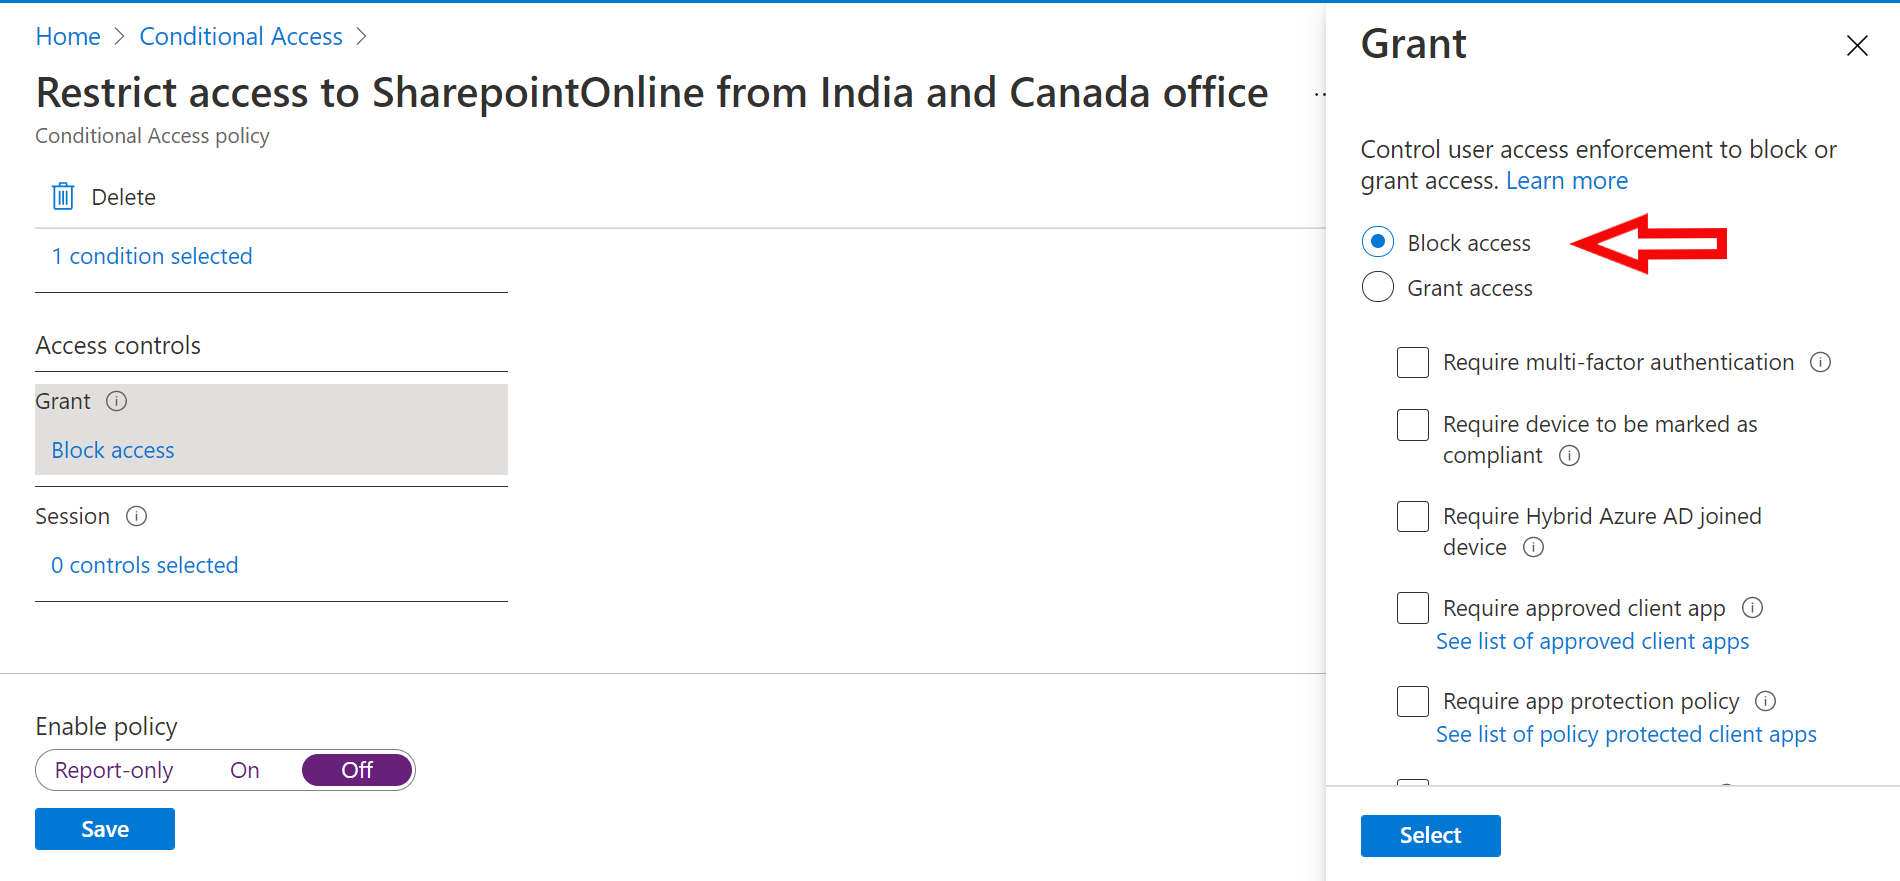
8. Under Access Controls, Block Access.

Select the ‘Block Access’ radio button.

blockacceesspolicy

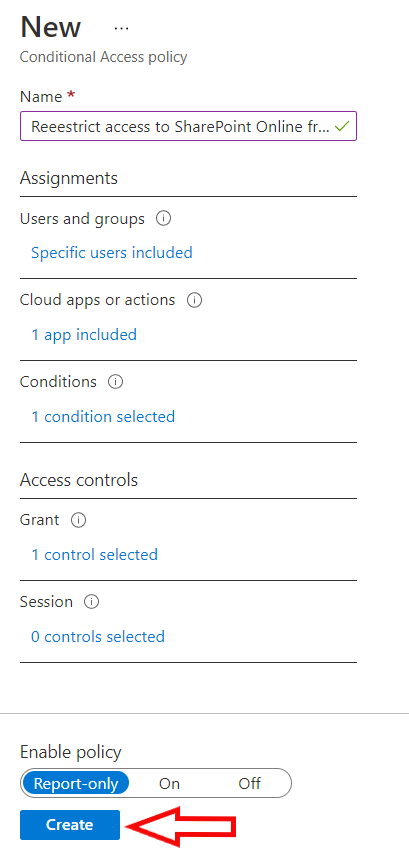
9. All configurations are done, now we need to enable and create the policy.

Enable Policy: Report-Only or On

Click Create

createpolicy

Simply put, this whole configuration means that if specified users are trying to access SharePoint Online from any other location than the USA, they will not be granted access.

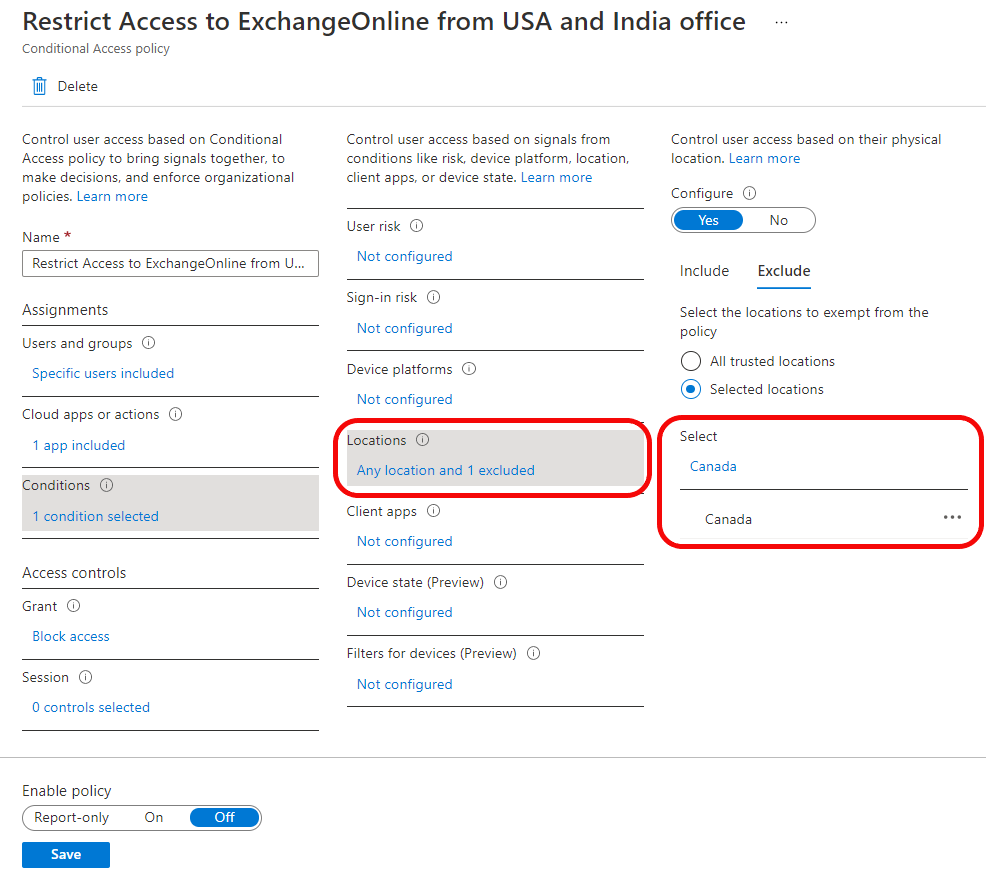
Exchange Online should be accessible through Canada office location and restricted for US and India.

exchangepolicy

Similarly, in this case, we did the same configurations as the previous one with the difference that here the application is Exchange Online. We are excluding ‘Canada’ and including both ‘India and the USA.’ This policy will allow users in the Canada office to access Exchange Online, whereas users of India and the USA will be restricted from accessing it.

PowerBI should be accessible through India office location and restricted for Canada and the US.

powerbipolicy

Equivalently, the same configuration with the difference being that application this time is PowerBI service. We are excluding ‘India’ whereas including ‘USA & Canada’ under locations. As a result, this policy will allow users in the India office to have access to PowerBI service, and the employees of the USA and Canada would not.

Outcome

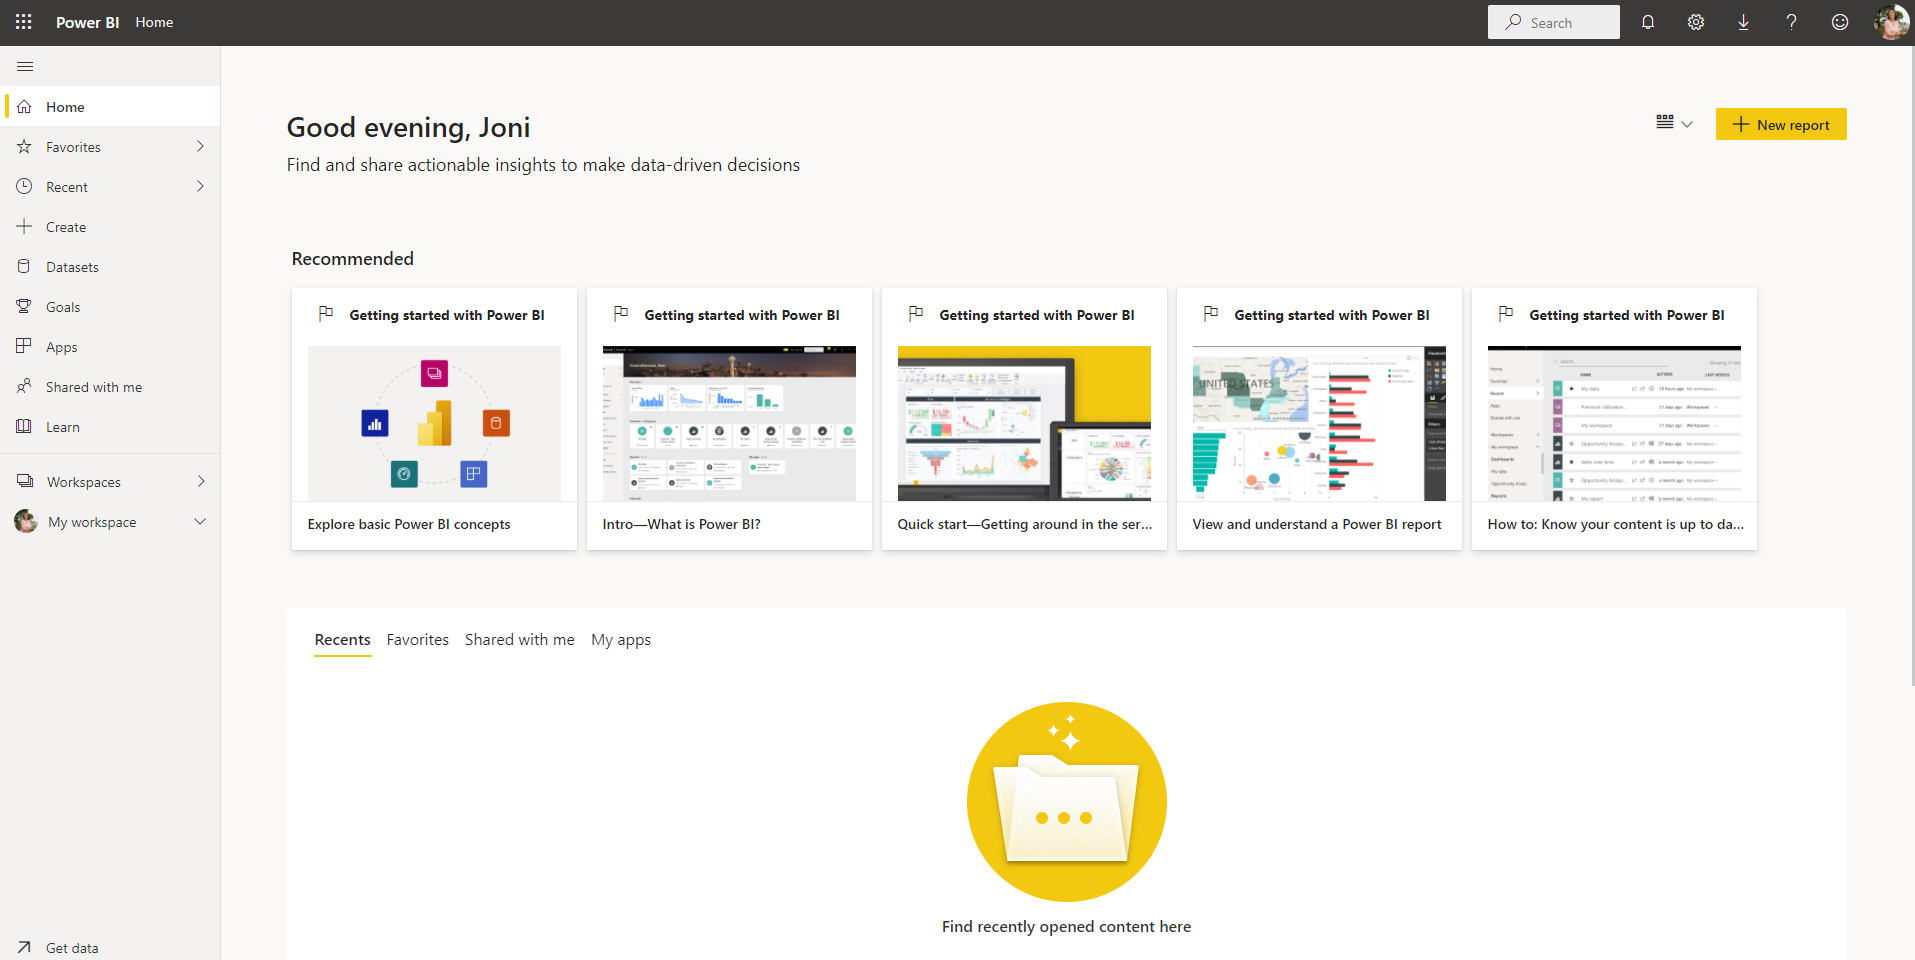
Let us try to access SharePoint Online from the USA, Canada, and India. As per the policy created by us, one should be granted access while accessing the USA office network application. Whereas the access should be restricted for users trying to access it from Canada and India offices.

         SharePoint Online is accessible 

spaccessgranted

         SharePoint Online access is restricted.

sprestrictaccess

outlookaccessgranted

Outlookrestrictaccess

PowerBI

powerbirestrictedaccess

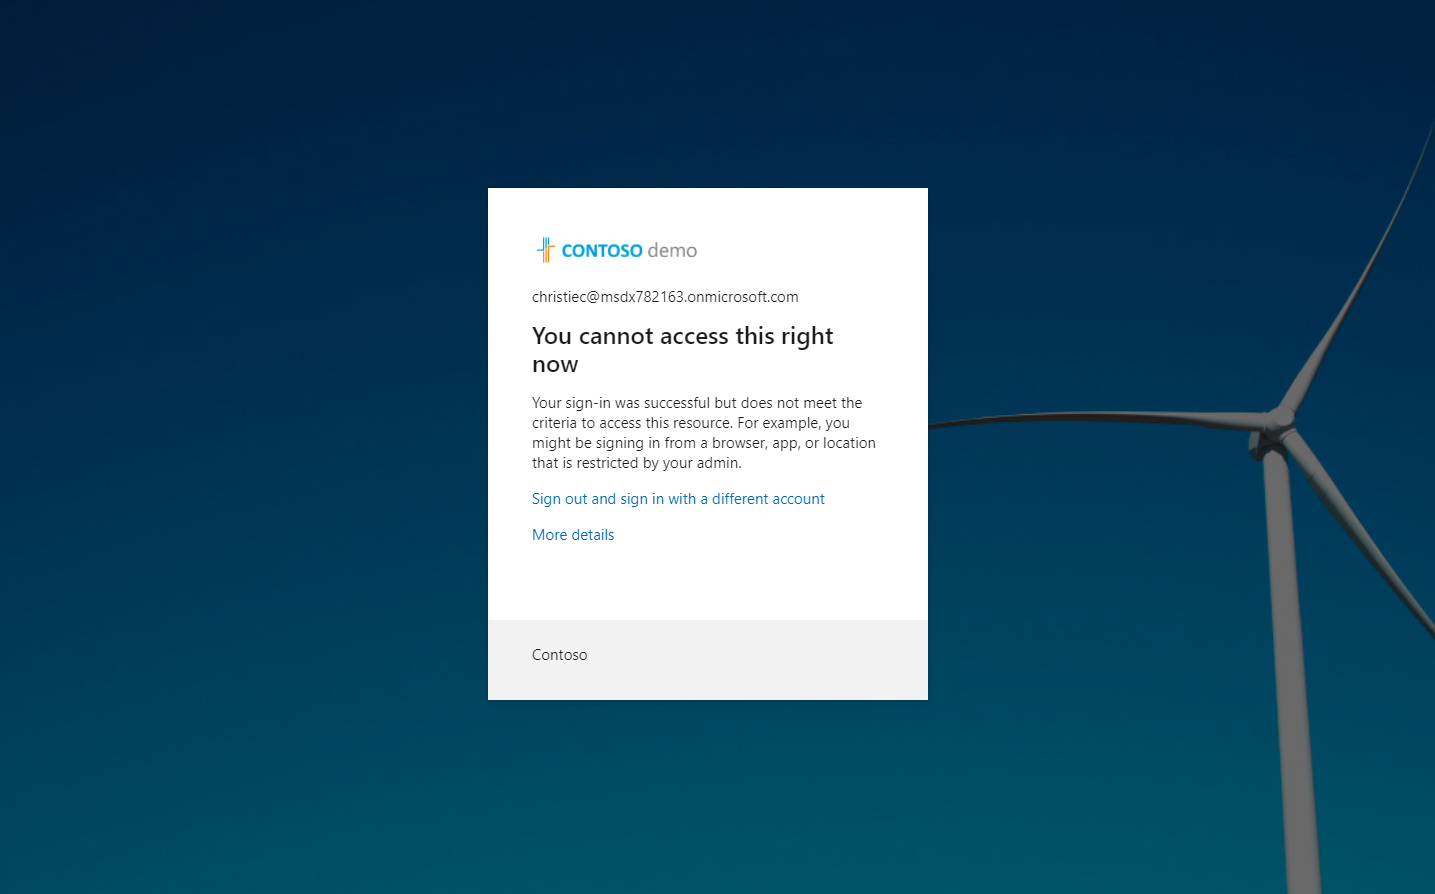
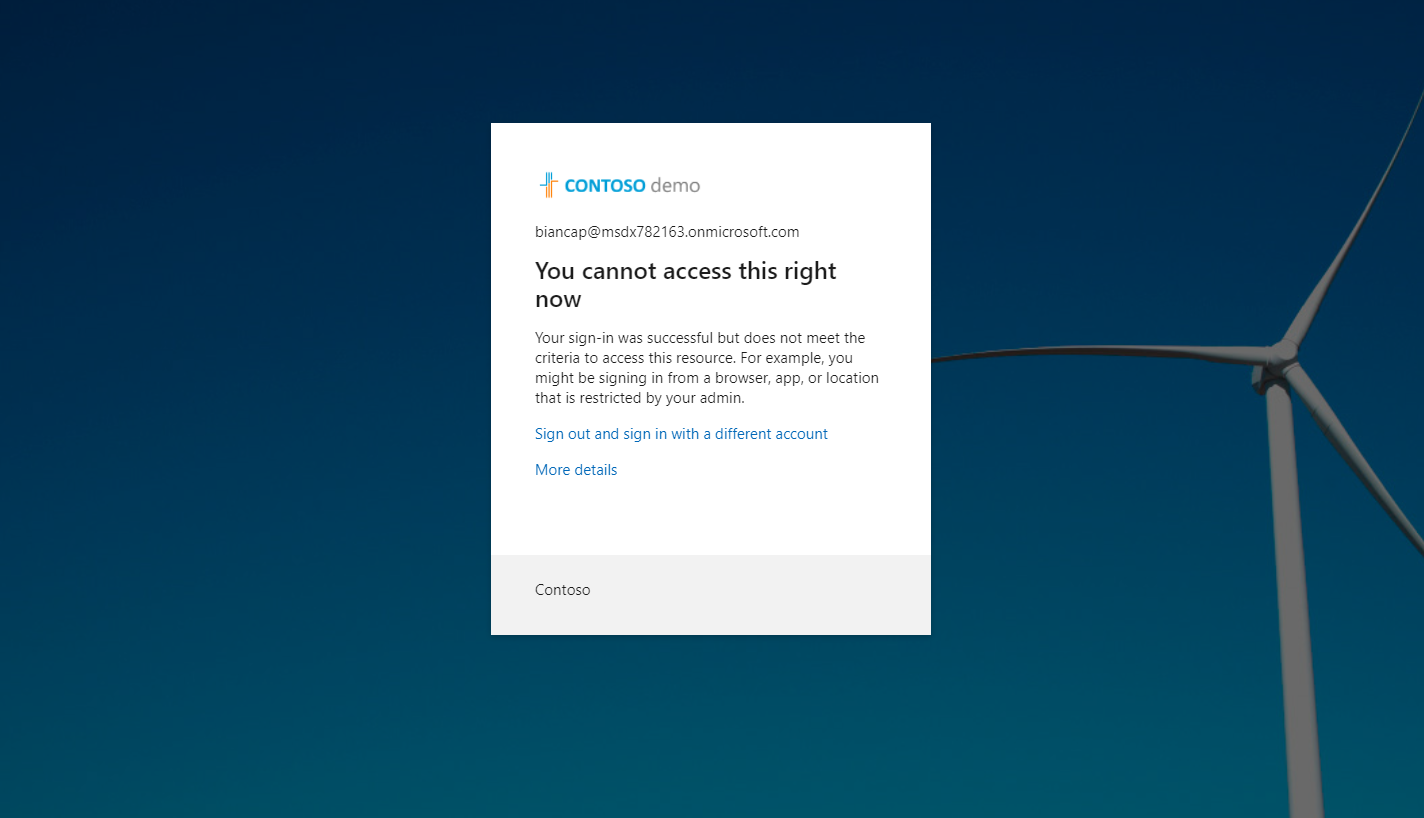
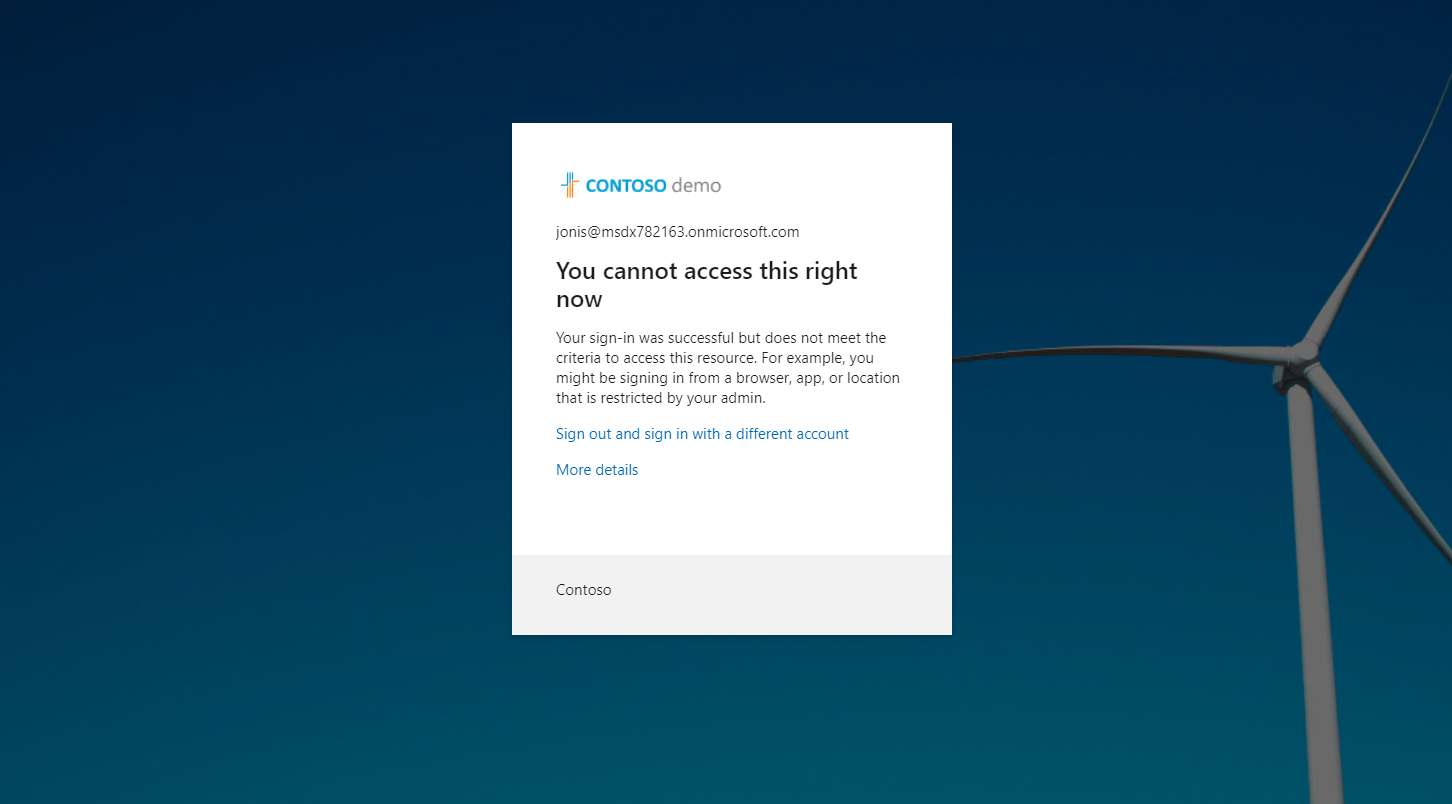
Consequently, users trying to access Exchange Online (from Canada office) and PowerBI service (from the India office) will be allowed to sign into the applications. Contrarily, suppose they are trying to sign in to Exchange Online (from the USA or India office) and PowerBI service (from the USA or Canada office). In that case, they will be shown a common error message.

Therefore, the policy is successfully implemented, and we secured access to the applications from defined locations only. Access from all other locations and IPs not defined is blocked.

What if someone tries to access applications from any other non-windows device? The error message would remain the same except for the changes in the user interface.

Raghav Jain

Written By-  Raghav Jain

(Cloud Security Engineer)

Written By-  Raghav Jain

(Cloud Engineer Trainee)

Jasjit

Peer Reviewed By-  Jasjit Chopra

(CEO)
Peer Reviewed By-  Jasjit Chopra

(CEO)
Sanika

Graphics Designed By- Sanika Sanaye

(Creative Design Director)

Graphics Designed By- Sanika Sanaye

(Creative Graphic Designer Trainee)

Bringing back Incoming Email to SharePoint Online document library using Power Automate

Objective

This article aims to outline the process for setting up incoming email functionality in SharePoint Online. This feature will help you receive incoming emails with attachments to the SharePoint document library.

Scenario

The Incoming email functionality allows the SharePoint sites to accept emails and store them in lists and libraries. This feature used the local SMTP server to provide this function. However, with Office 365, this feature has been deprecated.

This helps you store the mail contents sent to other recipients in SharePoint libraries without uploading the contents manually.

In this article, we help you achieve that functionality using a Shared Mailbox and a Power Automate flow, with a specific set of features:

1. Save emails received from specific domains.

2. Fix to clean special characters from the subject line for folder creation.

Prerequisites

1. A SharePoint document library with an additional Text column for Mail Sender

2. We need a Shared Mailbox, which will be used to receive emails that will be further uploaded to the SharePoint library.

3. Security requirements of Accounts – The accounts running the flow need to have access to the Shared Mailbox.

Configuration Steps

1. We will be creating a flow with the action to trigger when a new item with an attachment is received in the shared mailbox.

2. The flow further processes the mails to upload the mail content and attachments to the SharePoint document library.

3. Browse to the Power Automate site using the account that has Power Automate License to create a new Flow

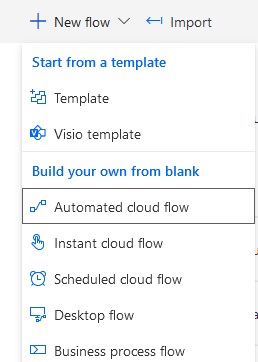
4. Selected New Flow > Automated Cloud flow

new flow

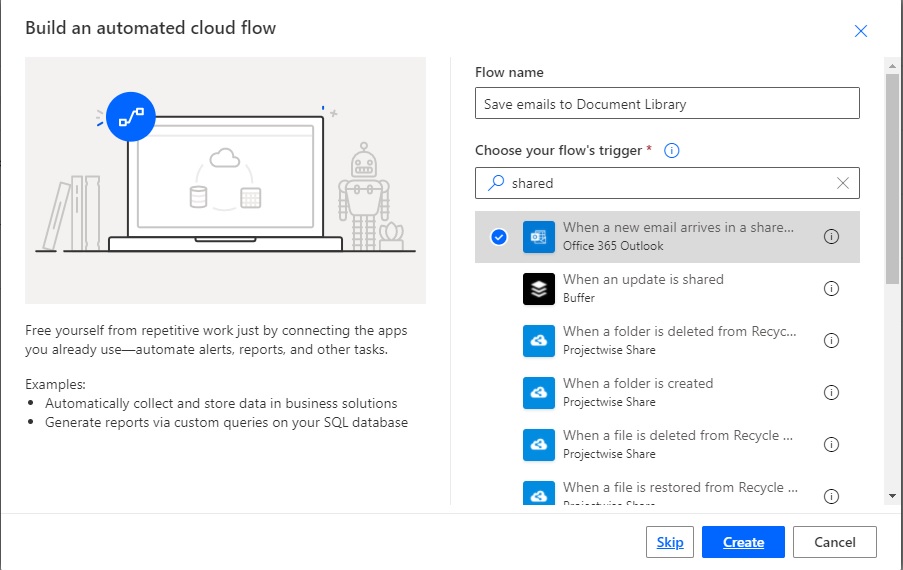
5. Specify the desired name (we have named it Save emails to Document Library) and under the triggers, select When a new email arrives in a shared mailbox (V2) (Office 365 Outlook). This will trigger the flow as soon as an item is created in our Shared Mailbox.

new flow

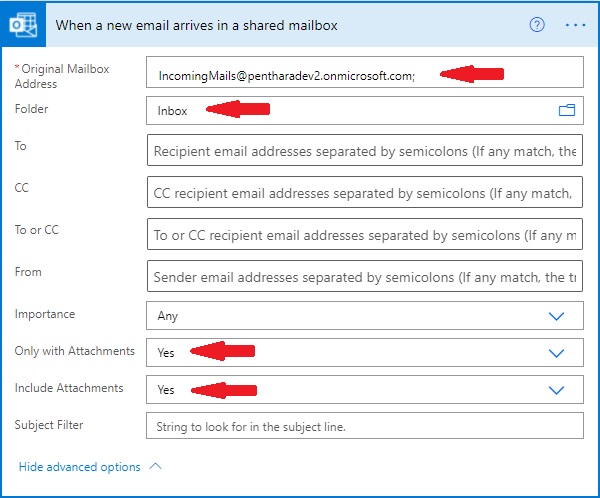
6. In the trigger, specify the Shared Mailbox alias (IncomingMails) that we will be used to receive Incoming emails for the SharePoint document library.

  • The Folder should be selected as Inbox
  • In the advanced options, Only with Attachments & Include Attachments should be set to Yes
  • incoming email action

    7. Initiate the following variables, which will be used further in the flow for calculations.

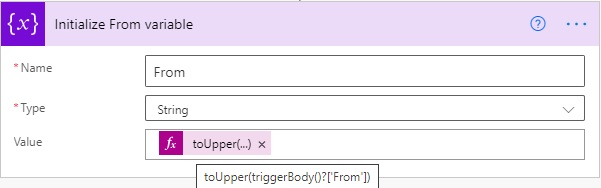
            a) From – This will be used to filter mails from specific domains and to update the Mail Sender field in the library

                      i. Type: String

                      ii. Value: toUpper(triggerBody()?['From'])

    initialize variable

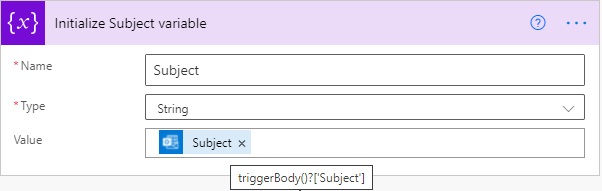
            b) Subject – This will be used to create a folder in the document library to store the email and the attachments.

                      i. Type: String

                      ii. Value: @{triggerBody()?['Subject']}

    initialize variable

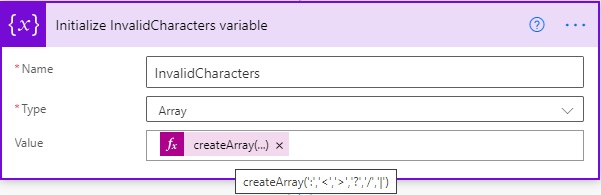
            c) InvalidCharacters – This will be used to clean the Subject with any special characters to create a folder name

                      i. Type: Array

                      ii. Value: createArray(':','<','>','?','/','|')

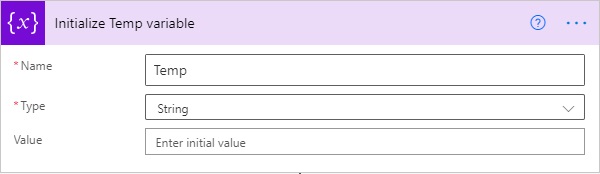
    initialize variable arrayd) Temp – This will be used to store the subject value temporarily until the special characters have been removed in the foreach loop

               i. Type: String

               ii. Value: Blank

    initialize variable string

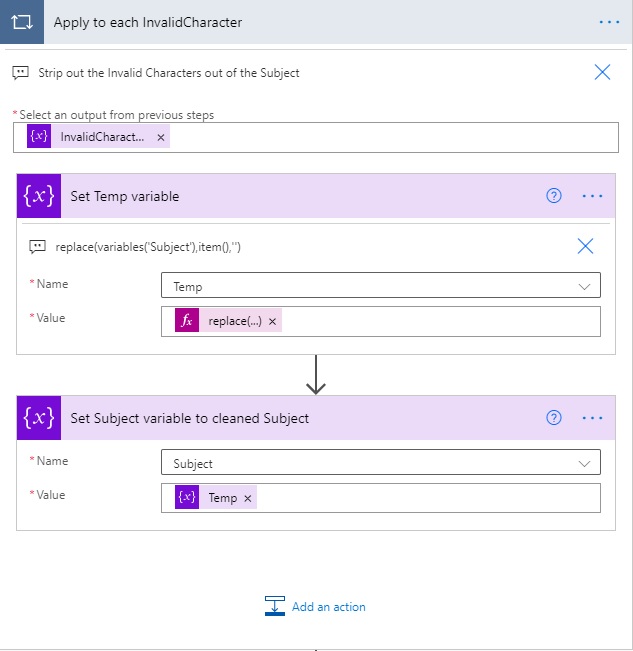
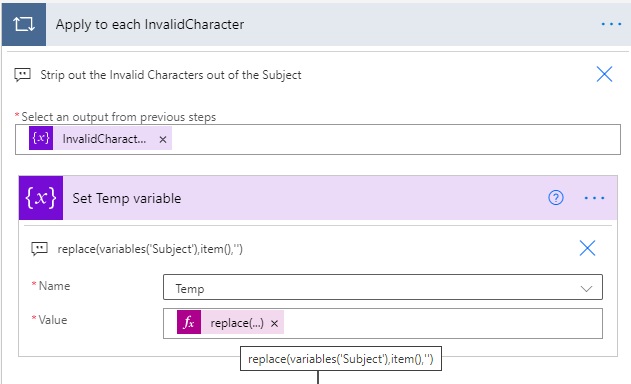
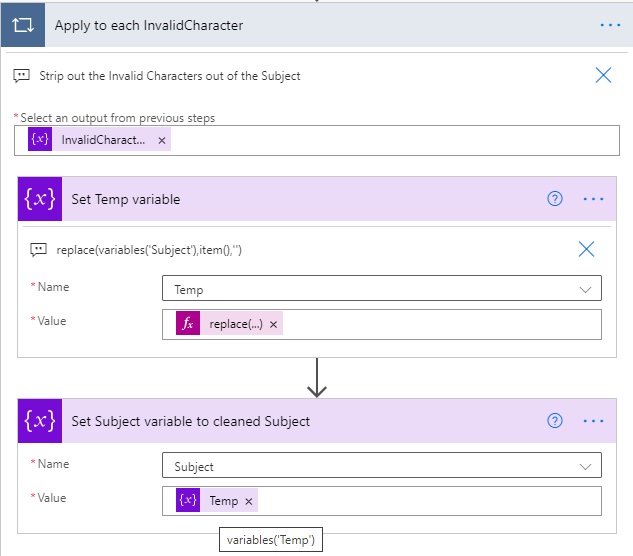
    8. In the next step, we remove the invalid characters from the mail subject, which will further be used to create a folder in the library.

    apply to each invalid char

    The following expressions have been used in the above step.

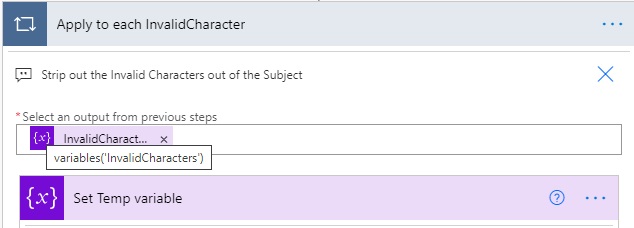
            a) Loop for each invalid character

                    i. Expression: @{variables('InvalidCharacters')}

    invalid character flowb) Set Temp variable

            i. Expression: replace(variables('Subject'),item(),'')

    invalid character flow variable

    c) Set subject variable after removal of invalid characters

            i. Expression: @{variables('Temp')}

    invalid character flow variable

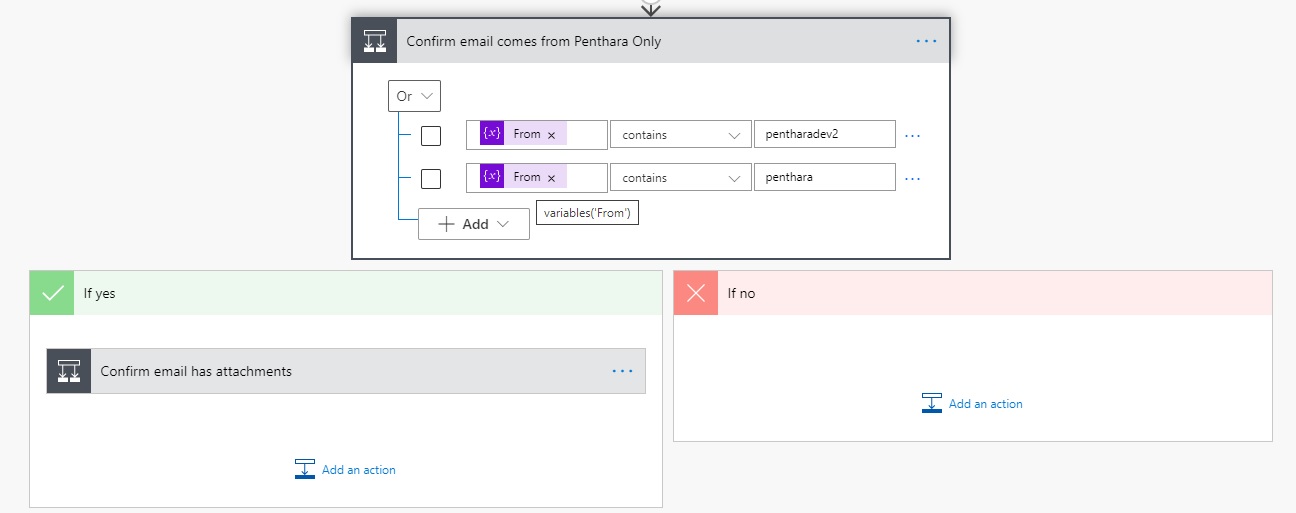
    9. In the next step, we add a condition to allow the processing of emails received from specific domains. This will ensure we filter out any unwanted emails.

    filter sender flow

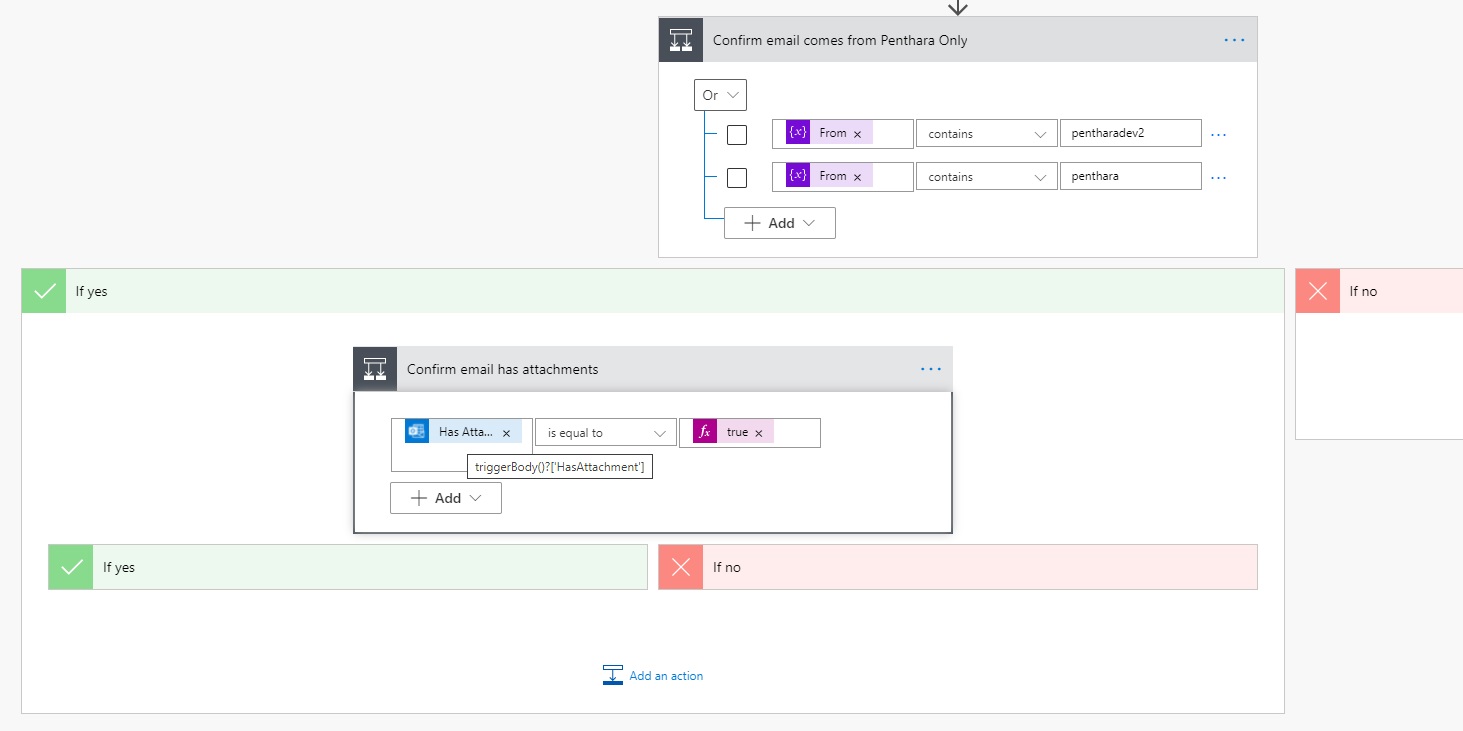
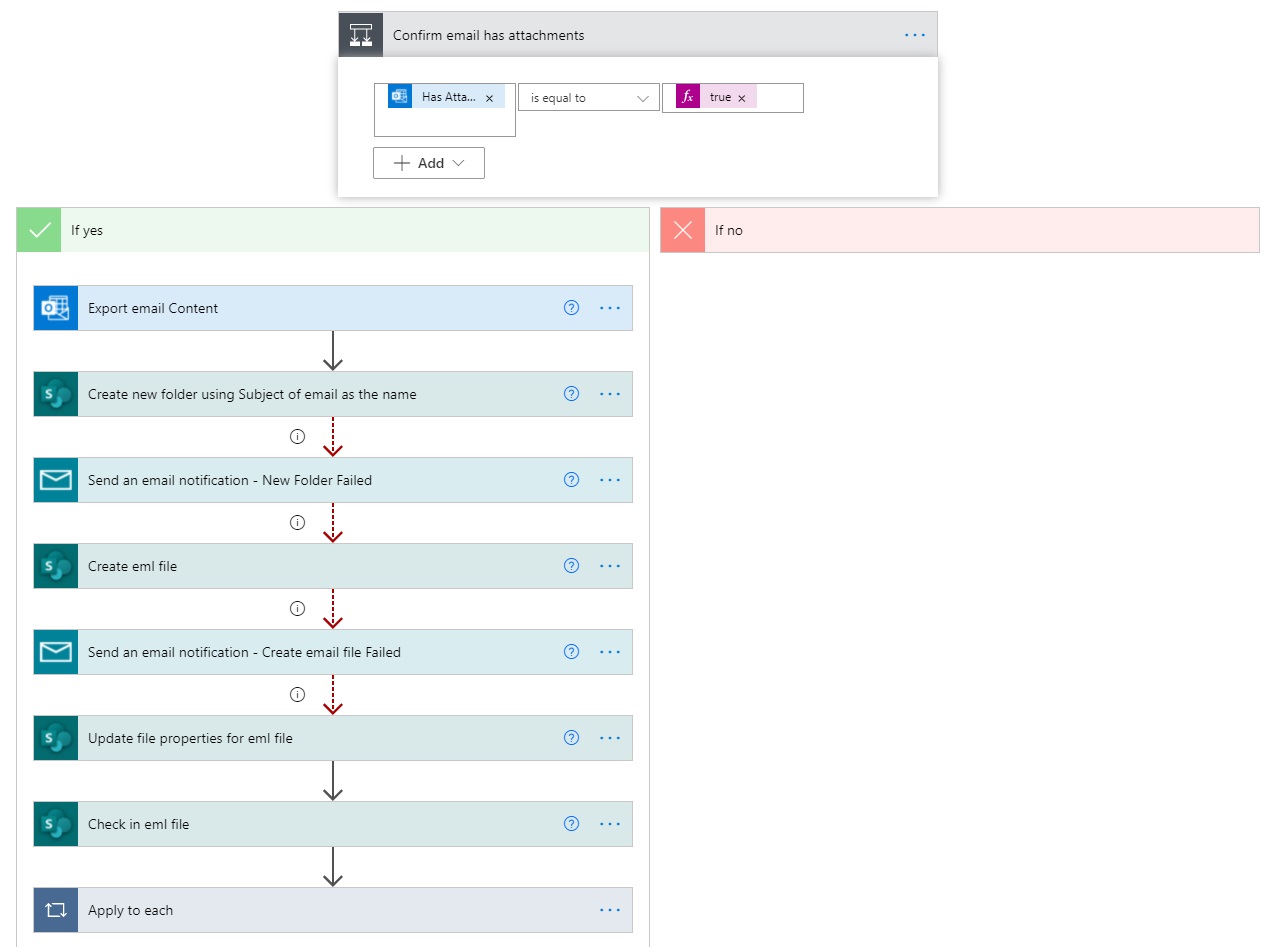
    10. In the next step, we filter out emails that do not have attachments.

           Expression: @triggerBody()?['HasAttachment']

    filter attachments flow

    11. In the next step, we further process the emails that have attachments.

    process email attachments flow

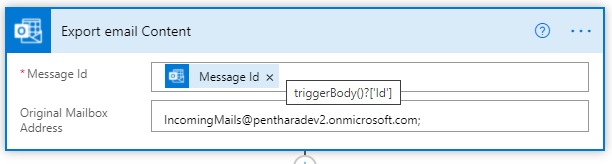
    12. We first export the contents of the email using the Export email (v2) action. This will be used to upload the email contents to the document library.

    Expression: @{triggerBody()?['Id']}

    export email content flow

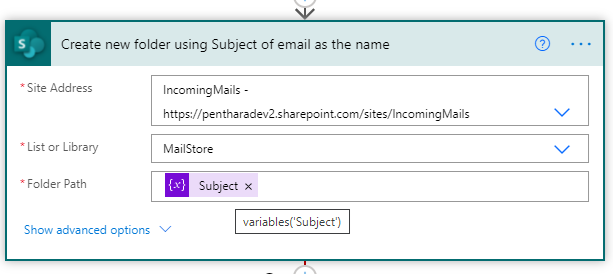
    13. The next step is to create a folder in the document library using the subject as the name.

    Expression: @{variables('Subject')}

    create folder subject flow

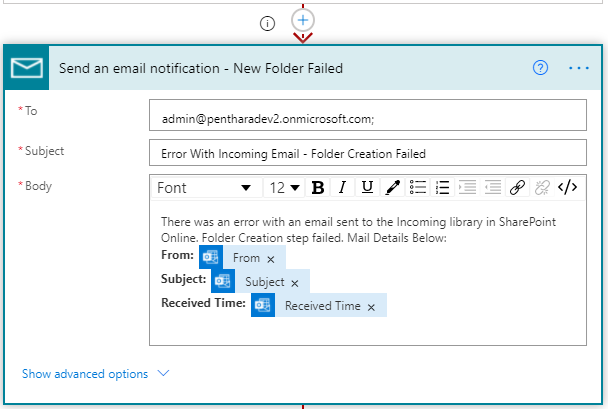
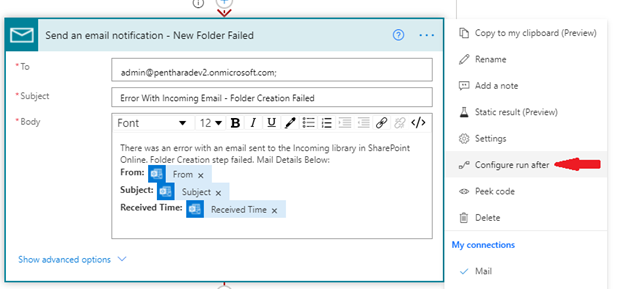
    14. The next step is to send an email to the admin in case of the previous step of folder creation failure. This will have a run after configuration as below. The content of the email can be customized as per requirements.

    folder creation failure notification flowemail creation failure notification flow

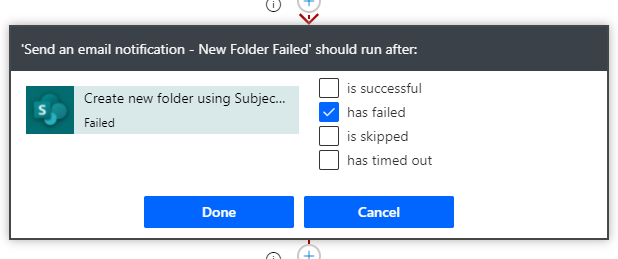
    Go to the Send an email notification settings – New Folder Failed step and then click on Configure run after. Uncheck all options and select has failed. This will ensure that the email will be triggered only when the create folder action fails.

    run after action failed flow

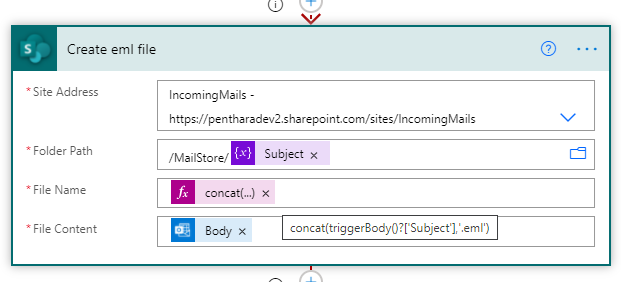
    15. The next step is to create the eml file in the Subject named folder created earlier.

    Expressions:

  • Folder Path: /MailStore/@{variables('Subject')}
  • File Name: @{concat(triggerBody()?['Subject'],'.eml')}
  • File Content: @{body('Export_email_Content')}
  • create email action flow

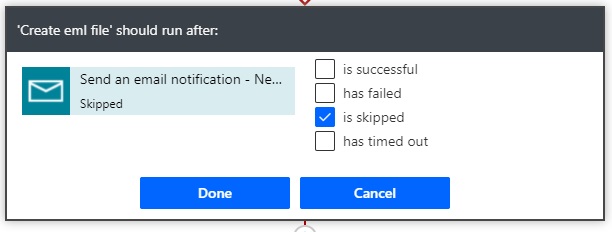
    This will also have a run after configuration to run only when the previous step is skipped. This will ensure that if the new folder creation fails and the email notification is triggered, then create eml file will not be triggered since the folder creation had failed earlier.

    run after skip email action flow

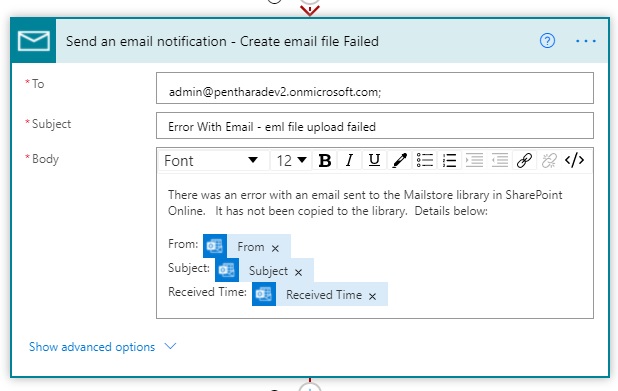
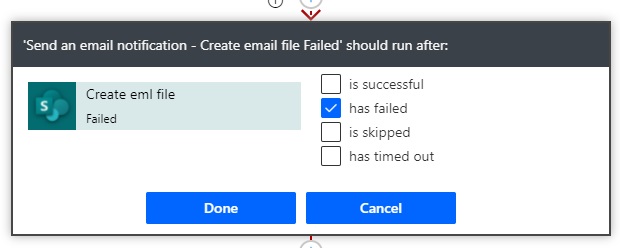
    16. The next step is again to send an email to the admin in case of the previous eml file creation failure. The contents of the email can be customized as per requirements.

    create email action failure notificationThis will run after configuration as below to ensure that the email will be triggered only when the create eml file action fails.email creation failed notification17. The next step is to update the properties of the eml file created in the previous step. 

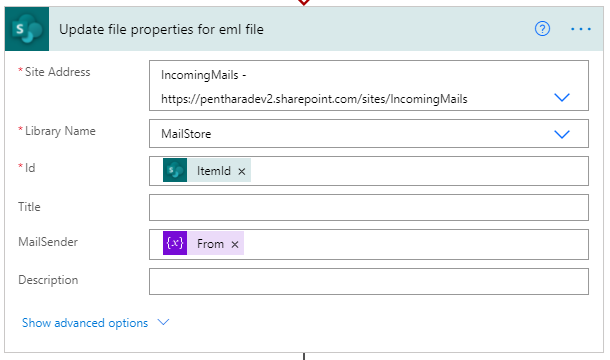
    Expressions:

            a) Id: @{body('Create_eml_file')?['ItemId']}

            b) MailSender: @{variables('From')}

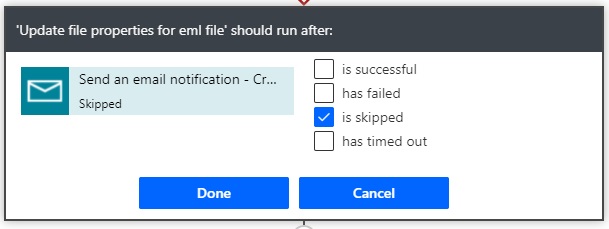
    update file properties actionThis step will run after configuration as below to ensure it will be triggered only when the previous step is skipped. This will ensure that if the new eml file creation fails and the email notification is triggered, then create update file properties of eml file will not be triggered since the eml file creation had failed earlier.run after update file properties action skipped18. In the next step, we check-in and publish a major version of the eml file created in the earlier steps. This will make it visible to authorized users.

    Expressions:

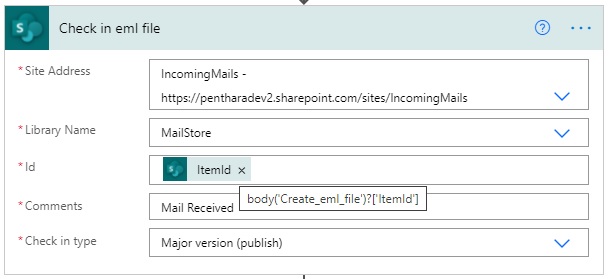
            a) Id: @{body('Create_eml_file')?['ItemId']}

    check in file action

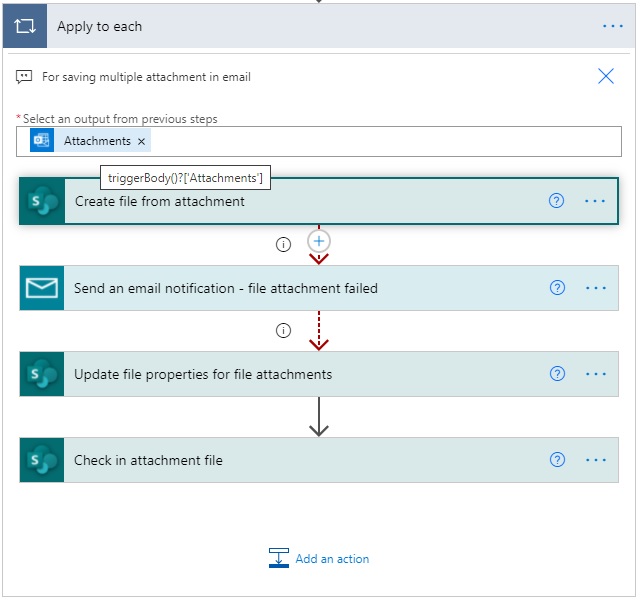
    19. The next step is to use the Apply to each action. This will loop through each attachment in the email and save it in the same Subject named folder created earlier.

    Expression: @{triggerBody()?['Attachments']}

    apply to each save attachments

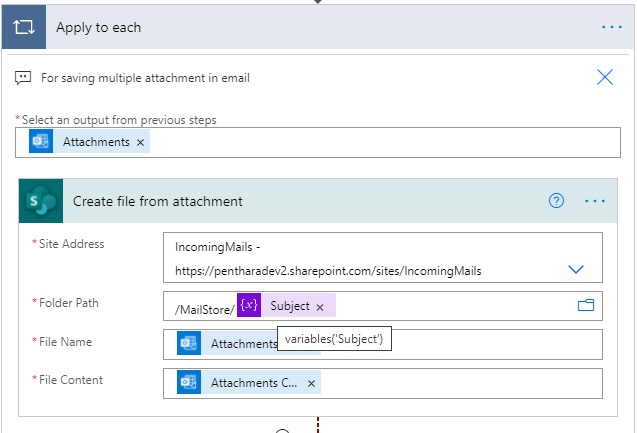
    20. The next step is to create a file from the attachment in the Subject named folder created earlier.

    Expressions:

            a) Folder Path: /MailStore/@{variables('Subject')}

            b) File Name: @{items('Apply_to_each')?['Name']}

            c) File Content: @{items('Apply_to_each')?['ContentBytes']}

    create file from attachment action

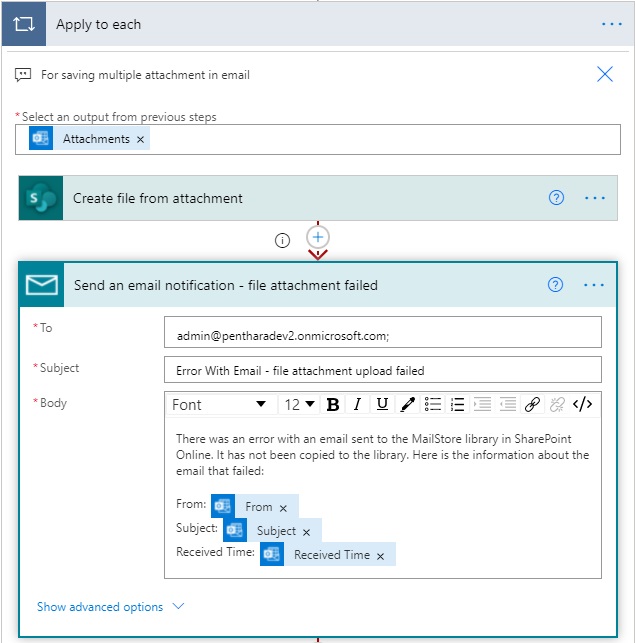
    21. The next is to send an email to the admin in case of the previous step of attachment file creation failure. This will have a run after configuration as below. The contents of the email can be customized as per requirements

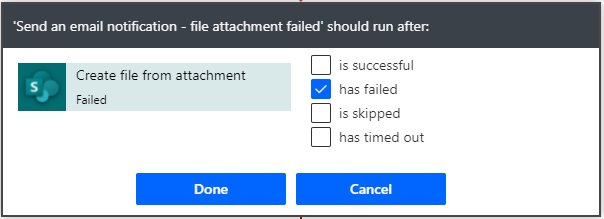
    attachment creation failed notificationGo to the settings on the Send an email notification – file attachment Failed step and then click on Configure run after. Uncheck all options and select has failed. This will ensure that the email will be triggered only when the create attachment file action fails.run after file creation failure notification

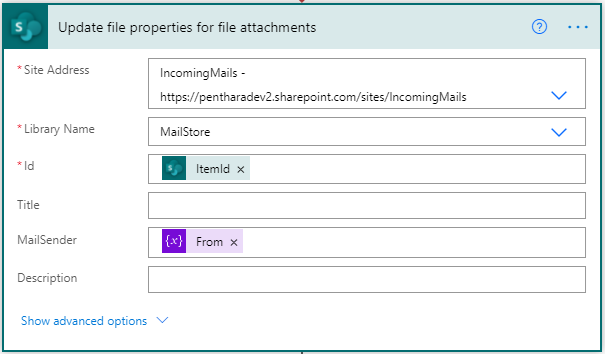
    22. The next step is to update the properties of the attachment file created in the previous step.

    Expressions:

            a) Id: @{body('Create_file_from_attachment')?['ItemId']}

            b MailSender: @{variables('From')}

    update file properties action

    This step will run after configuration as below to ensure it will be triggered only when the previous step is skipped. This will ensure that if the new attachment file creation fails and the email notification is triggered, then create update file properties of the attachment file will not be triggered since the attachment file creation had failed earlier.

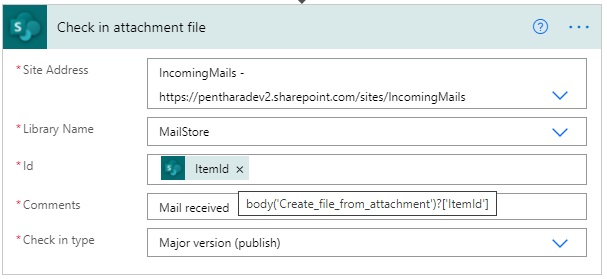
    23. In the next step, we check-in and publish a major version of the attachment file created in the earlier steps. This will make it visible to authorized users.

    Expressions:

            a) Id: @{body('Create_file_from_attachment')?['ItemId']}

    Check in attachment file

    Summary

    The above steps helped us achieve the Incoming email functionality that allows the SharePoint sites to accept emails and store them in lists and libraries.

    The Power Automate flow has the following features.

    1. Save emails received from specific domains.
    2. Fix to clean special characters from the subject line for folder creation
    3. Handle failures and notify admins at file creation and upload stages.
    4. Upload multiple attachments

    AneeshKumar

    Written By-  Aneesh Kumar

    (Microsoft 365 Solution Architect)

    Written By-  Aneesh Kumar

    (Microsoft 365 Solution Architect)

    Jasjit

    Peer Reviewed By-  Jasjit Chopra

    (CEO)
    Peer Reviewed By-  Jasjit Chopra

    (CEO)
    Sanika

    Graphics Designed By- Sanika Sanaye

    (Creative Design Director)

    Graphics Designed By- Sanika Sanaye

    (Creative Graphic Designer Trainee)

    Top 10 free mockup sites to take your branding projects

    Introduction

    What is a mockup?

    Mockups are a visual representation or rough sketch of what the final design would look like. They are meant to give the most helpful look in as minimal effort as possible.

    Mockups are often shared with the clients and other stakeholders. They show a preview of how the final design will look in various scenarios – on banners, stationery, billboards, business cards, wireframes, etc. This allows the clients to make any desired changes before developing it, saving on cost and effort.

    Why use mockups?

    Mockups are an essential part of the creative process. They are not just a great way to get client feedback but also to help clients visualize how the design would look in real life. Living in a world that is changing quickly, it is essential to iterate ideas flexibly.

    Mockups allow the designers to test their design and make changes to make sure that the design is fit for production. Additionally, if you are doing concept projects which do not involve developing products, displaying your designs on mockups gives your project a sense of professionalism.

    Though, the greater the number of mockup sites on the web, the longer it takes to find one which has high-quality mockups. As a graphic designer, I prefer to work with a handful of websites that I trust to provide good mockups for free. These websites have a great variety of mockups for all my branding-related needs, from packaging to stationery.

    My Top 10 Go-to Websites for Mockups

    1. Freepik

    Freepik

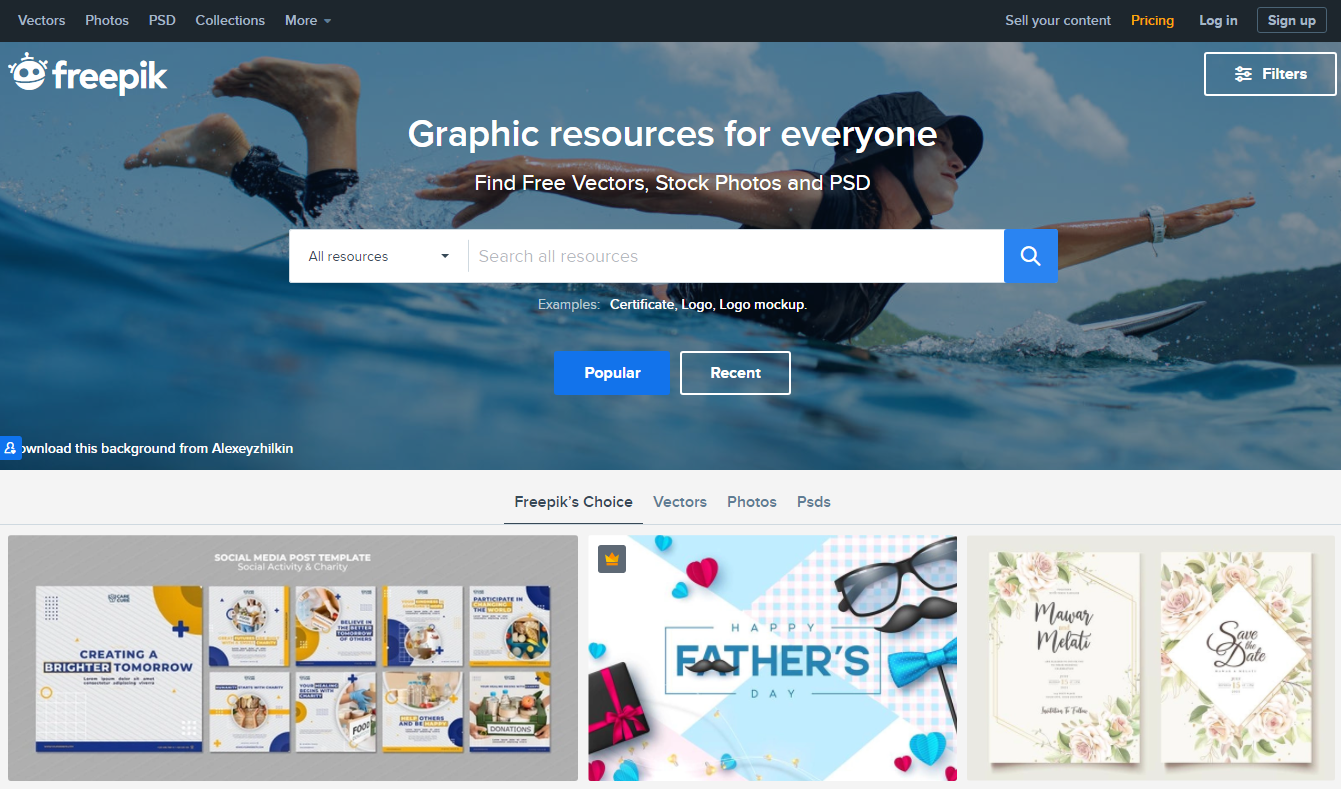
    Freepik offers a massive library of all types of free graphic resources including illustrations, stock photos, mockups, and other media. You will find what you are looking for here almost every time. However, the sheer volume of resources uploaded to this platform makes it difficult to find mockups that are not of subpar quality.

    Features

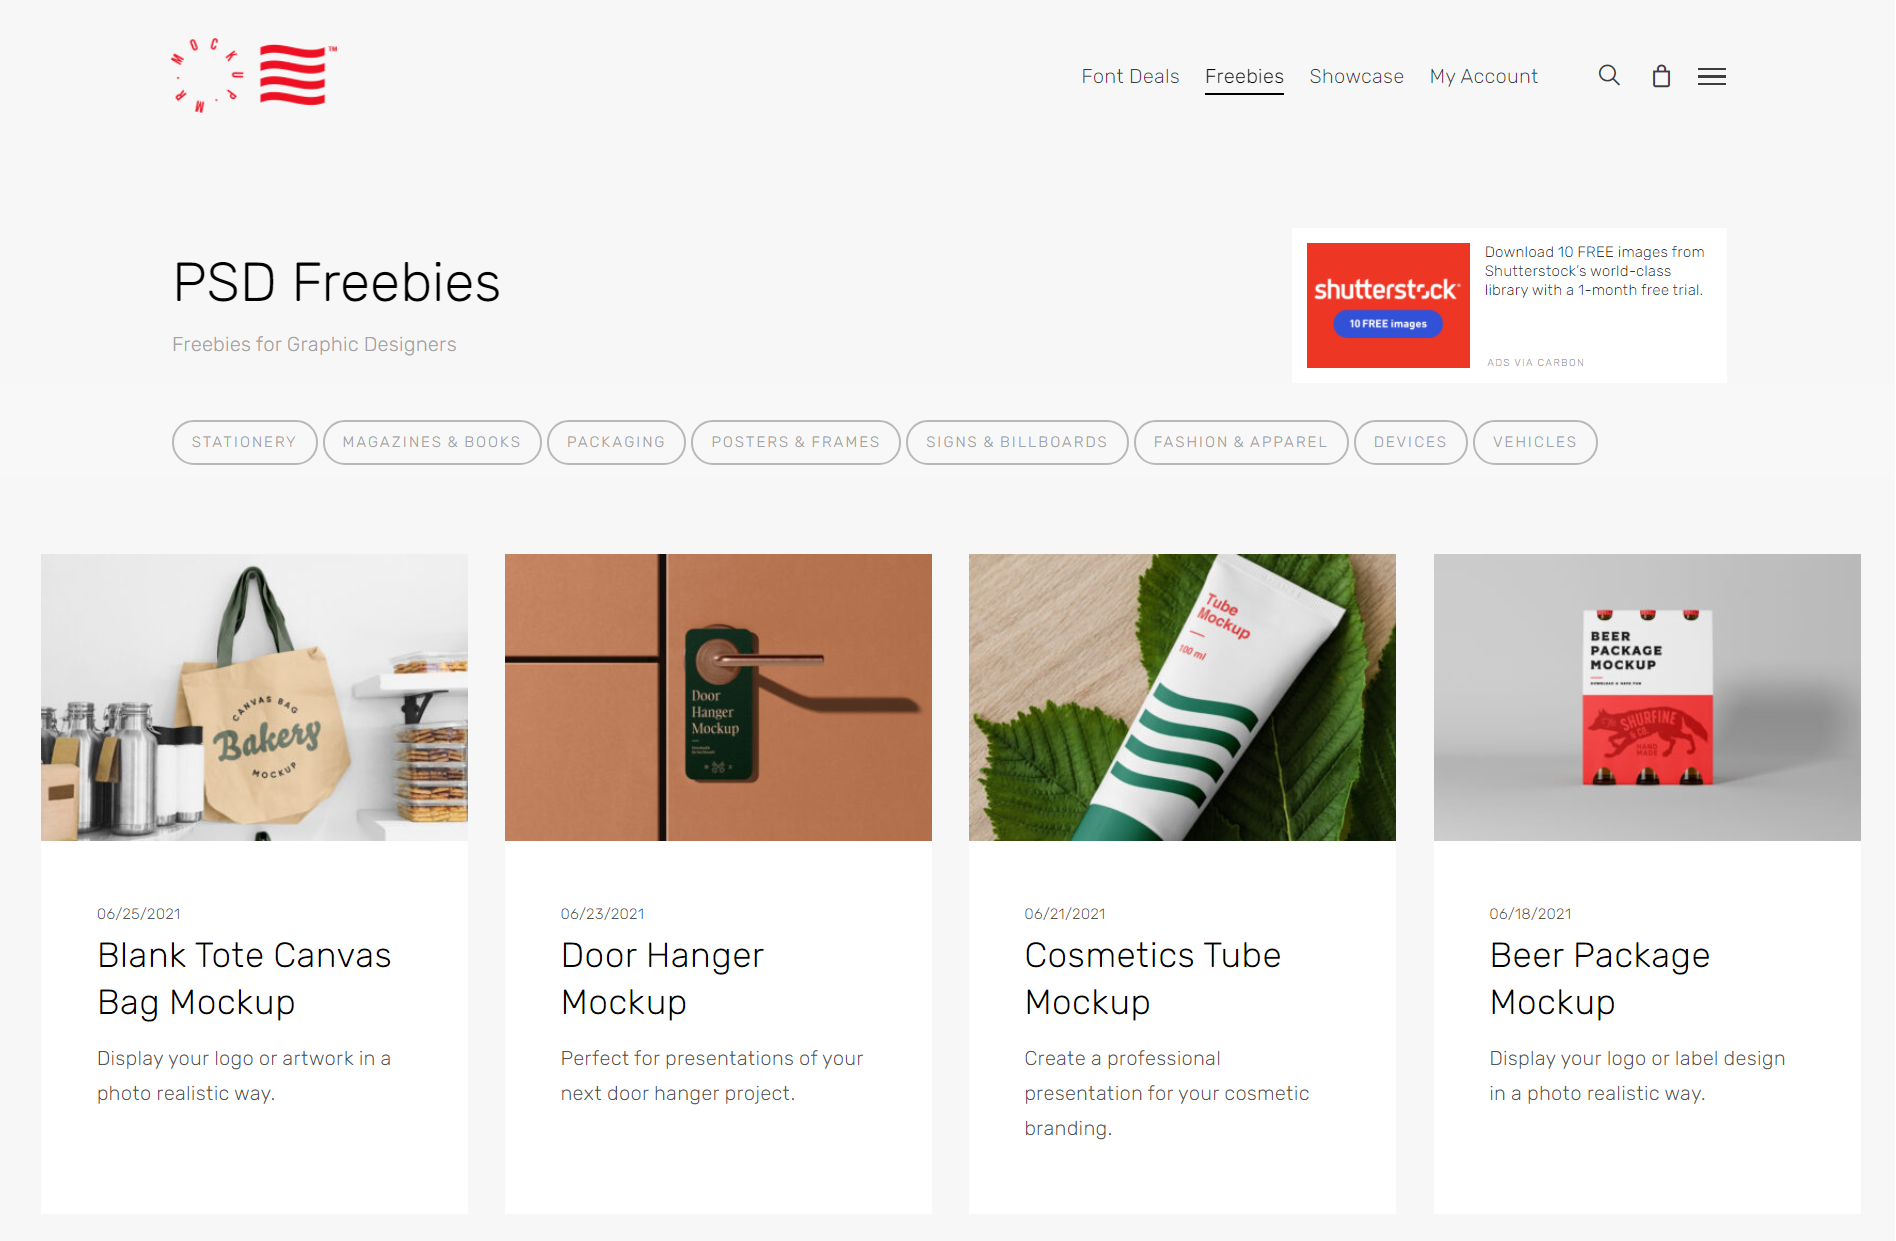
    2. Mockupworld

    mockupworld

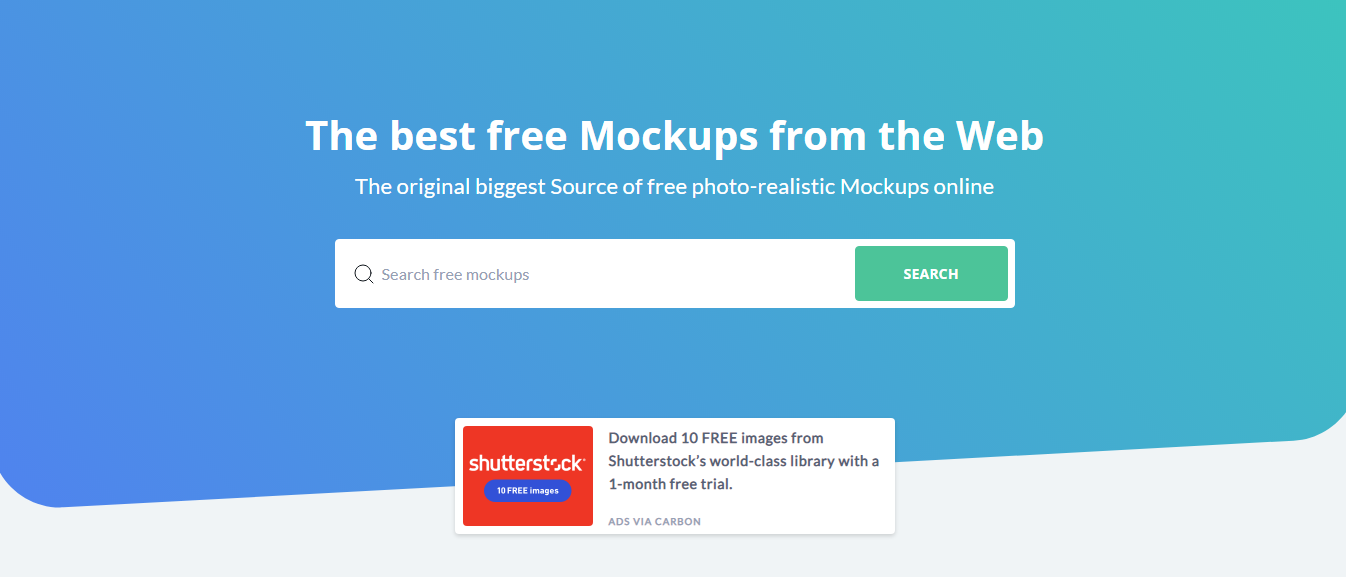
    Mockupworld offers links to high-quality photo-realistic mockups of all kinds – magazines, books, iPhones, MacBooks, fashion, apparel, billboards, and packaging. With the clutter-free aesthetic of the mockups from this site, it becomes very easy to find minimalist mockups to showcase your design. Most of the free mockups on this site are available as downloadable PSD files. In case you don’t have photoshop, you can use the ready-made mockups provided by PlaceIt in your browser, but these require you to buy a subscription for the service.

    Features

    3. Smartmockups

    smartmockups

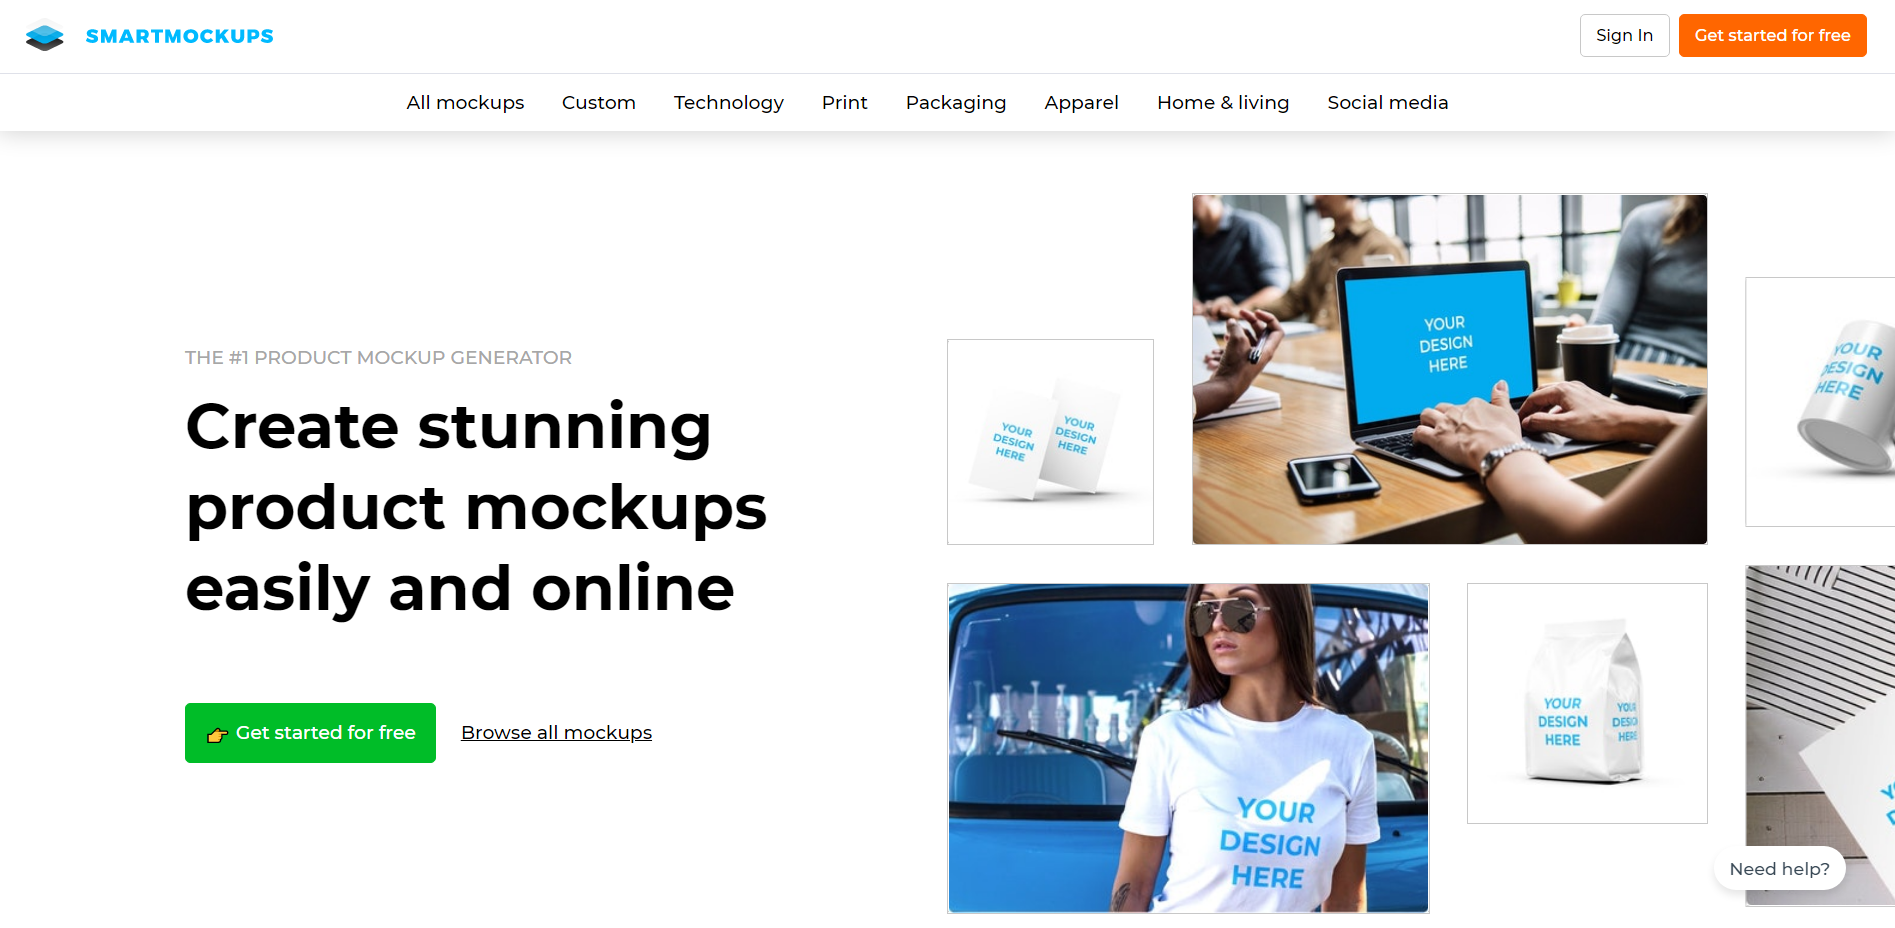
    Smartmockups is one of the best sites to download ready-made mockups straight from your browser. Much like PlaceIt, this site allows you to upload your image and download the finished mockup without needing to download heavy PSD files. But it has one major advantage over PlaceIt and that is, it offers free download of mockups. It is very easy to customize the mockups on this platform and free users can download the finished mockup as JPG with a high-quality resolution which is good enough for print as well as online use. It offers a wide variety of mockups in every category and was one of the first websites to provide high-quality mask mockups when the pandemic started.

    Features

    4. ZippyPixels

    zippypixels

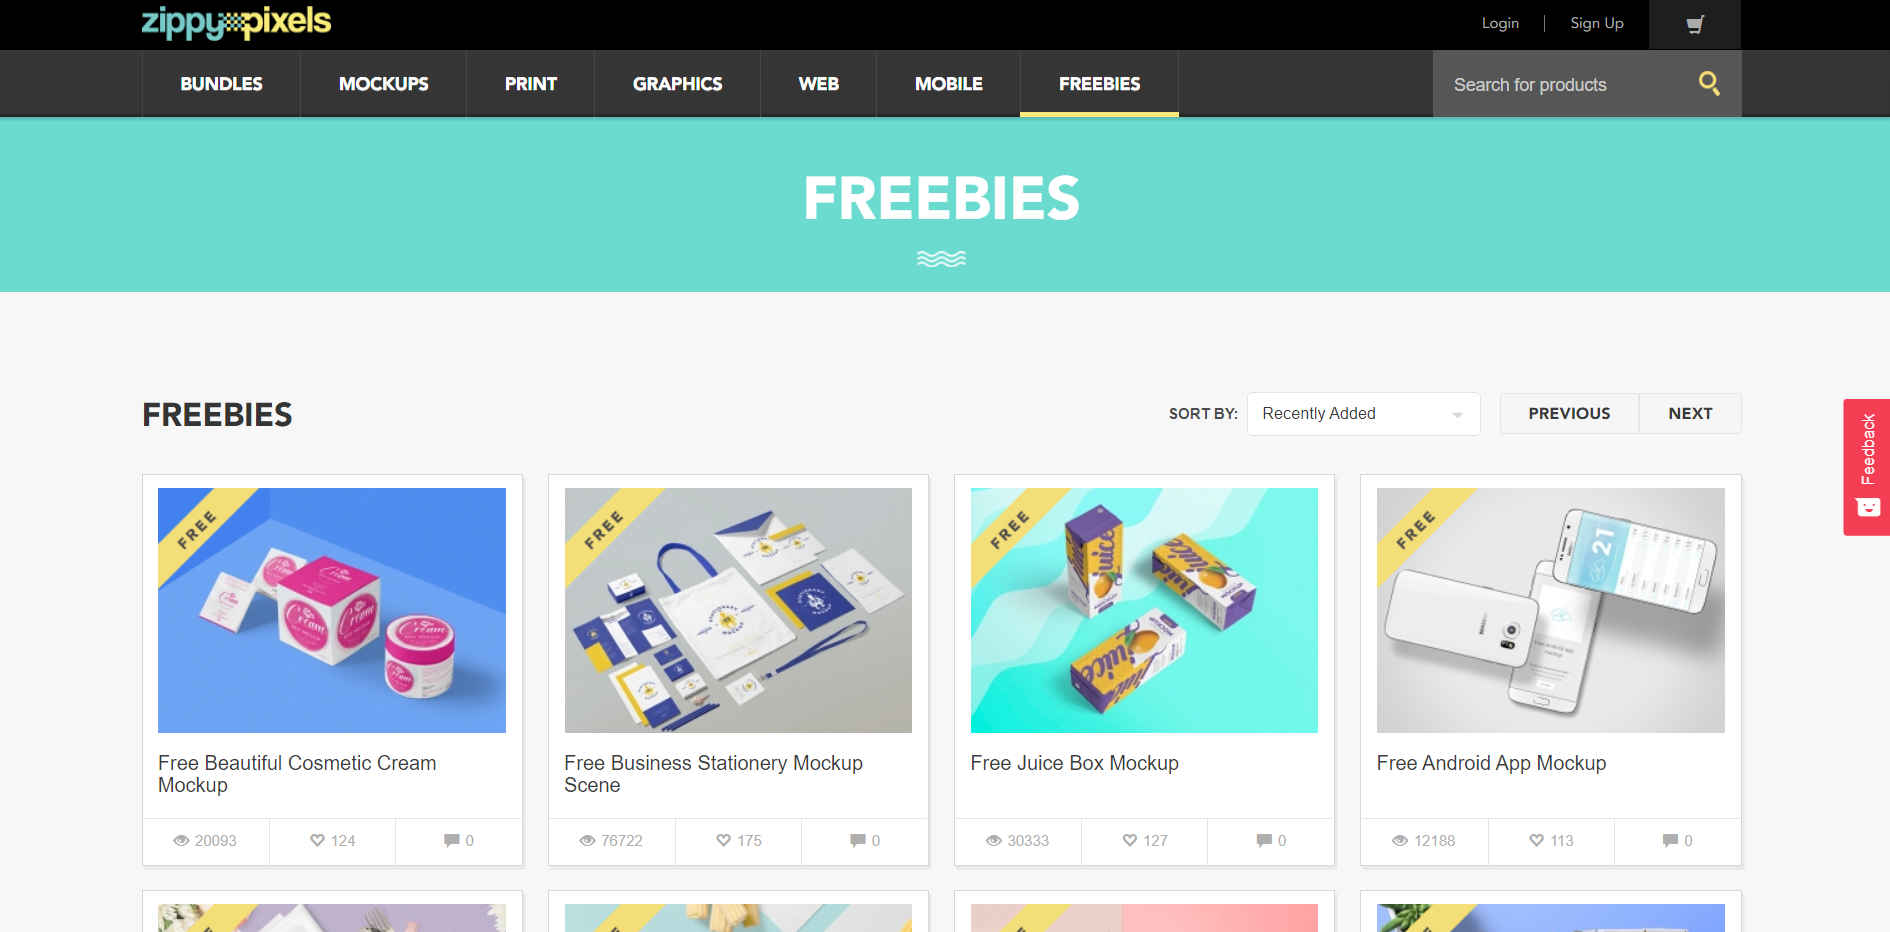
    ZippyPixels is another great resource for exploring mockups for your design projects. ZippyPixels has a large library of resources in both paid as well free categories. In the freebies section on the site, you can find a great variety of mockups to choose from. However, some of the mockups here are not exactly photo realistic. It requires some deep navigating in the pages to find the good ones. The free mockups available here can be used in personal as well as commercial projects. Downloading mockups involves providing your email address as the download link is sent to your inbox.

    Features

    5. Unblast

    unblast

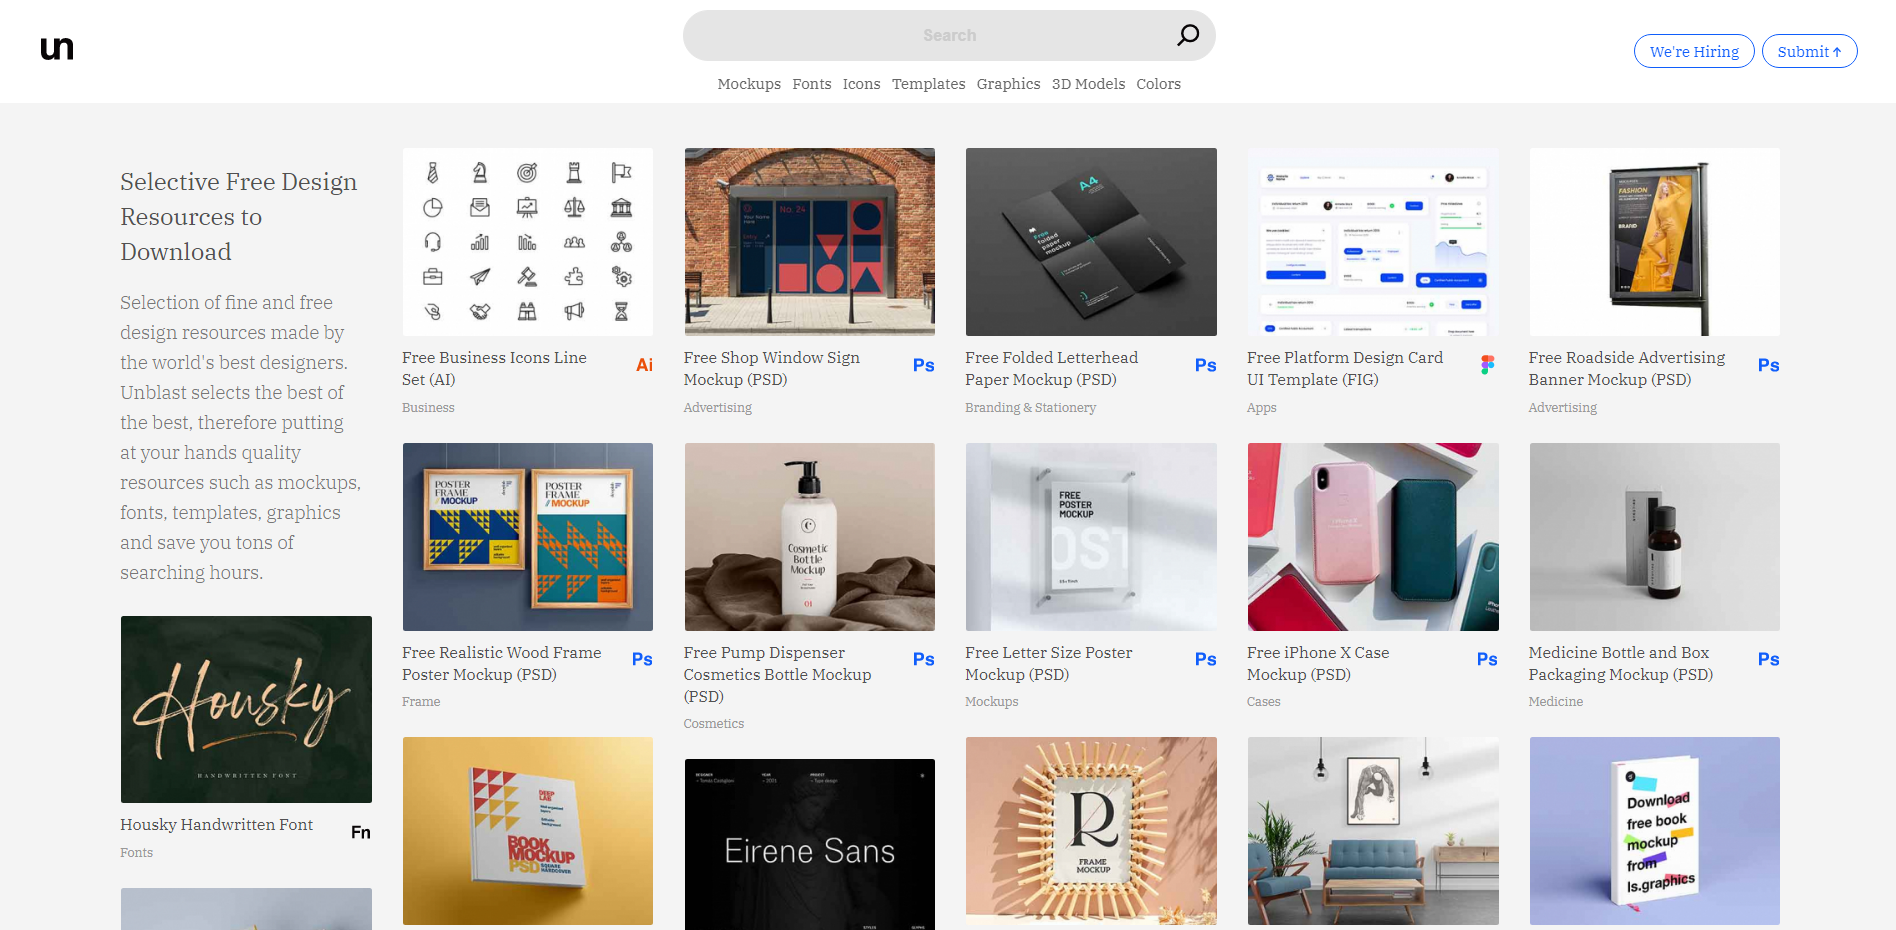
    Unblast is a site dedicated to providing free graphic design assets including mockups, icons, templates, 3D models and vectors. The library of Unblast is carefully selected by their team and offers a collection of beautiful, high-quality assets which are contributed by some of the best designers around the world. In addition to the mockups, the site also features fonts as well as curated color palettes that can be handy for your next project.

    Features

    6. Mr.Mockup

    mr_mockup

    Mr.Mockup provides creative, unique and clean PSD mockups created by an independent team of designers. It is a side project of Noeeko, a creative design studio delivering graphic design and brand identity services. This site features both paid as well as free mockups. You can find the free mockups in the freebies section on the site. Since it is a side project of a design studio, you can rest assured that all their mockups, even free ones, are of high quality. The clean and professional look of the mockups helps your design to stand out.

    Features

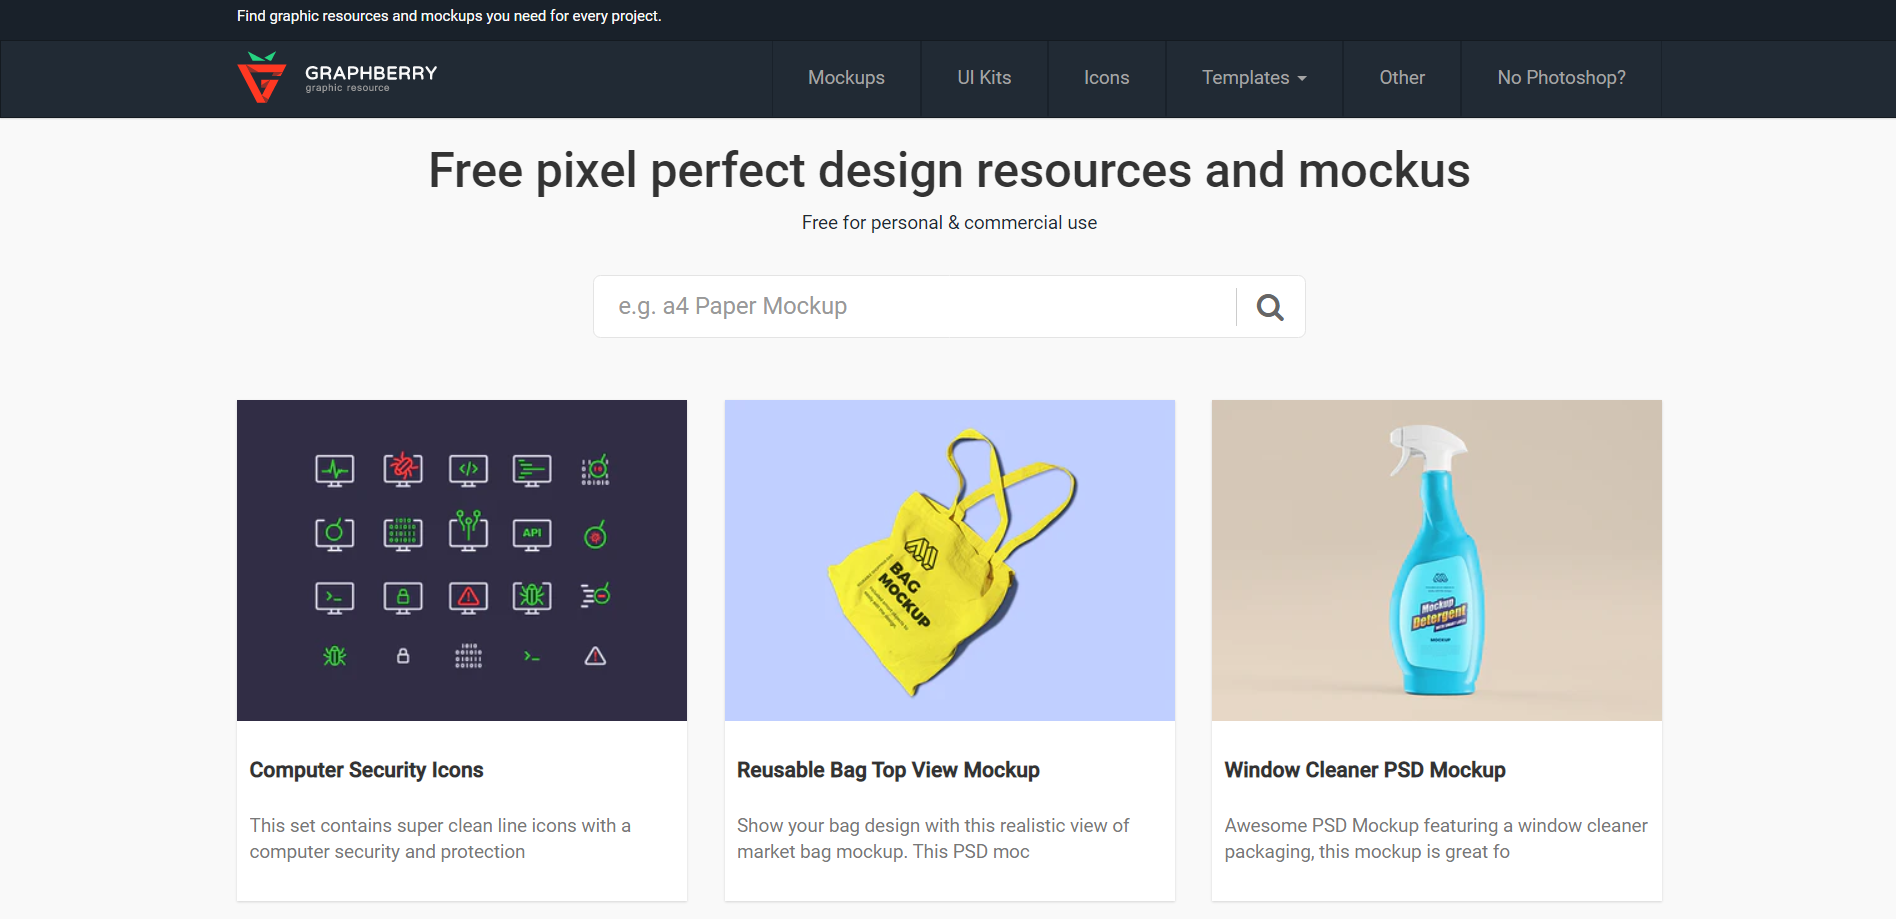
    7. Graphberry

    graphberry

    Graphberry is yet another amazing library of free graphic design resources. It features a varied collection of mockups of all categories. Be it packaging, billboards, devices, stationery, or vans, you are bound to find what you are looking for here. The site also has free vectors, UI kits, icon sets, and PSD, HTML and XD templates ready to download. The site has beautiful creative mockups that are perfect for branding projects.

    Features

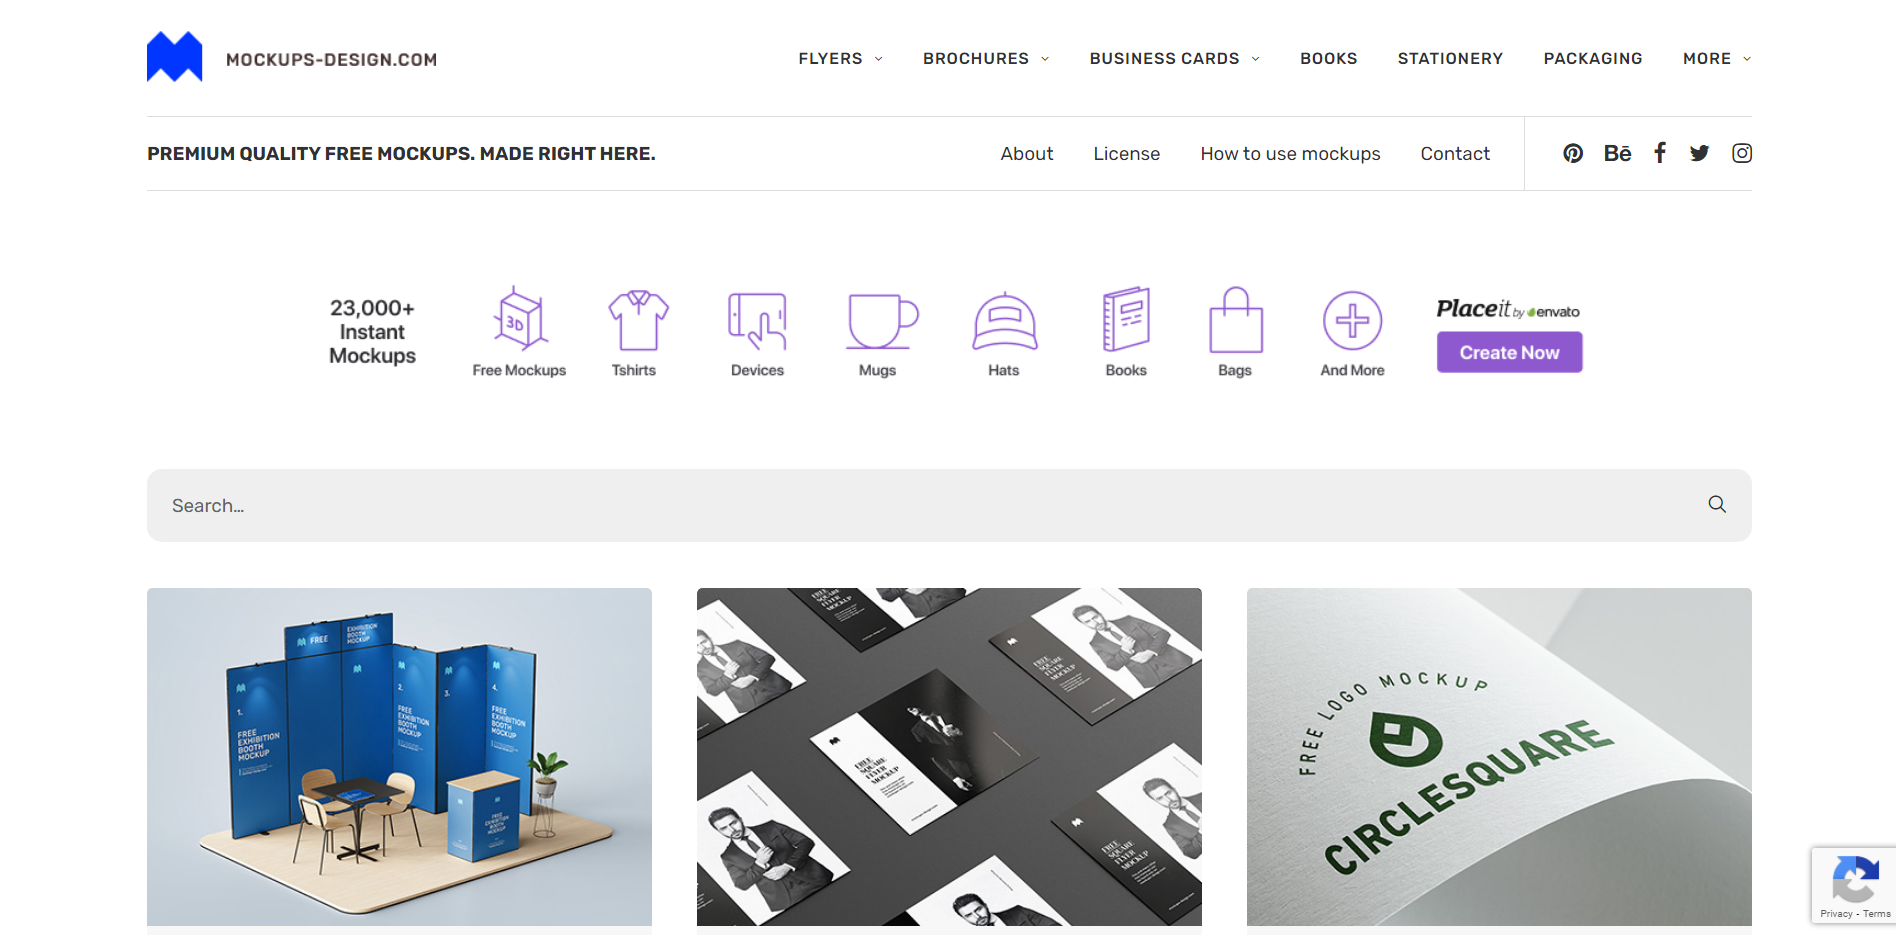
    8. Mockups-design

    mockups_design

    Mockups-design is a site dedicated to providing premium-quality mockups for free. The mockups are curated by the founder, Andrew, who is a graphic designer himself. The site has beautiful mockups that are even sorted according to their sizes in whichever category possible such as business cards, flyers, brochures, etc. All the mockups can be downloaded as PSD files and many of them contain multiple files with different views for the mockup. With such an arsenal of high-quality mockups, showcasing your design elegantly becomes very easy and flexible.

    Features

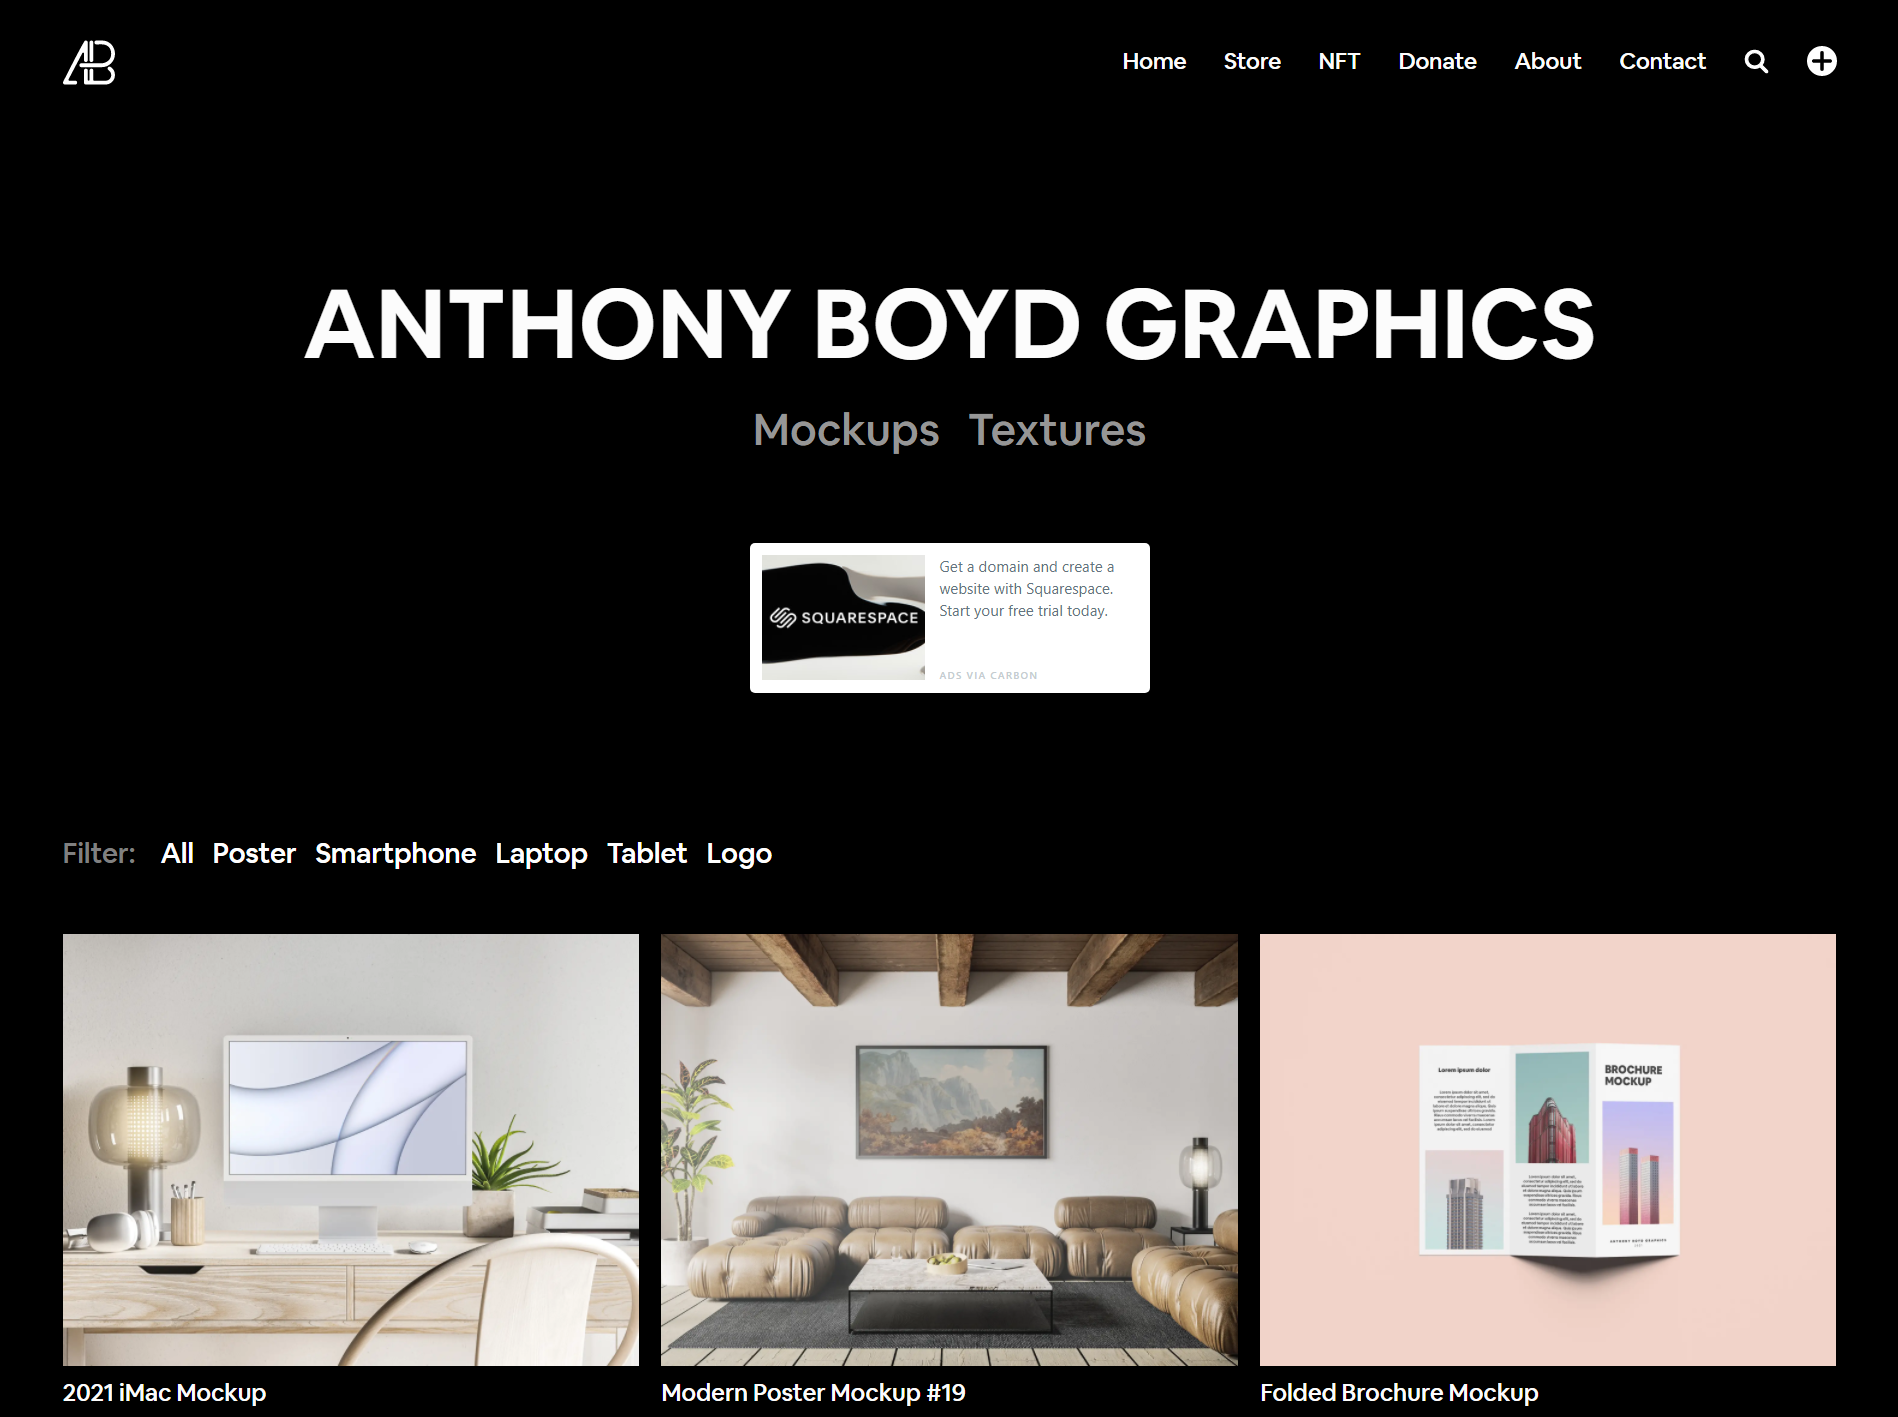
    9. Anthony Boyd Graphics

    anthony_boyd_graphics

    Anthony Boyd Graphics is a website run by the talented 3D designer, Anthony Boyd. The mockups on his site are spectacular. There is a good variety of mockups and there are mockups for smartphones and laptops other than iPhone and MacBook as well, such as Samsung Galaxy and Microsoft Surface Pro. You can also find mockups for branding, packaging, posters, vinyl records, UI showcases, Apparel, TV and much more. Apart from the freebies, there are also premium mockups that are available for purchase.

    Features

    10. AlienValley

    alienvalley

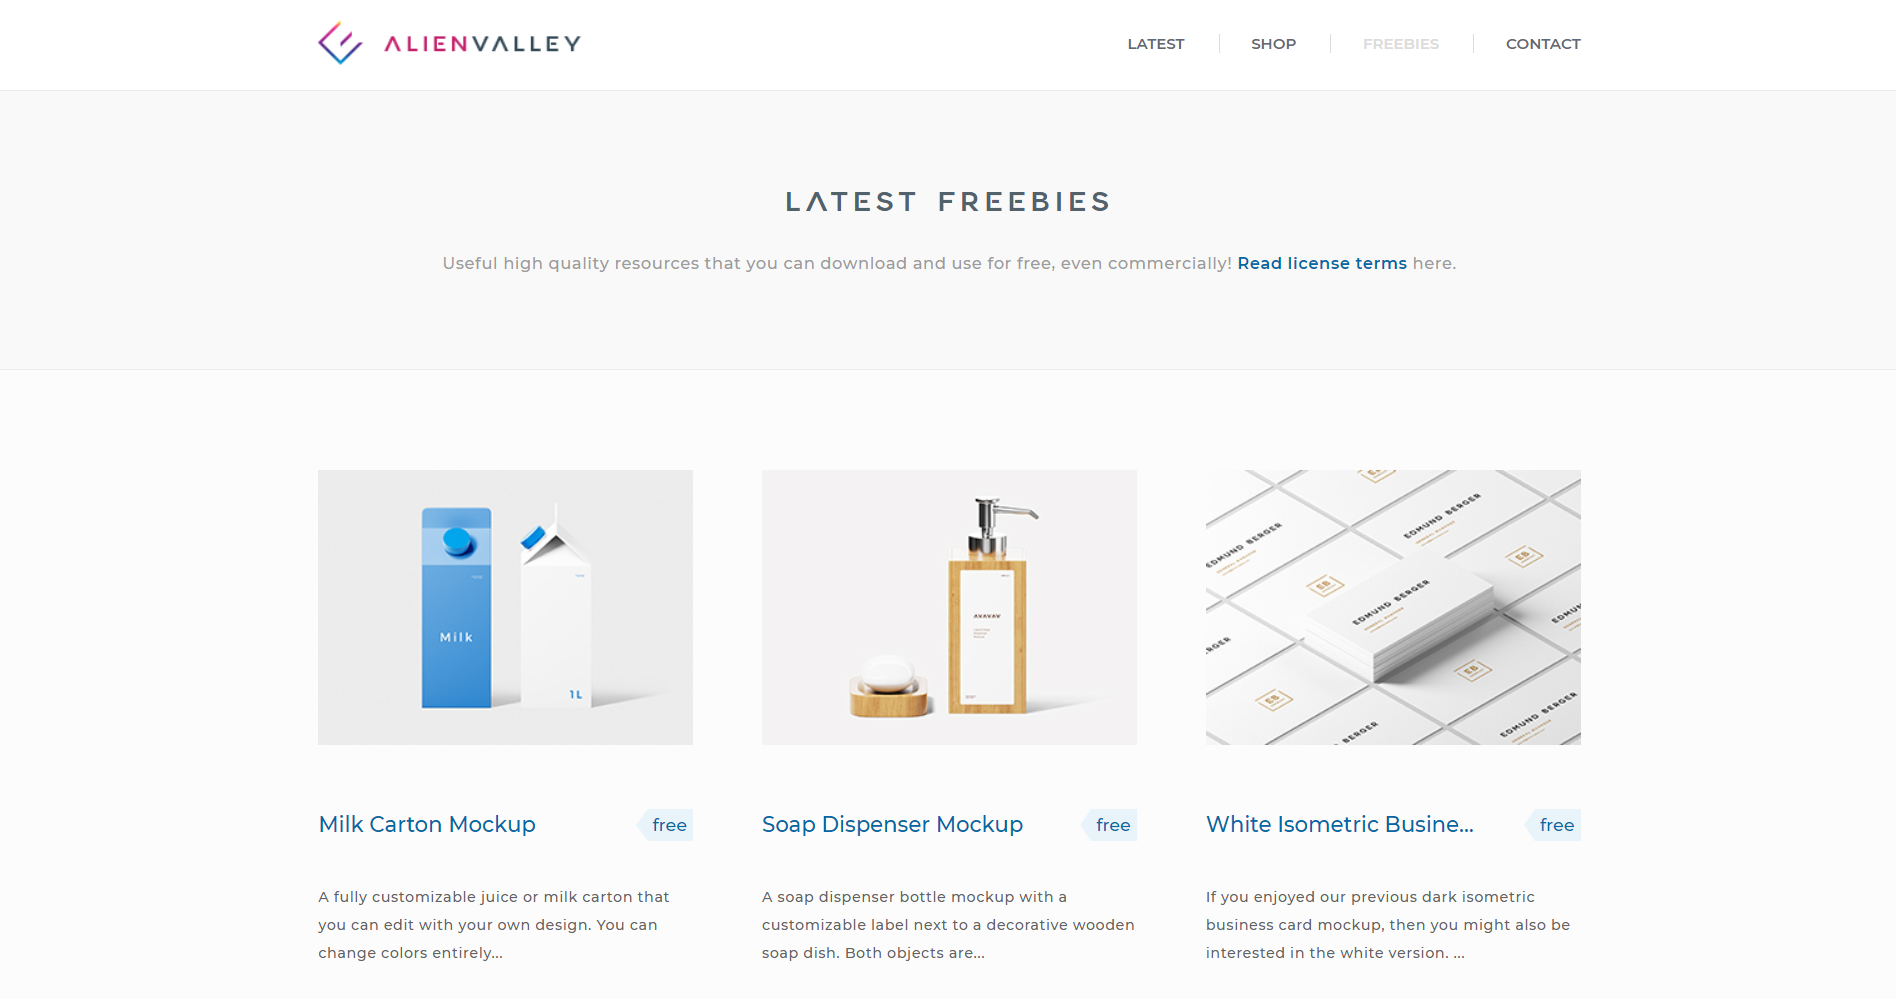
    AlienValley is a great place to find premium-quality, minimalistic, unique mockups for free to highlight your latest design project. The free mockups in the freebies section of the site have a great collection of options to choose from but the variety is limited. The mockups are crisp, stylish and cater to most branding applications. Apart from mockups, there are also free fonts, UI kits, icon sets that can come in handy in your daily design work. To download the mockups, you need to provide your email address as the download link will be sent to your inbox.

    Features

    Conclusion

    So, this is my arsenal of free mockup sites to turn towards when I do brand identity projects. Having a handful of them helps to aggregate the shortcomings of individual websites with the positive aspects of the other websites. Also, these sites have resources spread overall branding applications, saving me the time and effort of searching for high-quality mockups on the web for every project. I hope that you have found some new sites in case you already know a few.

    Share your favorite mockup websites with us and let us know what you like about them in the comments. We are interested to know if we missed out on any gems to include in our list.

    Sanika

    Authored and Graphics Designed By- Sanika Sanaye

    (Creative Design Director)

    Authored and Graphics Designed By- Sanika Sanaye

    (Creative Graphic Designer Trainee)

    Jasjit

    Peer Reviewed By-  Jasjit Chopra

    (CEO)
    Peer Reviewed By-  Jasjit Chopra

    (CEO)
    How to implement CSS in SPFx in different ways

    Introduction

    Modern SharePoint is aimed to make the user experience more collaborative, but the users also know that visual customization is not that vast. Where Microsoft makes the Modern SharePoint easy to manage and configure, an organization’s basic need is to render its theme of colors, font or style which still has its own challenges.

    The development of SPFx technology allows developers to experiment with the customization of web parts. This not only limits the extent to functionality but also allows them to configure their web pages.

    A very common way of styling your page is through CSS (Cascading Style Sheets). CSS handles the look and feel part of a web page.

    Why CSS ?

    CSS helps you to keep the informational content of a document separate from the details of how to display it. The details of how to display the document are known as its style. You keep the style separate from the content so that you can:

    You use HTML to describe the content of the document, not its style; you use CSS to specify its style, not its content. There are exceptions to this rule, of course, and HTML also provides some ways to specify style. For example, in HTML you can use a <b> tag to make text bold, and you can specify the background color of a page in its <body> tag. When you use CSS, you normally avoid using these HTML style features so that all your document’s style information is in one place.

    Ways to implement CSS in SPFx

    Today we are going to see just two ways of implementing CSS in your SPFx solutions. Ideally, this should suffice for majority of your needs. This is also in no way a complete and comprehensive way of implementing CSS in your SPFx solutions. There are other methods as well that have not been discussed.

    Using Inline CSS in SPFx Webpart

    Inline CSS is considered useful as it reduces the number of files that the browser needs to download before displaying the web page. With an external CSS, the browser first loads an HTML file and then downloads the CSS file. With an inline CSS, you just need to download one HTML file instead of 2, making the process a little bit faster.

    An inline CSS is used to apply a unique style to a single HTML element by using the style attribute of an HTML element. The following example sets the border color of the <div> to black while using React framework within your SPFx solution:

    <div className={`ms-Grid-col ms-u-md3`} style={{"border-color": "black"}}>

    <p> Hello World </p>

    </div>

    Similarly, if you want multiple attributes, try comma separated values as below:

    <div className={`ms-Grid-col ms-u-md3`} style={{"border-color": "black","font-size":"12px “}}>

    <p> Hello World </p>

    </div>

    Using dynamic classes via JavaScript

    Another way of adding CSS is by using dynamic classes.

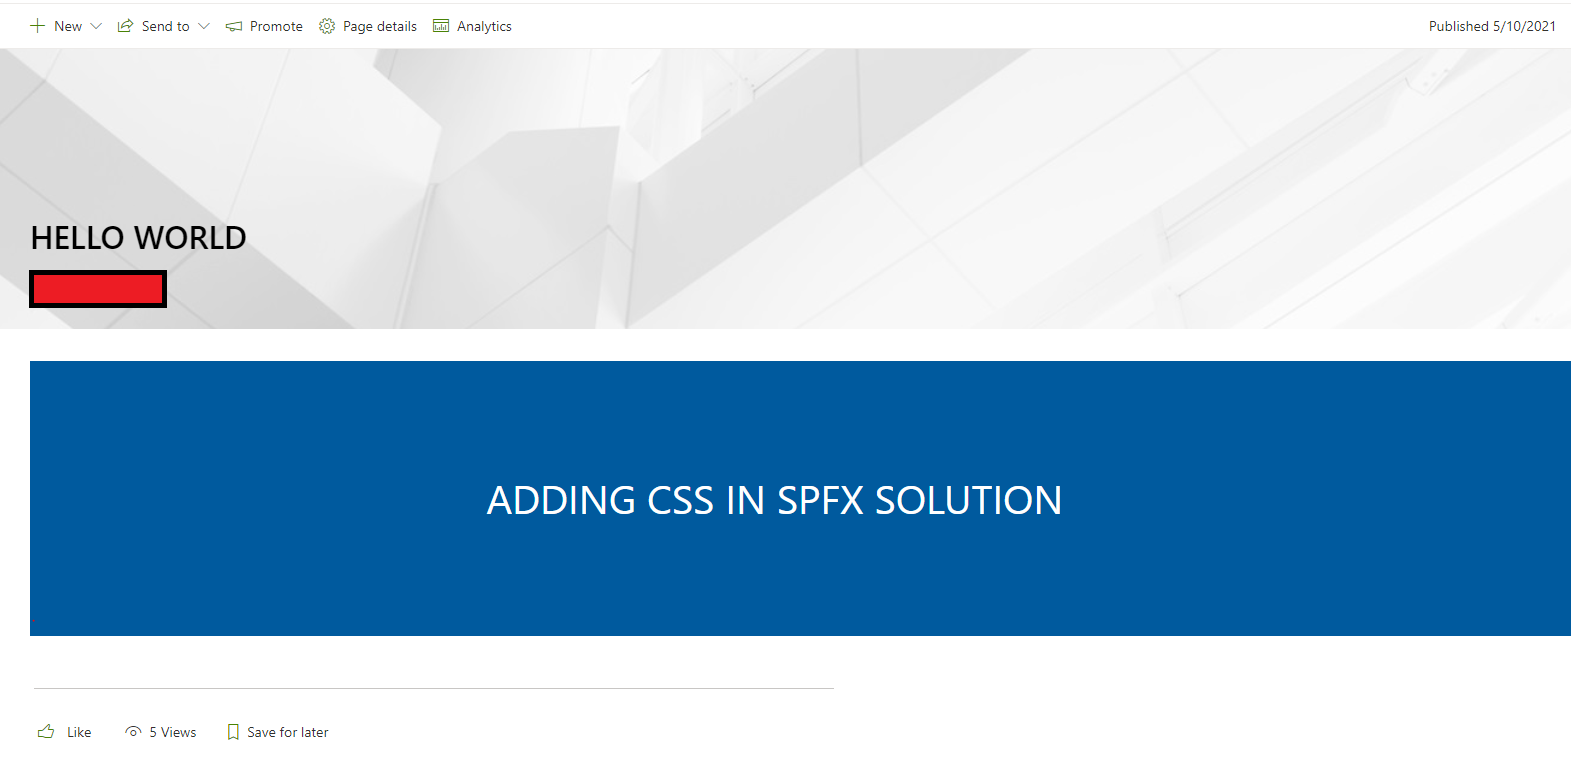
    The definition ${styles.helloSPFx} in the TypeScript/JavaScript code is a called template literal. This reference to the object property styles.helloSPFx gets automatically replaced with the compiled style class name. After this change, the web part renders properly.

    By generating this unique class name out of the defined generic class name, SPFx makes sure that the CSS added to the page only affects the web part and not the rest of the page.

    Below is the react code for our helloWorld.tsx file

    public render(): React.ReactElement< helloWorldProps> {

        return (

          <div className={ styles.helloWorld }>

            <p> Adding CSS in SPFX solution </p>

          </div>

        );

      }

    And our index.scss file will look like –

    @import "~office-ui-fabric-react/dist/sass/References.scss";

    .helloo {

      background-color: $ms-color-themeDark;

      p {

        color: red;

        text-align: center;

      }

    }

    The compile style sheet corresponding to the web part looks like this with dynamic class.

    <div>

    <p> Adding CSS in SPFX Solution </p>

    </div>

    And the output will be –

    Dynamic class output

    Among the many advantages of inline CSS, putting CSS into the head section of HTML ensures that your web browser doesn’t have to download a separate external file. It saves a round trip to the browser. It’s a good practice to inline the CSS of landing or home pages so they can load faster and be effectively viewed.

    Advantages of Inline CSS:

    Disadvantages of Inline CSS:

    Using External CSS

    import "./index.scss";

    And adding dynamic loading with SPComponentLoader

    SPComponentLoader.loadCss(this.context.pageContext.site.absoluteUrl + 'FilePath.css');

    One more thing a developer can do is to use Centralized CSS. By using this we can keep our CSS in the same file and work from there. It makes our CSS a little untidy though, but we can use it for small projects.

    So, if we are using a common modal or pop up, we can write its CSS in a Centralized CSS file so that we do not have to write the same code again and again.

    Advantages of External CSS:

    Disadvantages of External CSS:

    Conclusion

    Putting your CSS code in a separate file is highly recommended. The primary benefit of an external stylesheet is that it can be reused by multiple components. As a result, if all HTML on your site uses the same external stylesheet, changes to this stylesheet will be reflected in all of the HTML pages of your site.

    The most common rule of CSS is to keep your CSS in an external file and only add inline CSS for fancy stuff like animations and all. But do keep in mind to keep it to the minimum. The inline formatting will overwrite all the other styles when used, so keep the CSS Specificity in mind. For more details, please refer to this link.

    Nivedietta

    Written By-  Nivedietta Singh

    (Web Developer)

    Written By-  Nivedietta Singh

    (Web Developer)

    Jasjit

    Peer Reviewed By-  Jasjit Chopra

    (CEO)
    Peer Reviewed By-  Jasjit Chopra

    (CEO)
    Sanika

    Graphics Designed By- Sanika Sanaye

    (Creative Design Director)

    Graphics Designed By- Sanika Sanaye

    (Creative Graphic Designer Trainee)

    How to disable Focus Inbox in Outlook for All/Selective users in Microsoft 365

    Introduction

    Did your organization recently moved to Microsoft 365 and your users are wondering why are they missing their emails? Well, this could be because of a feature called Focused Inbox that is enabled by default in Microsoft 365 and unless you do not know how to use it, it is nothing but trouble.

    Note: This feature has a lot of advantages than you can think of. It can really help you stay on top of things!

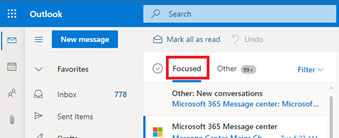
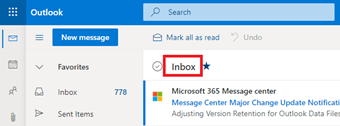
    Focused Inbox is not meant to take control of your mail, but rather work with you to prioritize what is actionable for you. What lands in your Focused Inbox is determined by an understanding of the people you interact with often, and the content of the email itself (e.g., newsletters, machine generated mail, etc.). If you need to fine tune your Focused Inbox, just use the “Move to Focused” or “Move to Other” options.

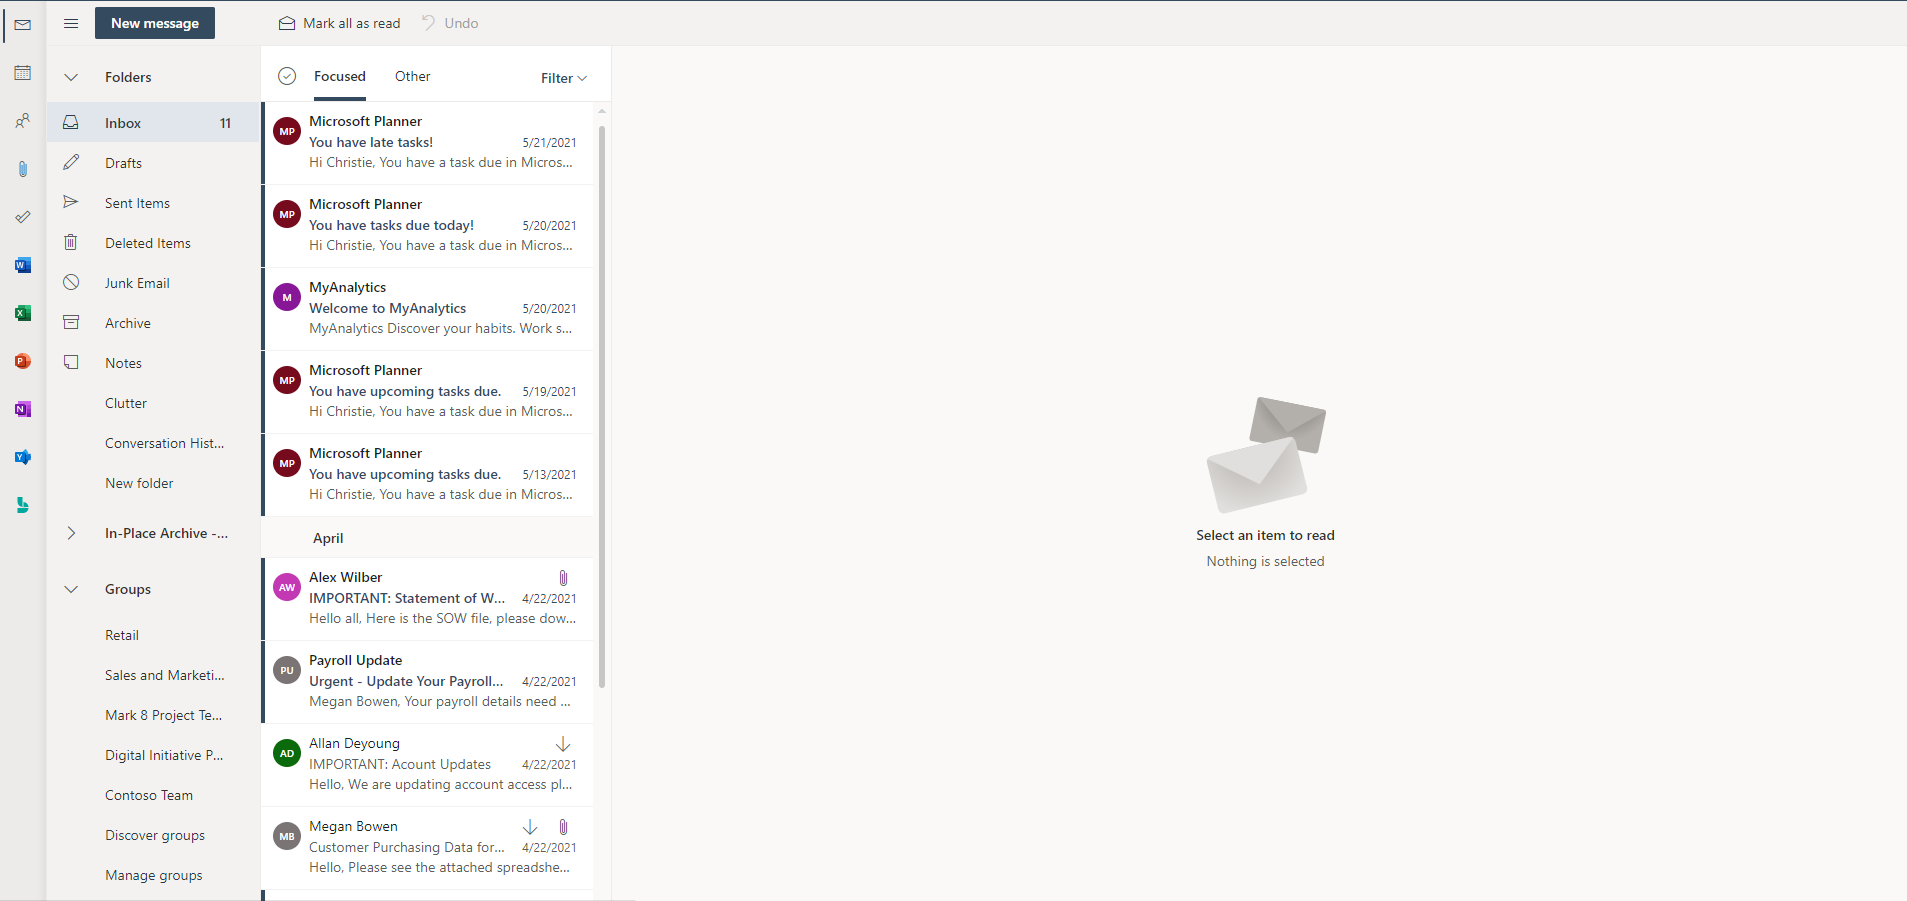
    Focused Inbox Enabled

    Focused Inbox Enabled

    Focused Inbox Disabled

    Focused Inbox Disabled

    Pre-Requisites

    Messaging Policy & Compliance Permissions

    You can refer to the below links to understand how to grant these permissions to a user who is required to perform the task of disabling Focused Inbox for the entire organization.

    Exchange Online (EXO) Service Admin Access

    How to get Exchange Online Service Admin Access?

    You will have to reach out to your Tenant’s Global Admin and request him to grant you access.

    Login to Microsoft 365 Admin Portal

    Expand the Users section and click on Active Users.

    Search for the user who needs to be granted the EXO Service Admin role and click on the user’s Display name.

    You will be presented with the user details panel.

    On the Accounts tab, you will see a section called Roles.

    Clicking on the Manage Roles option will present the Manage admin roles panel.

    Click the Admin center access radio button and then select the Exchange Administrator option

    Click Save changes button.

    The user will have to log out and log back in again so that the role change becomes effective.

    Exchange Online PowerShell Module V1 (EXO V1) or Exchange Online PowerShell Module V2 (EXO V2) installed on the machine being used.

    Exchange Online PowerShell Module v1 (EXO V1) does not support Multi-Factor Authentication (MFA). So, if the account that you are using for performing the action has MFA enabled, consider using Exchange Online PowerShell Module v2 (EXO V2).

    How to check which Exchange Online PowerShell version is installed?

    EXO V1 does not require any installation. All you need to do is connect and import the module using PowerShell commands (commands discussed later).

    Since EXO V2 requires an installation, it is always a good practice to check if the required module is installed or not using the below command:

    Get-Module -ListAvailable -Name *Exch*

    If the EXO V2 module is installed, check what version is currently installed, you can run the below command:

    Import-Module ExchangeOnlineManagement; Get-Module ExchangeOnlineManagement

    At the time of writing this content, the latest version of the EXO V2 module was 2.0.4. You can refer to the Release Notes section of this article to get the version of the Current Release:

    About the Exchange Online PowerShell V2 module | Microsoft Docs

    How to install

    As stated above, only Exchange Online PowerShell version v.2 (EXO V2) requires installation, to install the EXO V2 module for the first time, complete the following steps

    How to update

    If the module is already installed on your computer, you can run the command we shared above to see the version that is currently installed and update it to the latest version using the below command:

    How to uninstall

    To uninstall the module, run one of the below command (in an elevated PowerShell window)

    List of users in .csv format

    Ensure the CSV file is in the same folder where you run this PowerShell script from

    Below is the sample for the CSV file:

    Email Address

    John.doe@contoso.com

    Ricky.Ponting@contoso.com

    Turn Focused Inbox On or Off in your organization

    You use PowerShell to turn Focused Inbox on or off for everyone in your organization.

    Note: This change cannot be performed from the Microsoft 365 Admin Center.

    Executing the script on the mailboxes

    Now that you have clarity on whether you are using the EXOV1 or EXO V2 PowerShell Module, it should be easy for you to decide which path to follow.

    EXO PowerShell V1 execution process

    Before you run the script, please ensure you have met all the pre-requisites so that you get the desired outcome. After you confirm having met all the pre-requisites, copy and save the below script in your favourite script editor and save it as a AllUsers.ps1 file ensuring that the script and the CSV File are saved in the same location.

    #Make sure the csv file is in the same folder where you run this powershell from

    #Connect to Exchange Online PowerShell

    Set-ExecutionPolicy RemoteSigned

    $UserCredential = Get-Credential

    $Session = New-PSSession -ConfigurationName Microsoft.Exchange -ConnectionUri https://outlook.office365.com/powershell-liveid/ -Credential $UserCredential -Authentication Basic -AllowRedirection

    Import-PSSession $Session -DisableNameChecking -AllowClobber

    #Change this to path of the csv file that contains EmailAddress of all User Mailboxes you want to get a report for

    $List = import-csv ".AllUsers.csv"

    #Loop through each row in csv

    ForEach ($User in $List)

           {

                  $UserID = $User.EmailAddress

                  Set-FocusedInbox -Identity $UserID -FocusedInboxOn $False

                  Write-Host "Focused Inbox disabled for $UserID"

           }

    Remove-PSSession

    EXO PowerShell V2 execution process

    Before you run the script, please ensure you have met all the pre-requisites so that you get the desired outcome. After you confirm having met all the pre-requisites, copy and save the below script in your favourite script editor and save it as a AllUsers.ps1 file ensuring that the script and the CSV File are saved in the same location.

    #Import Exchange Online PowerShell Module

    Import-Module ExchangeOnlineManagement

    #Connect to Exchange Online PowerShell

    Connect-ExchangeOnline -UserPrincipalName <UPN>

    #<UPN> is your account in user principal name format

    #Change this to path of the csv file that contains EmailAddress of all User Mailboxes you want to get a report for

    $List = import-csv ".AllUsers.csv"

    #Loop through each row in csv

    ForEach ($User in $List)

           {

                  $UserID = $User.EmailAddress

                  Set-FocusedInbox -Identity $UserID -FocusedInboxOn $False

                  Write-Host "Focused Inbox disabled for $UserID"

           }

    Remove-PSSession

    Verifying the outcome

    After we are done running the above script, we now need to verify if the focused inbox has been disabled for the users or not. In order to verify the same, run the below command and then Look for FocusedInboxOn to view its current setting:

    Get-FocusedInbox -Identity <john.doe@contoso.com>

    Conclusion

    Well, you now know that the Focused Inbox can be disabled at the Org level as well as for specific users. You should now be able to decide how you want to implement the change.

    References

    Configure Focused Inbox for everyone in your organization - Microsoft 365 admin | Microsoft Docs

    Akhil Ohri

    Written By-  Akkhil Ohri

    (Microsoft 365 Solution Architect)

    Written By-  Akkhil Ohri

    (Microsoft 365 Solution Architect)

    Jasjit

    Peer Reviewed By-  Jasjit Chopra

    (CEO)
    Peer Reviewed By-  Jasjit Chopra

    (CEO)
    Sanika

    Graphics Designed By- Sanika Sanaye

    (Creative Design Director)

    Graphics Designed By- Sanika Sanaye

    (Creative Graphic Designer Trainee)

    Is Documentation Enough to clear AZ-104 Exam?

    With the increasing demand for cloud-related work within the industry, organizations require their current and future employees to be well skilled with the latest cloud advancements. With the word ‘cloud’, the first few names that strike in our minds are Azure, AWS and GCP. Though Oracle cloud is gaining a lot of success, still the top three leads the race by enough margin. Certification is one of the indispensable ways to benchmark your professional and successful IT career. More than anything, we believe the learning journey is more important than the actual certificate itself.

    Therefore, today we are going to discuss the associate level certification provided by Azure i.e., AZ-104 Azure Administrator Associate and discuss whether studying only the documentation will make you clear this exam or not.

    Latest Updates:

    The course content for this exam will be updated on 25th May 2021. What will be the updated content? Since Microsoft updates its course content based upon new changes or features it has made or added. You can see the updates here.

    Roles, Responsibilities and Job Areas:

    After successfully clearing the exam, one can manage and monitor identity, governance, networking, storage, cost, instances in a cloud environment (specifically Azure).

    An individual can apply for administrator-level roles in an organization. This certificate on your resume could also help in improving your chances of getting selected from the pile of resumes any organization might receive for a particular post.

    About the Exam:

    About the exam

    While appearing for the exam at home, the duration of the exam is 120 minutes, do not forget to add additional 30 minutes to this as you need to log in half an hour before being assigned a resource person on time. Giving an exam at the center does not require than additional half an hour to be assigned a resource person. Moreover, most of the centers are closed due to coronavirus pandemic and it is better to appear for the exam at home.

    So, the question here is who should take this exam? It is suggested that candidates for this exam should be experienced with having at least six months of hands-on training in implementing, managing, and monitoring an organization’s Microsoft Azure Environment.

    Is documentation sufficient to clear this exam?

    The answer to this question is a big NO. An individual with no experience with azure must put in a lot more effort (practical implementation) rather than just going through the documentation. On the other hand, one having good knowledge, hands-on experience, and enough confidence with all the aspects may proceed with reading only the document thoroughly. Microsoft provides a great source of learning through its documentation.

    For a student or a fresher who desires to take this exam, they must be atleast clear with the fundamentals of azure. In addition, they would have to read the documentation in detail and implement it practically on Azure.

    Experienced professionals having more than 2 years of working experience overall including at least six months of which in Azure may proceed with reading the documents thoroughly. This is because they have been practically working with Azure before and have enough hands-on expertise to clear the exam.

    Apart from documentation, it is highly recommended to also test your expertise and understand how the exam is conducted by attempting various practice exams as well.

    How to prepare yourself?

    How to prepare yourself

    Microsoft learn portal is a great source for learning about all Microsoft products and services.

    Practice Exams with multiple-choice questions is a great way of clearing the concepts in depth. MCQs include tricky options which become difficult to answer as more than one option seems correct. The more you give the MCQs and practice exams, the more you will be confident and overcome the fear of attempting the actual exam.

    For those not having an active Azure subscription and want to do practical implementation; Microsoft provides a free azure trial for 12 months ($200 credits). Click here to sign up for azure now. Also, Microsoft and tech communities organize various conference, events, and virtual training after successful completion of which sometimes they provide with either Azure Coupons or free certification vouchers.

    My Experience of clearing the exam.

    My name is Raghav Jain. I joined Penthara Technologies in October 2020 as a Cloud Engineer Trainee. Before that, I knew cloud, but it is only after joining the company I started implementing the things practically being provided with $150 worth of credits every month via Visual Studio subscription (formerly MSDN subscription) by the company. As a trainee, I was always guided by my super friendly mentors. Later in December, I cleared my Azure fundamentals (AZ-900) exam and in March 2021 I successfully cleared AZ-104 in one attempt.

    Throughout the preparation for the exam, certain topics required more attention in detail to understand. ’Manage Identities and Governance was the module I found a bit complex at first but later interesting. It majorly includes creating and managing users, giving role-based access (RBAC) to a specific user, creating custom roles for Azure resources as per the requirement. Azure Active Directory (AAD) includes a lot of things that require some serious hands-on implementation to understand what is going on, how things are working all together. It is very important to understand the different licenses and their features ranging from free to Azure AD Premium P2. This was the area that I focused on and worked hard implementing everything practically which gave me enough confidence to answer questions from this topic.

    I would suggest to practically implement all subsections covered in the ‘Configure and manage virtual networks for azure administrators’ module to understand how the networking operates in azure.  The majority of the questions (25-30%) are being asked from this module and the questions are tricky as well. Giving practice exams will clear these concepts more as it will cover most of the scenarios.  Load Balancing, DNS, Vnet Peering, Azure Bastion are some of the aspects covered in this module.

    ‘Implement and Manage storage’ is a module that is important to understand thoroughly as it clears all the aspects related to azure Blob, Table, File, Queue and VM disks. Azure provides different series and sizes of its VM disks. It is not possible to remember all VM sizes, but one must at least know which series (A, B, D, H, etc.) is best suited as per the requirement. In the exam, I was given a scenario where I had to choose the right-sized disk which fulfills the given requirements and is also cost-efficient. 15-20% questions (mostly scenario-based) do come in the exam from this module.

    ‘Deploy and Manage Azure Compute Resources’ module covers the azure compute resources. I found this module very interesting to study and implement except that it lagged more in depth understanding of Kubernetes. For instance, it is mentioned in the documentation about Azure Kubernetes Cluster (AKS) and how to deploy them on Azure but before deploying it, a lot more understanding of Kubernetes is required in advance which needs to be studied from the other resources. Therefore, I felt that it is better to study them through other resources to have an actual understanding of what they are. Also, while giving practice exams I was not confident enough to answer questions on Kubernetes, So I studied these topics, their basic commands watching videos on YouTube. One of the videos I liked was What is Kubernetes. 25-30% of the questions in the exam are asked from this module. Successful completion of this module makes one eligible to deploy and configure virtual machines, containers, and web apps in azure.

    ‘Monitor and Backup Azure Resources’ is a short module and covers Azure Monitor, Backup, Logs, Alerts and Site Recovery. Monitoring performance of virtual machines by using Azure Monitor for VM’s was the subsection in which I missed to go a step further in understanding the syntax and structures i.e., after successfully deploying the log analytics workspace, which is used to run azure monitor log queries, I simply ran built in queries which are just a click away. Whereas it is very important to understand the syntax of the queries. The queries are written in Kusto Query Language (KQL). In the exam, you will not have to write any query instead you will be asked to choose the correct syntax out of the given four options. In my case, I got confused with two options as they were very similar, but I did not know that KQL is case sensitive (typically in lowercase). As a result, I got my answer wrong as I selected the one written in uppercase. I would highly recommend remembering the syntax and operators used for KQL so that you can easily judge the right query and answer in the exam.

    Completing this module makes an individual learn how to monitor resources by using Azure Monitor and implement backup and recovery in Azure. 15-20% of the questions in the exam are asked from this module.

    Resources to help you study for the exam.

    Resources

    There are many ways to study and prepare for the AZ-104 course. Self-learning modules include Microsoft learn portal, official documentation. Also, there is an option of paid instructor led training. Moreover, practice exams and MCQs can be found on learning portals like Udemy, SkillCertPro, etc.

    Personal Suggestions:

    Raghav Jain

    Written By-  Raghav Jain

    (Cloud Security Engineer)

    Written By-  Raghav Jain

    (Cloud Engineer Trainee)

    Jasjit

    Peer Reviewed By-  Jasjit Chopra

    (CEO)
    Peer Reviewed By-  Jasjit Chopra

    (CEO)
    Sanika

    Graphics Designed By- Sanika Sanaye

    (Creative Design Director)

    Graphics Designed By- Sanika Sanaye

    (Creative Graphic Designer Trainee)

    How to dynamically calculate working business days for a due date in Power Automate

    Objective

    The objective of this article is to understand how we can use Power Automate aka Flow to calculate the due date for a task excluding holidays and weekends.

    Prerequisites

    1. An account with SharePoint Site Collection Admin and Power Automate Access
    2. SharePoint Team Site

    Steps to create the lists

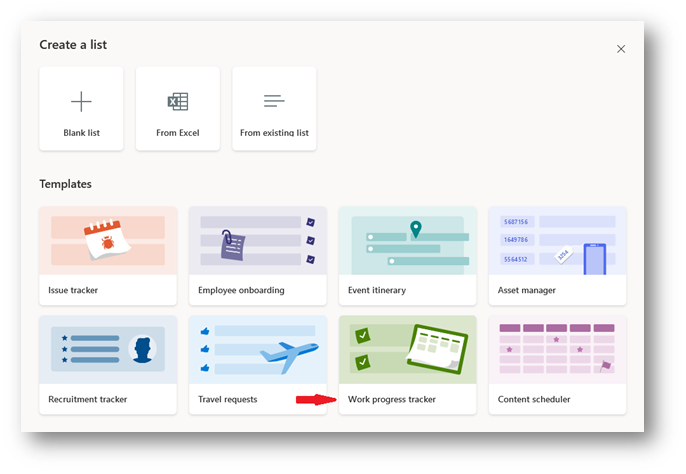
    1. Create a SharePoint list Titled Work Progress Tracker using the default template ‘Work Progress Tracker’ as it has most of the columns needed for our demo. We will use this list to track the work items assigned to the team members.

    Tip: While creating the list we used the title as WPT to shorten the url and changed the list title to Work Progress Tracker post creation.

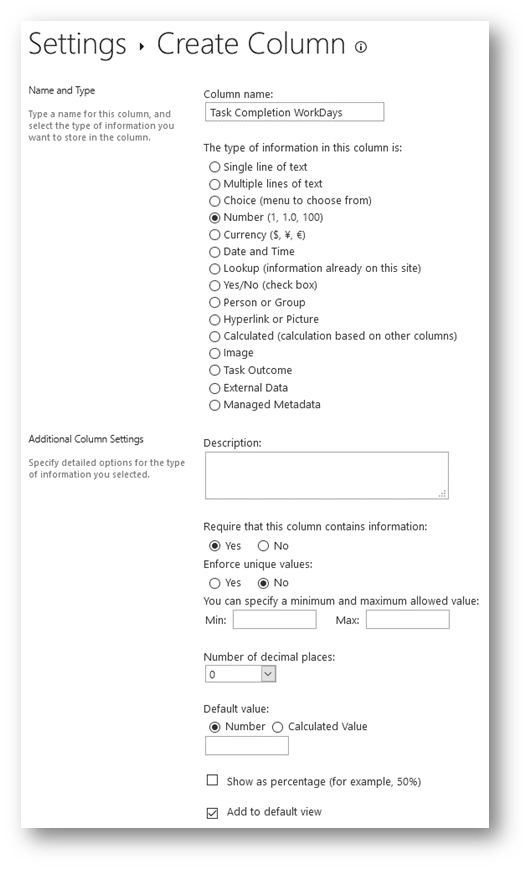
    2. Create a column to track the workdays assigned for a task. This will be used to calculate the Due Date excluding the weekends and holidays. The column will be created with the following details:

    Name: Task Completion Workdays

    Type: Number

    Require that this column contains information: Yes

    Number of decimal places: 0

    Add to default view: Yes

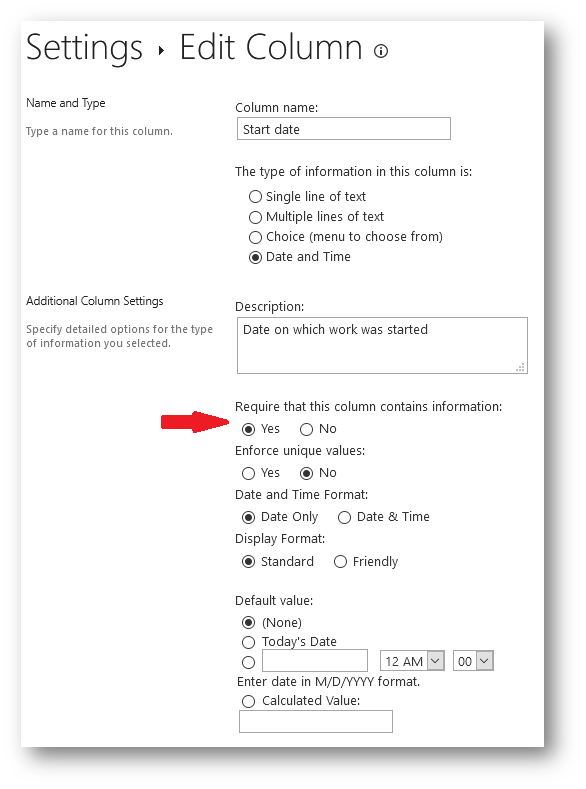
    3. Change the Start Date column in the list as a required column. If the item is created without the start date, the flow will fail. Hence we make this a required column.

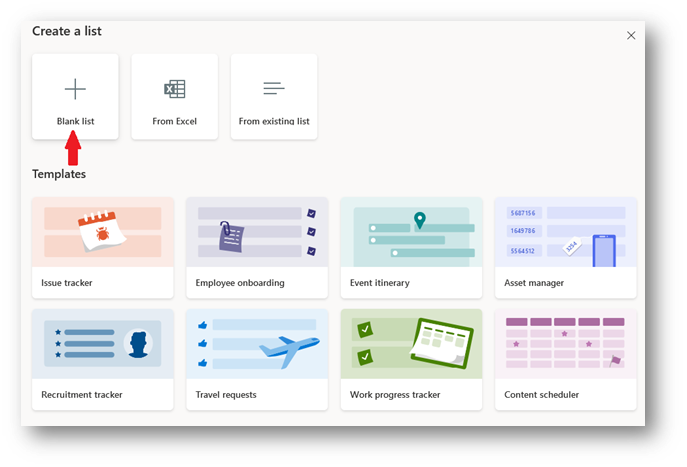
    4. Create a new list with the title Company Holiday List with the Blank list This will be used to track the company holidays that need to be excluded from the workdays for due date calculation.

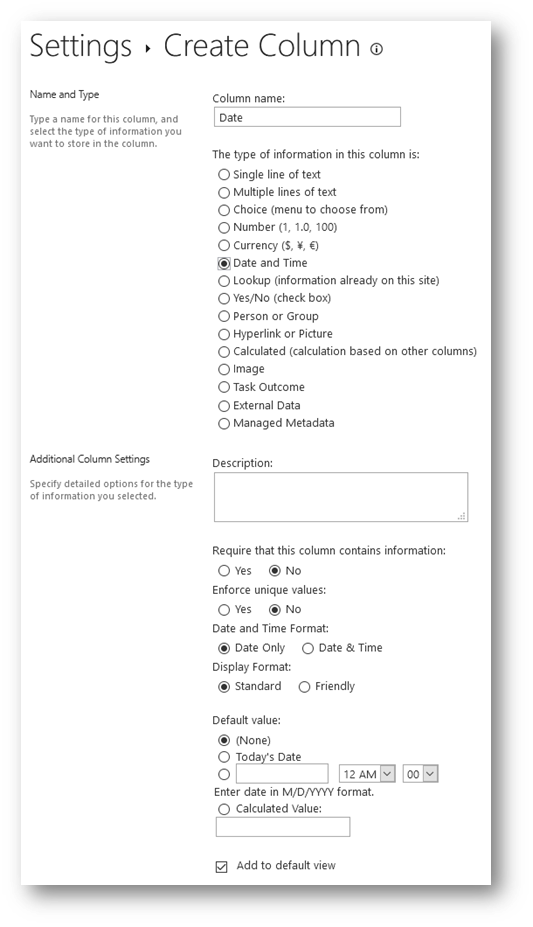
    5. Create a new column Date to track the Holiday date in the Company Holiday List with the following details.

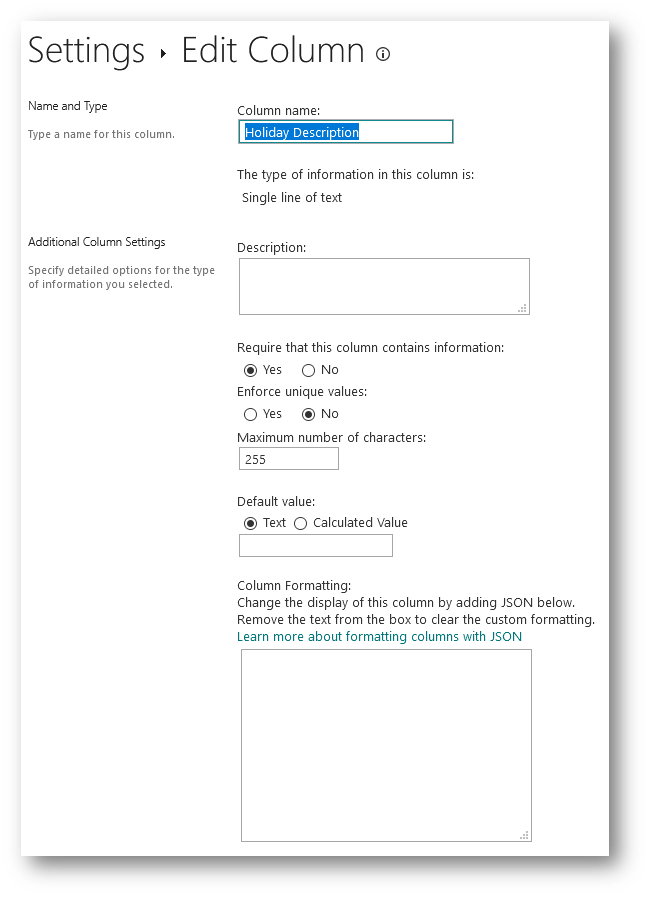
    6. Rename the Title column in the Company Holidays List to Holiday Description

    Steps to create the flow in Power Automate

    1. We will be creating a new Flow from Power automate to automatically calculate and update the Due Date of a task in Work Progress Tracker list excluding the weekends and company holidays.
    2. Browse to the Power Automate site using the account that has Power Automate License to create a new Flow
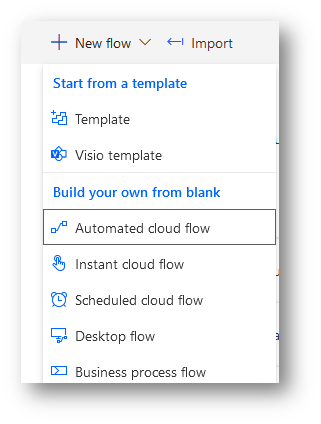
    3. Selected New Flow > Automated Cloud flow

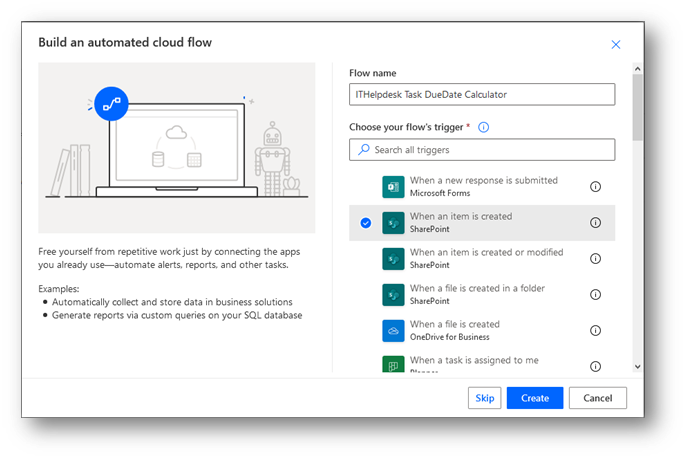
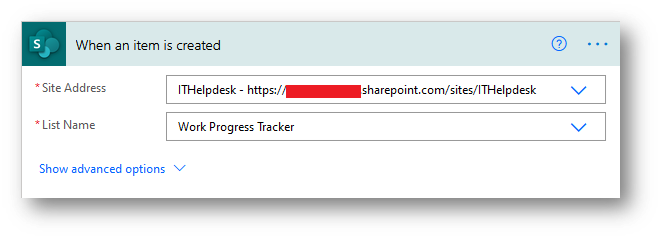
    4. Specify the desired name (we have named it ITHelpdesk Task DueDate Calculator) and under the triggers select When an item is created (SharePoint). This will trigger the flow as soon as an item is created our Work progress tracker

    5. In the trigger specify the site URL and the list name as shown below. The list is the work progress tracker list we created earlier to track work tasks.

    6. Initiate the following variables which will be used further in the flow for calculations.

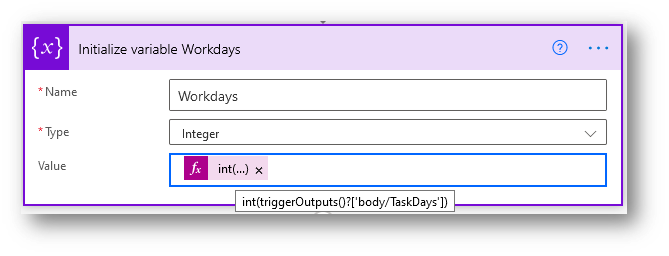
    (a) Workdays – This will be used to keep a count of how many workdays have passed in our process to derive at a Duedate excluding the Holidays and Weekends.

    1. Type: Integer
    2. Value: int(triggerOutputs()?[‘body/TaskDays’])

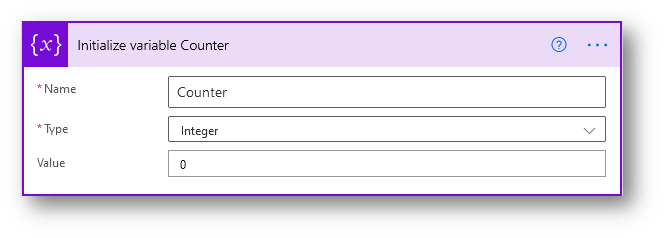
    (b) Counter – This will be used to keep a count on the number of loops needed in calculation of the Due date in the Do While loop further.

    1. Type: Integer
    2. Value: 0

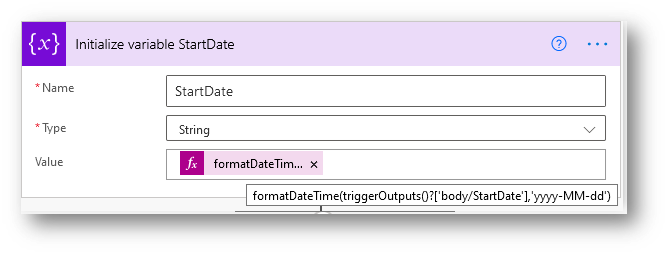
    (c) StartDate – This variable is used to capture the value of the StartDate field in the list and will be further used in calculating the due date

    1. Type: String
    2. Value: formatDateTime(triggerOutputs()?[‘body/StartDate’],’yyyy-MM-dd’)

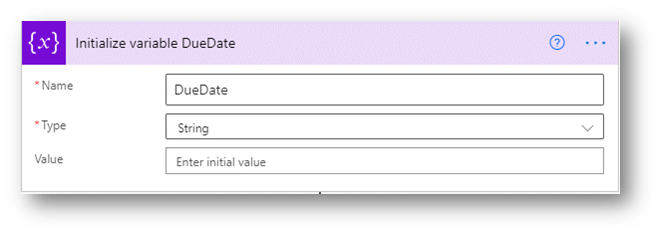
    (d) DueDate – This variable will be used to store the value of the due date during the calculation in the Do While loop further.

    1. Type: String
    2. Value: @{variables('StartDate')}

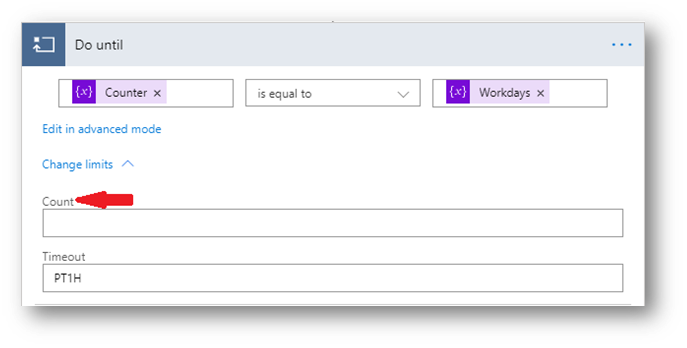
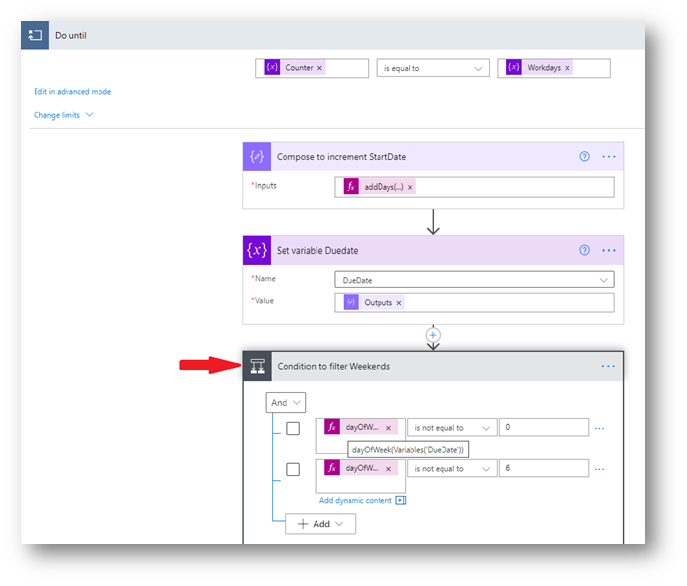
    7. Add a Do Until control to loop the actions within, until the counter variable is equal to the variable workdays.

    The purpose of this action is to create a loop to calculate working days, by excluding the weekends and company holidays. This is achieved by using the dayOfWeek expression and matching against the dates in the Company Holidays List.

    Expression values:

    Counter: variables(‘Counter’)

    Workdays: variables(‘Workdays’)

    Also change the limits in the Do until loop and set the count to blank which means this will be set to unlimited loops.

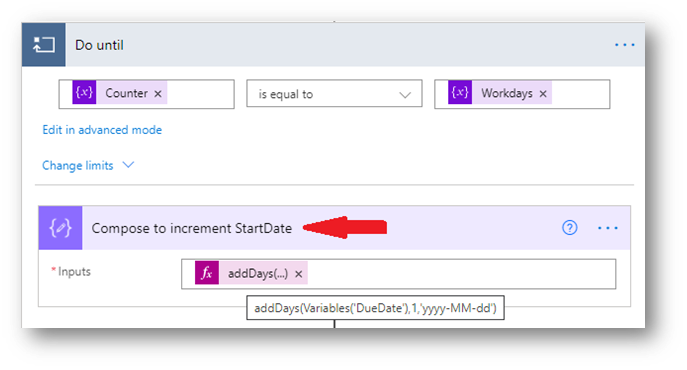
    8. Add a Compose action in the Do until loop to increment the due date by a day.

    Expression: addDays(Variables(‘DueDate’),1,’yyyy-MM-dd’)

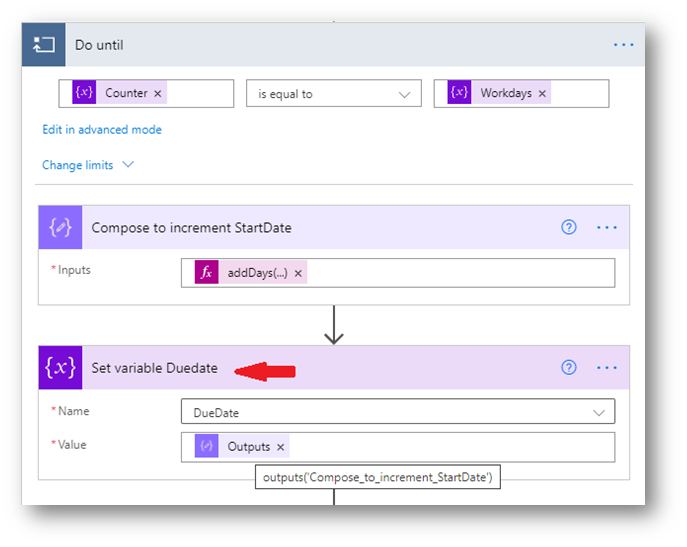
    9. Add a Set variable action in the Do until loop to set the variable DueDate. This will be further used to filter weekends and holidays.

    Expression: outputs(‘Compose_to_increment_StartDate’)

    10. Add a condition to filter the weekends. Expression: dayOfWeek(Variables(‘DueDate’))

    1. dayofWeek value for Sunday is 0 and for Saturday is 6
    2. Our condition is to filter out weekends from DueDate and loop to the next date if it does not match the condition.
    3. If the DueDate matches our condition, it moves to the next calculation step.

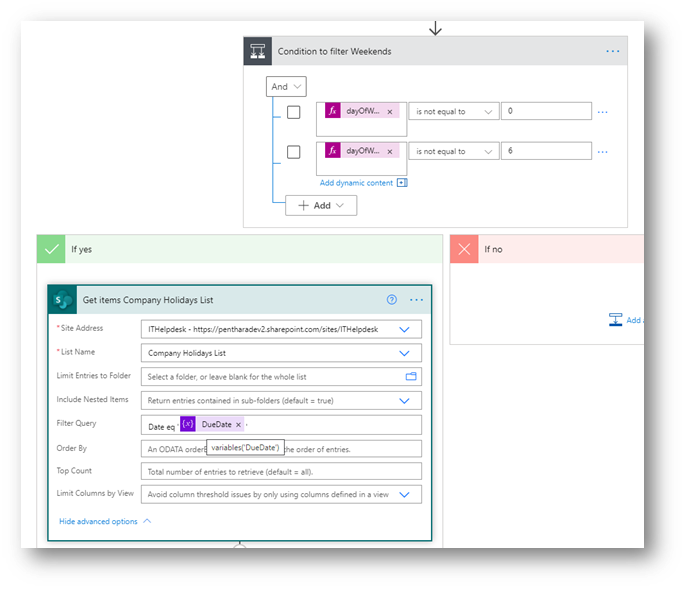
    11. If the DueDate matches our condition (it is not a Saturday or Sunday), it moves to the next calculation step. Here we add a Get Items action from SharePoint list Company Holidays List with a filter query Date field equals DueDate variable value.

    Expression: Date eq ‘@{variables(‘DueDate’)}’

    This will give us an output if the DueDate value is a Company Holiday.

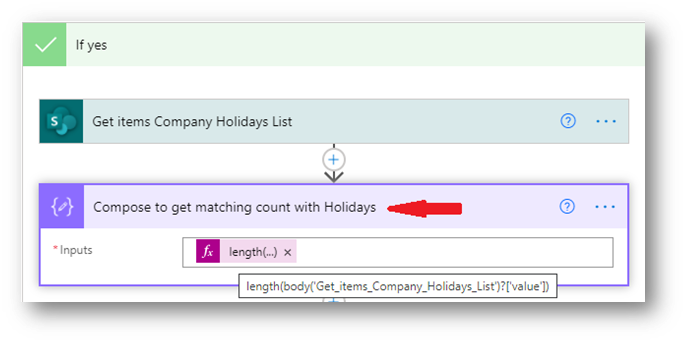
    12. The next step is to add a compose action to calculate the length of the output from the Get Items action. This will help us calculate of the current DueDate is a holiday if the output is not Zero.

    Expression: length(body(‘Get_items_Company_Holidays_List’)?[‘value’])

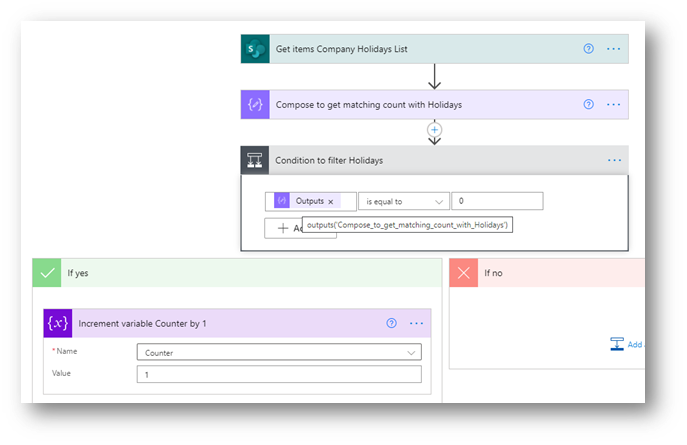
    13. In the next step we add the Condition action to filter the holidays. If the output of the previous step of getting items where Date field does not match the Due date variable, the output length would be 0. This means that the current DueDate value isn’t a holiday and ehnce will be counted as a working Day for the Task. We use this logic to filter out the holidays.

    Expression: @outputs(‘Compose_to_get_matching_count_with_Holidays’)

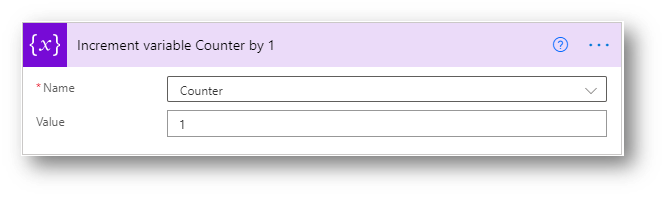
    14. If the condition output is true (number of items in the Company Holiday List where Date equals Due Date is Zero), we increment the Counter Variable by 1

    15. The Do Until loop will complete until the variable counter matches the variable workdays.

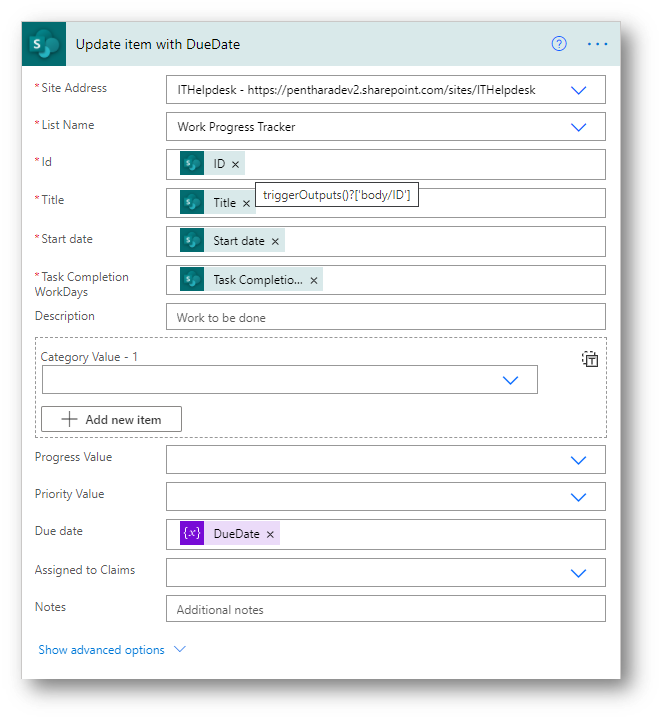
    16. In the final step we update the DueDate in the Work Progress Tracker list for the current item using the SharePoint – update item action.

    Expressions:

    1. ID
      1. Value: @{triggerOutputs()?[‘body/ID’]}
    2. Title
      1. Value: @{triggerOutputs()?[‘body/Title’]}
    3. Start date
      1. Value: @{triggerOutputs()?[‘body/StartDate’]}
    4. Task Completion WorkDays
      1. Value: @{triggerOutputs()?[‘body/TaskDays’]}
    5. Due date
      1. Value: @{variables(‘DueDate’)}

    Conclusion

    As you can see in the example, we will calculate the Due date when start date is 1st April’21, with 5 days duration. Consider 2nd April’21 to be a holiday.

    The day for 2nd April’21 being a Company Holiday has been skipped hence the counter stays as 0. Also the days 3rd April’21 and 4th April’21 are skipped as it’s a weekend. Hence the Counting the Business Days, the DueDate will be 9th April’21.

    Start Date Running Due Date Counter SKIP (YES/NO) NOTES
    1 April 2021 2 April 2021 0 Yes Company Holiday
    Cell 3 April 2021 0 Yes Weekend
    4 April 2021 0 Yes Weekend
    5 April 2021 1 No Weekend
    Cell 6 April 2021 2 No Business Day
    Cell 7 April 2021 3 No Business Day
    Cell 8 April 2021 4 No Business Day
    Cell 9 April 2021 5 No Business Day

    AneeshKumar

    Written By-  Aneesh Kumar

    (Microsoft 365 Solution Architect)

    Written By-  Aneesh Kumar

    (Microsoft 365 Solution Architect)

    Jasjit

    Peer Reviewed By-  Jasjit Chopra

    (CEO)
    Peer Reviewed By-  Jasjit Chopra

    (CEO)
    Sanika

    Graphics Designed By- Sanika Sanaye

    (Creative Design Director)

    Graphics Designed By- Sanika Sanaye

    (Creative Graphic Designer Trainee)

    Different use case scenarios of useEffect in SPFx React solutions

    What is useEffect in React

    UseEffect is a hook in react which was created to be used in a functional component. useEffect hook can be used in different scenarios depending on our need i.e.

    it can provide lifecycle functionality of class component as componentWillMount or componentDidMount.

    For more detailed information you can refer to the following link: https://reactjs.org/docs/hooks-effect.html

    Pre-requisites

    Why do we need useEffect() Hook

    Whenever we make an API call in react component, usually we store the retrieved data in a state. A react component re-renders after any change in the current state. As soon as we store our retrieved data in the state our component will re-render and the API call will be triggered again. This cycle will continue, and we will be facing the issue of an infinite loop in our component. That is where useEffect() hook comes in the play and can save the day for our re-rendering problem.

    Variations in useEffect() Hook

    UseEffect can work as componentWillMount and componentDidMount.

    useEffect as componentWillMount

    ComponentWillMount comes in action after and for each render cycle. The syntax for using useEffect as componentWillMount is:

    useEffect(() => {});

    This gets into play when we set data in the state coming from some other component as a prop. This useEffect() will set the data in the state whenever the component loads.

    Note: If you are thinking that you can also do your API call in here then you will be in the same problem of infinite loop.

    useEffect as componentDidMount

    ComponentDidMount runs just once after the component renders. The syntax for using useEffect as componentDidMount is:

    useEffect(() => {}, [ ]);

    The empty square brackets at the end are what makes it different from the previous variant. It solves our problem of infinite loops. Now this is the place where we can make all our API calls.

    What is a Dependency?

    Dependency is what we specify as the second argument in the useEffect. If we have given any dependency, then the useEffect will only be triggered on the change of that dependency.

    Use Case Scenarios of useEffect() Hook

    UseEffect hook can be used in different scenarios according to the situations. Some examples of how to use it are given below:

    Without any Dependency

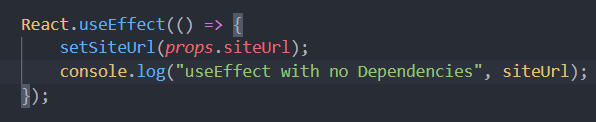
    1. As componentWillMount

    React.useEffect(() => {

    SetSiteUrl(props.siteUrl);

    Console.log(“useEffect with no Dependenies”, siteUrl);

    });

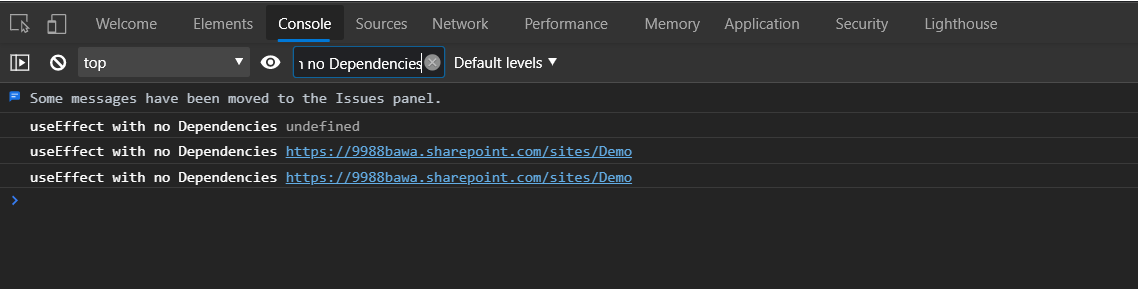
    In this situation we are using it as a componentWillMount replacement. It will run after and for every render cycle. Its console output is shown as below:

    In the above console output, the first one is running after the first render of the component, that is why the state value is being returned as ‘undefined’. The second and third console output lines are due to re-rendering of the component after every change in the state.

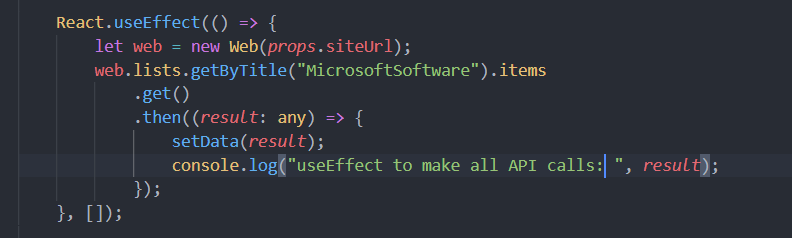
    2. As componentDidMount

    React.useEffect(() => {

    Let web = new Web(props.siteUrl);

    Web.lists.getTitle(“MicrosoftSoftware”).items

    .get()

    .then((result: any) => {

    SetData(result);

    Console.log(“useEffect to make all API calls:”, result);

    })

    }, [ ]);

    In this situation we are using it as componentDidMount. If we make any API calls in our react app then this is where it will be called. In this case useEffect will run only once. Console output for above code is shown as below:

    As we can see in the console output above, useEffect is only running once, no matter how many times our component re-renders. 

    UseEffect with single dependency 

    Below is an example of useEffect having single dependency:

    React.useEffect(() => {

    Console.log(“useEffect with one dependency:”, data);

    }, [data]);

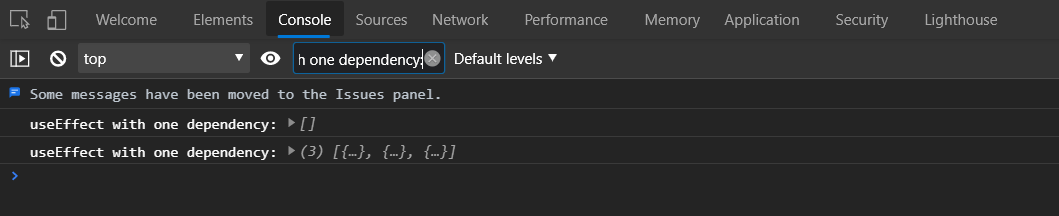
    In the above situation the useEffect will run whenever the state of ‘data’ changes. Console output for this useEffect is shown as below:

    In the above console output, first we are getting empty array because we have initialised our state with empty ‘data’ array. Then our API call occurs and after maintaining the state our component will re-render and the above useEffect will run again due to the given dependency. Now we can see in the console output, that we have value in our ‘data’ state. 

    Multiple dependencies 

    Below is the example of useEffect having multiple dependencies.

    React.useEffect(() => {

    Console.log(“This useEffect will run either data or siteUrl changes”, data, siteUrl);

    }, [data, siteUrl]);

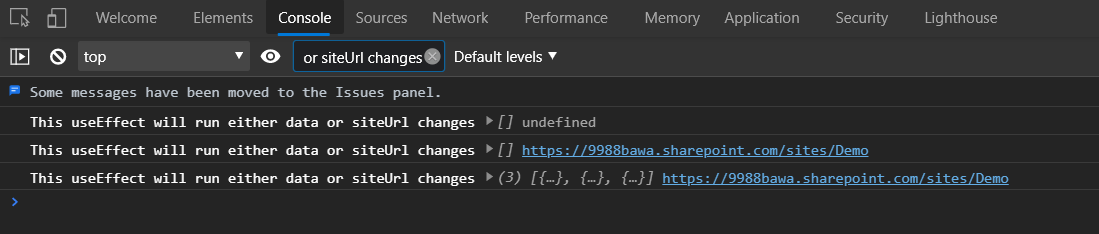
    In the above scenario, useEffect will run when either value of ‘data’ or ‘siteUrl’ changes. We can also give more dependencies according to our requirements. Console output for the above useEffect is shown as below:

    In the above console output, first we are getting empty array as ‘undefined’ because we have initialised our state with empty array and our ‘siteUrl’ with null. Any change in state of ‘siteUrl’ will trigger useEffect resulting the second line of console output. Then the API call occurs and after maintaining the state of our component, it will re-render and the above useEffect will be triggered due to the given dependency. This gives us the third line of console output where we can value of ‘data’ array. 

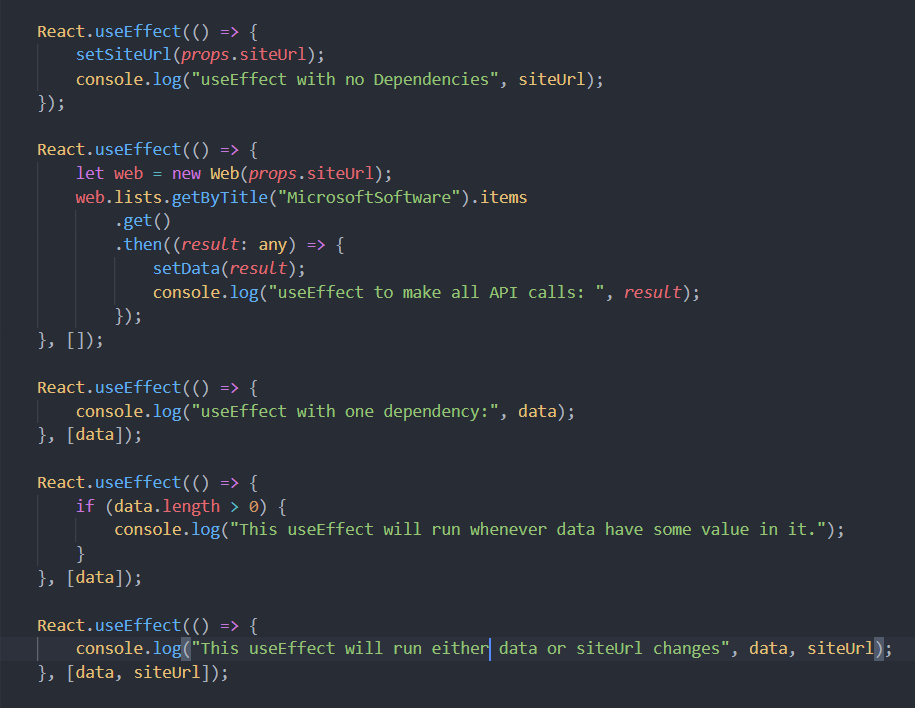
    Multiple useEffects in a single component

    As we can see in the above reference we can use as many useEffect hooks we want according to our requirement.

    Note: Be careful while using multiple useEffect hooks, as it lead to infinite loops. 

    Conclusion

    After going through this blog now we can assume that you will be able to work with useEffect confidently. For better understanding create your own scenarios and apply useEffect accordingly.

    Tanish

    Written By-  Tanish Bawa

    (Software Developer Trainee)

    Written By-  Tanish Bawa

    (Software Developer Intern)

    Jasjit

    Peer Reviewed By-  Jasjit Chopra

    (CEO)
    Peer Reviewed By-  Jasjit Chopra

    (CEO)
    Sanika

    Graphics Designed By- Sanika Sanaye

    (Creative Design Director)

    Graphics Designed By- Sanika Sanaye

    (Creative Graphic Designer Trainee)

    What I learnt in my first month as a Self-Taught Graphic Design Intern

    Though the journey of a self-taught graphic designer is very unconventional, you will be surprised by just how many of them are out there. Encouraged by this and the spare time I had on my hands due to the pandemic, I started learning things that I was interested in. That is how my graphic design journey began – by taking an online course. A few passion projects later, I began to actively pursue professional experience in the industry. My journey so far as a graphic design intern at Penthara Technologies has been a ride of learning and discovering. Here are a few takeaways from my first month at the job that stood out to me –

    Learn, Unlearn and Relearn

    This is a sound advice from Alvin Toffler which anyone who wants to get ahead in their career would benefit from. To make work that is clear in its purpose, you first need to understand the core principles of design. Right from the first day at my internship, the company’s CEO put an extra emphasis on learning design from all possible sources – people, videos, blogs, and books. It does not matter where you are in your design journey, always be a student of the craft.

    You also need to be able to loop through unlearning and relearning if you want to stay current about the happenings in the industry. I would spend a lot of time drawing grids in Adobe Illustrator using rectangles and guides. Soon, I saw a better method to do it by dividing a rectangle, the size of the artboard, into a grid from the toolbar. Finding the latter much more efficient, I had to unlearn the previous way of making grids and relearn this new method.

    Take Notes    

    The one thing more important than learning is remembering. According to research, we forget about 50 percent of new information within one hour of learning it. One of the best ways in which I like to retain information is to take notes. I use OneNote to create a single, structured repository of notes about the concepts I learn. This way, whenever I forget a particular concept, I have a source to refer from instantly. Additionally, taking notes lays down a strong foundation for a better understanding of the concept.

    Know the tools

    Often the roadblock to creating an awesome design and bringing it alive on the artboard was my little knowledge about the tool. This could happen to anyone, as new tools are coming to the market every day. So, if you are planning to use a tool or learn a new one, make sure to know all the key operations in it. Good knowledge of tools not only helps you to decide which tool to use but also when. I found that using Canva for social media posts was much quicker and easier than Illustrator or Affinity Designer. This went a long way in increasing my productivity.

    Have a 1000 Mentors

    Coming from a non-design background, I did not have much exposure to people doing design except for those on social media. This is usually the case for most self-taught designers. Growing your network to include people who are doing the work that inspires you, interacting with them and seeking their guidance can speed up your learning curve. Learn from a professional, a friend or even a stranger doing a talk at an event. Anyone can be a mentor for you if they teach you something you did not know before.

    Work on Your Style

    As a designer you will be working on projects which call for the use of many different styles. The busier it gets working on these different styles, the easier it is to forget your own. Imitating other people's style might get the work done for now. But in the long run, you are going to end up having no style of your own. Hence, finding a style that you identify yourself with and working on it is very important as a beginner. I currently love working on minimalistic brand and identity design. However, in my internship I work on social media posts, website illustrations, blog post creatives and much more. Each of these assignments requires me to capture the essence of the company’s identity, which is very different from my personal style. That is why I regularly work on personal projects during the weekends, to hone my own expression of design. I take this a step further by learning from the process of leading design studios in identity design sector like:

    Track your time

    This is the most important takeaway for me from this internship. The practice of tracking the tasks which I do in my workday and how much time I spend on each one of them has allowed me to be more mindful about what I am spending my time on. It allows me to prioritize tasks accordingly and set realistic deadlines for delivering the best work possible. Also, seeing what I have accomplished for the day before I sign out makes me feel more motivated about returning to work tomorrow. For my internship, I am using the internal timesheet system provided by the company.

    If you are a freelancer, I would suggest using one of the free time-tracking apps or even a pen and paper to record the time you spend on various tasks. This simple practice can help you make better use of your time and increase your productivity.

    Be open to constructive criticism

    It is understandable to feel deeply about your work. You spend hours making it, doing the changes and finally the review comes in. If it is good, then you are on cloud nine. But in case it is not, which could be the case many times, it is easy to slip into a loop of self-doubt and feeling inadequate. “You are not your work.” This is a sound advice given by none other than Chris Do, an Emmy award winning designer and the founder of TheFutur. Remember, we are all work in progress. Do not get overly attached to the feedback. It will also do you good to remember that majority of the feedback given is subjective to each person reviewing it. This way when a negative review does come in, you will be able to assess it objectively and make the required changes so that the design fits its purpose.

    These learnings can go a long way to not just improve the quality of your work but also the systems that complement your personal growth. Finally, I think learning design is not as difficult as it is to bring discipline into your design. As a beginner in design, it was when I did my work in a disciplined and structured manner that I saw myself truly progress, skill wise and as a person.

    Sanika

    Authored and Graphics Designed By- Sanika Sanaye

    (Creative Design Director)

    Authored and Graphics Designed By- Sanika Sanaye

    (Creative Graphic Designer Trainee)

    Jasjit

    Peer Reviewed By-  Jasjit Chopra

    (CEO)
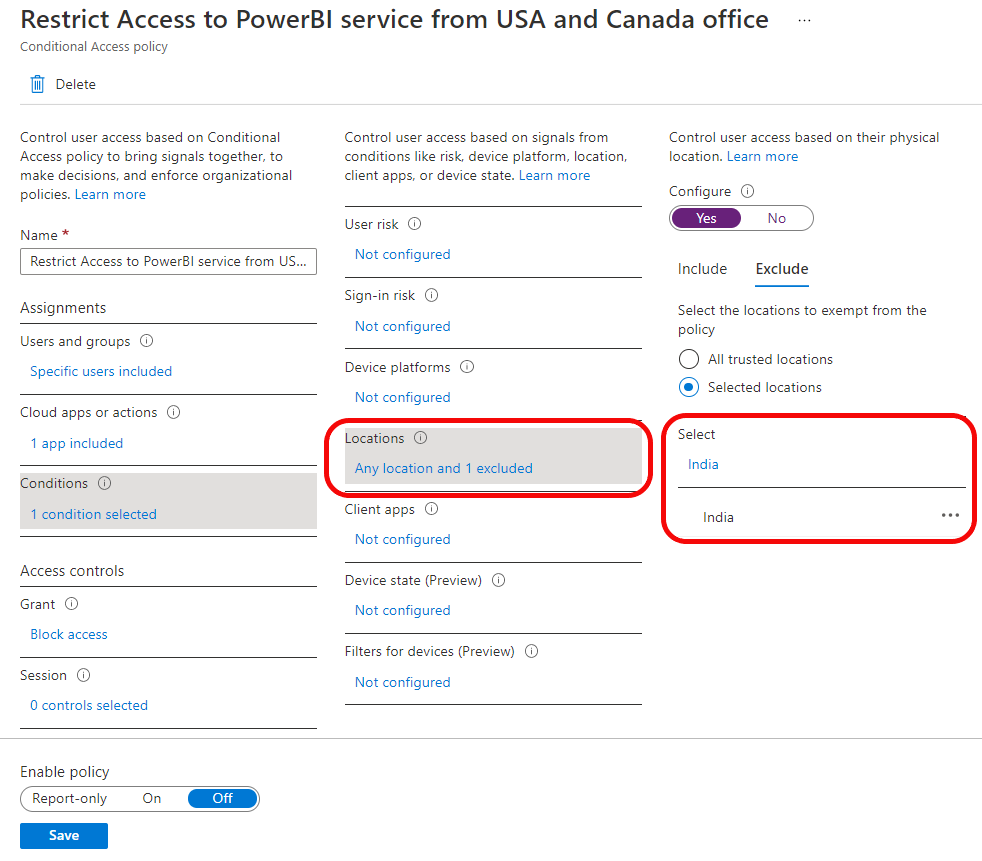
    Peer Reviewed By-  Jasjit Chopra

    (CEO)