Eligible vs. Active PIM Roles Explained: Best Practices for Microsoft 365 Security

Discover the difference between eligible and active roles in Microsoft 365 Privileged Identity Management (PIM). Learn how just-in-time access helps minimize security risks, how to configure PIM roles effectively, and which best practices to follow for compliance and least privilege access.
CATEGORIES:
SHARE THIS BLOG:
Table of contents
PIM Role Types: Eligible vs Active
Eligible Role Assignment
Active Role Assignment
Configuring PIM Assignments in Microsoft 365
Step-by-Step Example – Assigning an Eligible Role
PowerShell / Graph API for PIM
Setting Role Activation Policies
How End Users Activate an Eligible Role
Key PIM Policies (Quick Settings & Best Practice)
When to Use Which: Policy + Role Examples + Quick Decision Guide
Additional Tips for a Secure PIM Deployment
Why Trust Penthara Technologies for Microsoft 365 PIM Deployment?
Frequently Asked Questions (FAQ)

Privileged Identity Management (PIM) in Microsoft 365 is all about keeping admin access safe.

Why?
Because permanent admin rights are risky. If attackers get hold of them, the damage can be huge. In fact, most breaches happen because of compromised privileged accounts.

That’s where PIM helps. Instead of giving someone always-on admin power, you can assign them as eligible. This means they only become active when they actually need it - through a process called just-in-time (JIT) access.

Think of it like a keycard. You don’t keep the door open 24/7. You swipe in only when you need to enter.

In Microsoft 365 PIM, there are two types of role assignments:

  • Eligible PIM role assignment – Access is available but needs activation.
  • Active PIM role assignment – Access is always on, without extra steps.

This guide explains the difference between eligible and active PIM roles, how to configure them in Microsoft 365, and the best practices to keep your organization secure.

By the end, you’ll know:

  • When to use eligible vs active roles
  • How the PIM role activation process works (MFA, approval, expiration)
  • Real-world best practices for security admins, IT ops, and compliance teams

Let’s break it down step by step.

To learn more about securing your environment beyond role management, explore our Microsoft 365 security consulting services, designed to strengthen your overall access control and compliance posture.

80% of security breaches involve privileged accounts.

PIM Role Types: Eligible vs Active

Eligible Role Assignment

An eligible role means the user could get admin permissions, but only after activating them.

Until they activate, the role sits idle - no permissions granted.

Activation usually involves:

  • Going into PIM
  • Clicking “Activate”
  • Passing checks like MFA, giving a reason, or waiting for approval

This is just-in-time (JIT) access. The user only gets elevated rights for a set time, and once it expires, the access disappears.

Example: Alice is an eligible Exchange Admin. She can’t manage mailboxes until she activates her role. At that moment, she becomes active, does her task, and then loses access automatically.

Eligible Role Activation Flow

Active Role Assignment

An active role means the user already has the permissions, all the time.

No activation step. No waiting. Just immediate access as long as the assignment lasts.

This is the traditional way of assigning admin roles.

Example: Bob is an active Security Administrator. He always has those permissions whenever he signs in.

In PIM, active assignments can be:

  • Time-bound (e.g., expires after 90 days)
  • Permanent active (standing admin privileges)
Aspect Eligible Assignment Active Assignment
Requires manual activation? Yes – user must “Activate” the role on demand before use. No – user has the role privileges at all times once assigned.
Default state for user Not privileged until activated (zero standing access). Always privileged (standing access).
Best for Regular admins who only need occasional privileged access (JIT). Break-glass accounts, service accounts, or constantly-needed roles
Time-bound option Yes – can set start/end for eligibility (after end date, can’t activate) Yes – can expire the active assignment at a future date
Security benefits Least privilege: Reduces attack surface since role is dormant until needed. Actions are auditable upon activation Immediate access (no delays) but higher risk if account is compromised, since attacker has admin access any time.
User experience Extra step: user must request/activate when admin tasks arise. Transparent: no extra steps; privileges always available.

Summary
The key difference is when and how access is granted. Eligible roles provide the same permissions as active ones but with additional security controls, helping reduce risk while still enabling necessary admin work.

Configuring PIM Assignments in Microsoft 365

Admins can manage PIM in the Entra admin center (Azure AD).

Step-by-Step Example – Assigning an Eligible Role

  1. Sign in to the Microsoft Entra admin centeras at least a Privileged Role Administrator.
  2. Browse to ID GovernancePrivileged Identity Management > Microsoft Entra roles.
The Microsoft Entra admin center showing navigation to Privileged Identity Management under ID Governance, with Microsoft Entra roles selected.
  1. Select Roles to see the list of roles for Microsoft Entra permissions.
Privileged Identity Management Roles page displaying available Entra roles with the Add assignments button highlighted.
  1. Select Add assignments to open the Add assignments
  2. Select Select a role to open the Select a role
Add assignments page showing the Select role dropdown menu with a list of available Microsoft Entra roles.
  1. Select a member to whom you want to assign to the role, and then select Next.
Add assignments page displaying a list of users to select for the chosen role.
Tip: For scalability, consider group-based assignments rather than assigning roles to individual users one by one.
  1. Choose Eligible as the assignment type.
  2. To specify a specific assignment duration, add a start and end date and time boxes. When finished, select Assignto create the new role assignment.
    • Permanent → no expiration
    • Time-bound → specify start and end dates
Add assignments settings page showing Eligible assignment type selected with start and end dates configured.
  1. Click Assign to finish.
  2. After the role is assigned, an assignment status notification is displayed.
Notification showing that member Adele Vance is being assigned the Intune Administrator role in the Directory.

For Active assignments, the steps are the same, except you select Active.
Active roles can also be time-bound or permanent.

Technical Note:
Service principals (applications) can only receive active assignments. If an admin tries to assign a PIM role to a service principal, the portal will force it to Active.

PowerShell / Graph API for PIM

Assignments and settings can also be managed via Microsoft Graph API or PowerShell.

For example, the New-MgRoleManagementDirectoryRoleAssignment cmdlet can create role assignments programmatically.

This is useful for large enterprises or DevOps scenarios where you want to automate:

  • Bulk role assignments
  • Converting eligible roles to active
  • Managing multiple users or groups at scale

PIM roles are represented as role management policy objects in Graph.

Setting Role Activation Policies

After assigning a role, admins can configure PIM role settings (policies):

  • Require approval before activation
  • Require MFA
  • Set duration limits
  • Enable notifications

These policies govern how eligible roles behave and add extra security controls.

How End Users Activate an Eligible Role

Once administrators have assigned a user an Eligible role in PIM, here’s what that user needs to do when they need elevated access:

  1. Sign in to the Microsoft Entra admin center as a user who has an eligible role assignment.
  2. Browse to Identity governance > Privileged Identity Management > My roles.
Privileged Identity Management quick start page showing navigation to “My roles” under ID Governance.
  1. Select Microsoft Entra roles to see a list of your eligible Microsoft Entra roles.
  2. In the Microsoft Entra roles list, find the role you want to activate.
My roles page displaying eligible role assignments with options to activate or extend.
  1. Select Activate to open the Activate pane.
Activate role page for Intune Administrator showing duration, reason field, and the Activate button highlighted.
  1. If prompted, please select Additional Verification Required and follow the instructions to complete the necessary security verification. Authentication is required only once per session; therefore, if you have already completed this process, no further action is needed.
  2. If necessary, specify a custom activation start time. The Microsoft Entra role would be activated after the selected time.
  3. In the Reason box, enter the reason for the activation request.
  4. Click Activate.
  5. If the role requires approval to activate, a notification appears in the upper right corner of your browser informing you the request is pending approval.
  6. Once approved, the role becomes Active for the set duration (for example, 2 hours).
Notification confirming successful activation of the Intune Administrator role for Delia Dennis
  1. The user can confirm this by checking the Active assignments tab under Microsoft Entra Roles - the role and its remaining time will be visible there.
My roles page showing Active assignments with the Intune Administrator role currently activated.
  1. When time expires, the role automatically deactivates, and the user loses elevated rights.
Tip: Encourage users to plan work ahead so they can activate roles during approved windows. Activations and justifications are logged automatically for auditing. Note: When a role is assigned, the assignment:
  • Can't be assigned for a duration of less than five minutes
  • Can't be removed within five minutes of it being assigned
Demo This video demonstrates the process of assigning an Active role to a user in Microsoft Entra, followed by a demonstration of the end-user experience when utilizing the activated role.

Key PIM Policies (Quick Settings & Best Practice)

To maximize security while keeping PIM practical, configure the following settings for eligible roles (defaults apply per your org’s risk tolerance):

  • Activation Duration: 1–4 hours for high-privilege roles (Global Admin, Privileged Role Admin). Keep short to enforce just-in-time access.
  • Require Multi-Factor Authentication (MFA): Always enabled at activation to mitigate stolen token risk. If you haven’t already configured MFA, follow our step-by-step guide on how to enable MFA in Microsoft 365 to protect admin activations from unauthorized access.
  • Require Justification: Users provide a reason or ticket number; encourage meaningful input for audit trails.
  • Require Ticket / Change Number: Recommended if using ITSM; adds accountability.
  • Require Approval: Critical roles (Global Admin, Privileged Role Admin) should require approver validation before activation.
  • Notifications: Ensure alerts are sent to approvers, admins, and requesters for every activation.
  • Conditional Access (Advanced): Optionally enforce device compliance or additional authentication during activation for sensitive roles.
  • Time-Bound Assignments: Always set temporary eligibility for contractors or external admins; review permanent assignments regularly.
  • Break-Glass Accounts: Only two emergency Global Admins should remain permanently active; store securely offline.
  • Access Reviews: Schedule periodic reviews (monthly or quarterly) to ensure roles are still required and appropriately scoped.
Key PIM Policies (Quick Settings & Best Practice)

When to Use Which: Policy + Role Examples + Quick Decision Guide

Eligible by default → Use Active only for exceptional cases (emergency, service accounts, rare continuous needs).

Default Stance – Eligible by Default:

  • Standard admins and privileged roles should be eligible.
  • Enforces just-in-time access and reduces standing access risks.
  • Even if an account is compromised, the attacker must complete MFA/approval steps.

When Active Makes Sense:

  • Break-Glass / Emergency Accounts: Two Global Admins, always active, stored securely offline.
  • Service / Automation Accounts: Scripts or service principals that can’t use eligible roles. Limit scope, use certificates, and monitor tightly.
  • Rare Continuous Use: Only if daily activation is impractical; prefer splitting duties or short daily activation.
Role Recommended Assignment Notes
Global Administrator Eligible + Approval Highest risk, except emergency accounts
Privileged Role Administrator Eligible + Approval Controls PIM itself
Exchange / SharePoint Admin Eligible Approval optional for daily tasks
User Administrator Eligible Low-risk, approval optional
Security Reader (read-only) Can be Active Minimal risk
Compliance Officer / Auditor Active (read-only) For continuous access to reports
Service Account / Backup Script Active Limit scope and monitor
Developers needing occasional access Eligible Auto-approval possible for convenience

Compliance & Governance:

  • Eligible roles demonstrate least privilege.
  • Provides audit trails and enforces access reviews.
  • Supports ISO, SOC2, and internal control compliance.

Balancing Security and Usability:

  • Eligible roles introduce an extra step but normalize quickly with training and adoption.
  • JIT access fosters security without significantly affecting productivity.

For a more holistic view of how privileged identity fits within your security strategy, don’t miss our article top strategies to optimize your Microsoft 365 security posture and strengthen administrative resilience.

Additional Tips for a Secure PIM Deployment

Audit and Access Reviews
Keep a close eye on who has roles and how they’re used. PIM provides audit logs and Access Review tools. Best practice: check permanent active roles and eligible assignments quarterly (or monthly) to ensure they’re still needed.
Look for patterns like users activating high-privilege roles for everyday tasks - this could indicate over-scoped access. Adjust roles accordingly. To further minimize exposure and protect inactive sessions, learn how to enforce session timeout policies in Microsoft 365 across all user devices.

Common Pitfalls

  • Making users active out of convenience: Avoid unless absolutely necessary.
  • Ignoring notifications or logs: Assign someone to monitor alerts and review logs.
  • Approval delays: Ensure approvers are available or use a rotation.
  • Too short activation periods: Start with a reasonable default (e.g., 4 hours) and adjust.
  • No break-glass accounts: Always maintain emergency active accounts to prevent lockouts.
Avoid these common PIM deployment mistakes

Using PIM Beyond Microsoft 365
PIM works for Azure RBAC roles and privileged groups too. While this guide focuses on Microsoft 365, the same principles of eligible and active assignments apply.

For organizations managing Azure workloads, Microsoft Azure consulting services can help design secure and scalable RBAC and identity governance frameworks.

Training and Adoption
Invest in admin training on how PIM works. Demonstrate the activation workflow, the security benefits, and best practices. With clear guidance and hands-on practice, admins quickly adapt to just-in-time access and see it as an efficient tool rather than extra overhead.

Conclusion

Secure PIM deployment combines smart configuration, role discipline, and regular monitoring. Use eligible roles by default, reserve active roles for exceptions, review assignments regularly, and train your team. Following these steps keeps your Microsoft 365 environment secure, compliant, and practical, while empowering admins to work efficiently.

Why Trust Penthara Technologies for Microsoft 365 PIM Deployment?

  • Microsoft Security Specialists
    We have proven expertise in deploying secure privileged access solutions across Microsoft 365 and Entra ID.
  • Certified & Experienced Team
    Our consultants hold advanced Microsoft certifications and hands-on experience with Privileged Identity Management (PIM), just-in-time access, eligible and active role management, and policy configuration.
  • Compliance-Driven Approach
    We help organizations meet regulatory requirements (ISO, SOC 2, HIPAA, GDPR) by enforcing least-privilege access, audit trails, and approval workflows.
  • Seamless Rollout & Support
    From planning and pilot to full deployment, we guide you through every step, including configuring MFA, approvals, time-bound assignments, and monitoring – minimizing disruption while maximizing security.
  • Continuous Improvement
    We don’t just set up PIM; we help you monitor, optimize, and evolve your privileged access management strategy. Our experts ensure your environment stays secure while maintaining productivity.
  • Microsoft Solutions Partner Advantage
    As a certified Microsoft Solutions Partner, we combine official guidance with practical experience, giving you trusted, enterprise-grade PIM deployment.

Secure your Microsoft 365 environment with a structured, least-privilege approach. Schedule a consultation today and let our team design, deploy, and support the right PIM strategy for your organization.

Frequently Asked Questions (FAQ)

Q: What is the difference between a role and a role assignment?
A: A role defines a set of permissions (what you can do). A role assignment links a user or group to that role, granting them those permissions.

Q: What are the three types of RBAC controls in Azure?
A: Azure uses Role Assignments, Role Definitions, and Scopes.

  • Role Assignment: Gives a user/group a role at a specific scope.
  • Role Definition: The actual set of permissions (e.g., Reader, Contributor).
  • Scope: Where the permissions apply (subscription, resource group, or resource).

Q: What is the difference between IAM and PIM?
A: IAM (Identity and Access Management) is the broad system that handles who can access what. PIM (Privileged Identity Management) is a layer on top of IAM that manages privileged roles, providing just-in-time access, approvals, and audit logs.

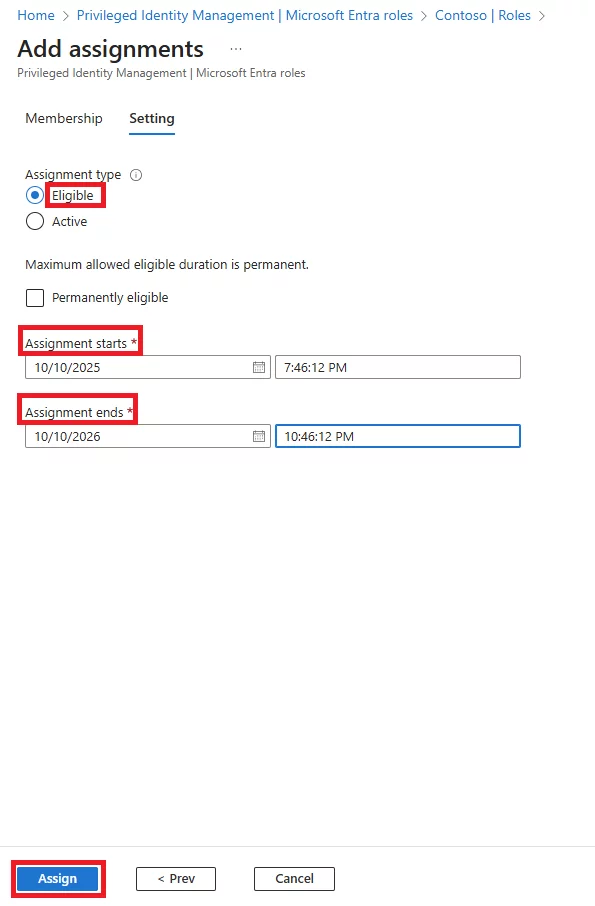
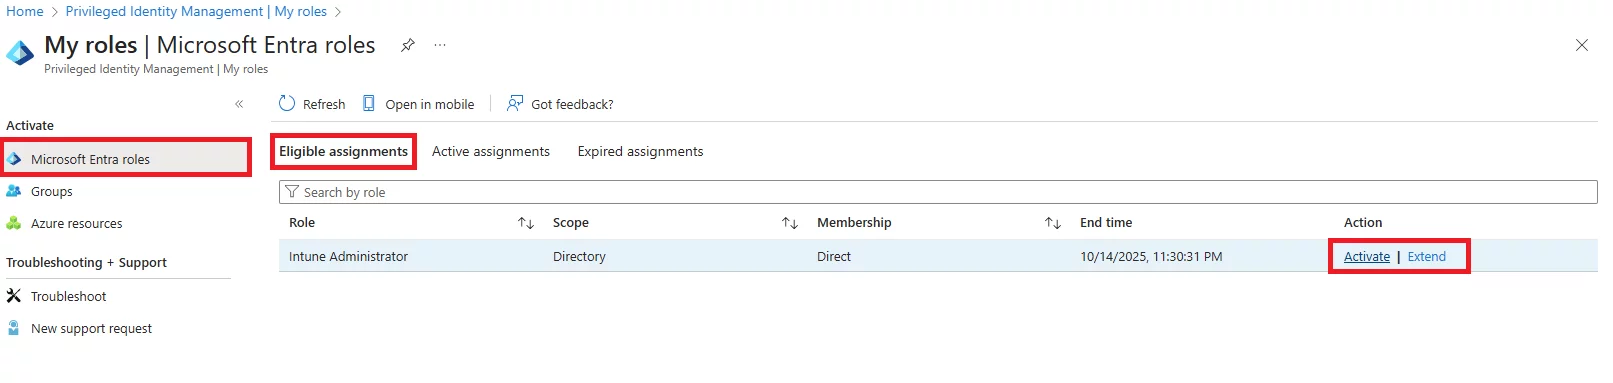
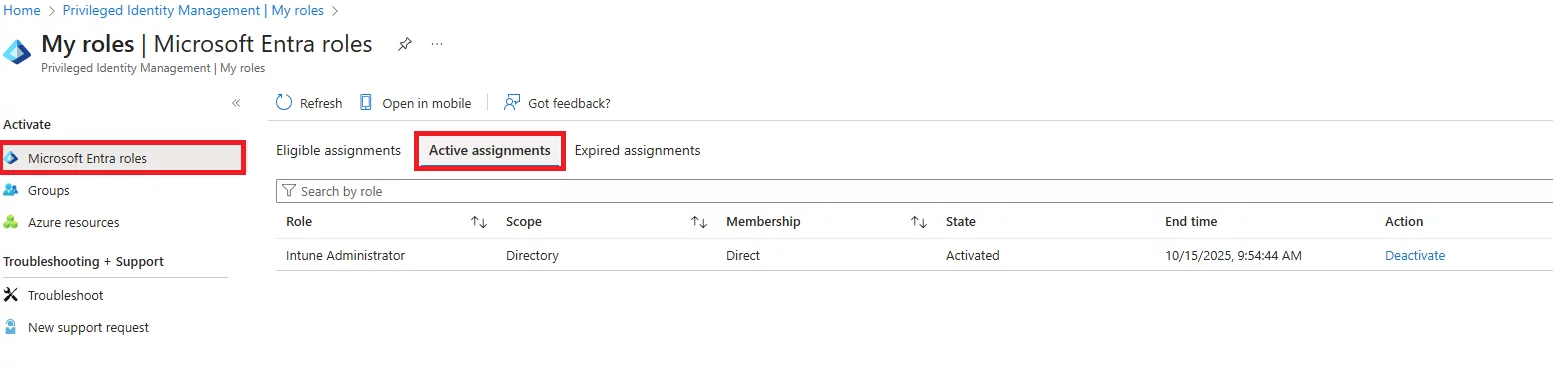
Q: What is the difference between eligible and active PIM roles?
A: Eligible roles must be activated each time you need them – temporary, just-in-time access. Active roles are always on – the user has admin permissions at all times. Eligible = “on demand,” Active = “standing access.”

Q: When should I use an eligible role vs an active role in PIM?
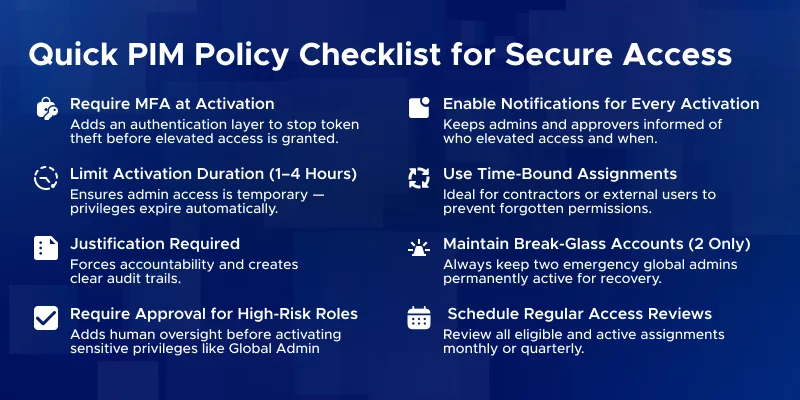
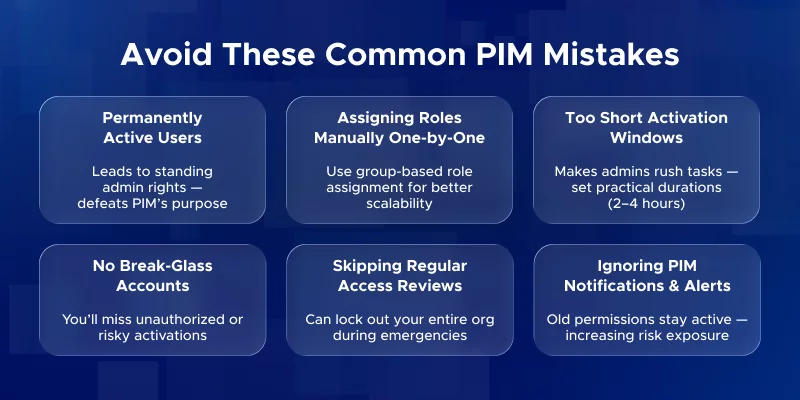
A: Use eligible roles by default for day-to-day administration. Use active roles only for exceptions like break-glass accounts or service accounts that cannot use JIT activation. Eligible roles reduce risk by limiting exposure.

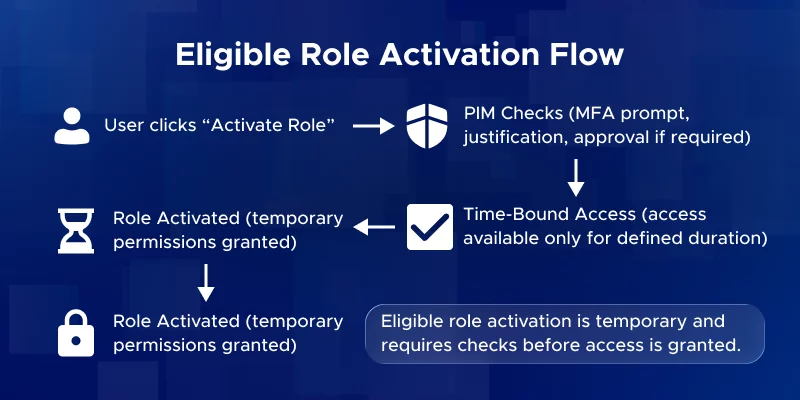
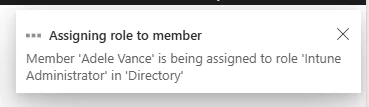
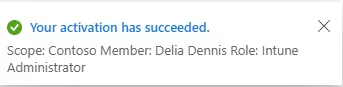
Q: How do users activate an eligible PIM role?
A: Users go to the PIM portal (or Teams/PIM app), select their eligible role, click Activate, and complete any requirements like MFA or providing justification. If approval is required, they wait for it. Once done, the role is active for the set duration (e.g., 1–4 hours).

Q: Can eligible PIM roles expire or be time-bound?
A: Yes. Eligible assignments can have a set expiry date, after which the user loses eligibility. Each activation also expires after a configured duration, after which the user must activate again.

Q: What triggers the activation of an eligible PIM role?
A: Activation is manual. The user must intentionally start it in PIM. Scripts can automate this via PIM API, but it’s always a deliberate action, not automatic.

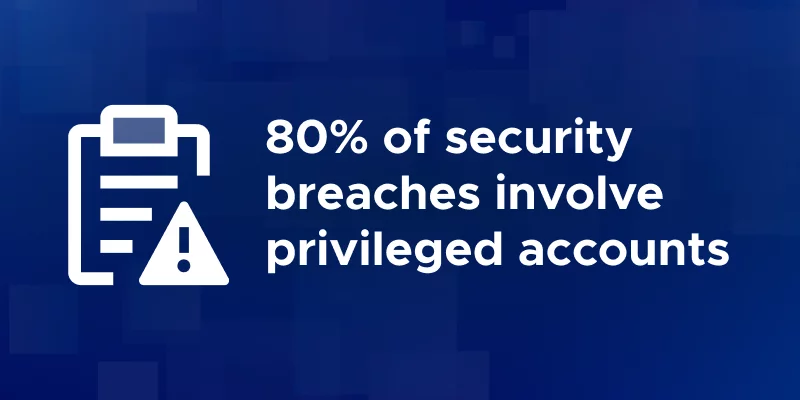
Q: Are active PIM roles more risky than eligible roles?
A: Yes. Active roles give standing access, so if compromised, the attacker immediately has permissions. Eligible roles add MFA, approval, and logging, which creates security checkpoints and audit trails.

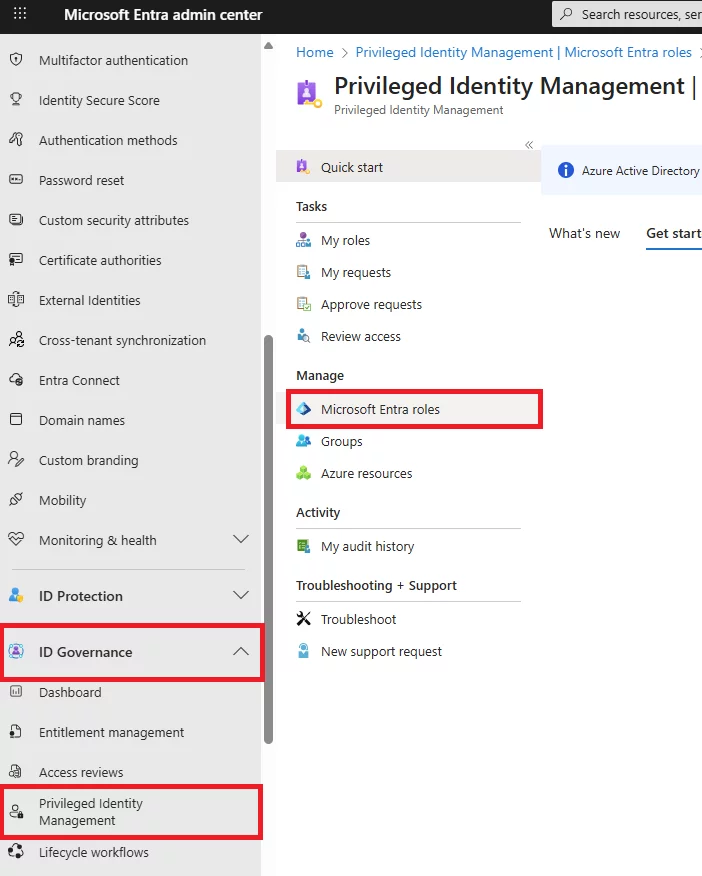
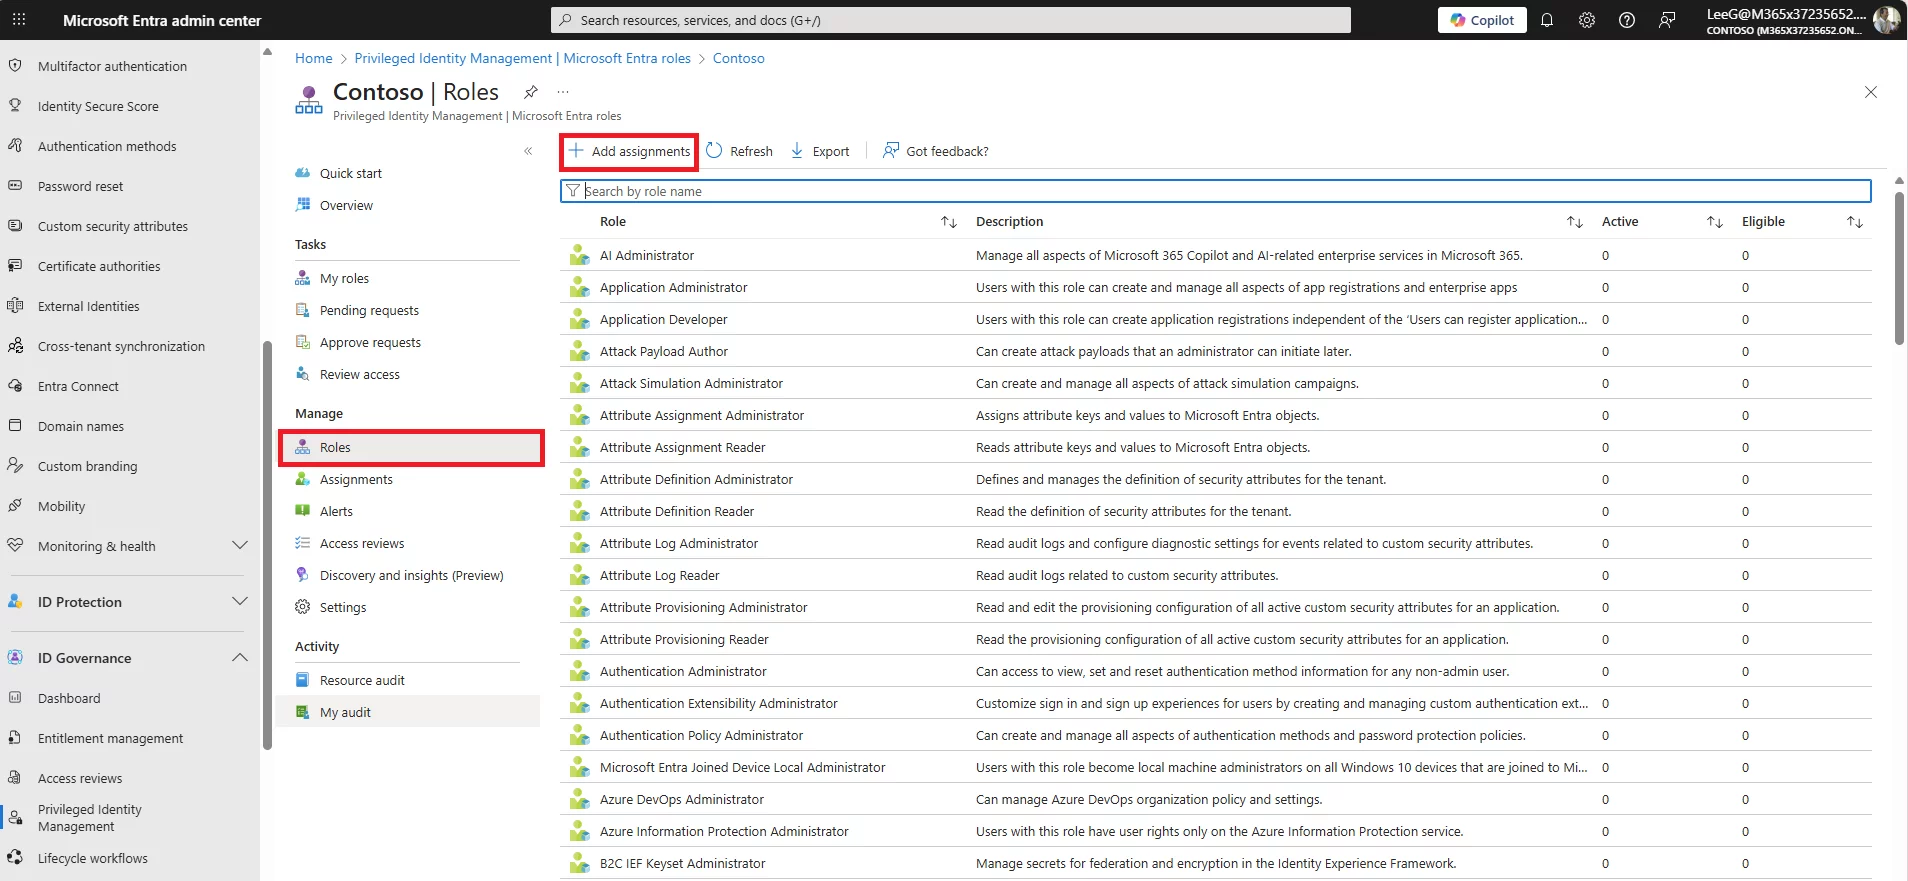
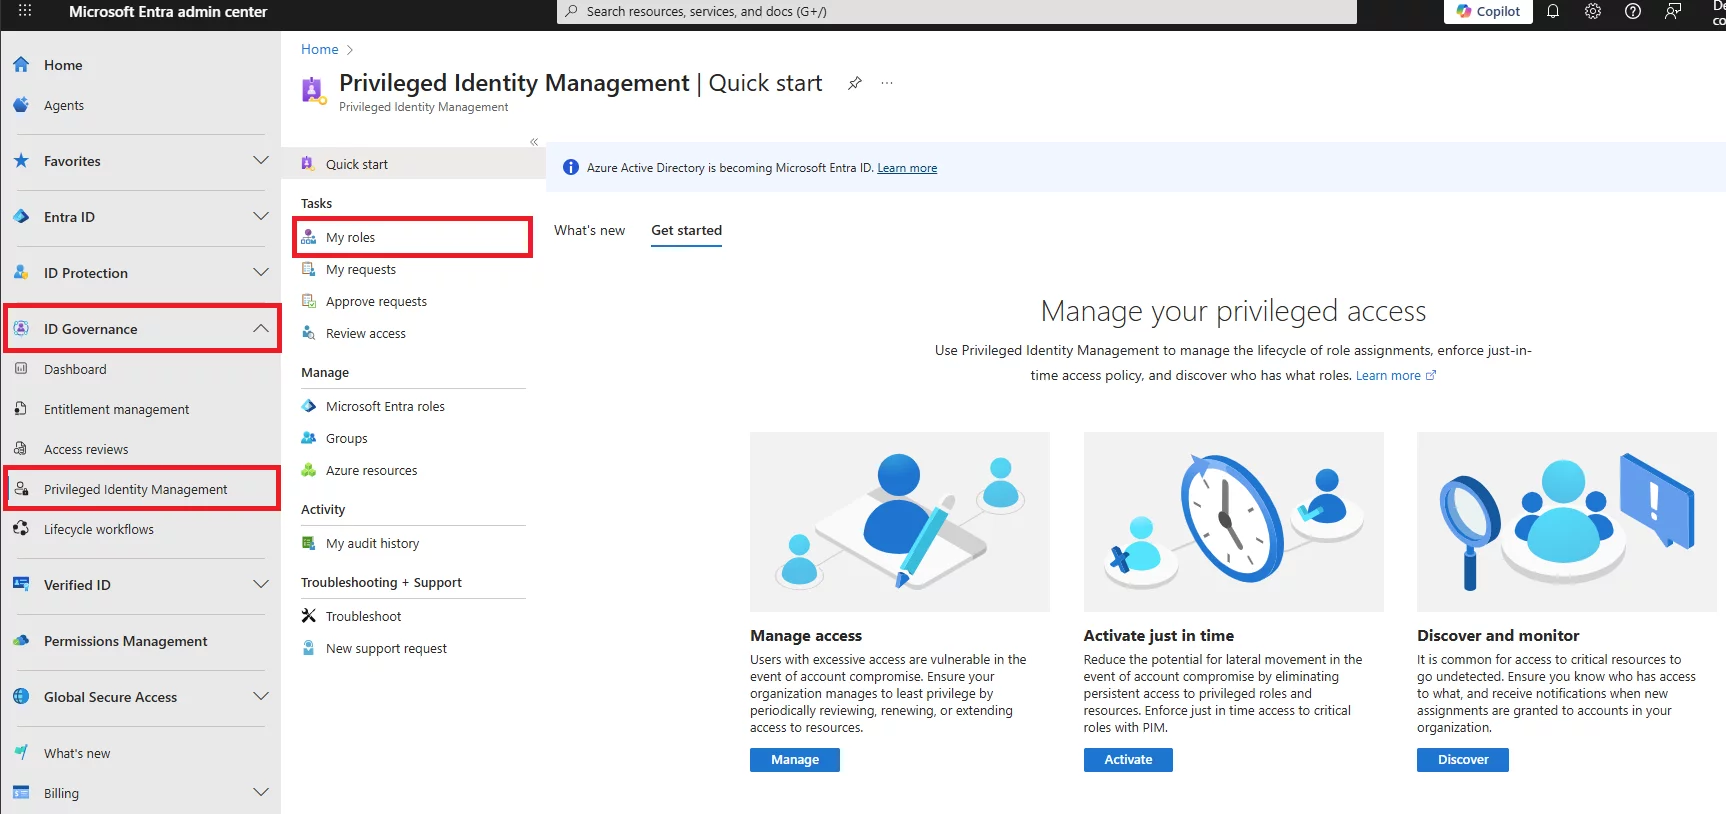
Q: How to activate eligible assignments in Azure?
A: Through the Entra/PIM portal, select your eligible role, click Activate, satisfy any MFA/approval/justification requirements, and the role becomes active for the set duration.

Q: What are the permission levels in Azure?
A: Azure permission levels are defined by roles – e.g., Reader (view-only), Contributor (modify resources), Owner (full access). PIM controls elevated roles within these permissions.

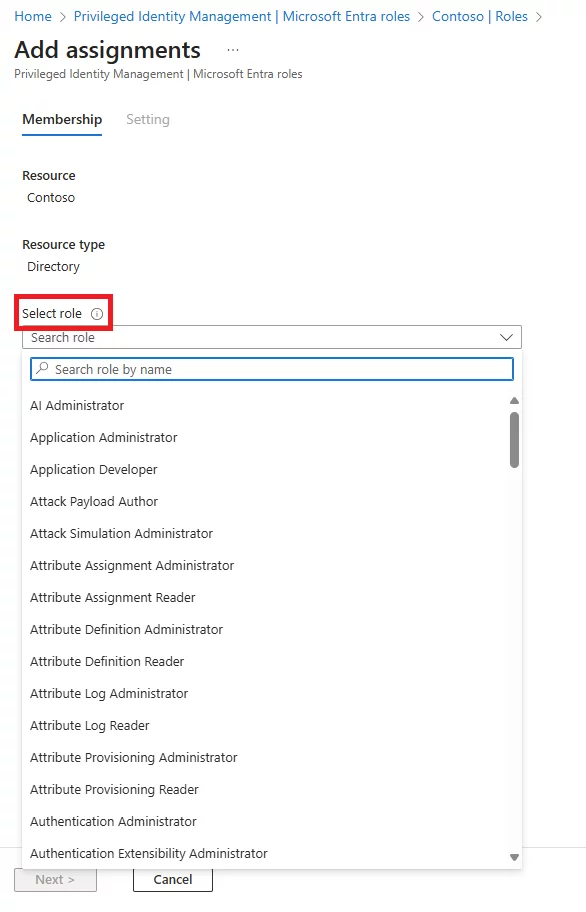
Q: What is the scope type of roles in Entra?
A: Role scope defines where permissions apply: subscription, resource group, or specific resource. Eligible/active assignments inherit the role’s scope.

Q: How are NotActions used in a role definition?
A: NotActions define exceptions to permissions. For example, a role may allow all Contributor actions except deleting VMs. This refines what a role can do.

Q: Why is Add Role Assignment disabled?
A: This usually happens due to missing permissions or scope restrictions. The admin must have a high-enough role at the target scope to assign roles.

Jasjit Chopra
Jasjit Chopra

CEO at Penthara Technologies

About the Author

Microsoft MVP LogoLinked-in

Jasjit Chopra is the CEO of Penthara Technologies and a Microsoft Most Valuable Professional (MVP) with over two decades of hands-on experience in Microsoft 365, SharePoint, and Security. He has led 100+ digital transformation projects across six countries, securing 50,000+ users, migrating 250+ TB of data, and automating processes that save organizations thousands of hours each year. A recognized leader at the crossroads of AI, security, and workplace modernization, Jasjit is passionate about simplifying complexity, mentoring technology professionals, and helping businesses build secure, intelligent, and future-ready digital environments.

Leave a Reply

Your email address will not be published. Required fields are marked *

More From This Category

Passwordless vs. MFA in Microsoft 365: What's the Difference?

Learn the difference between MFA and Passwordless in Microsoft 365 - secure logins with biometrics, FIDO2 keys, and Conditional Access.

Read More
Get Rid of Passwords: Microsoft 365 Passwordless Implementation Guide

Learn how Microsoft 365 enables secure, passwordless authentication using biometrics, FIDO2 security keys, Microsoft Authenticator, and Conditional Access

Read More
How to Use Device Filters in Conditional Access Policy Conditions

Learn how to use device filters in Microsoft 365 Conditional Access to secure apps, control access, and simplify management for any device type.

Read More
1 2 3 5
chevron-right