

A hidden SharePoint permission - “Everyone Except External Users” - quietly breaks Zero Trust, exposing internal data and amplifying risk in the age of Copilot.

Redux is a framework that is responsible for managing the state for most of the popular front-end frameworks, such as React, Angular, etc. You can build web parts using any of the frameworks using redux. (Insert basics of redux)
In this post, I will walk you through how to use React and Redux to build a web part.
Today, we are going to cover some scenarios where we will be getting data from SharePoint lists using API calls and storing it in redux store so it can be re-used anywhere in the solution. It will enhance the performance of our SPFx solution by reducing the frequency of API calls. We will load the data once in the starting of our app and store it in redux store for further use.
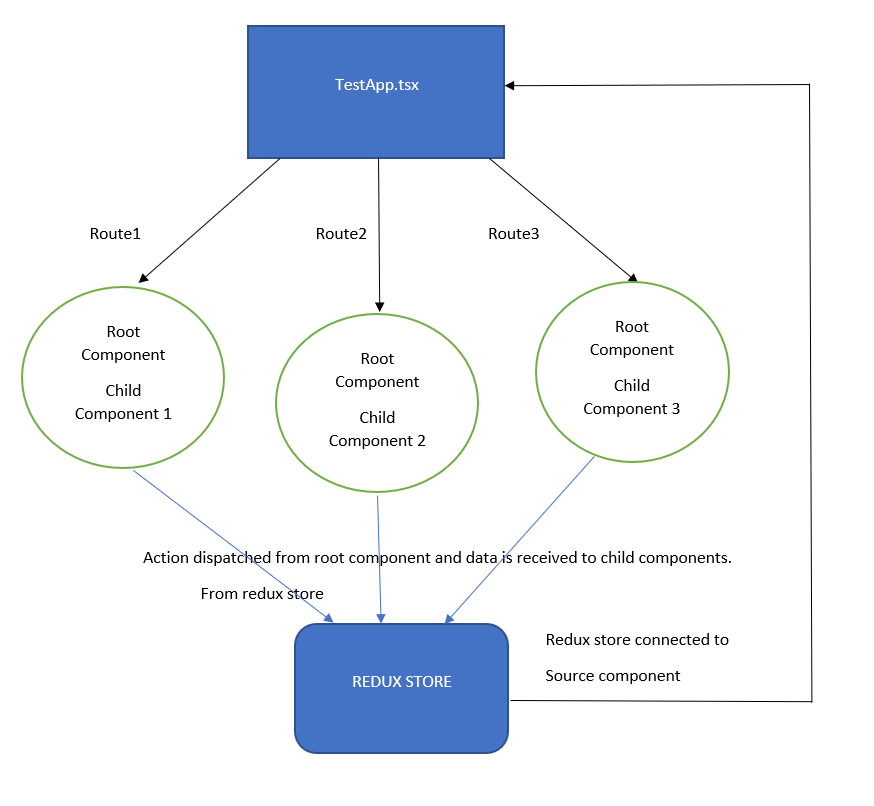
In this scenario we are building a single page application using hash routing. In this application we are fetching data from SharePoint list in the header component and storing it in redux store using actions, then further using that data in child components. To implement hash routing in SPFx solution you can refer to the link given below.
Implement hash routing in SPFx solution ( https://ravichandran.blog/2020/06/10/react-router-in-spfx/)
If you are building multi webpart solution, then please refer to the document on how to pass data from one webpart to another. Using redux store for a single webpart solution might not be a good use-case here. When you build SPA like capabilities, that is where this type of scenario can be helpful.
Before starting one must have basic knowledge about:
React is component-based library, we can take advantage of this feature in building our SPFx solution by building different re-usable components at specific level.
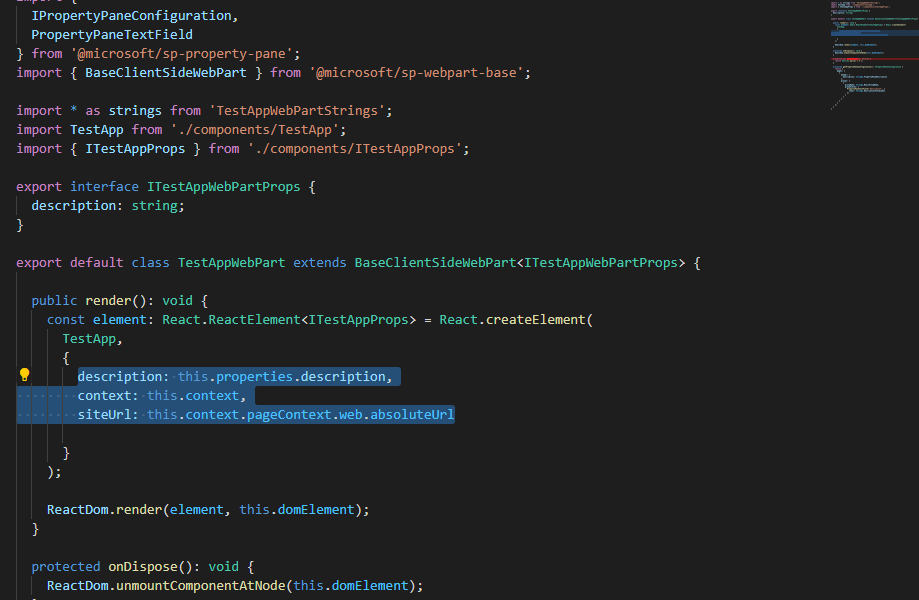
When you create a new SPFx solution all you need to keep in mind is that react component should receive all the properties via props which your SPFx solution has. Here we are passing three properties to the root component.

After you have created your basic SPFx solution follow the above folder structure to implement redux in your SPFx solution.
Here we have created store folder in our root folder (src/webparts/TestApp)
NOTE: Your Webpart name must not contain any special character, otherwise you will face an error while uploading your sppkg file.
In store folder we have further made subfolders for actions and reducer specifically.
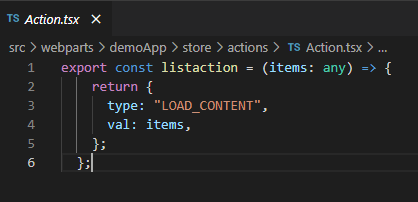
Actions: Action carries the payload of information from your Application to the redux store. For more detailed explanation refer to (https://redux.js.org/tutorials/fundamentals/part-3-state-actions-reducers).
Reducer: Reducers are a pure function in Redux. Reducers are the only way to change states in Redux. It is the only place where you can write logic and calculations. For more detailed explanation refer to (https://redux.js.org/tutorials/fundamentals/part-3-state-actions-reducers).
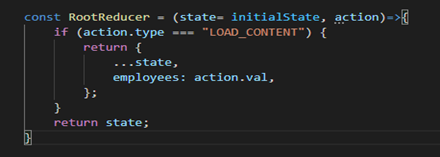
Reducer function contains the initial state and action. It checks the type of action and changes the specific state.
After you have created redux store and initialized the state in redux store all you need is to connect your root component to the redux store.

Middleware: Redux Middleware Is the point between dispatching the action and the time it reaches the reducer. It is basically used when we are dealing with API calls, routing etc.
This is how middleware fits into redux pattern:
For more detailed information you can refer to this link (https://redux.js.org/understanding/history-and-design/middleware).
Redux-Thunk: Redux-Thunk Middleware returns function instead of action object. It can make your actions asynchronous by delaying them on specific conditions. For more detailed information you can refer to (https://www.digitalocean.com/community/tutorials/redux-redux-thunk).
Now, your redux store is connected to your SPFx solution.
It is always advised to keep your component structure as simple as possible, and you must keep in mind that all the components are able to receive data from root component. There must be one root component which has all components called inside it (this is because we are implementing multiple components within a single SPFx solution inside SPA). Further these components have their child component.

Here TestApp.tsx is our root component which has all the parent components inside specific route. Further these parent components have their child components. This type of component breakdown makes your project management simpler and easier.
After you have created your project structure like shown above all you have to do is use the values from redux store in your component as props and you can update the values in redux store as well. Here comes the use of mapStateToProps to read the values from the redux store and map them to props and mapDispatchToProps to update the values in redux store.
mapStateToProps: mapStateToProps is passed as the first argument in connect, mapStateToProps is used for accessing data in your component as props from the redux store. It should take a first argument called state and return a plain object containing the data that the connected component needs.
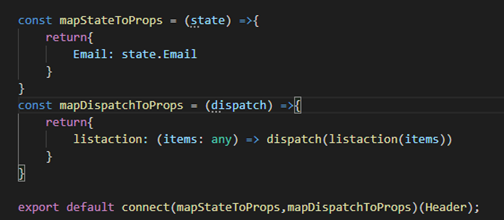
mapDispatchToProps: mapDispatchToProps is passed as the second argument in connect, mapDispatchToProps is used for dispatching actions to the store. mapDispatchToProps gives you the privilege to dispatch the action from your component to make changes in redux store. It provides you the action dispatching functions as props.
NOTE: If second argument is left empty in connect() function, then dispatch will be received by props as default property. In this scenario you will not be able to update the values in redux store.
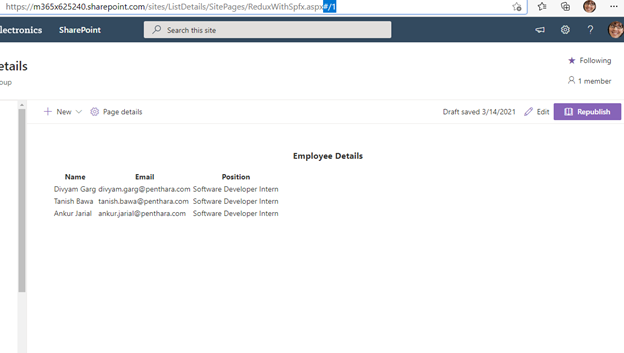
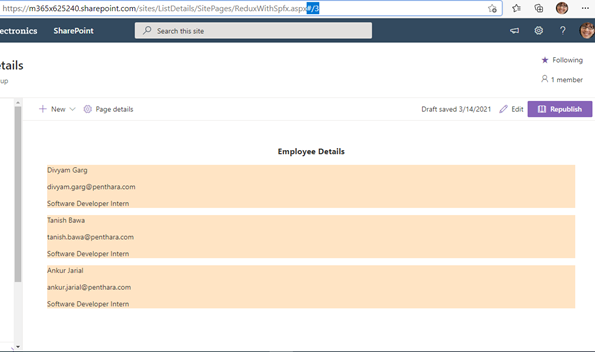
We have created a simple single page application using react framework. We have used redux to manage our state. And the good part is that now we can create a simple webpart using react and redux.
This is how our webpart looks like we have used hash routing for making single page application.

You can view the full code at GitHub: https://github.com/penthara/Redux-Implmentation-In-SPFx

CEO at Penthara Technologies


Monthly updates, news & events from Microsoft to help your business grow.
 The Most Dangerous Permission in SharePoint Is Hiding in Plain Sight
A hidden SharePoint permission - “Everyone Except External Users” - quietly breaks Zero Trust, exposing internal data and amplifying risk in the age of Copilot.
 What's new in Microsoft | May 2025 Updates
An overview of the latest Microsoft updates for May 2025 covering Microsoft Copilot, Microsoft Teams, SharePoint Online and Microsoft 365 Apps.
 What's new in Microsoft | April 2025 Updates
Monthly updates, news & events from Microsoft to help you & your business grow & get best out the Microsoft services.