
Explore the latest Microsoft 365 updates including Copilot enhancements, AI meeting recaps, Teams improvements, and new productivity features.
Power Automate is a service that helps you create automated workflows between your favorite apps and services to synchronize files, get notifications, collect data, and more.
What can you expect from Power Automate?
In this blog, we are going to create an Adaptive Card containing the information of events occurring in the next 60 days and post it in the MS Teams channel. These events will be stored in the SharePoint calendar (Classic SharePoint calendar list, not the modern one).
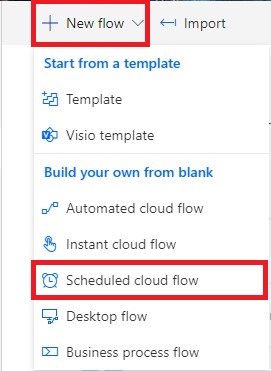
We will use the “Scheduled cloud flow” template for this flow. It will run at a particular schedule and fetch upcoming events in the next 60 days and post them in a particular MS Teams channel.
To start with, we need a SharePoint calendar list with events listed in it. To do that we will follow the following steps to create a calendar on the SharePoint site. We will be leveraging the legacy calendar app available on the SharePoint site itself. If you want, you can use your calendar with columns in it.
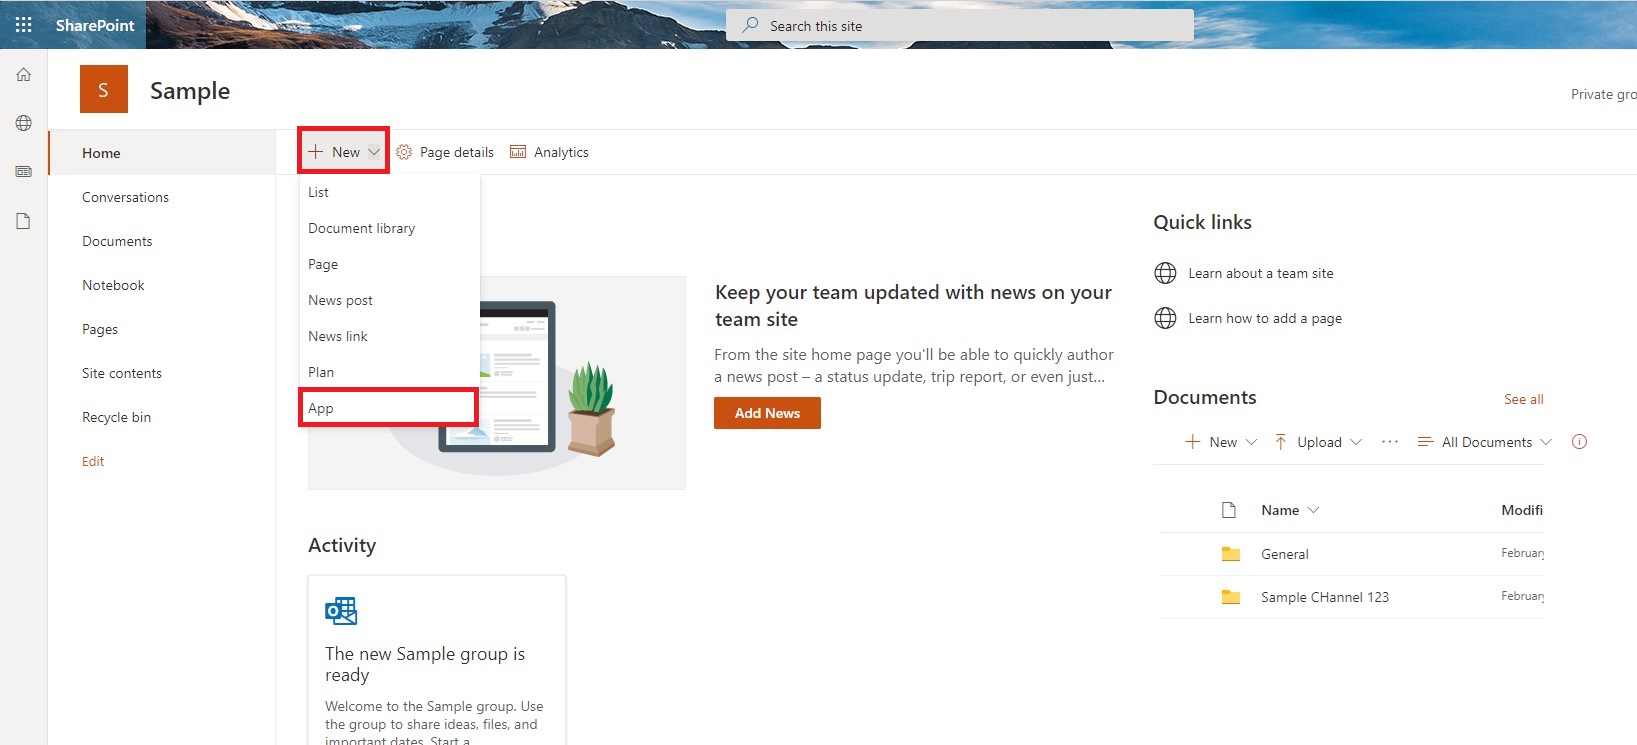
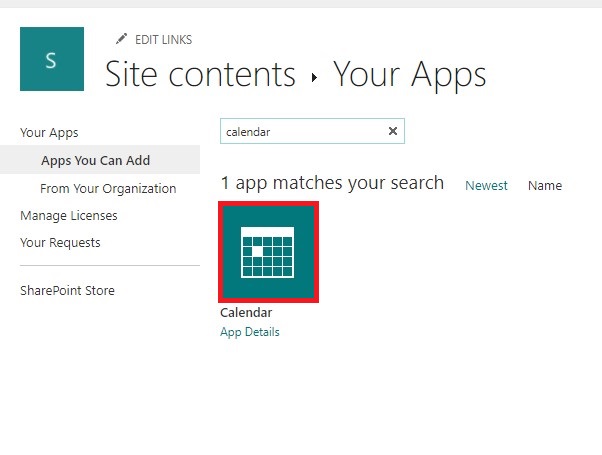
2. We will search “calendar” in the search bar and then click on the “search” button.
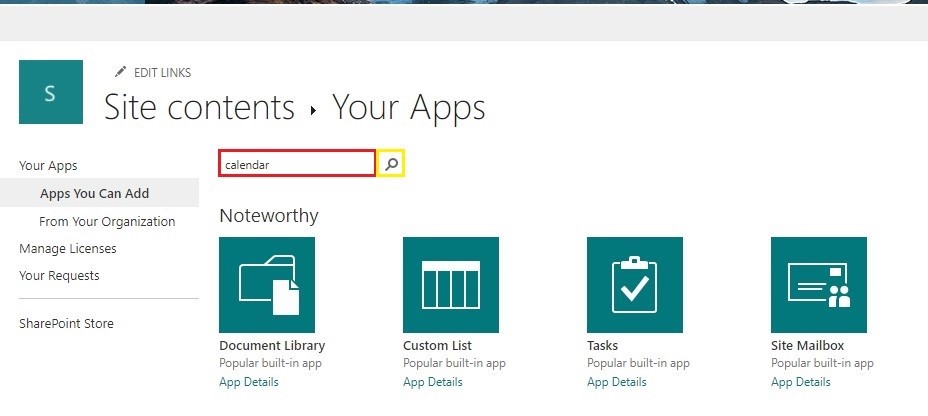
3. The result will show only one option named “Calendar” select it.
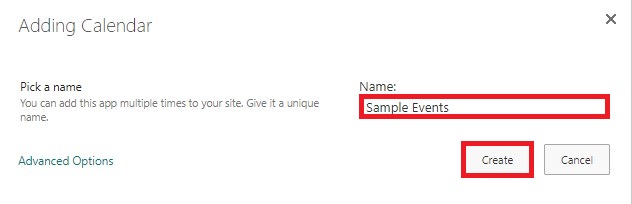
4. A dialogue box will open, asking the name of the calendar. We will give a name and click on “Create”.
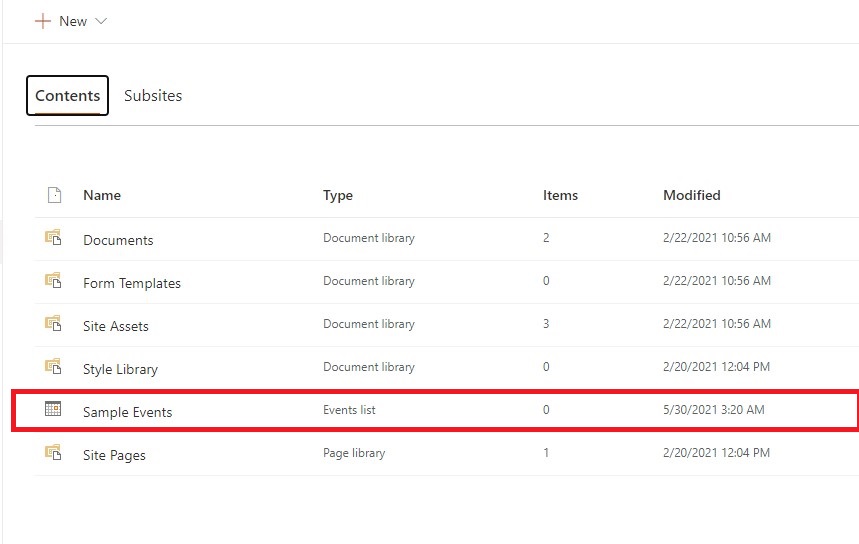
5. Now, it will bring us back to the “Site Content” page and we can see our new calendar listed here.
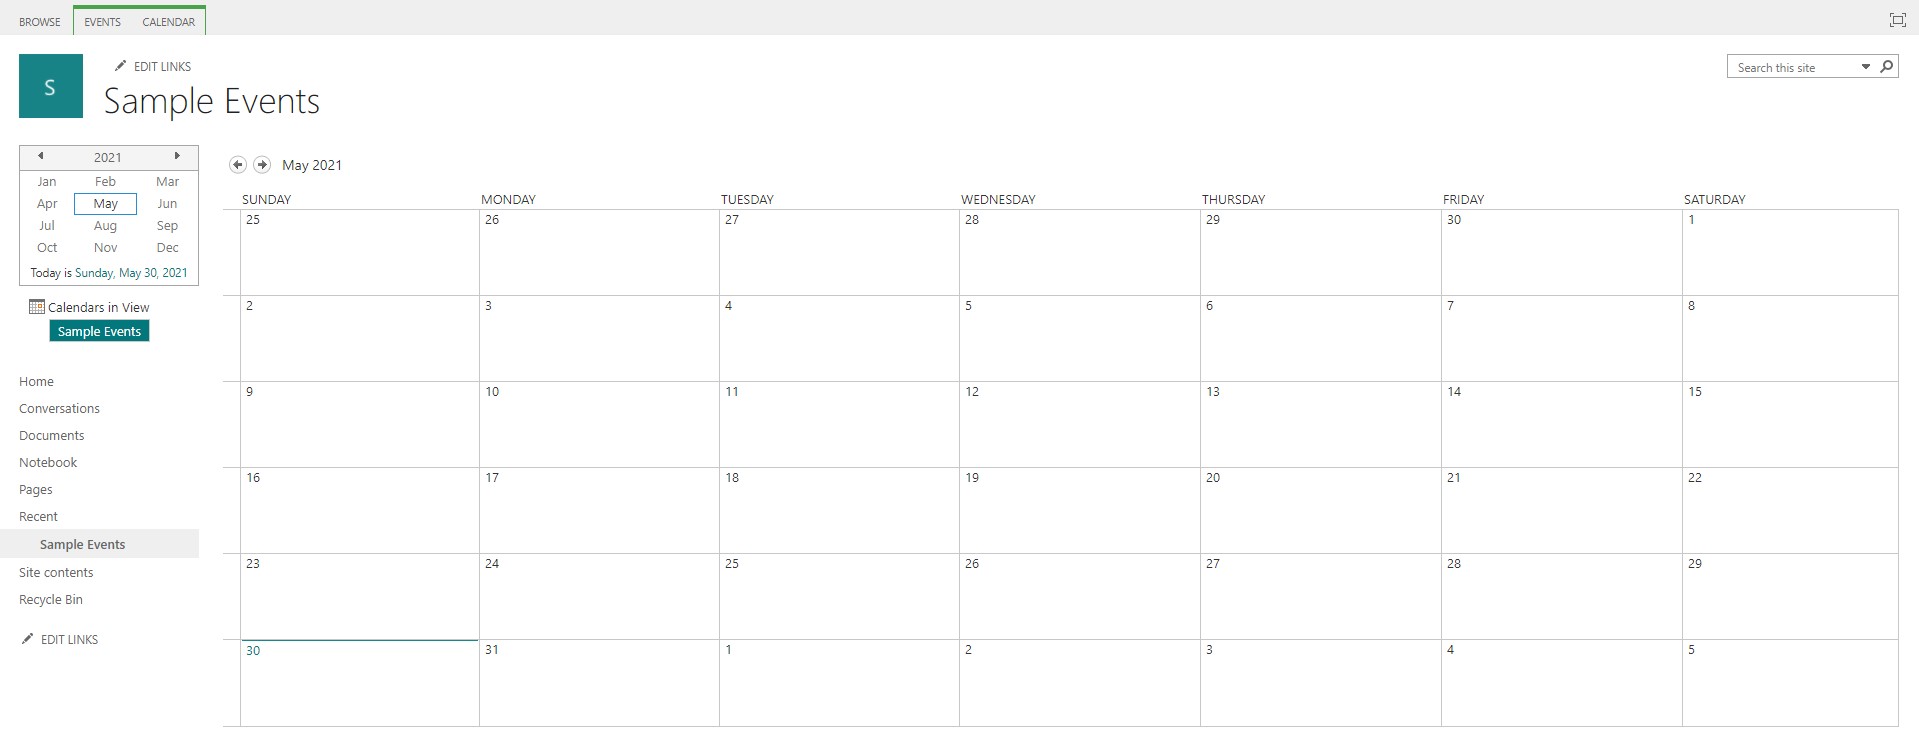
6. We will open the calendar by clicking on it and we will see a default view of the calendar as follows:
7. To see the list view of the calendar, click on “Calendar” and then from the dropdown of “Modify View” select “All Events”.

8. The list view will look like the following. Now to add an event we will click on “+ new event”.
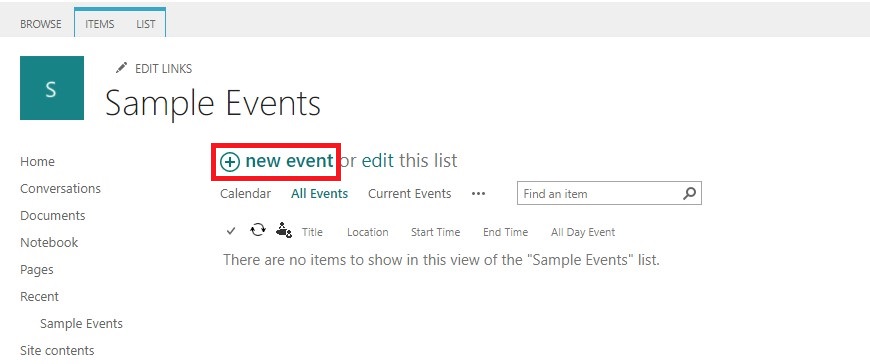
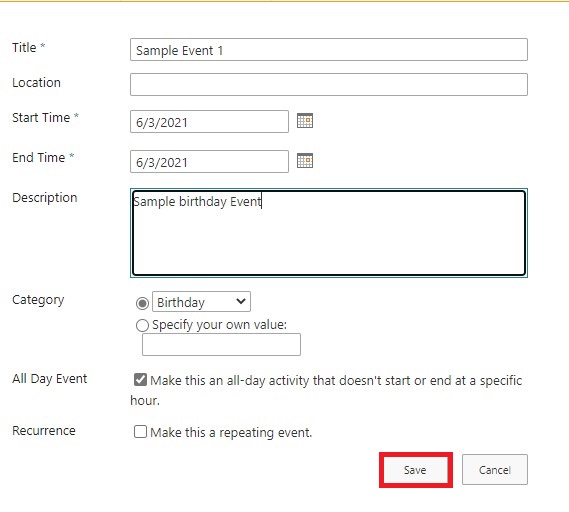
9. Fill in all the details about the event and click on the “Save” button.
10. After clicking on “Save” button, we will be redirected to our calendar events page, and we can see our event listed there.

Similarly, we can add more events.
Now we are ready with our events list, we will focus on creating the flow.
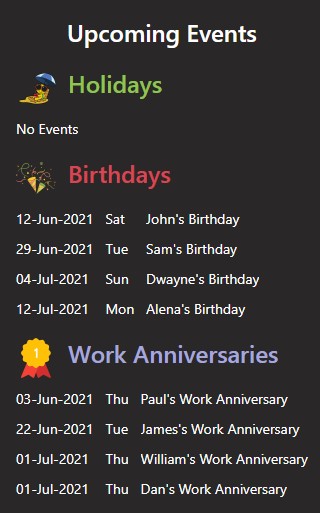
Before starting the flow. Following is the adaptive card that will be posted in the MS Teams channel.
To learn more about Adaptive Cards click here.
Steps to create the flow are as follows:
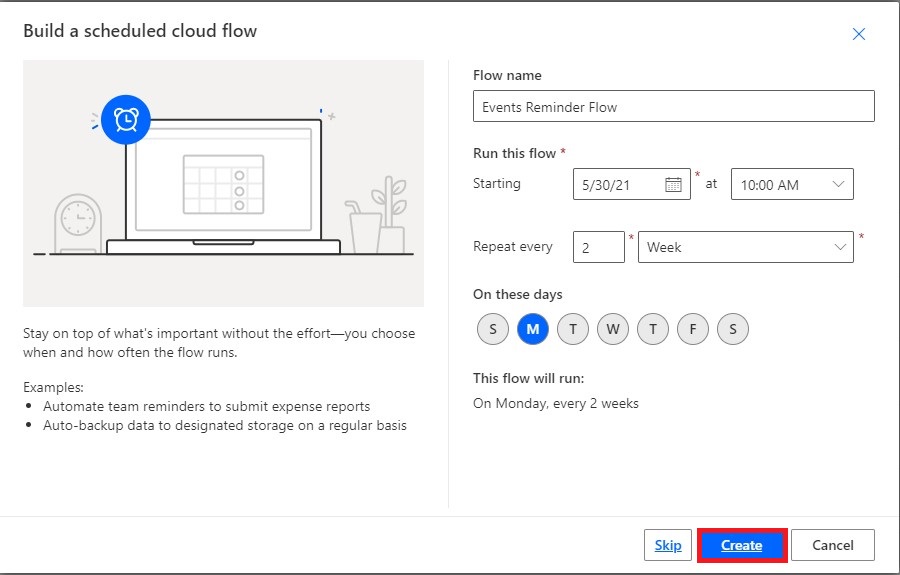
2. A dialogue box will open asking the name of the flow and when it should trigger.
In our case we have given the name as “Events Reminder Flow” and this will trigger every 2nd week on Monday. Click on “Create” to create the flow.
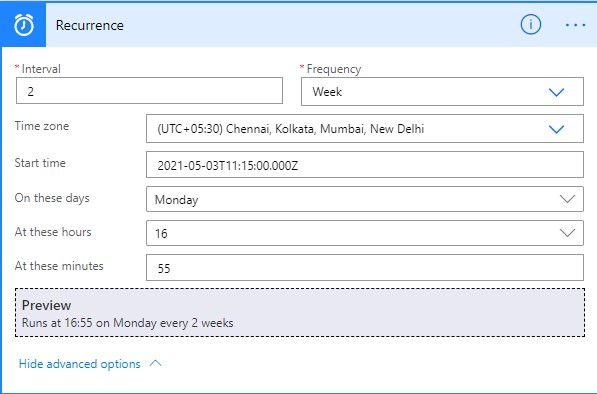
3. Our flow is created with the trigger “Recurrence” click on it to expand and then click on “Show advanced options” to see all the options.
We can select time zone and the exact time when this flow should trigger. Here we have given the time as 1655 hours.
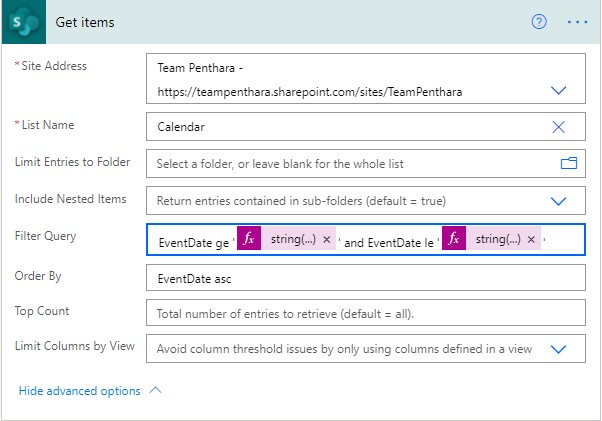
4. Get items (with filter query). Here we will filter and fetch events that are occurring in next 60 days only. In the filter query we have used two expressions. First expression results in today’s date in string format and the second expression results in date after 60 days in string format from today. The expressions are as follows:
The above expression will give todays date in “IST” and string format.
The above expression will give date after 60 days from today in “IST” and string format.
We have ordered our events in ascending order by Event’s date.
Filter query is as follows:
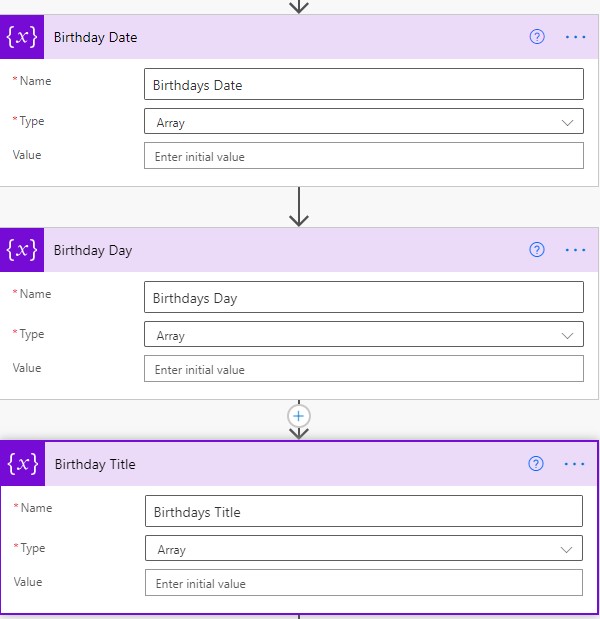
5. Initialize variables Birthdays Date, Birthdays Day and Birthdays Title (Array). We will be using these variables to store birthday events. The reason they are in array format is because we need to append more events (if exists) then compile them all and convert it to string (JSON format), so that it can be used in Adaptive Card.
6. In the same way we will create other variables (Array) that will contain information about Work Anniversary and Holidays
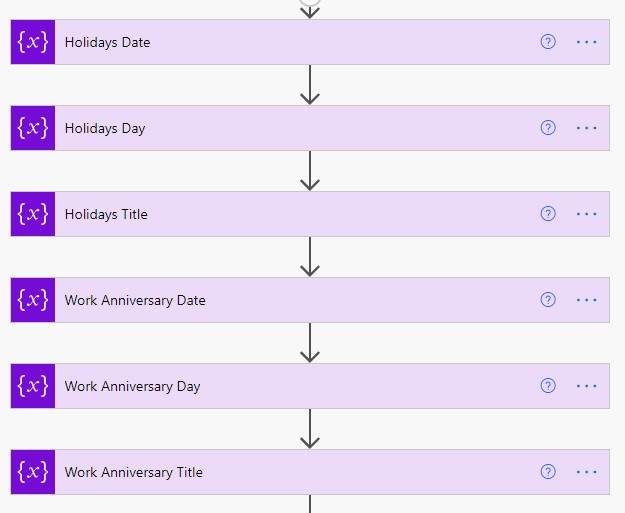
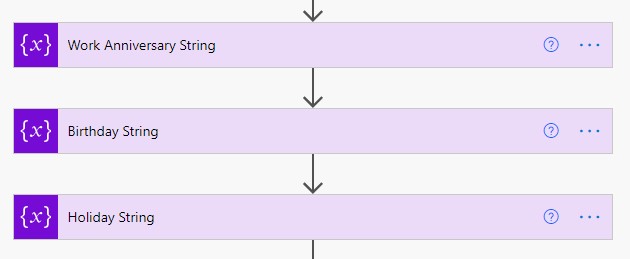
7. Initialize 3 more variables that will contain the final string (JSON format) of each event type and will be used in Adaptive Card later.
We require these variables, because we do not know whether there will be a Work Anniversary or Holiday or Birthday in next 60 day. So, we use Condition to check whether there are any events or not and then set these variables with either “No Events” or the data available from the SharePoint calendar list.
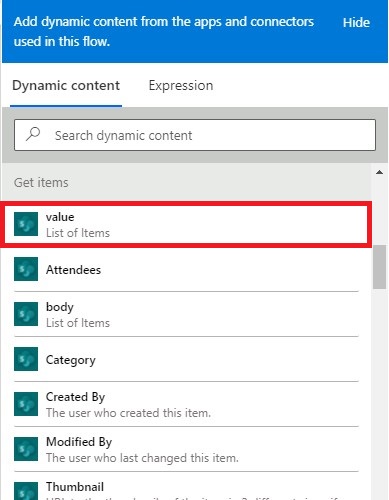
8. In this step we will use Apply to each to append all the events data i.e., Date, Day and Title in the arrays variable that we defined above. The loop will be applied on “Value”. Can be selected from dynamic content. This “value” is the type of event in our SharePoint calendar.
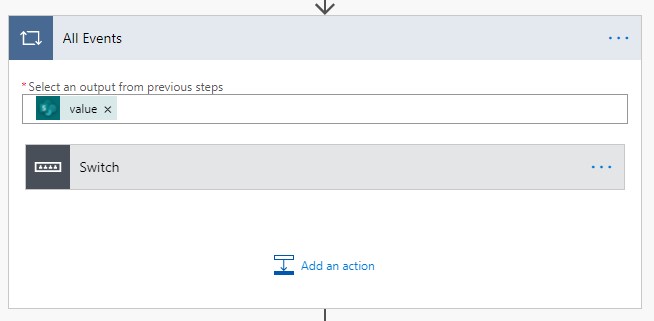
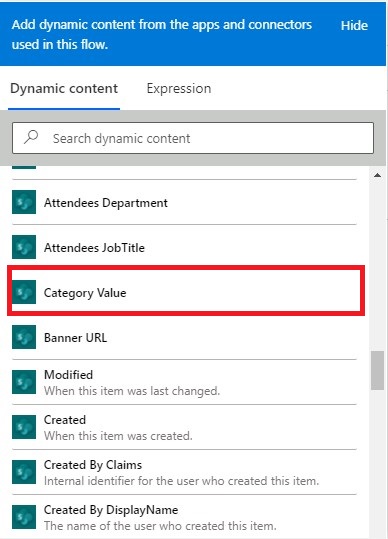
9. Inside the loop we will use Switch to check what kind of event it is (Birthday or Work Anniversary or Holiday). Switch will be applied on Category/Value. This can be found in dynamic content.

10. We will be having 3 options in switch as follows:

11. In the Birthday option we append the 3 variables that we created before Birthday Date, Birthday Day and Birthday Title. This is written in JSON format which is required in Adaptive Cards.
Value used in “Equals” is category name. Switch will check what is the outcome of “value” in each iteration and then it will go into the designated branch. Branch is selected by giving value in “Equals” input field of the choice action. We will give the type of event in “Equals” field.
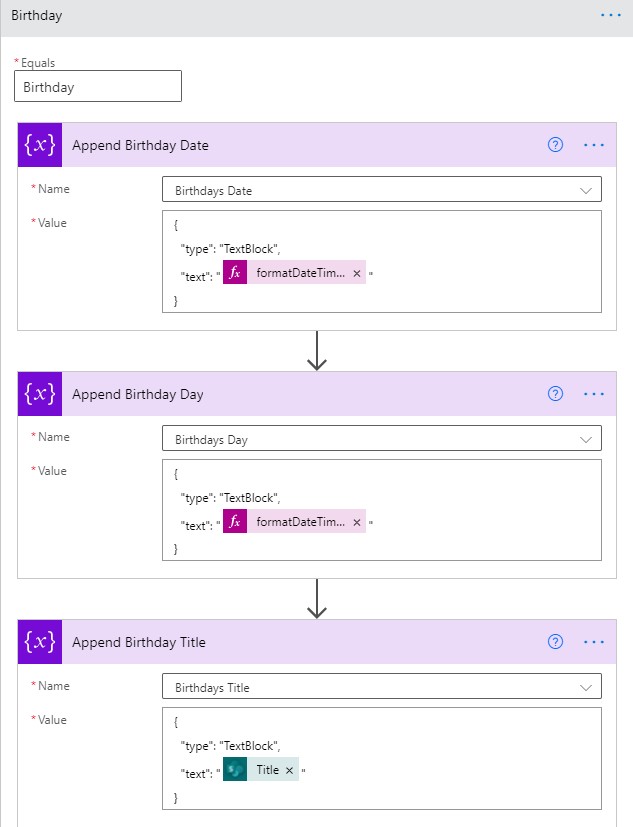
We have added two expressions for formatting date and day which is visible on adaptive card.
Copy paste the entire Value from the Append connectors for each.
Expression used in Birthday Date is :
Expression used in Birthday Day is:
Value in “Append Birthday Date” action is as follows:
Value in “Append Birthday Day” action is as follows:
Value in “Append Birthday Title” action is as follows:
12. Similarly, we will add the other two event types in the switch as shown below:
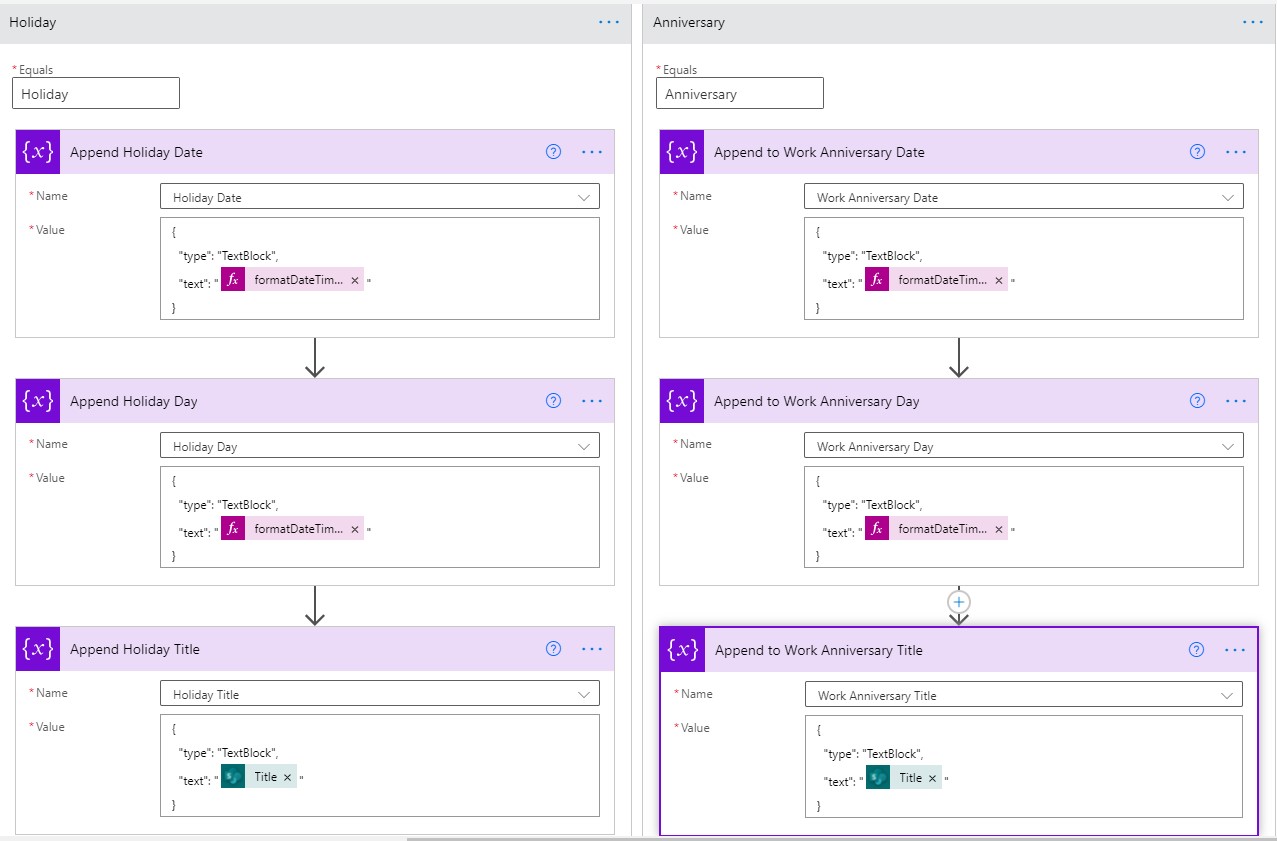
Value in “Append Holiday Date” action is as follows:
Value in “Append Holiday Day” action is as follows:
Value in “Append Holiday Title” action is as follows:
Value in “Append to Work Anniversary Date” action is as follows:
Value in “Append to Work Anniversary Day” action is as follows:
Value in “Append to Work Anniversary Title” action is as follows:
13. In this step, we have used condition to check whether our Birthday Date(Array) variable is empty or not. If it is empty, it means there are no Birthday events in next 60 days. So we need to show “No Events” text in the Birthday section of Adaptive Card. The expression used to check whether its empty or not is:
If the Birthday Date array is empty, then we will set the variable Birthday String to the following JSON code.
Note: Do not miss any commas (,) because we are writing this code in JSON format and commas are very important in JSON. If you miss any comma or put any extra then flow will fail with an error. We have put “,” in starting because, this piece of code is going in between the JSON code. That means there is some more code above this piece of code, so to maintain the JSON formatting we have to give “,” in starting.
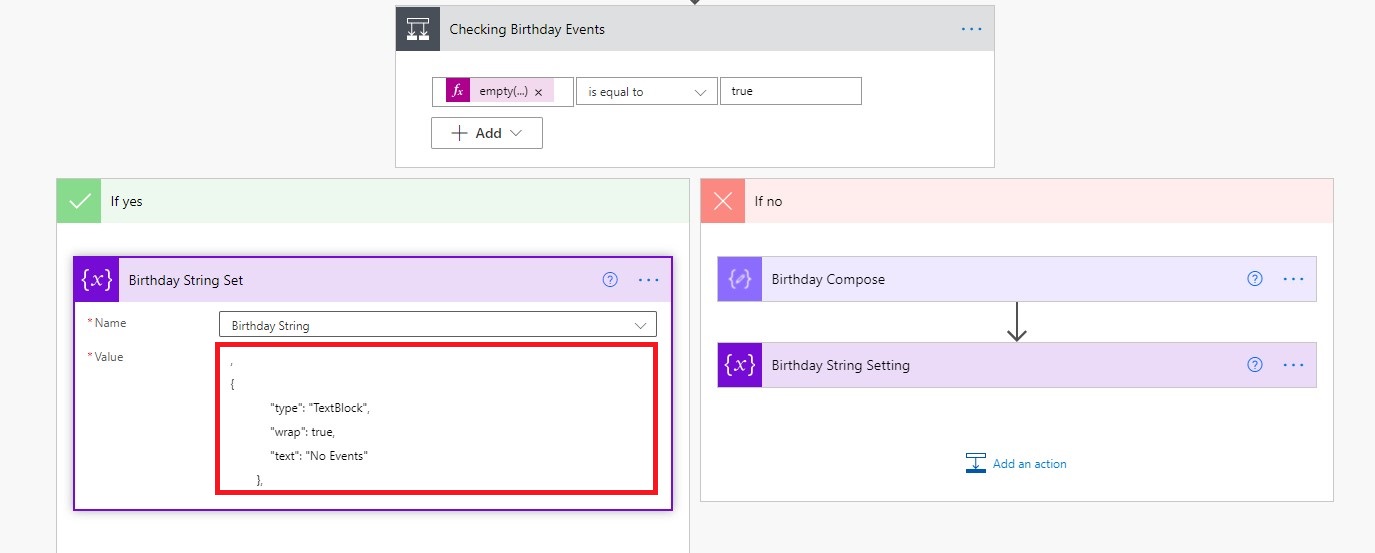
14. If our Birthday Date array is not empty. Then we will use compose action to create our Birthday String.
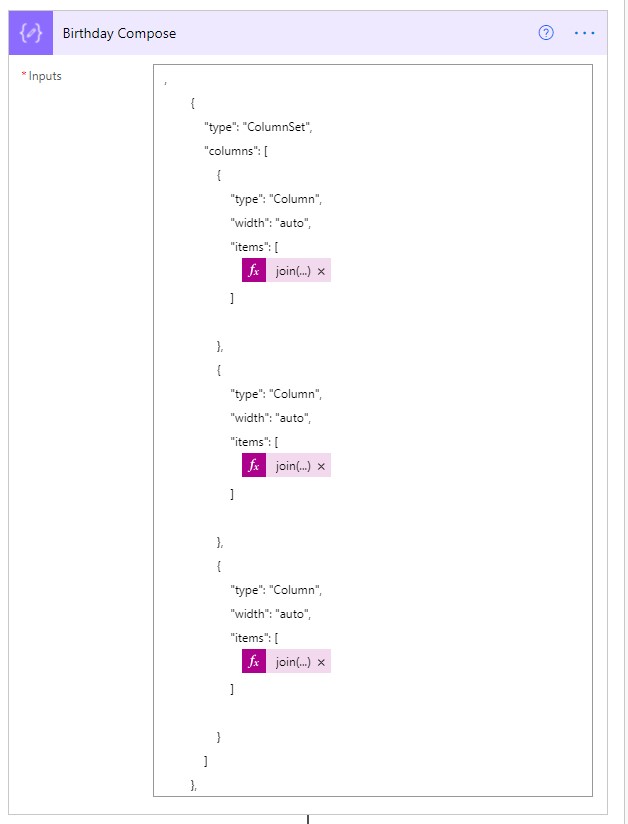
Here we have used 3 expressions, these are used to join all the array items and separating them by “,” comma.
Expression goes like this:
This expression is for Birthday Date array, in similar ways we have applied it in other two places for Birthday Day and Birthday Title.
The complete code for this section is shown as below:
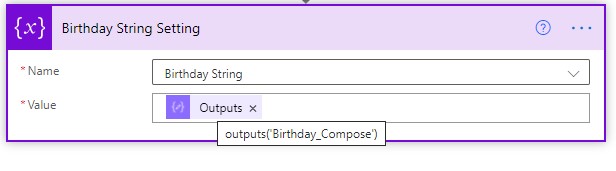
15. In the next step we will set our Birthday String variable as the output of the compose action we did above.
16. Follow the above steps and create another condition that will check Holiday Date.
Condition to check if, Holiday Date is empty or not
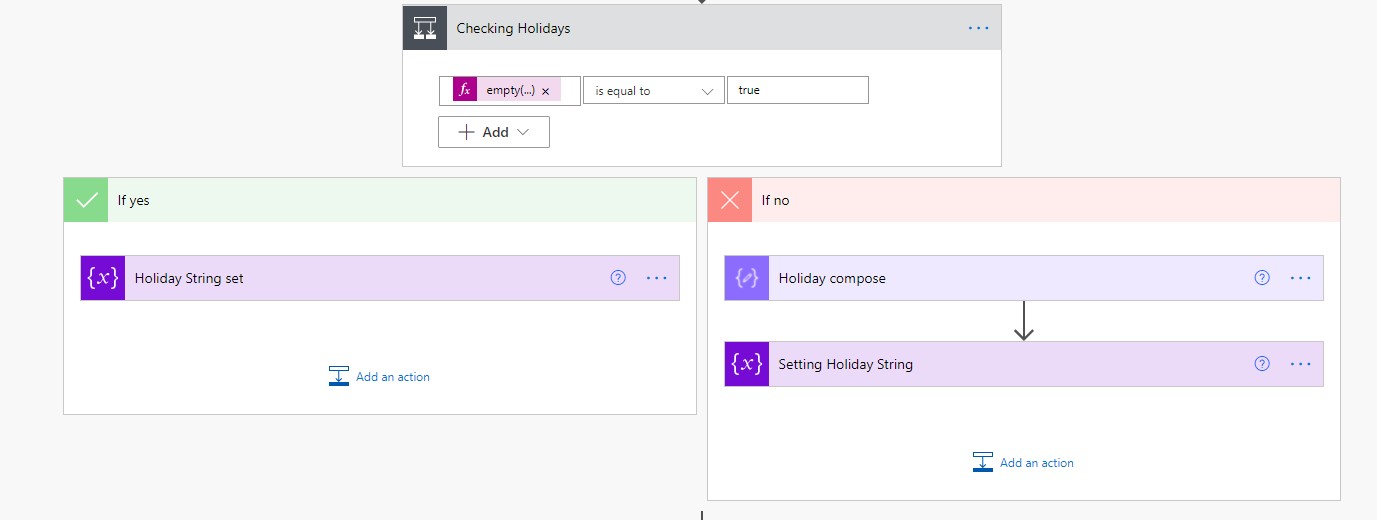
If its empty set the variable same as Holiday String.
Code snippet is as follows:
17. If it is not empty then, use the compose action and this time change the variables in expressions to Holiday Date, Holiday Day and Holiday Title. And set the Holiday String variable the same way we did for Birthday String. Here is the code snippet to be used in compose action for Holiday String.
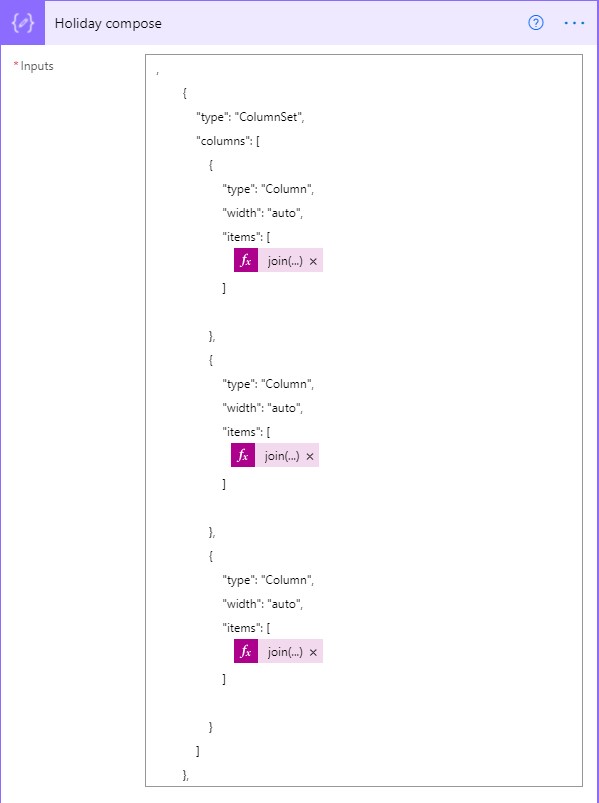
Complete code of this section is as follows:
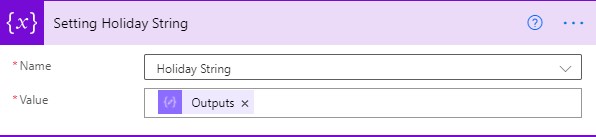
18. In the next step we will set our Holiday String variable as the output of the compose action we did above.
19. We will add another condition for Work Anniversary Event. The condition to check whether Work Anniversary Date array is empty or not will be the same as in Birthday or Holiday Date
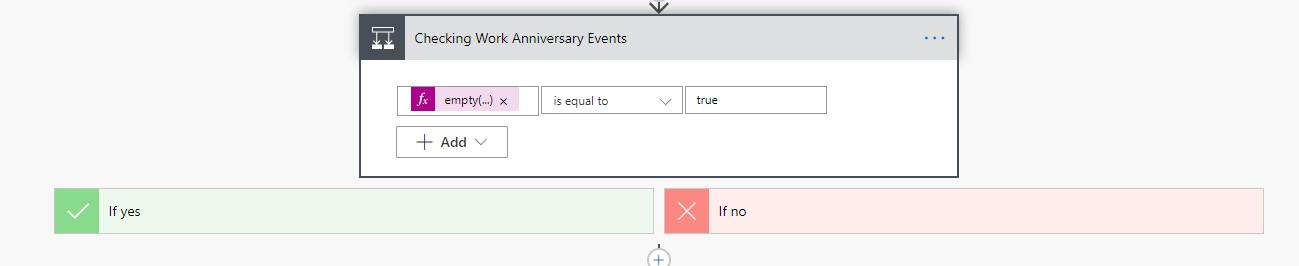
20. Work Anniversary in our last event type and in Adaptive Card it is shown at the last. So, in this one the comma (,) that was there at the last of the compose code and in the No Events code snippet will not be there. Below is the code snippet if the Work Anniversary Date array is empty:
Here, we can see that there is no comma at the end because this is our last event type to be displayed in adaptive card.
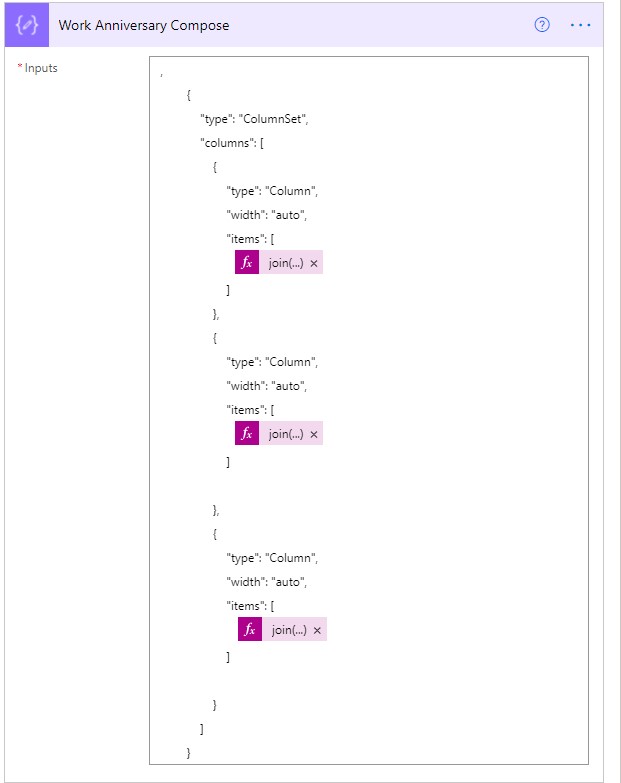
21. If the Work Anniversary Date array is not empty, then the compose code snippet looks like this:
We have used the same expressions to join the array items.
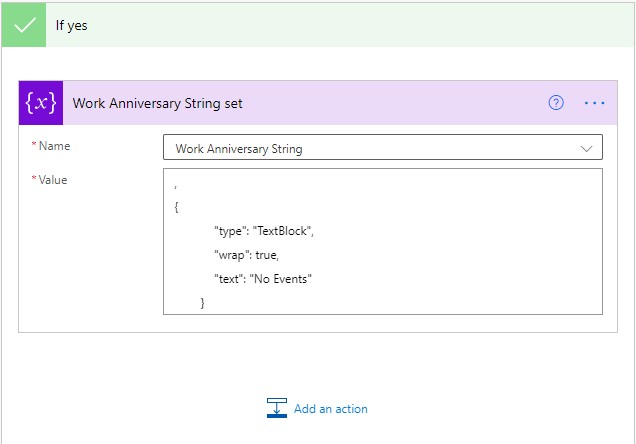
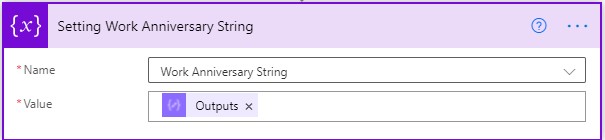
22. Set the Work Anniversary String variable to output of compose action above.
23. We will use 3 more compose connectors to store the URL to the images that are visible on Adaptive Card.
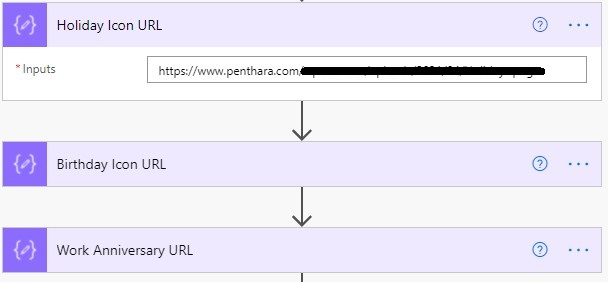
We can use variables as well to store the URL.
24. Finally, we will post the adaptive card in MS Teams Channel. We will use the following connector.

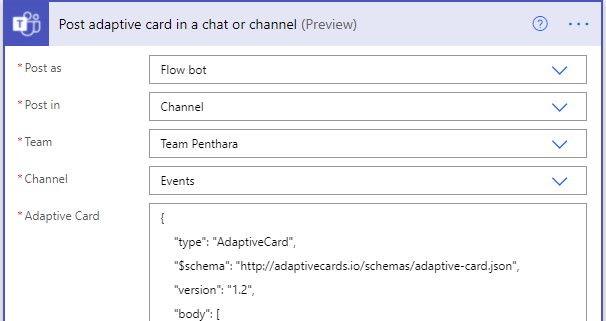
25. The code of the body of the Adaptive Card is as follows:
We have successfully posted an adaptive card with the events of the next 60 days to the selected Channel in MS Teams. We can post this Adaptive Card to a specific user as well. We can change the recurrence time according to our needs. We can change the design of the adaptive card in the Adaptive Card designer.

CEO at Penthara Technologies


Monthly updates, news & events from Microsoft to help your business grow.
 What's new in Microsoft | June 2026 Updates
Explore the latest Microsoft 365 updates including Copilot enhancements, AI meeting recaps, Teams improvements, and new productivity features.
 What's new in Microsoft | May 2026 Updates
Explore the latest Microsoft 365 updates including Copilot enhancements, AI meeting recaps, Teams improvements, and new productivity features.
 What's new in Microsoft | April 2026 Updates
Explore the latest Microsoft 365 updates including Copilot enhancements, AI meeting recaps, Teams improvements, and new productivity features.